
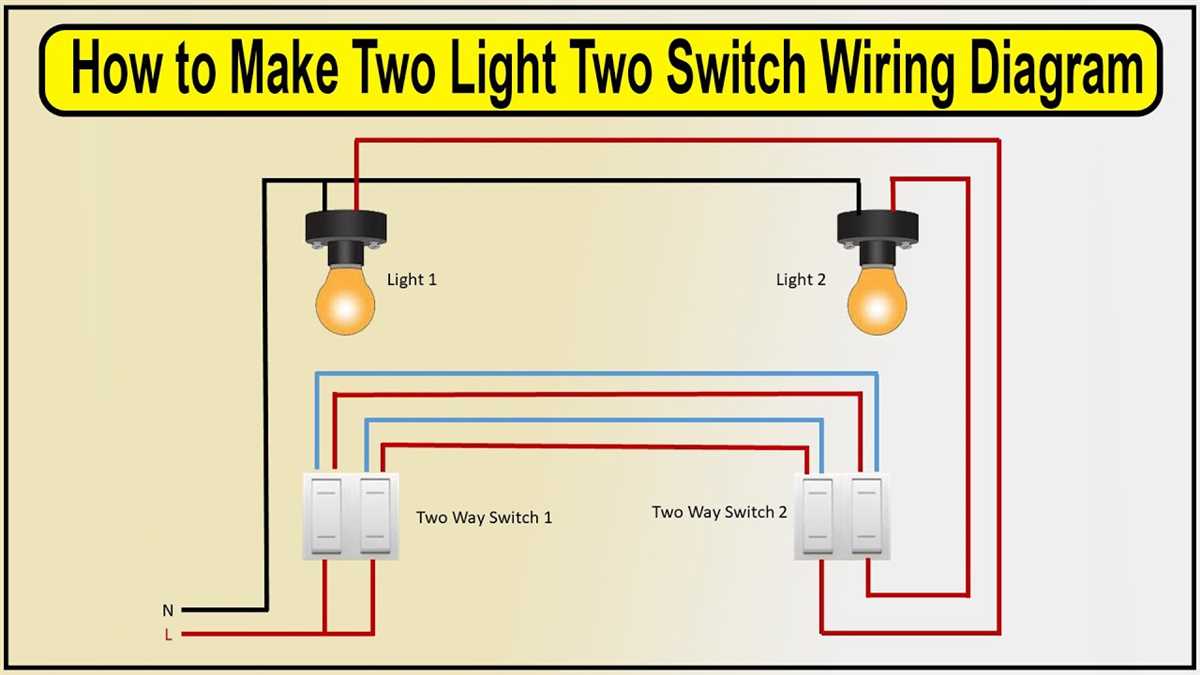
A 2-way light switch is a handy feature that allows you to control a light fixture from two different locations. It is commonly used in rooms with multiple entrances, such as staircases or large living areas. By installing a 2-way light switch, you can conveniently turn the lights on or off without having to go to the original switch.
Wiring a 2-way light switch may seem intimidating at first, but it is a relatively simple task that anyone can do with the right tools and instructions. It involves connecting three wires – the live wire, the common wire, and the traveler wire – in a specific configuration. By following the correct wiring diagram and steps, you can easily install a 2-way light switch in your home.
In this article, we will guide you through the process of wiring a 2-way light switch. We will explain the functions of each wire, provide a step-by-step guide, and offer tips and precautions to ensure a safe and successful installation. Whether you are a beginner or an experienced DIY enthusiast, this article will provide you with the knowledge and confidence to wire a 2-way light switch in your home.
How to Wire a 2-Way Light Switch
Wiring a 2-way light switch may seem daunting at first, but with the right instructions and a little bit of patience, it can be a straightforward process. A 2-way light switch is commonly used in stairways, hallways, and rooms with multiple entrances, allowing you to control the same light fixture from different locations.
1. Gather the necessary tools and materials:
- – Screwdriver
- – Wire stripper
- – Voltage tester
- – Electrical tape
- – 2-way light switch (make sure it is compatible with your wiring system)
- – Electrical cables
2. Turn off the power:
Before starting any electrical work, always turn off the power at the main circuit breaker or fuse box to ensure your safety. Use a voltage tester to double-check that the power is indeed off before proceeding with the installation.
3. Remove the existing switch:
Use a screwdriver to remove the screws holding the existing switch in place. Carefully pull the switch out of the wall, exposing the wires behind it. Take note of the wire connections and the colors of the cables.
4. Prepare the wires:
With the wire stripper, remove about 3/4 inch of insulation from the ends of the wires. The number of wires will depend on your specific wiring system, but typically you will have a black (live) wire, a white (neutral) wire, and a bare copper (ground) wire.
5. Connect the wires to the new switch:
Attach each wire to the corresponding terminal on the new 2-way light switch. The live wire (usually black) is connected to the “common” terminal, the neutral wire (usually white) is connected to the “neutral” terminal, and the ground wire (usually bare or green) is connected to the grounding screw. Ensure that the connections are secure.
6. Mount and secure the new switch:
Position the new switch into the wall box and use the provided screws to secure it in place. Make sure the switch is level and flush with the wall.
7. Test the switch:
Once the switch is installed, turn the power back on at the main circuit breaker or fuse box. Test the switch by flipping it on and off from both locations. Ensure that the light turns on and off as expected.
Remember, if you are unsure about any step in the process or if you have any doubts about your electrical skills, it is always best to consult a professional electrician for assistance.
Understanding the basics of a 2-way light switch
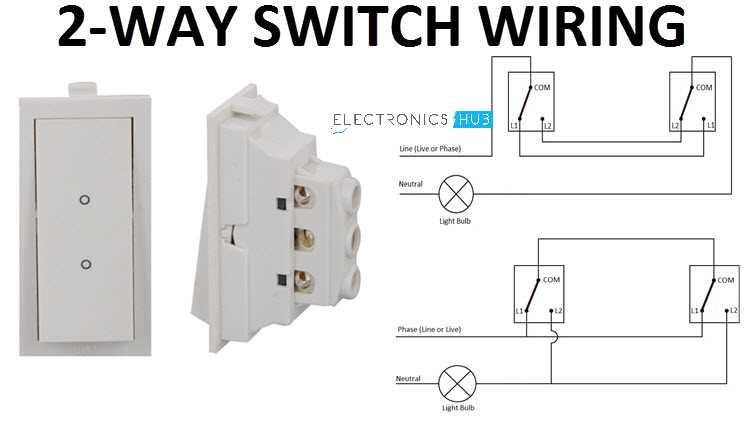
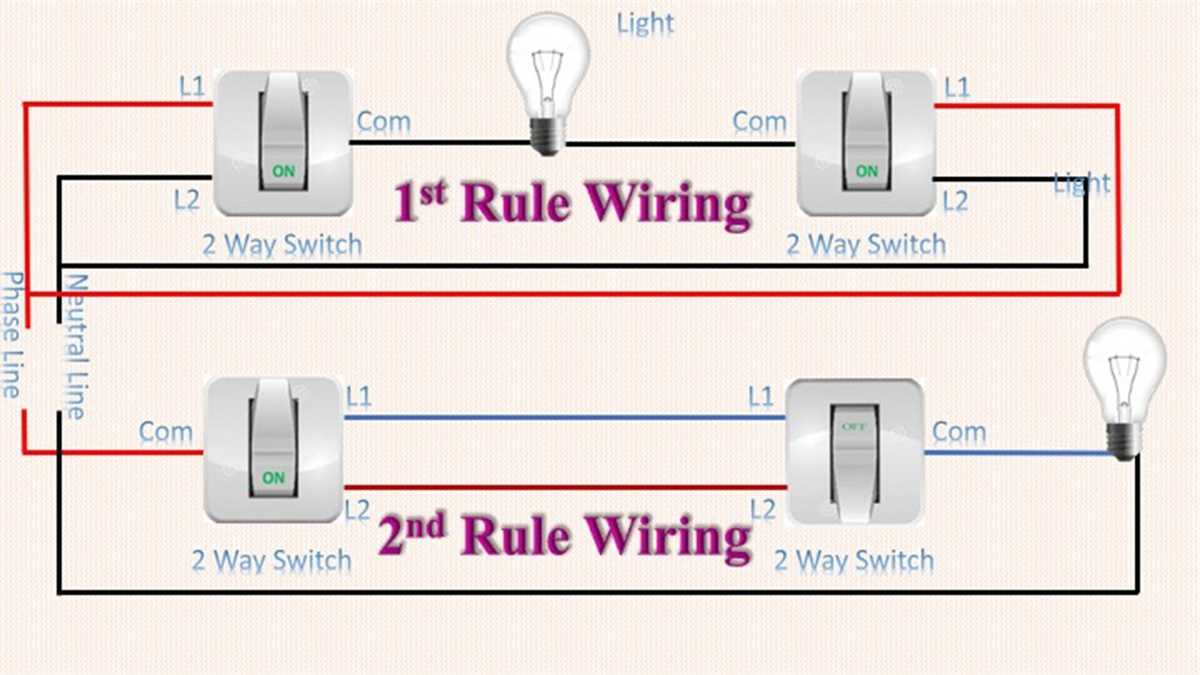
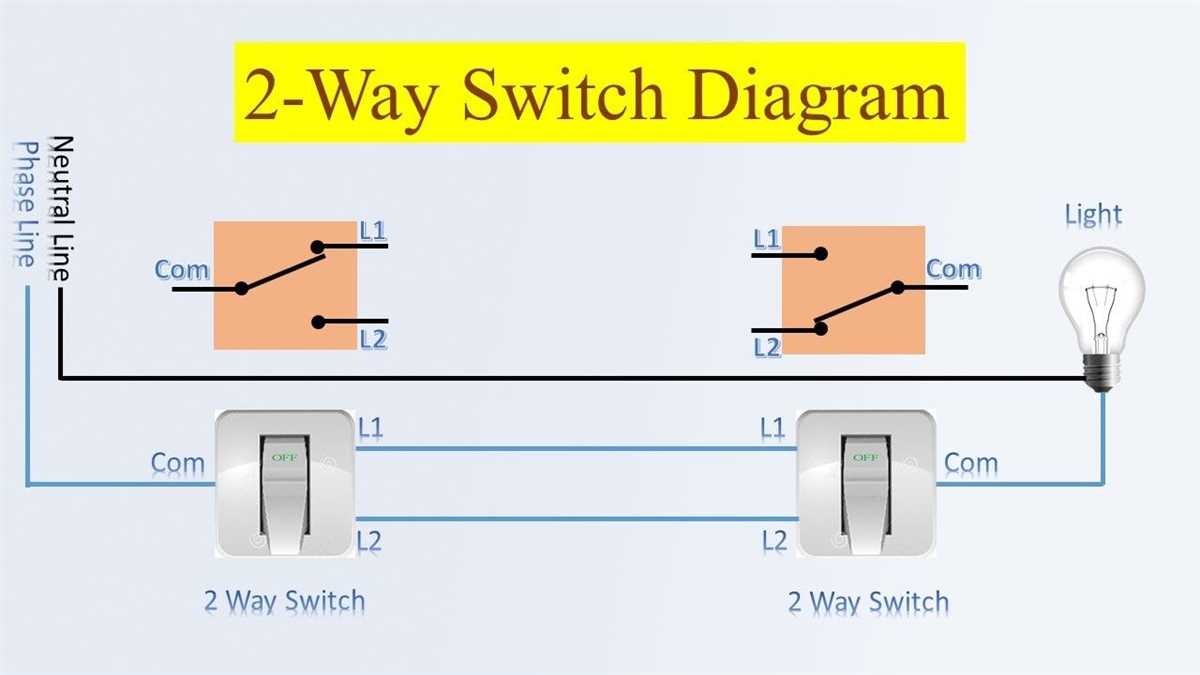
The 2-way light switch is a common electrical component used in residential and commercial buildings. It allows users to control a single light fixture from two different locations, such as opposite ends of a hallway or staircase. To understand the basics of a 2-way light switch, it is essential to familiarize yourself with its components and how they function together.
At its core, the 2-way light switch consists of three terminals: a common terminal and two traveler terminals. The common terminal is typically labeled with the letter ‘C’ and is connected to the power source. The traveler terminals, on the other hand, are labeled with either ‘L1’ or ‘1’, and ‘L2’ or ‘2’, depending on the switch model. These traveler terminals allow the flow of electricity between the switch locations.
When the light switch is in the ‘Off’ position, the traveler terminals are not connected, and the circuit is open. This prevents the flow of electricity to the light fixture, resulting in the light being off. When the switch is flipped to the ‘On’ position, the traveler terminals are connected, creating a closed circuit and allowing electricity to flow from the power source to the light fixture, illuminating the area.
It is important to note that when wiring a 2-way light switch, the location of the common terminal may vary depending on the switch model. Therefore, it is crucial to refer to the manufacturer’s instructions or seek professional assistance to ensure proper installation and functionality.
In conclusion, understanding the basics of a 2-way light switch is essential for individuals looking to control a single light fixture from two different locations. By familiarizing yourself with the switch components and how they function together, you can confidently wire a 2-way light switch and enjoy the convenience it offers in residential and commercial settings.
Gathering the necessary tools and materials
Before you begin wiring a 2-way light switch, it’s important to gather all the necessary tools and materials. Having everything prepared beforehand will make the process smoother and ensure you have everything you need to complete the job.
To wire a 2-way light switch, you will need the following tools:
- Screwdriver: A screwdriver will be essential for removing and installing screws on the switch.
- Wire stripper: A wire stripper is necessary for removing the insulation from the electrical wires.
- Wire cutter: A wire cutter is used to cut the electrical wires to the desired length.
- Voltage tester: A voltage tester is important for ensuring that the electricity is turned off before working on the switch.
- Tape measure: A tape measure will help you measure the length of wires and ensure they are cut to the correct size.
In addition to the tools, you will also need the following materials:
- 2-way light switch: Make sure you have a 2-way light switch specifically designed for this type of wiring.
- Electrical wires: You will need electrical wires of appropriate gauge and color for connecting the switch.
- Wire connectors: Wire connectors are used to secure the ends of the wires together.
- Electrical tape: Electrical tape is used to insulate and protect the exposed wires.
Once you have gathered all the necessary tools and materials, you can proceed with wiring the 2-way light switch. Remember to always exercise caution when working with electricity and follow proper safety procedures.
Step-by-step guide to wiring a 2-way light switch
Wiring a 2-way light switch can seem challenging, but with the right tools and a step-by-step guide, it can be a straightforward process. This guide will walk you through the necessary steps to successfully wire a 2-way light switch in your home.
Gather the required tools: Before you begin, gather the necessary tools to complete the project. This may include wire strippers, electrical tape, a screwdriver, and a voltage tester. Safety should always be a priority, so make sure you have turned off the power to the circuit you will be working on.
Step 1: Remove the old switch
Start by removing the old switch from the wall. Carefully unscrew the cover plate and use your screwdriver to detach the switch from the electrical box. Ensure that the wires are not touching any part of the switch or each other to avoid any electrical shocks.
Step 2: Identify the common wire

Once the old switch is removed, you will need to identify the common wire. This wire is typically black in color and is connected to the dark-colored screw terminal on the switch. Use your voltage tester to confirm which wire is the common wire. The other two wires connected to the switch are travelers and can be any color other than black.
Step 3: Connect the wires to the new switch
Next, connect the wires to the new 2-way light switch. Attach the common wire to the dark-colored screw terminal and the two traveler wires to the remaining two screw terminals. Use your wire strippers to remove a small portion of insulation from the end of each wire, and then loop the exposed wire around the appropriate screw terminal. Tighten the screws to secure the wires in place.
Step 4: Test the switch
Once all the wires are securely connected, turn the power back on and test the switch. Flip the switch up and down to ensure the light turns on and off properly. If there are any issues, double-check the wiring connections to make sure they are correct.
Wiring a 2-way light switch may seem daunting at first, but by following these step-by-step instructions, you can successfully wire a 2-way light switch in your home. Remember to always prioritize safety and consult a professional electrician if you have any doubts or questions.
Testing and troubleshooting the wiring
After wiring a two-way light switch, it is important to test and troubleshoot the connections to ensure proper functionality. Here are some steps you can take to test the wiring:
1. Turn off the power: Before testing the wiring, make sure to turn off the power at the circuit breaker to avoid any electrical accidents.
2. Inspect the connections: Check the connections at the switch and ensure that all wires are securely fastened. Look for any loose or damaged wires that may need to be repaired or replaced.
3. Use a voltage tester: Use a voltage tester to test the wires and determine if there is any electrical current present. This will help identify if there are any issues with the wiring or if the power is properly flowing.
4. Check for continuity: Use a continuity tester to check for continuity in the wires and connections. This will help ensure that there are no breaks or interruptions in the electrical flow.
5. Test the switch: Once the wiring connections have been inspected and tested, it’s important to test the functioning of the switch. Turn on the power and toggle the switch to see if the light turns on and off as expected.
6. Troubleshooting: If there are any issues with the wiring or the switch, troubleshoot the problem by checking the connections, replacing any damaged wires, or consulting an electrician for further assistance.
By following these steps and conducting thorough testing and troubleshooting, you can ensure that the wiring for your two-way light switch is properly installed and functioning correctly.
Important Safety Measures to Consider
Safety should always be your top priority when working with electrical wiring. Here are some important safety measures to consider when wiring a 2-way light switch:
- Turn Off the Power: Before you start any electrical work, make sure to turn off the power to the circuit you will be working on. This can be done by switching off the circuit breaker or removing the fuse connected to the circuit.
- Use Proper Tools and Equipment: Make sure to use insulated tools and equipment designed for electrical work. This includes wire strippers, pliers, screwdrivers, and a voltage tester.
- Inspect the Wiring: Before making any connections, inspect the wiring to ensure there are no frayed or damaged wires. Replace any damaged wiring before proceeding.
- Follow Wiring Diagrams and Instructions: Use a wiring diagram and instructions specific to your 2-way light switch setup. Follow the instructions carefully to ensure proper installation.
- Avoid Overloading the Circuit: Make sure the circuit you are working on is not already overloaded. Check the amperage rating of the circuit and ensure that the total wattage of the lights connected to the switch does not exceed it.
- Securely Connect Wires: When making wire connections, ensure they are securely connected. Use wire nuts or proper connectors and ensure that there are no loose or exposed wires.
- Test the Circuit: Once the wiring is complete, double-check all connections and test the circuit using a voltage tester to ensure it is working properly.
By following these safety measures, you can ensure a safe and successful wiring process when installing a 2-way light switch.
Q&A:
What are some important safety measures to consider in the workplace?
Some important safety measures to consider in the workplace include properly training employees on safety procedures, regularly inspecting and maintaining equipment, providing personal protective equipment, having clear emergency evacuation plans in place, and promoting a culture of safety awareness.
How can I ensure my home is safe?
To ensure your home is safe, you can install smoke detectors on every level of your home, have a fire extinguisher readily available, inspect and maintain electrical wiring and appliances, secure windows and doors, install a security system, and keep emergency phone numbers easily accessible.
What are some important safety measures to consider when driving?
When driving, it is important to wear your seatbelt at all times, obey traffic laws and speed limits, avoid distracted driving such as using your phone, regularly check and maintain your vehicle’s brakes, tires, and lights, and be aware of blind spots when changing lanes.
What are some safety measures to consider when using the internet?
When using the internet, you should regularly update your antivirus software, use strong and unique passwords for your accounts, be cautious of clicking on suspicious links or downloading unknown files, avoid sharing personal information with strangers, and use secure and encrypted Wi-Fi connections when accessing sensitive information.
What are some important safety measures to consider during a natural disaster?
During a natural disaster, important safety measures include following evacuation orders and having an emergency preparedness kit with essential supplies, staying informed through reliable sources for updates and instructions, having a communication plan in place with your family or loved ones, and having a designated safe location within your home or community.
What are some important safety measures to consider in the workplace?
Some important safety measures to consider in the workplace include providing proper training to employees, enforcing the use of personal protective equipment, regularly inspecting and maintaining equipment and machinery, promoting a culture of safety awareness, and having emergency evacuation plans in place.
What are some important safety measures to consider at home?
Some important safety measures to consider at home include installing smoke detectors and fire extinguishers, keeping household chemicals and medications out of reach of children, using childproof locks on cabinets and doors, securing heavy furniture and appliances to prevent tipping, and properly storing and handling firearms.