
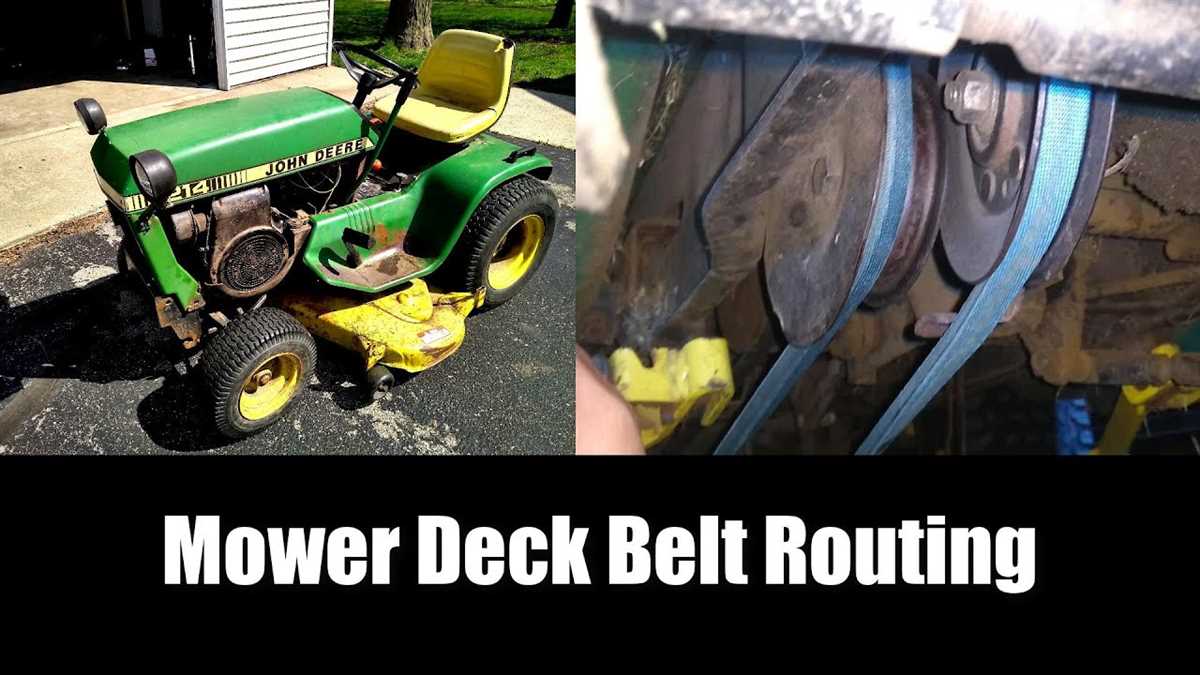
If you own a John Deere 212 mower, it’s important to understand the deck belt diagram to properly maintain and repair your machine. The deck belt plays a crucial role in the operation of your mower, as it connects the engine to the blades, allowing them to rotate and cut the grass efficiently. With time and use, the deck belt may wear out or break, and knowing how to replace it correctly is essential for keeping your mower in top shape.
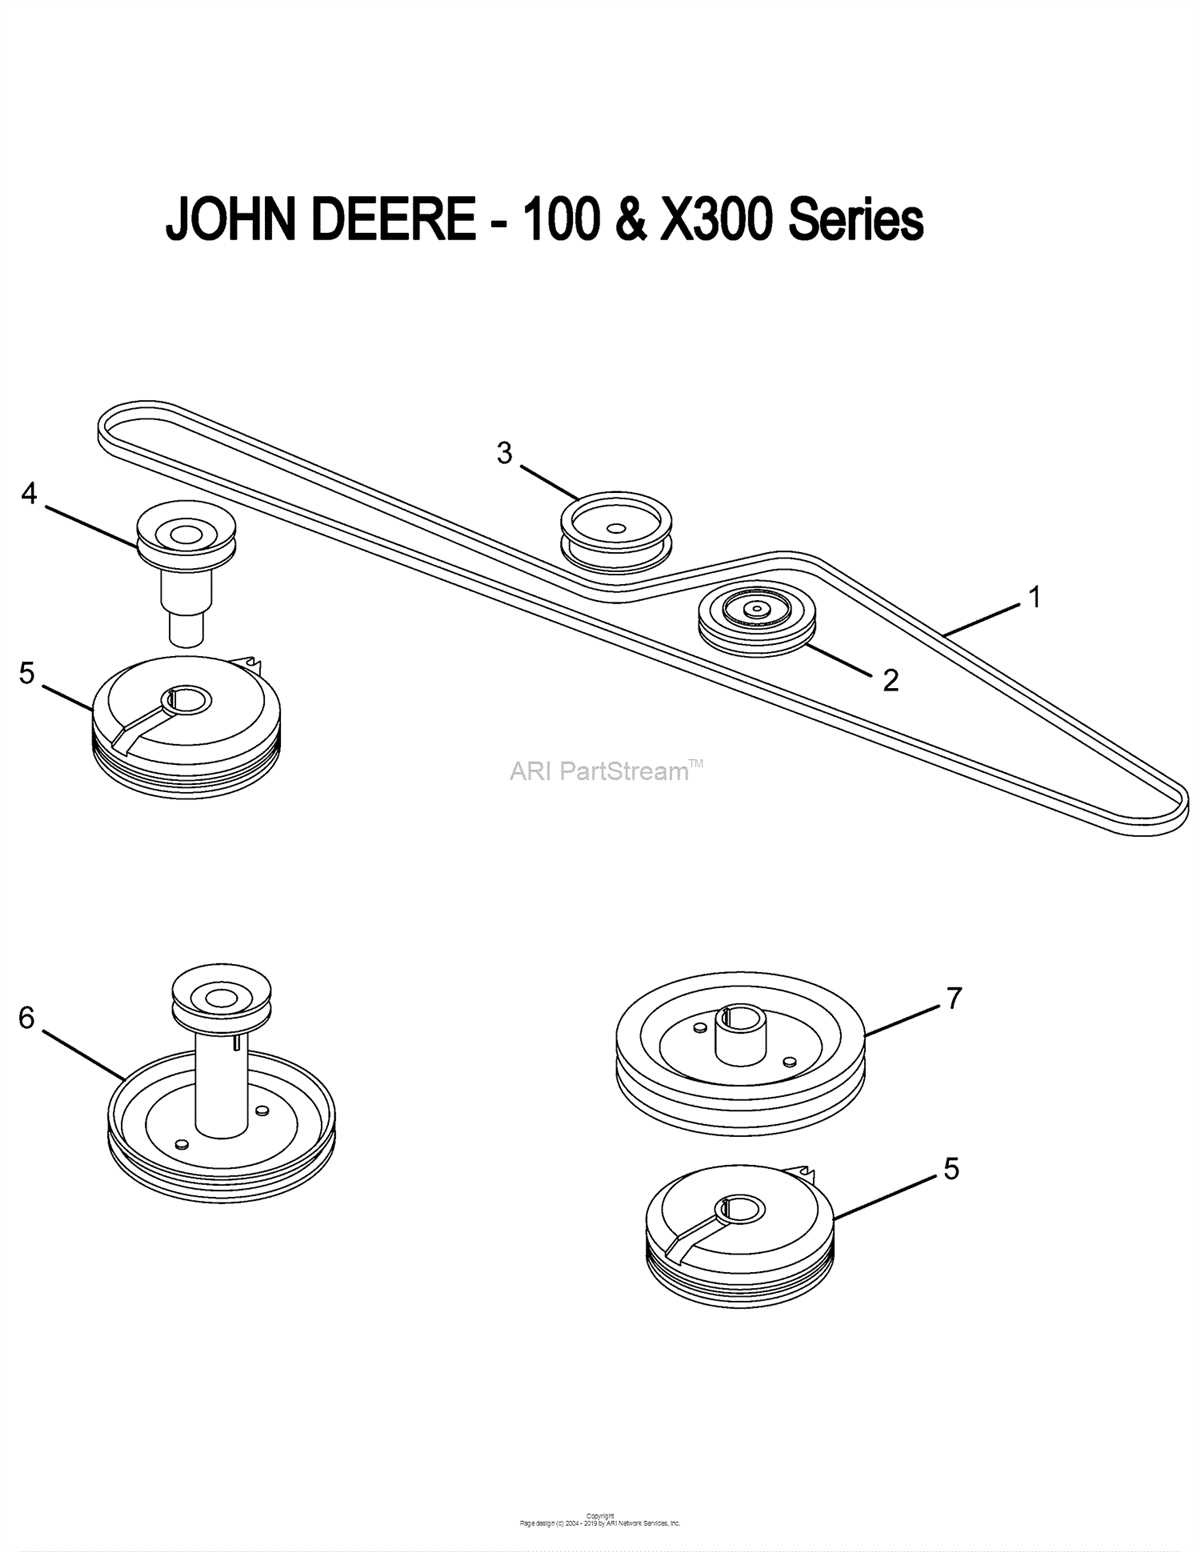
In this article, we will provide you with a detailed guide on the John Deere 212 deck belt diagram, ensuring you have everything you need to perform maintenance and repairs on your mower. We will explain the different components of the deck belt system, including the engine pulley, the spindle pulleys, and the idler pulleys, and how they interact to drive the blades. Understanding how these components fit together is crucial for correctly installing and adjusting the deck belt.
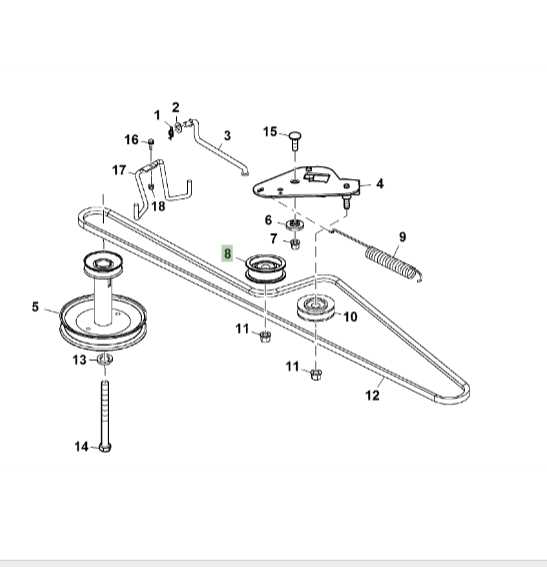
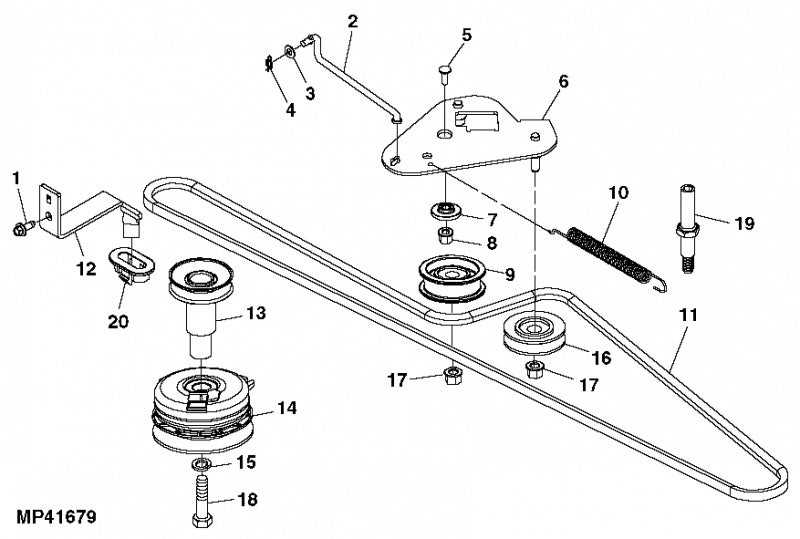
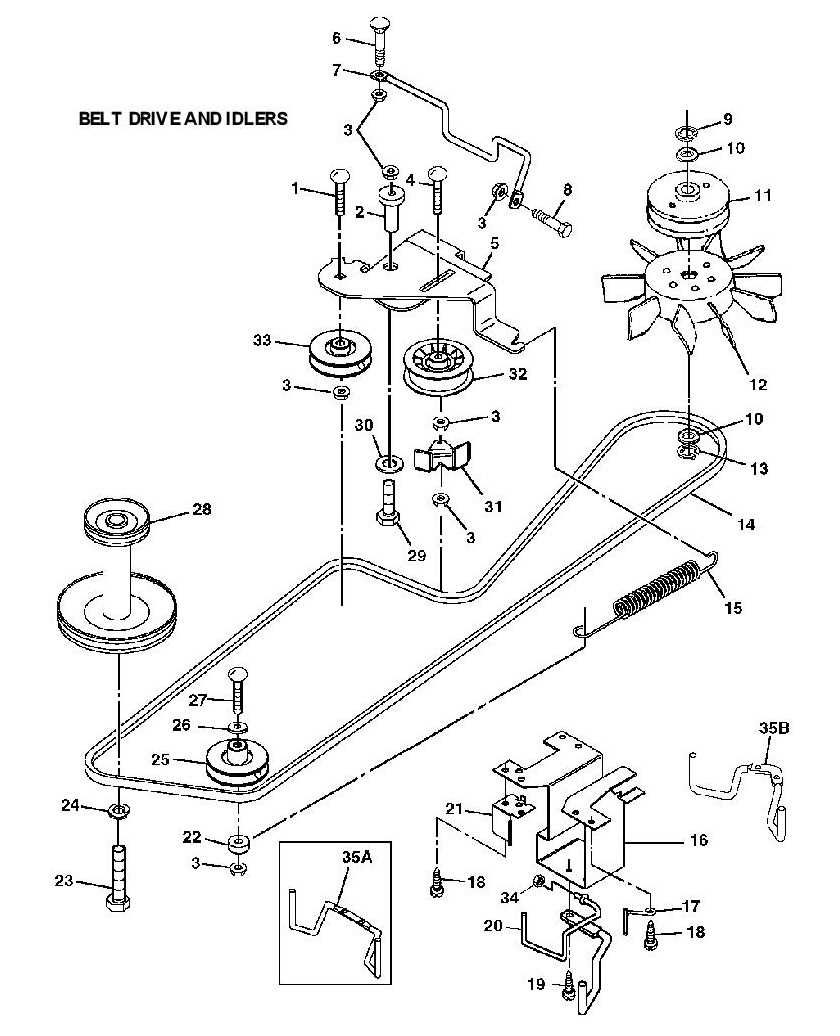
The John Deere 212 deck belt diagram will also illustrate the routing of the belt around the pulleys and the tensioning mechanism. Incorrect routing or inadequate tension can cause the belt to slip or break, resulting in poor performance or damage to the mower. By following the diagram and correctly adjusting the tension, you can avoid these issues and ensure your mower operates smoothly.
John Deere 212 Deck Belt Diagram
One important aspect of maintaining a John Deere 212 riding mower is understanding the deck belt diagram. The deck belt is responsible for transferring power from the engine to the mower deck, allowing the blades to spin and cut the grass. Having a clear understanding of the belt diagram is essential for proper installation and replacement of the deck belt.
The John Deere 212 deck belt diagram typically shows the routing of the belt around the various pulleys and idler arms on the mower deck. It illustrates how the belt wraps around each pulley and how the tension is applied to keep the belt in place. It is important to follow the diagram precisely to ensure proper belt tension and prevent any issues with the mower’s cutting capabilities.
When referring to the John Deere 212 deck belt diagram, it is important to note the specific model and year of the mower. Different models and years may have variations in the deck belt routing, so it is crucial to have the correct diagram for your specific mower. This information can usually be found in the owner’s manual or by consulting a John Deere dealership or authorized service center.
It is recommended to inspect the deck belt regularly for signs of wear or damage. If the belt shows signs of cracking, fraying, or stretching, it should be replaced immediately to prevent the risk of the belt snapping during operation. When replacing the deck belt, always refer to the John Deere 212 deck belt diagram to ensure proper installation.
By understanding and following the John Deere 212 deck belt diagram, owners can properly maintain their riding mower and ensure optimal cutting performance. Regular inspection and replacement of the deck belt, when necessary, will help extend the lifespan of the belt and ensure smooth operation of the mower deck.
Overview
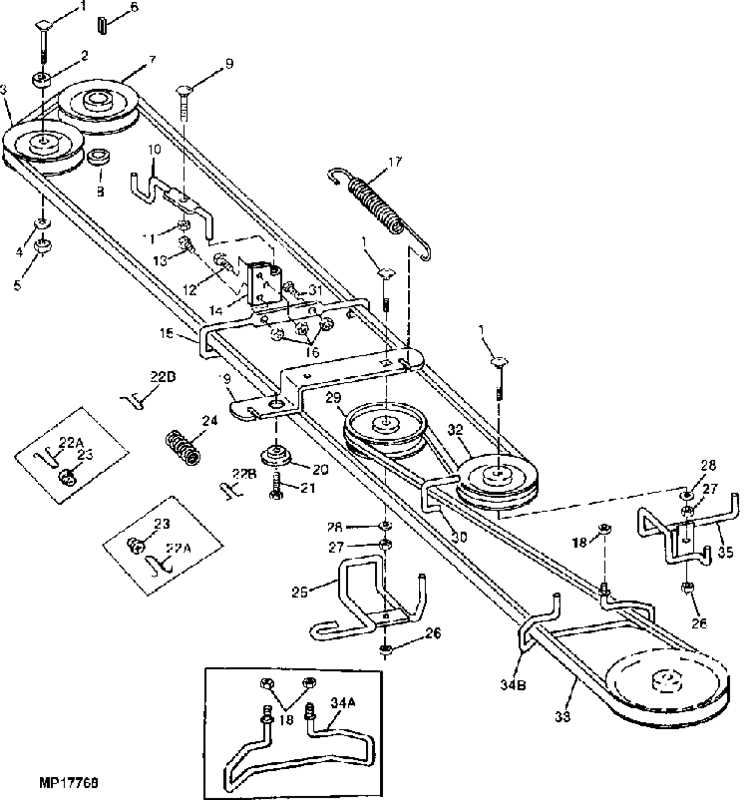
The John Deere 212 deck belt diagram is a valuable resource for ensuring proper installation and maintenance of the deck belt on your John Deere 212 tractor. The diagram provides a visual representation of the belt’s route and how it interacts with the various pulleys and idlers on the mower deck.
Having a clear understanding of the deck belt diagram is essential for maintaining optimal performance and preventing premature wear and tear on the belt. With this diagram, you can easily identify any potential issues or misalignments that may be affecting the belt’s performance and make the necessary adjustments or repairs.
The deck belt on the John Deere 212 is responsible for driving the blades and ensuring a clean and even cut of the grass. It is subject to a significant amount of tension and friction during operation, which can lead to wear and eventual failure if not properly maintained. Regular inspection and replacement of the belt, as indicated in the deck belt diagram, is crucial for keeping your mower in top condition.
The John Deere 212 deck belt diagram typically includes information on the correct belt size, tensioning requirements, and the specific routing path the belt should follow. It may also indicate the location of any tensioners or idlers that need to be adjusted during installation or maintenance. Following the diagram carefully will help ensure that the belt is properly aligned and under the correct tension, minimizing the risk of breakage or slippage during use.
By referencing the John Deere 212 deck belt diagram, you can confidently maintain your mower’s deck belt and keep it operating at its best. Proper installation and maintenance of the deck belt will not only extend the life of the belt but also contribute to an optimal cutting performance and a beautifully maintained lawn.
Step-by-step Guide
Replacing the deck belt on a John Deere 212 can be done by following a few simple steps. This guide will provide a step-by-step procedure for replacing the deck belt on your lawn mower.
Step 1: Start by disconnecting the spark plug wire to ensure the engine is turned off and cannot accidentally start while you are working on the mower.
Step 2: Locate the deck lift lever and lower the mower deck to its lowest setting. This will provide easier access to the belt and make it easier to remove and install the new belt.
Step 3: Use a socket wrench or pliers to remove the bolts or clips that secure the mower deck to the mower. Once the deck is free, carefully slide it out from under the mower.
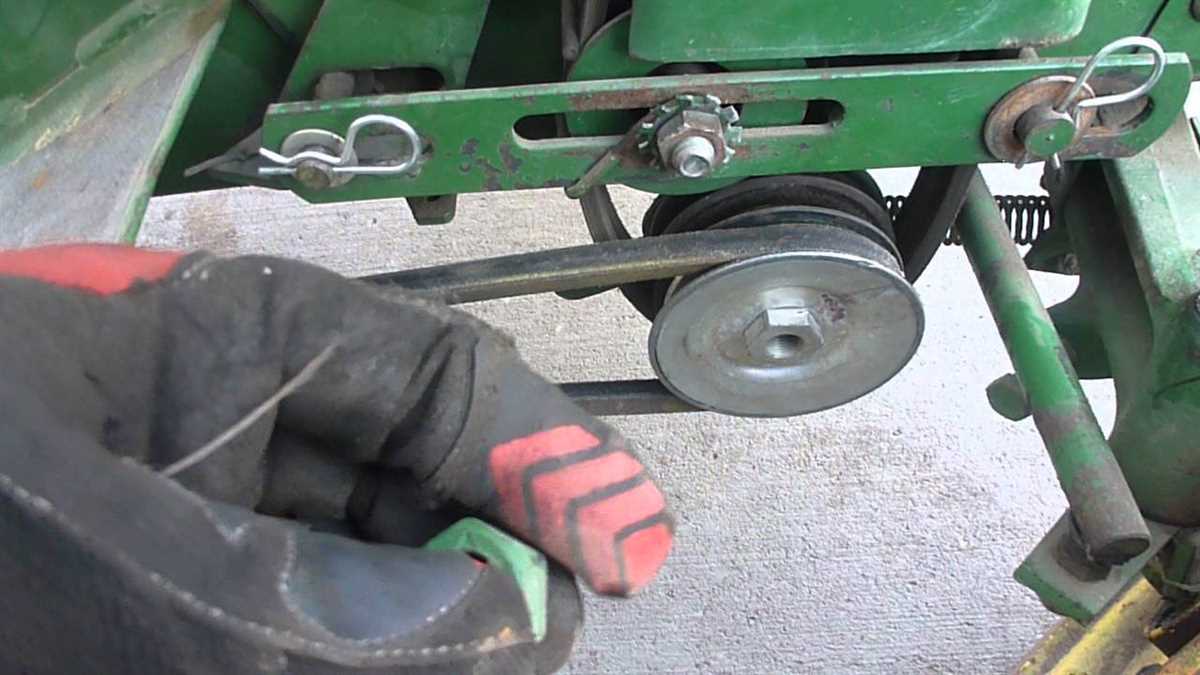
Step 4: Locate the deck belt on the underside of the mower deck. Take note of how the belt is currently routed so you can install the new belt correctly.
Step 5: Loosen the tension on the belt by either releasing the tensioner or sliding the belt off the pulleys. This will allow you to easily remove the old belt from the deck.
Step 6: Once the old belt is removed, carefully thread the new belt through the belt guides and around the pulleys, making sure it is properly aligned and seated in the correct position.
Step 7: Once the belt is properly installed, tighten the tension by either adjusting the tensioner or manually sliding the belt back onto the pulleys. Ensure the belt is not too loose or too tight.
Step 8: Slide the mower deck back under the mower and secure it with the bolts or clips that were removed earlier. Ensure the deck is properly aligned and securely attached.
Step 9: Raise the mower deck to its desired cutting height using the deck lift lever. This will also help to tighten the new belt further.
Step 10: Finally, reattach the spark plug wire and start the mower to test the deck belt. Make sure it is functioning properly and that there are no issues with the belt slipping or coming off.
By following these step-by-step instructions, you can easily replace the deck belt on your John Deere 212 and ensure optimal performance of your lawn mower.
Tools and Materials Needed

When replacing or repairing the deck belt on a John Deere 212 mower, it is important to have the right tools and materials on hand. This will ensure that the job is done correctly and efficiently. Here are the tools and materials that you will need:
- Socket set: A socket set with a variety of sizes will be necessary for removing and installing bolts and nuts.
- Wrenches: Wrenches in various sizes will be needed to loosen and tighten bolts and nuts.
- Jack or ramps: A jack or ramps will be needed to lift the mower and provide access to the deck belt.
- Replacement belt: It is important to have the correct replacement belt for the John Deere 212 mower. Refer to the owner’s manual or consult a John Deere dealer to ensure you have the right belt.
- Safety glasses: When working on any machinery, it is important to protect your eyes. Safety glasses should be worn at all times.
Having these tools and materials on hand before starting the deck belt replacement or repair will make the process go smoothly. It is always a good idea to double-check that you have everything you need before beginning the job. This will help save time and prevent frustration during the process.
Troubleshooting Tips
If you are experiencing issues with your John Deere 212 deck belt, it is important to troubleshoot the problem in order to find the appropriate solution. Here are some troubleshooting tips to help you identify and fix potential problems:
1. Inspect the Belt
Start by visually inspecting the deck belt for any signs of wear or damage. Look for tears, cracks, or fraying. If you notice any of these issues, it is likely that the belt needs to be replaced. Additionally, check if the belt is properly aligned on the pulleys. If it is misaligned, adjust it accordingly to ensure smooth operation.
2. Check Tension

The tension of the deck belt is crucial for proper functioning. Make sure the belt is tightened to the appropriate tension. A loose belt can cause belt slipping and ineffective cutting. On the other hand, an overly tight belt can put excessive strain on the system and lead to premature wear and tear. Refer to the manufacturer’s guidelines for the correct tension specifications.
3. Examine the Pulleys
The pulleys play an essential role in transferring power to the deck belt. Inspect the pulleys for any signs of damage or misalignment. Make sure they are clean and free from debris, as this can lead to belt slippage. If you suspect any issues with the pulleys, consider replacing them to ensure optimal performance.
4. Lubricate Moving Parts
Regular lubrication of the moving parts can help reduce friction and ensure smooth operation. Check if the pulleys, bearings, and other components are properly lubricated. Apply lubricant as recommended in the manufacturer’s guidelines to prevent unnecessary wear and prolong the life of your deck belt.
By following these troubleshooting tips, you can identify and resolve common issues with your John Deere 212 deck belt. Remember to refer to the manufacturer’s manual for specific instructions and guidelines related to your equipment.
Maintenance and Care
Maintaining your John Deere 212 deck belt is vital for keeping your lawn mower in good working condition. Here are some important maintenance and care tips to follow:
- Regular inspections: It is recommended to regularly inspect the deck belt for any signs of wear or damage. Look for fraying, cracking, or stretching. If any issues are found, replace the belt immediately.
- Cleaning: Keep the deck and belt clean from dirt, debris, and grass clippings. A build-up of these materials can cause the belt to slip or become less effective. Use a brush or air compressor to remove any debris.
- Tension adjustments: The deck belt should have the correct tension for proper operation. If the belt is loose, it may slip or come off during use. Consult the owner’s manual for instructions on how to adjust the tension of the deck belt.
- Replacement: Over time, the deck belt will wear out and need to be replaced. It is important to use genuine John Deere parts for optimum performance and longevity. Follow the manufacturer’s guidelines for replacing the deck belt.
- Proper storage: When not in use, store your lawn mower in a clean and dry area. Protect it from extreme temperatures, moisture, and sunlight. This will help prevent any damage to the deck belt or other components.
By following these maintenance and care tips, you can ensure that your John Deere 212 deck belt stays in good shape and your lawn mower continues to perform at its best. Regular inspections, cleaning, tension adjustments, and proper storage will help prolong the life of your deck belt and prevent costly repairs.