
Troy-bilt is a well-known brand of outdoor power equipment, known for its durability and reliability. One of the most popular products from Troy-bilt is the 54-inch deck belt, which is an essential component for keeping the lawn mower running smoothly.
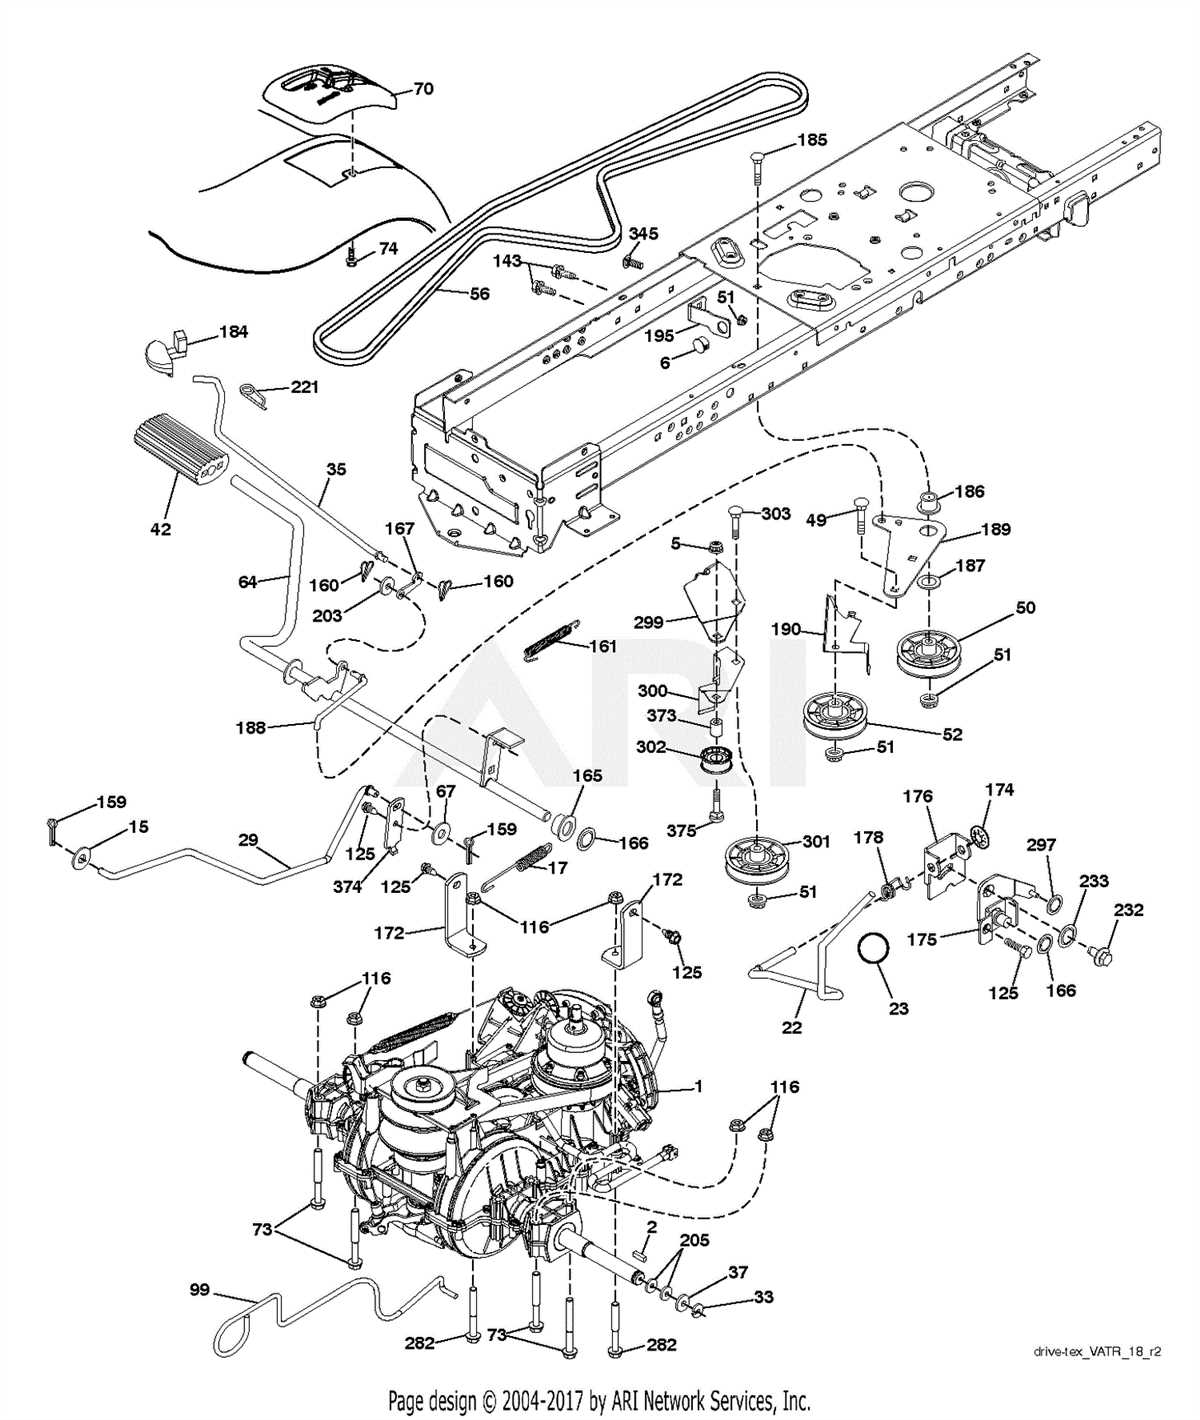
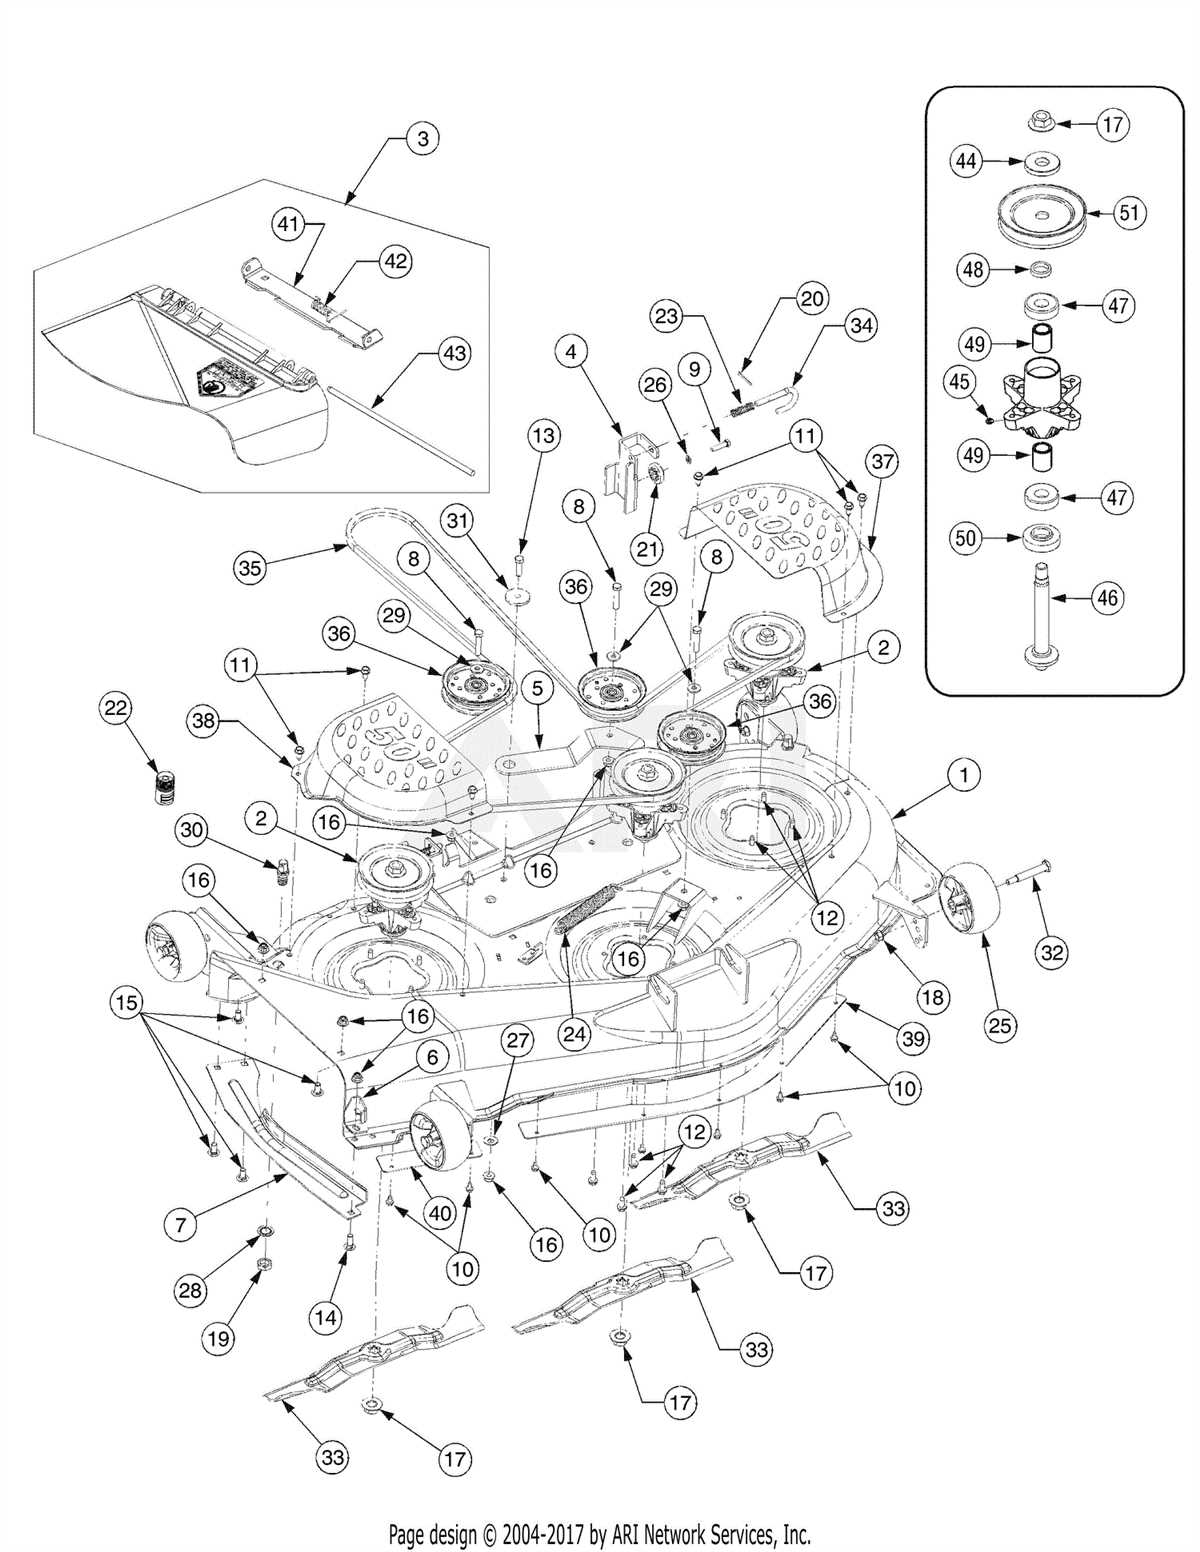
The 54-inch deck belt diagram is a visual representation of how the belt is positioned and threaded on the deck of the lawn mower. It provides a clear and detailed illustration of each step involved in the installation and replacement of the belt. This diagram is an invaluable resource for anyone who owns a Troy-bilt lawn mower and needs to replace the deck belt.
By following the 54-inch deck belt diagram, users can easily understand the correct path for threading the belt through the pulleys and around the blades. This ensures that the belt is properly tensioned and prevents it from slipping or becoming loose during operation. Additionally, the diagram identifies any additional components, such as tensioners or idlers, that may need to be adjusted or replaced along with the belt.
Whether you are a seasoned lawn mower owner or a beginner, having access to a 54-inch deck belt diagram can save time and frustration when it comes to maintaining your Troy-bilt lawn mower. Understanding the proper installation and replacement process will ensure that your mower operates at its best and helps you achieve a well-manicured lawn.
Understanding the importance of a deck belt diagram

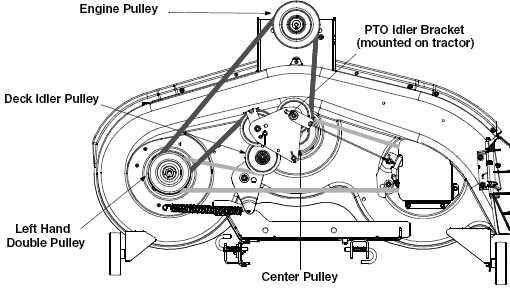
When it comes to maintaining a Troy-Bilt 54-inch deck, having a deck belt diagram is crucial. The deck belt diagram provides a visual representation of how the belt should be routed around the pulleys and other components of the deck. This diagram serves as a useful reference when it comes time to replace or adjust the deck belt.
One of the main reasons why the deck belt diagram is important is that it helps ensure the proper functioning of the deck. By following the diagram, you can ensure that the belt is correctly aligned and tensioned, which in turn helps prevent slipping or excessive wear. A properly installed and tensioned deck belt can help maximize the performance and longevity of your Troy-Bilt 54-inch deck.
Additionally, the deck belt diagram can be useful in troubleshooting any issues with the deck. If you notice unusual noises, vibrations, or uneven cutting, consulting the deck belt diagram can help you identify any potential problems with the belt’s installation or routing. By referencing the diagram, you can confirm that the belt is correctly installed and rule out any potential issues related to misalignment or incorrect tension.
Overall, having a deck belt diagram for your Troy-Bilt 54-inch deck is an essential tool for proper maintenance and troubleshooting. It helps ensure that the belt is correctly installed and tensioned, maximizing the deck’s performance and preventing unnecessary wear. By following the diagram, you can confidently maintain and repair your deck, keeping it in optimal working condition for years to come.
Step-by-step instructions for replacing the deck belt on a Troy-bilt 54-inch mower
Replacing the deck belt on your Troy-bilt 54-inch mower is a simple process that can be completed in a few steps. Follow these instructions to ensure a smooth and successful belt replacement.
Step 1: Prepare for the replacement
Before beginning the replacement, make sure the mower is turned off and the spark plug wire is disconnected to prevent accidental starting. Find a flat, level surface to work on and gather the necessary tools, including a socket wrench and a belt diagram specific to your mower model.
Step 2: Locate the deck belt
Underneath the mower deck, locate the deck belt that connects the engine pulley to the blade pulleys. Take note of the belt’s current routing and position to aid in the installation of the new belt.
Step 3: Remove the old belt
Using a socket wrench, loosen the bolts securing the belt tension pulley. Once loosened, move the tension pulley to relieve tension on the belt. Remove the old belt from the pulleys, taking care to remember the routing pattern.
Step 4: Install the new belt
Refer to the belt diagram specific to your mower model to ensure proper installation. Start by positioning the new belt onto the engine pulley and then follow the routing pattern to install it onto the blade pulleys. Use the tension pulley to adjust the belt tension and make sure it is properly seated on all pulleys.
Step 5: Check belt tension and alignment
After installing the new belt, check that it is correctly tensioned. Maintain a slight amount of tension on the belt, ensuring it is not too loose or too tight. Also, make sure the belt is properly aligned and running smoothly on all pulleys.
By following these step-by-step instructions, you can easily replace the deck belt on your Troy-bilt 54-inch mower and ensure efficient and reliable operation of your machine.
Troubleshooting common issues with the deck belt on a Troy-bilt 54-inch mower
When it comes to maintaining a Troy-bilt 54-inch mower, one common issue that owners may encounter is problems with the deck belt. The deck belt is responsible for driving the blades and ensuring smooth operation of the mower. However, over time, the belt may become worn, loose, or misaligned, leading to performance issues. Here are some common troubleshooting steps to help resolve deck belt problems:
1. Inspect the belt for signs of wear: Start by visually inspecting the deck belt for any signs of fraying, cracking, or excessive stretching. If any of these issues are present, it’s recommended to replace the belt with a new one to ensure optimal performance.
2. Check the belt tension: A loose deck belt can cause the blades to rotate slower or not at all. To check the tension, locate the belt tensioner and verify that it is properly adjusted. Use the manufacturer’s guidelines to ensure proper tension. If the belt tensioner is not properly adjusted, adjust it accordingly to achieve the recommended tension.
3. Verify the belt alignment: An improperly aligned belt can lead to uneven cutting or blade engagement issues. Check that the deck belt is properly aligned with the pulleys on the mower deck. If misalignment is detected, adjust the belt accordingly until it is properly seated on the pulleys.
4. Ensure proper routing of the belt: If the deck belt is routed incorrectly, it can cause performance issues. Refer to the mower’s manual or deck belt diagram to ensure the belt is routed correctly around the pulleys. Make any necessary adjustments if the belt is not properly routed.
5. Lubricate the belt: Lack of lubrication can cause excessive friction and premature wear on the deck belt. Apply a small amount of belt lubricant or silicone spray to the belt to reduce friction and ensure smooth operation. Be careful not to over-apply the lubricant, as it can cause slippage.
By following these troubleshooting steps, owners of Troy-bilt 54-inch mowers can address common deck belt issues and ensure their mower operates smoothly and efficiently. Regular inspection and maintenance of the deck belt can help prevent problems and prolong the life of the belt.
Tips for maintaining the deck belt on a Troy-bilt 54-inch mower
Maintaining the deck belt on a Troy-bilt 54-inch mower is essential for ensuring optimal performance and longevity of the mower. Here are some tips to help you maintain the deck belt effectively:
1. Regular inspection
Regularly inspect the deck belt for any signs of wear, damage, or tension issues. Look for any cracks, fraying, or stretching. It’s important to catch any problems early on to prevent further damage and avoid costly repairs.
2. Cleaning
Keep the deck belt clean and free from debris. Dirt, grass clippings, and other particles can accumulate on the belt, causing it to slip or wear out faster. Use a brush or compressed air to remove any debris regularly.
3. Proper tension
Ensure the deck belt is properly tensioned. A loose belt can cause inefficient operation and excessive wear, while an overly tight belt can strain the mower’s components. Follow the manufacturer’s guidelines to adjust the tension as needed.
4. Lubrication

Apply a suitable lubricant to the deck belt to reduce friction and heat buildup. This will help extend the life of the belt and ensure smoother operation. Be sure to use a lubricant that is recommended by the manufacturer.
5. Replacement
If the deck belt is severely worn out, damaged, or no longer tensioned properly, it may be necessary to replace it. Refer to the Troy-bilt 54-inch deck belt diagram or the manufacturer’s instructions for the correct replacement part and installation process.
By following these tips, you can effectively maintain the deck belt on your Troy-bilt 54-inch mower and keep it running smoothly for years to come.