
When it comes to maintaining and repairing your John Deere D140 lawn tractor, having access to the proper diagrams and schematics is essential. One crucial component of the D140 is the transmission belt, which is responsible for transferring power from the engine to the wheels. Understanding the layout and configuration of this belt is vital for troubleshooting issues and performing maintenance tasks.
The transmission belt on the D140 is an integral part of the machine’s operation, ensuring smooth and efficient power delivery. Over time, this belt may wear out or stretch, requiring replacement. Having a clear diagram of its layout allows you to locate all the necessary components involved in the belt’s installation and make the process much easier.
By referring to a John Deere D140 transmission belt diagram, you can also identify the proper routing of the belt, ensuring that it is installed correctly. Incorrect installation can lead to poor performance, increased wear and tear, and even potential damage to other components. With a diagram in hand, you can confidently complete the replacement process and get your D140 running smoothly again.
John Deere D140 Transmission Belt Diagram
The John Deere D140 is a popular model of lawn tractor that is widely used for residential yard maintenance. This powerful machine is equipped with a transmission belt that is responsible for transferring power from the engine to the wheels, allowing the tractor to move and perform its various tasks. Understanding the transmission belt diagram is essential for proper maintenance and troubleshooting of the D140 model.
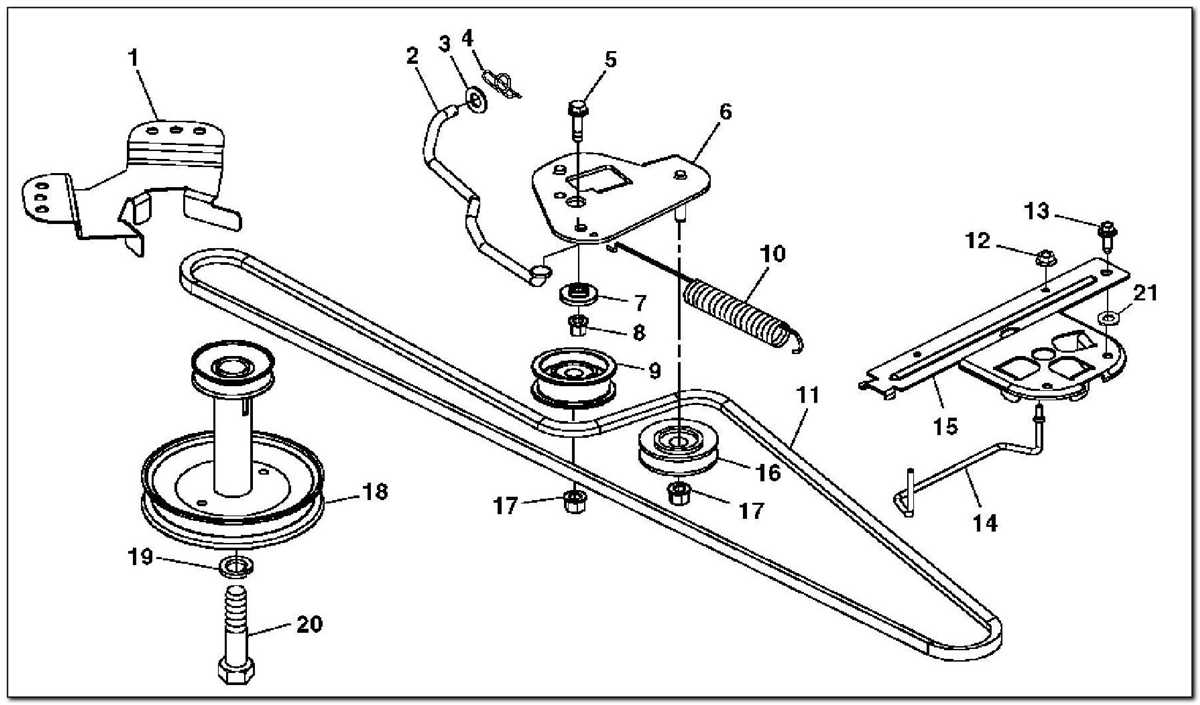
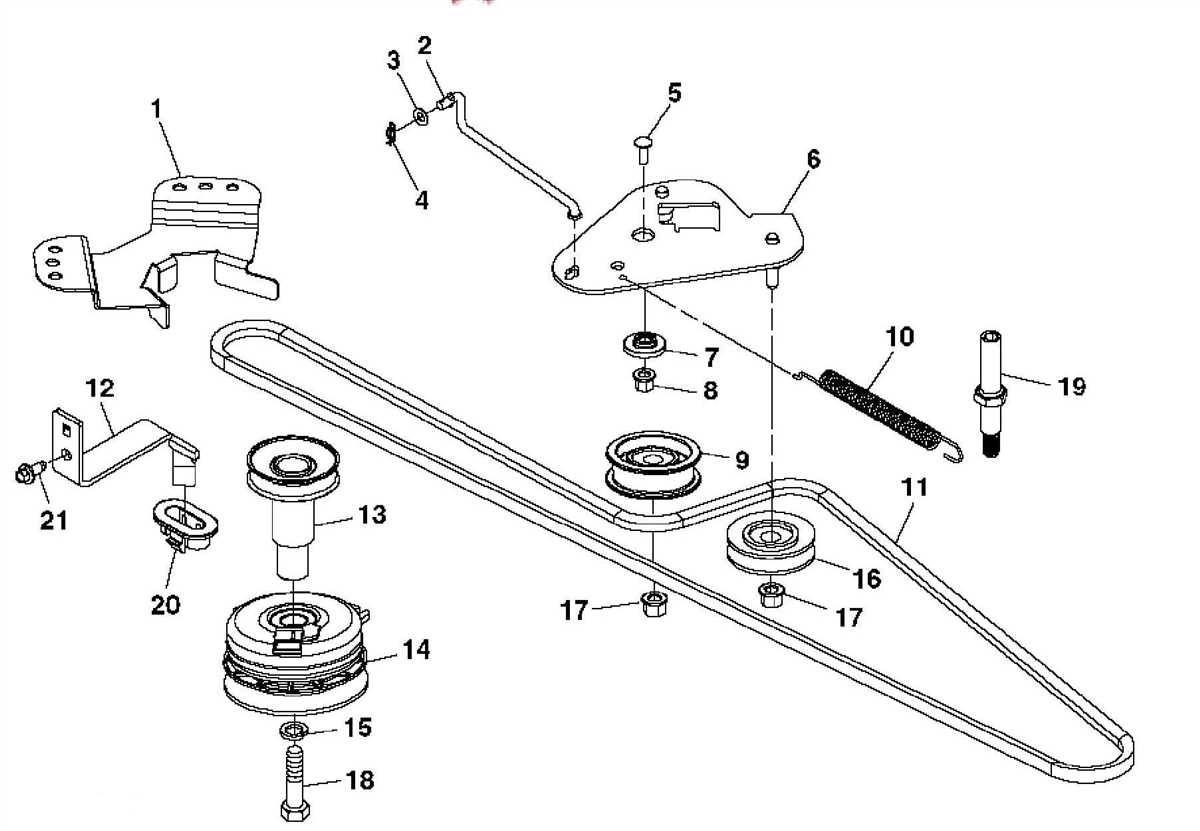
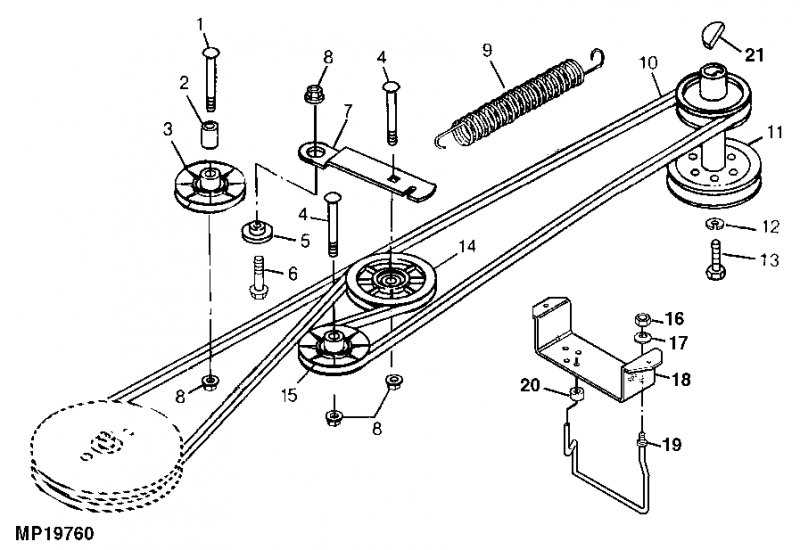
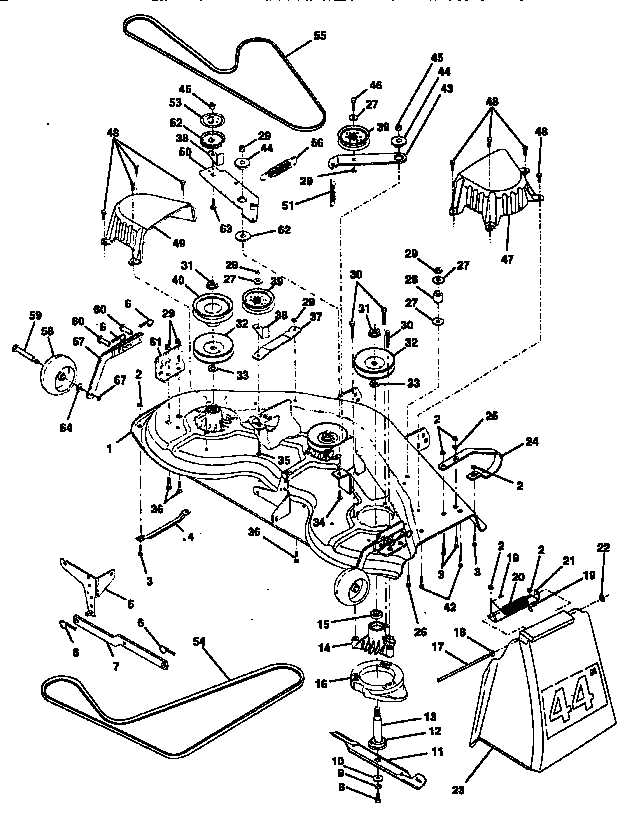
Transmission Belt Components:
- Drive Pulleys: These pulleys are connected to the engine and transmit power to the transmission belt.
- Transmission Belt: It is a reinforced rubber belt that transfers power from the drive pulleys to the driven pulleys.
- Driven Pulleys: These pulleys are connected to the wheels and rotate when power is transferred from the transmission belt.
- Idler Pulleys: These pulleys are used to maintain tension on the transmission belt and ensure proper operation.
- Belt Guards: These protective covers are installed to prevent debris and other objects from interfering with the transmission belt.
By referring to the John Deere D140 transmission belt diagram, users can easily identify each component and their respective positioning in the machine. This visual representation aids in understanding the functionality and proper assembly of the transmission belt system. In case of any issues, such as slipping, squeaking, or complete belt failure, the diagram can also serve as a helpful reference for troubleshooting and identifying potential causes.
Regular inspection and maintenance of the transmission belt system are crucial to ensure its longevity and optimal performance. This includes checking for signs of wear, adjusting tension if necessary, and replacing the belt when it shows signs of damage or excessive wear. By following the recommended maintenance schedule and referring to the John Deere D140 transmission belt diagram, users can keep their lawn tractor running smoothly for years to come.
What is a transmission belt and its role in the John Deere D140?
The transmission belt is a crucial component of the John Deere D140 lawn tractor, responsible for transferring power from the engine to the wheels. It is a reinforced rubber belt that loops around the transmission pulleys and is kept in tension by various components of the tractor’s drive system. The transmission belt plays a vital role in ensuring proper operation and efficient performance of the lawn tractor.
In the John Deere D140, the transmission belt works in conjunction with the engine’s drive system to transfer power to the transmission and ultimately the wheels. When the engine is running, it creates rotational motion that is transmitted through the belt to the transmission pulleys. The belt’s tension and grip on the pulleys allow it to transfer power effectively, enabling the tractor to move forward or backward.
The transmission belt is designed to withstand high levels of tension and torque, ensuring that it can handle the demands of regular lawn mowing and other tasks. However, over time, the belt may wear out or become damaged, leading to a loss of power transmission or even complete failure. Regular inspection and maintenance of the transmission belt are essential to identify any signs of wear or damage and replace it when necessary.
To ensure the longevity and optimal performance of the transmission belt, it’s important to follow the manufacturer’s recommended maintenance schedule. This may include periodic belt inspections, cleaning, and adjustment to maintain proper tension. In case of any visible signs of wear or damage, it is crucial to replace the transmission belt promptly to prevent further damage to the John Deere D140 and ensure its continued operation.
Understanding the different components of the transmission belt
A transmission belt is an essential component of John Deere D140 lawn tractors and plays a crucial role in transferring power from the engine to the wheels. It consists of several components that work together to transmit power efficiently and smoothly. Understanding these different components is important in ensuring proper maintenance and functioning of the transmission belt.
The main component of the transmission belt is the belt itself. Made from durable materials such as rubber or synthetic polymers, the belt is designed to withstand high levels of tension and maintain flexibility. The belt wraps around a system of pulleys and is responsible for transferring power from the engine to the wheels. It is important to regularly inspect the belt for any signs of wear or damage and replace it if necessary.
Another important component of the transmission belt system is the tensioner. The tensioner serves to keep the belt taut and ensures proper engagement with the pulleys. It is typically spring-loaded and allows for adjustments to maintain the correct tension. Regular inspection and adjustment of the tensioner is essential to prevent slipping or excessive wear of the belt.
- The idler pulleys are also integral to the transmission belt system. These pulleys are part of the belt routing and serve to guide and support the belt’s movement. They are typically adjustable to maintain proper alignment and tension throughout the system.
- The drive pulley is another key component that is connected directly to the engine. It transfers power to the belt and initiates its rotation. The drive pulley’s size and design determine the speed ratio between the engine and the wheels, allowing for different speed settings.
- The driven pulley is connected to the wheels and transfers power received from the belt to propel the tractor forward or backward. Like other components, it is important to inspect the driven pulley regularly for any signs of wear or damage.
By understanding the different components of the transmission belt and regularly inspecting and maintaining them, owners of John Deere D140 lawn tractors can ensure optimal performance and longevity of their equipment.
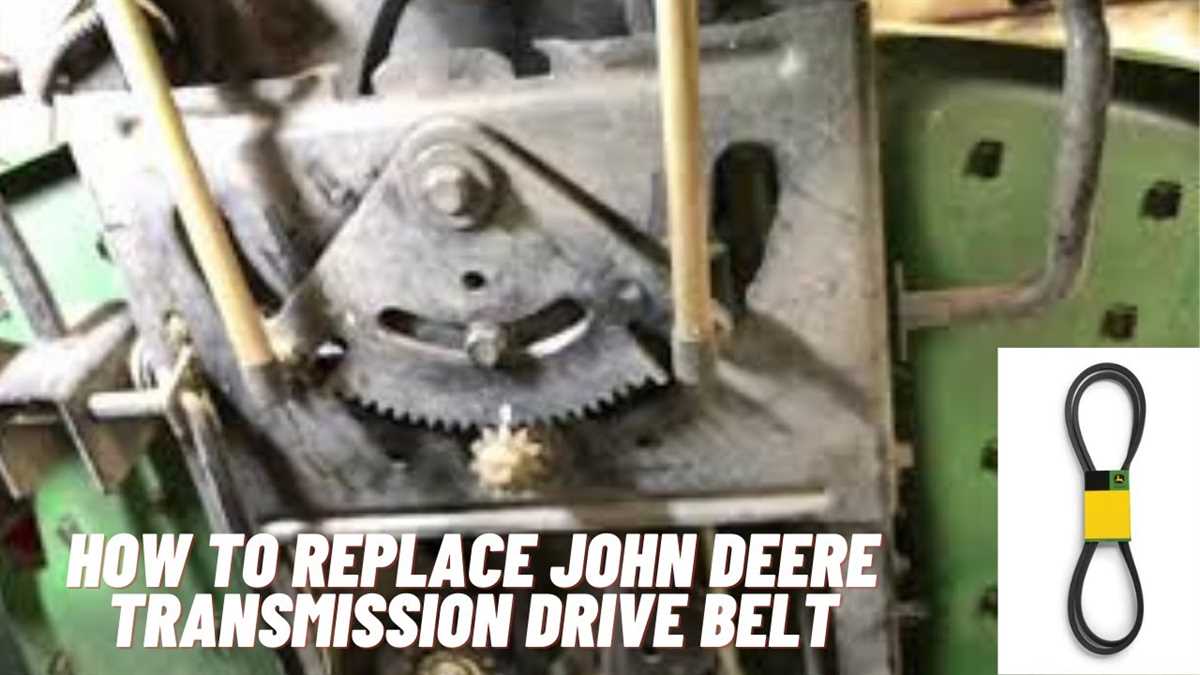
How to Replace a Worn Out Transmission Belt in the John Deere D140?
If you own a John Deere D140 and notice that the transmission belt is worn out, it is important to replace it to ensure the smooth operation of your lawn tractor. The transmission belt is responsible for transferring power from the engine to the wheels, allowing the tractor to move forward or backward. Over time, the belt can become worn or damaged, leading to reduced performance and potential breakdowns.
To replace the transmission belt in the John Deere D140, follow these steps:
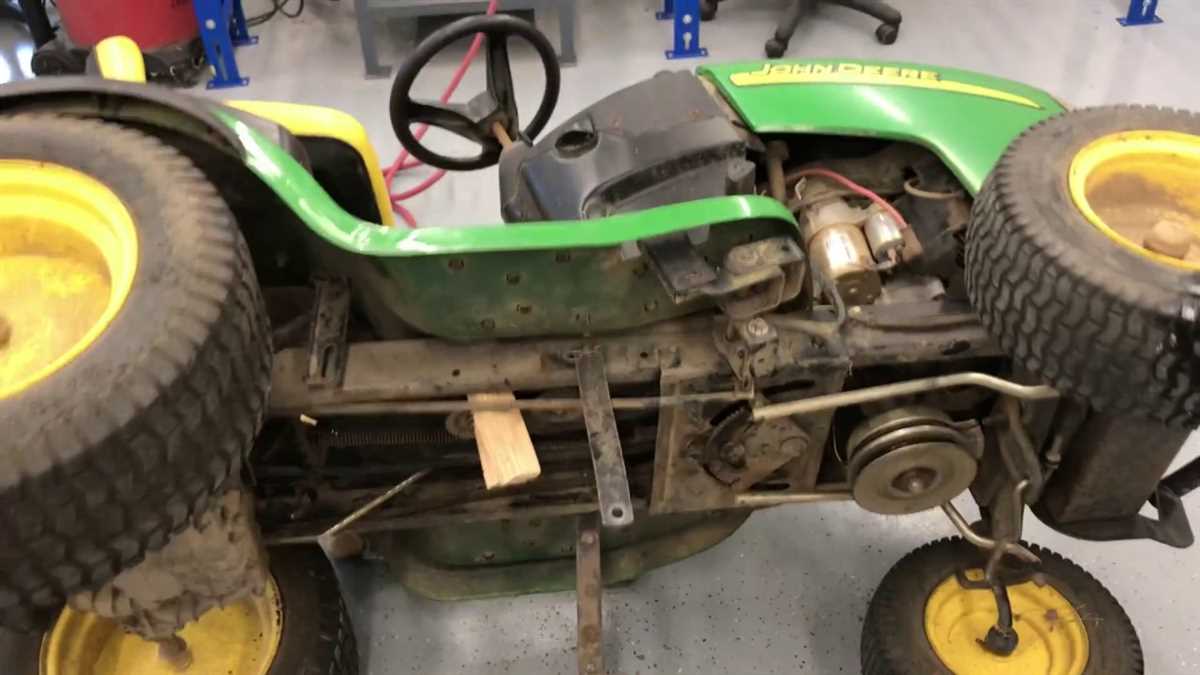
- Prepare the tractor: Before you begin, make sure the tractor is turned off and the engine is cool. Disconnect the spark plug wire for added safety.
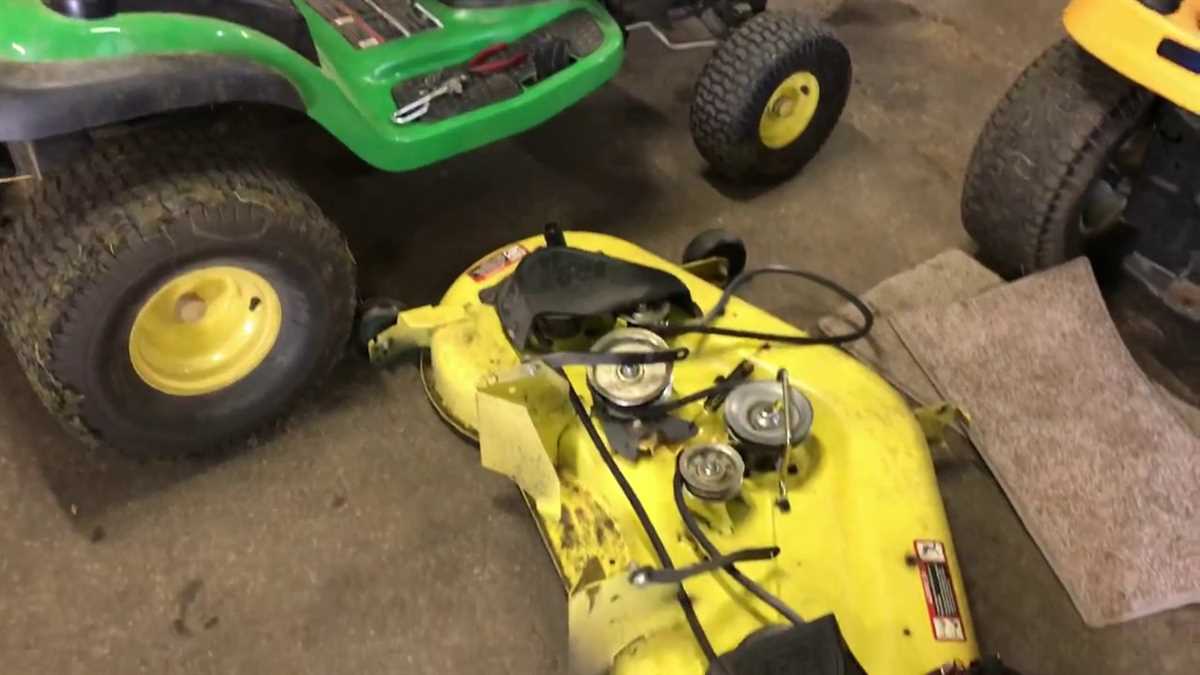
- Remove the mower deck: To access the transmission belt, you’ll need to remove the mower deck. Follow the instructions in the owner’s manual to safely remove the deck.
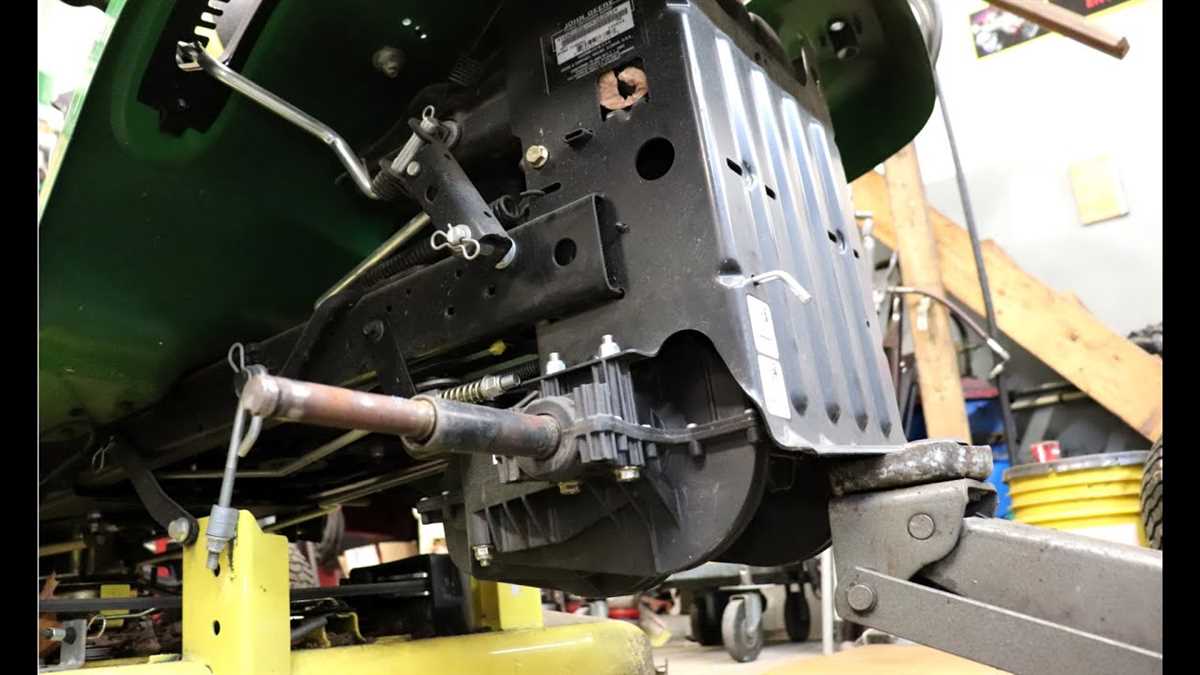
- Locate the transmission pulley: Once the mower deck is removed, locate the transmission pulley underneath the tractor. The transmission belt is connected to this pulley.
- Remove the old belt: Using a wrench or socket set, loosen the tension on the belt by adjusting the idler pulley. Once the tension is released, carefully slide the old belt off the transmission pulley.
- Install the new belt: Begin by sliding the new transmission belt onto the transmission pulley. Make sure it is properly seated in the grooves. Then, adjust the tension on the belt by tightening the idler pulley.
- Reinstall the mower deck: Once the new belt is in place, reattach the mower deck following the instructions in the owner’s manual.
- Test the tractor: After everything is reassembled, start the tractor and engage the transmission. Test the tractor’s movement to ensure the new belt is working properly.
Replacing a worn out transmission belt in the John Deere D140 may seem like a complex task, but by following these steps and referencing the owner’s manual, you can successfully complete the replacement. Regular maintenance, such as inspecting and replacing worn belts, will help prolong the life of your lawn tractor and keep it running smoothly for years to come.
Tips for maintaining the transmission belt in good condition
Proper maintenance of the transmission belt in your John Deere D140 is crucial to ensure its smooth operation and longevity. Here are some tips to help you keep the transmission belt in good condition:
1. Regularly inspect the belt
Inspect the transmission belt for any signs of wear, damage, or misalignment. Look out for cracks, fraying, or stretching. If you notice any issues, it is important to address them promptly to prevent further damage.
2. Clean the belt
Regularly clean the transmission belt to remove any debris, dirt, or grass clippings that may accumulate on its surface. Use a soft brush or cloth to gently remove the debris. This will help prevent build-up and ensure proper functioning of the belt.
3. Adjust belt tension
Check the tension of the transmission belt regularly. If it is too loose, it may slip or disengage during operation. If it is too tight, it can put excessive strain on the belt and other components. Follow the manufacturer’s guidelines to adjust the belt tension properly.
4. Replace worn-out belts
If the transmission belt is worn out or damaged beyond repair, it is important to replace it with a new one. Continuing to use a damaged belt can put additional stress on the engine and other parts, leading to further damage.
5. Proper storage
If you are storing your John Deere D140 for an extended period, it is important to take proper precautions to protect the transmission belt. Store the mower in a dry and covered area to prevent exposure to moisture and other elements that can cause the belt to degrade.
Following these tips will help ensure the transmission belt in your John Deere D140 remains in good condition, allowing for smooth operation and prolonging its lifespan.
Common problems and troubleshooting solutions for the transmission belt
The transmission belt on a John Deere D140 mower can experience several issues that may affect its performance. Here are some common problems and troubleshooting solutions:
1. Belt slipping
One of the most common issues with the transmission belt is slipping. This can happen if the belt is not properly tensioned or if the pulleys are not aligned correctly. To fix this problem, check the tension of the belt and adjust it if necessary. Also, make sure the pulleys are aligned properly and free from any debris that may cause belt slipping.
2. Belt damage
The transmission belt can get damaged due to wear and tear or external factors such as hitting a foreign object. If the belt is frayed, cracked, or has any visible damage, it needs to be replaced. Inspect the belt regularly and replace it when necessary to ensure optimal performance of the mower.
3. Belt breakage
In some cases, the transmission belt may break while in use. This can be caused by excessive tension, improper installation, or a malfunctioning component. To prevent belt breakage, make sure the belt is installed correctly and has the appropriate tension. If the belt continues to break, it may be necessary to inspect other components of the mower’s transmission system for potential issues.
4. Belt misalignment
If the transmission belt is not properly aligned with the pulleys, it can cause problems such as belt slipping or premature wear. To fix this issue, carefully inspect the belt and the pulleys, ensuring they are aligned correctly. Adjust the position of the belt or pulleys if needed, and make sure there is sufficient clearance between the belt and other components.
5. Unusual noises or vibrations
If you notice unusual noises or vibrations coming from the transmission area, it may indicate a problem with the belt. Inspect the belt for any signs of damage or misalignment. Additionally, check the other components of the transmission system, such as the pulleys and idlers, for any issues that may be causing the noises or vibrations.
Overall, proper maintenance and regular inspection of the transmission belt are crucial to ensure its optimal performance and extend its lifespan. By addressing any problems promptly and following the troubleshooting solutions mentioned above, you can keep your John Deere D140 mower’s transmission belt in good condition and enjoy efficient and reliable operation.
Q&A:
What are some common problems with the transmission belt?
Some common problems with the transmission belt include slipping, fraying, and breaking.
What causes the transmission belt to slip?
The transmission belt can slip due to improper tension, worn-out pulleys, or oil or grease on the belt.
How can I troubleshoot a frayed transmission belt?
If you notice a frayed transmission belt, it is important to replace it immediately. Fraying can be caused by wear and tear or a misalignment of the belt. Check for any obstructions or misalignment and ensure that the new belt is properly tensioned.
Why does the transmission belt break?
The transmission belt can break due to excessive tension, excessive load, or aging. It is important to regularly inspect the belt for signs of wear and replace it if necessary.
How do I prevent transmission belt problems?
To prevent transmission belt problems, you should regularly inspect the belt for signs of wear, ensure proper tension, and keep the belt clean and free from debris and oil or grease. Also, avoid overloading the system or subjecting it to excessive loads.