
The KC Daylighter is a popular choice for off-road enthusiasts looking for powerful and reliable lighting solutions. With their high-intensity beams and sturdy construction, these lights are designed to withstand the rigors of off-road adventures. Proper wiring of the KC Daylighter is crucial to ensure optimal performance and safety.
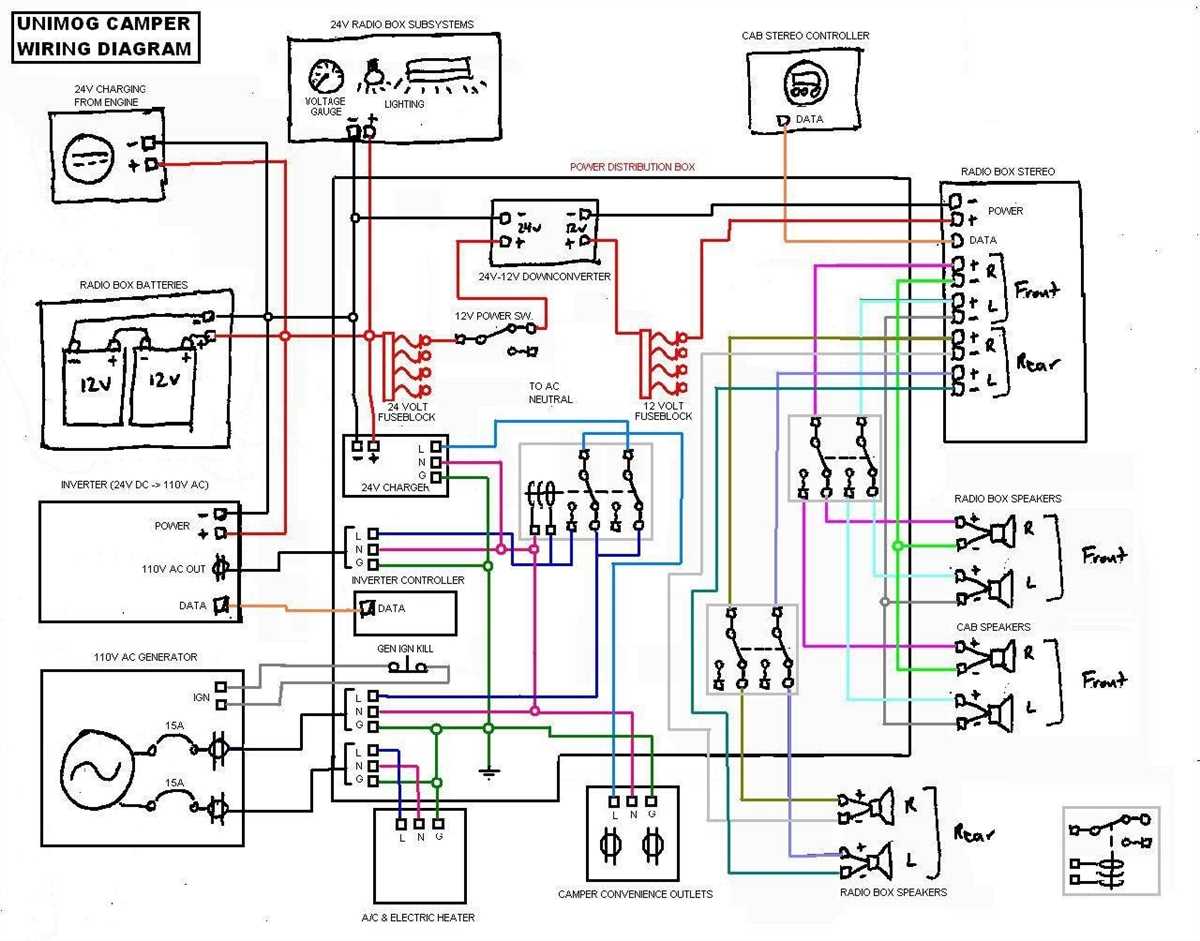
The wiring diagram for the KC Daylighter consists of several components, including the battery, switch, relay, fuse, and the lights themselves. Understanding how each component is connected will help you install and troubleshoot your KC Daylighter effectively.
Firstly, the battery provides the power source for the lights. The positive terminal of the battery is connected to the positive terminal of the relay, while the negative terminal of the battery is connected to the negative terminal of the switch. This ensures that power is properly distributed to the lights when the switch is activated.
The switch acts as the control mechanism for the KC Daylighter. When the switch is turned on, it completes the circuit and allows power to flow through the relay. The relay then activates, delivering power to the lights. The switch also includes a fuse, which serves as a safety mechanism in case of an electrical overload or short circuit.
KC Daylighter Wiring Diagram: Complete Guide for Installation
Installing KC Daylighters on your vehicle can greatly enhance your visibility during off-road adventures and other low-light situations. To ensure proper installation and functionality, it’s important to follow the correct wiring diagram. In this guide, we will provide you with a complete overview of the KC Daylighter wiring diagram and step-by-step instructions for installation.
1. Gather the necessary materials
Before you begin installing your KC Daylighters, make sure you have all the necessary materials on hand. This includes the Daylighter lights, wiring harness, relay, switch, fuse, and any other additional components provided in the kit.
2. Plan the installation
Take some time to plan the installation process. Determine where you want to mount the lights on your vehicle and ensure that the wiring harness is long enough to reach the desired locations. Additionally, decide where to mount the switch and ensure that there is enough space and accessibility for easy operation.
3. Connect the wiring harness
The KC Daylighter wiring harness typically consists of three main components: the power wire, ground wire, and relay. Start by connecting the power wire to the positive terminal of your vehicle’s battery. Then, connect the ground wire to a suitable grounding point on your vehicle’s chassis.
4. Install the switch
Mount the switch in a convenient location on your dashboard or center console. Drill a hole for the switch and secure it in place. Connect the switch to the wiring harness using the provided connectors.
5. Connect the lights
Attach the Daylighter lights to their designated mounting locations on your vehicle. Then, connect the lights to the wiring harness using the provided connectors. Ensure that the connections are secure and snug.
6. Test the installation
After completing the wiring connections, it’s important to test the installation before fully securing all the components. Turn on your vehicle’s ignition and toggle the switch to activate the lights. Check if the lights turn on and off properly and make any necessary adjustments before finalizing the installation.
Remember to always consult the specific wiring diagram provided with your KC Daylighter kit for precise instructions and details. Following the correct wiring diagram will ensure a safe and successful installation of your KC Daylighters, allowing you to enjoy improved visibility during your off-road adventures.
Understanding the Components of a KC Daylighter
The KC Daylighter is a popular choice for off-road vehicle enthusiasts due to its powerful lighting capabilities and durable construction. To fully understand how this lighting system works, it is essential to familiarize yourself with its various components. Here is a breakdown of the key components of a KC Daylighter:
1. Light Housing
The light housing is the outer shell that protects the internal components of the KC Daylighter. It is typically made of high-quality materials such as aluminum or stainless steel, which provide excellent durability and resistance to corrosion. The housing also features a mounting bracket, allowing for easy installation onto the vehicle’s roof, bumper, or other desired location.
2. Bulb
The bulb is the heart of the KC Daylighter and is responsible for emitting the powerful beam of light. These lights usually use halogen bulbs, which offer a bright, white light output. However, LED options are also available, providing even greater brightness and energy efficiency. The choice of bulb will depend on personal preferences and the specific lighting needs.
3. Reflector
The reflector plays a crucial role in directing and focusing the light emitted by the bulb. It is designed to maximize the light output and ensure a concentrated beam pattern for better visibility. The reflector is typically made of high-quality materials such as polished aluminum, which helps enhance the efficiency of the light projection.
4. Lens Cover
The lens cover is a protective shield that covers the bulb and reflector assembly. It is made from durable materials such as polycarbonate or acrylic and is designed to withstand impacts, vibrations, and extreme weather conditions. The lens cover also helps to shape the beam pattern and can be available in various colors, such as clear, amber, or blue, depending on personal preferences and specific lighting requirements.
5. Wiring Harness
The wiring harness is an essential component that connects the KC Daylighter to the vehicle’s electrical system. It consists of various wires, connectors, and switches that enable the user to control the lights. The wiring harness should be designed to handle the high electrical current required by the KC Daylighter and should be properly installed to ensure safe and reliable operation.
By understanding the components of a KC Daylighter, users can make informed decisions when it comes to installation, maintenance, and customization. Whether you are using the KC Daylighter for off-roading adventures or enhancing your vehicle’s lighting capabilities, knowing how each component works together will ensure optimal performance and longevity.
Step-by-Step Wiring Instructions for KC Daylighter
The KC Daylighter is a popular off-road light that provides enhanced visibility during night-time driving. If you’ve recently purchased a set of KC Daylighters and need guidance on how to properly wire them, this step-by-step guide is for you. Follow these instructions carefully to ensure a safe and effective installation.
Materials Needed:
- KC Daylighter lights
- Wire stripper
- Electrical tape
- Fuse holder with fuse
- Wire connectors
- Wiring diagram (refer to your specific model)
Step 1: Prepare the Lights
Before you begin the wiring process, it’s essential to prepare the KC Daylighter lights. Start by attaching the mounting brackets to the lights, ensuring that they are secure and aligned correctly. This step will vary depending on the specific model of Daylighters you have, so refer to the provided instructions for guidance.
Step 2: Determine the Desired Location
Decide where you want to mount the lights on your vehicle. Popular locations include the front bumper, grille, or roof. Keep in mind that the lights should be positioned in a way that maximizes visibility without obstructing the driver’s view or any legal restrictions.
Step 3: Mount the Lights
Using the appropriate hardware, mount the lights in the chosen location. Make sure they are securely attached to prevent any movement or damage during use. Refer to the specific instructions for your Daylighters to ensure proper mounting.
Step 4: Connect the Wiring Harness
Using the wiring diagram provided with your KC Daylighter model, connect the wiring harness to the lights. Follow the instructions carefully, matching the designated wires and connectors. Use a wire stripper to remove a small section of insulation from each wire end and a wire connector to securely join the harness to the lights.
Step 5: Wire the Switch and Relay
Locate a suitable location for the switch on the dashboard or control panel of your vehicle. Drill a small hole and mount the switch using the provided hardware. Connect the wiring from the switch to the relay following the wiring diagram and secure the connections with wire connectors. Ensure the relay is properly grounded.
Step 6: Connect the Power Source
Find a suitable power source in the vehicle to connect the lights. It is recommended to use a fuse holder with a fuse to protect the wiring and lights from electrical damage. Connect the power wire from the lights to the power source, making sure to secure all connections and insulate them with electrical tape.
Step 7: Test the Lights
Once all the wiring is complete, turn on your vehicle’s ignition and test the functionality of the KC Daylighter lights. Ensure that they turn on and off correctly when the switch is activated. If there are any issues, double-check the wiring connections and consult the wiring diagram.
Follow these step-by-step instructions to correctly wire your KC Daylighter lights. Remember to always refer to the specific wiring diagram provided with your model and exercise caution when working with electricity. Once properly installed, enjoy the improved visibility and enhanced off-road experience that the KC Daylighters provide.
Troubleshooting Common Issues with KC Daylighter Wiring
The KC Daylighter is a popular choice for off-road enthusiasts looking for powerful and reliable lighting. However, like any wiring system, it can sometimes encounter issues. Here are some common problems that may arise with KC Daylighter wiring and how to troubleshoot them.
1. Lights Not Turning On
If your KC Daylighter lights aren’t turning on, the first thing to check is the power source. Make sure the lights are properly connected to the battery or power supply. Check the wiring connections for any loose or corroded wires. If everything seems to be properly connected, use a multimeter to test the battery voltage and ensure it is supplying power to the lights. If the voltage is low or there is no voltage at all, you may need to replace the battery or troubleshoot the power supply.
2. Lights Flickering
Flickering lights can be caused by a few different factors. First, check the wiring connections for any loose or damaged wires. Tighten any loose connections and repair or replace any damaged wiring. Next, check the light bulbs themselves. Loose or improperly seated bulbs can cause flickering. Make sure the bulbs are securely seated in the housing. If the issue persists, it may be due to a faulty switch or a problem with the power supply. Consider replacing the switch or troubleshooting the power supply.
3. Lights Overheating
Overheating lights can be a safety hazard and may indicate an issue with the wiring or the lights themselves. Check the amperage rating of your lights and ensure that the wiring and power supply can handle the load. Make sure the lights are not obstructed and have proper ventilation to dissipate heat. If the lights continue to overheat, it may be necessary to replace them or consult a professional for further troubleshooting.
4. Lights Dimming
If your KC Daylighter lights are dimming, it could be a sign of a poor electrical connection or a voltage drop. Check all of the wiring connections for any loose or corroded wires. Clean and tighten any connections as needed. Additionally, check the battery voltage and ensure it is at the proper level to power the lights. If the issue persists, it may be necessary to upgrade the wiring or power supply to handle the load of the lights.
Overall, troubleshooting issues with KC Daylighter wiring involves checking the power source, inspecting and repairing wiring connections, and ensuring that the lights are properly seated and ventilated. If the problems persist, it may be necessary to consult a professional for further assistance or consider replacing the wiring or lights.
Summary:
Proper installation of KC Daylighter lights is essential to ensure optimal performance and longevity. By following these tips and tricks, you can ensure a successful installation process:
Tips for Wiring:
- Plan your wiring route: Before starting the installation, carefully plan the wiring route to avoid any potential interference with other components or moving parts.
- Use the appropriate gauge wire: Ensure that you use the correct gauge wire for your specific light and vehicle. This will help maintain a stable electrical connection and prevent any power loss or overheating.
- Secure and protect the wires: Use wire loom, zip ties, or other means to secure and protect the wiring from potential damage caused by vibrations, heat, or external factors.
- Properly ground the lights: It’s crucial to establish a good ground connection for your KC Daylighter lights. This can be achieved by securely fastening the ground wire to a clean and unpainted metal surface on the vehicle’s chassis.
Tips for Mounting:
- Choose a sturdy mounting location: Select a solid and secure mounting location that can withstand vibrations and harsh off-road conditions.
- Ensure proper alignment: Properly align the lights to ensure maximum visibility and to prevent blinding oncoming drivers.
- Use appropriate mounting hardware: Utilize the recommended mounting hardware provided by KC to ensure a secure and reliable attachment of the lights to your vehicle.
With these tips and tricks in mind, you can confidently install your KC Daylighter lights and enjoy enhanced visibility during your off-road adventures or nighttime driving. Remember to always refer to the KC Daylighter wiring diagram and the instructions provided by KC for your specific light model and vehicle.