
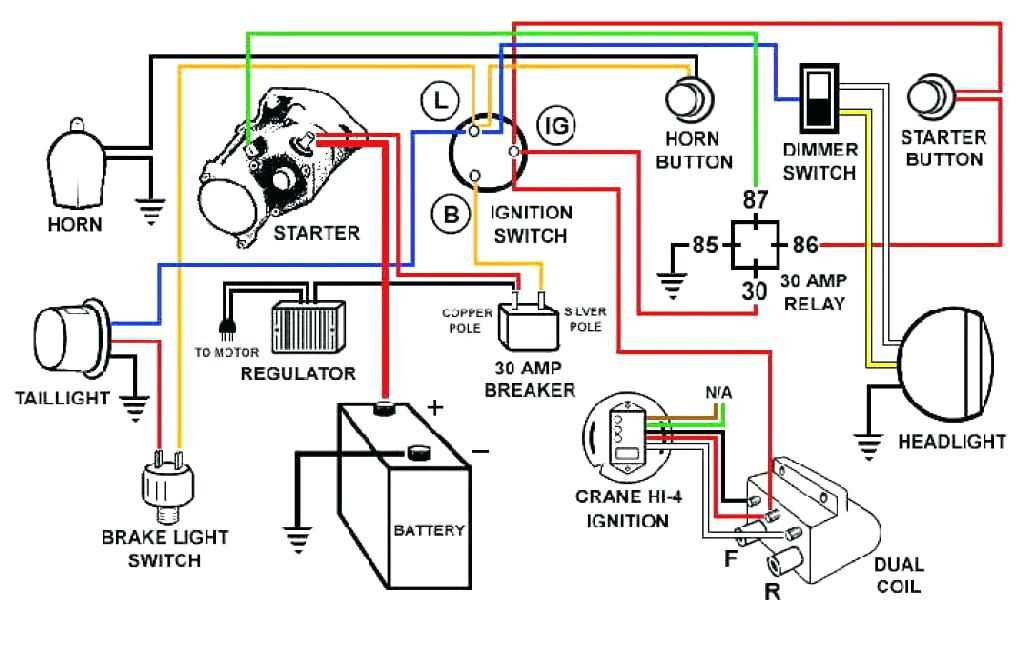
If you’re in the process of building or repairing an Ultima motorcycle, having a comprehensive wiring diagram is crucial. The wiring diagram serves as a roadmap for all electrical components and connections in the motorcycle, allowing you to troubleshoot any issues and ensure a smooth wiring installation. It provides a visual representation of the wiring system, indicating the location of switches, lights, sensors, and other electrical components.
With an Ultima wiring diagram, you’ll be able to easily identify the different color-coded wires and their functions. This information is essential when it comes to routing the wires correctly and avoiding any potential shorts or malfunctions. Whether you’re an experienced motorcycle builder or a beginner, having a reliable wiring diagram can save you time, effort, and frustration.
Ultima is known for its high-quality motorcycles and aftermarket parts, and their wiring diagrams are no exception. They are meticulously designed and regularly updated to meet industry standards and ensure compatibility with various Ultima models. Whether you have an Ultima Chopper, Bobber, or Cafe Racer, there’s a wiring diagram available to help you navigate the electrical system of your specific model.
In addition to providing clear instructions on how to connect different electrical components, an Ultima wiring diagram also includes information on fuse placement, wire gauge recommendations, and compatible accessories. This comprehensive resource allows you to customize your motorcycle’s electrical system to your exact specifications. From adding additional lighting to installing a new stereo system, the wiring diagram provides the guidance you need to make these modifications safely and effectively.
Ultima Wiring Diagram: A Comprehensive Guide to Wiring Your Ultima Motorcycle
When it comes to wiring your Ultima motorcycle, having a comprehensive wiring diagram is essential. The Ultima wiring diagram provides a detailed guide on how to connect various electrical components and ensure proper functionality of your motorcycle’s electrical system.
The wiring diagram outlines the various electrical connections and circuits, including the ignition system, lights, horn, battery, and more. It provides a visual representation of how each component is connected, making it easier to understand and troubleshoot any electrical issues that may arise.
With the help of the Ultima wiring diagram, you can easily identify the correct wires and terminals to ensure proper installation and connection. It is important to follow the diagram closely and double-check all connections to avoid any short circuits or malfunctioning electrical components.
The Ultima wiring diagram also includes information on wire colors and gauges, which is crucial for selecting the right wires and connectors for your motorcycle. It provides a clear understanding of how to route the wires and where to make the necessary connections.
Whether you are a professional motorcycle mechanic or a DIY enthusiast, the Ultima wiring diagram is an invaluable resource that will simplify the wiring process and help you achieve a properly functioning electrical system on your Ultima motorcycle.
Understanding the Basics of Ultima Motorcycle Wiring
Ultima motorcycles are known for their sleek designs and powerful performance. However, behind the scenes, a complex wiring system controls all the electrical components and ensures they work in harmony. Understanding the basics of Ultima motorcycle wiring is essential for any owner or enthusiast who wants to maintain or customize their bike.
At its core, Ultima motorcycle wiring consists of a series of interconnected electrical components that allow for the operation of various systems, such as ignition, lights, and charging. These components include the battery, starter solenoid, ignition switch, fuses, relays, and various connectors and wires.
One essential component in Ultima motorcycle wiring is the battery, which provides power to start the engine and run the electrical systems. The starter solenoid acts as a switch to engage the starter motor when the ignition is turned on. The ignition switch controls the flow of electrical current to the ignition system, allowing the engine to start and run.
Fuses and relays play a crucial role in protecting the electrical system from overload and short circuits. Fuses are designed to blow and break the circuit if there is an excessive current flow, preventing damage to the wiring or electrical components. Relays, on the other hand, act as switches that control high-powered devices like headlights or the fuel pump.
In order to properly understand the wiring diagram of an Ultima motorcycle, it is necessary to familiarize oneself with the components and their respective connections. It is also essential to have a good understanding of electrical principles and troubleshooting techniques in order to diagnose and fix any issues that may arise.
Overall, understanding the basics of Ultima motorcycle wiring is crucial for any owner or enthusiast who wants to maintain, troubleshoot, or customize their bike. It allows for a better understanding of how the electrical systems work and enables modifications or upgrades to be done safely and effectively.
Key Components in an Ultima Wiring Diagram
The Ultima wiring diagram is a crucial tool for understanding and troubleshooting the electrical system of an Ultima motorcycle. It provides a visual representation of all the key components and their connections, ensuring that the wiring is done correctly and efficiently.
One of the main components in an Ultima wiring diagram is the battery. The battery is responsible for storing and supplying electrical energy to the various components of the motorcycle. It is typically represented as a simple symbol in the diagram, indicating its location and polarity.
Another important component in the wiring diagram is the ignition switch. The ignition switch is used to control the flow of electricity to the ignition system and other essential components, such as the lights and accessories. It is usually represented as a switch symbol with multiple positions (e.g., off, on, and accessory).
The Ultima wiring diagram also includes other key components such as the starter relay, solenoid, and fuse box. The starter relay is responsible for engaging the starter motor when the ignition switch is turned to the start position. The solenoid acts as a bridge between the battery and the starter motor, allowing for the necessary electrical current to start the engine. The fuse box, on the other hand, houses various fuses that protect the electrical system from overload or short circuits.
Additionally, the wiring diagram may feature symbols representing various lights, indicators, and sensors found on the motorcycle, such as the headlight, taillight, turn signals, and speedometer. These symbols provide a clear understanding of the connections and functionality of each component, allowing for proper installation and troubleshooting.
In summary, the Ultima wiring diagram is a valuable resource for anyone working on an Ultima motorcycle. It showcases the key components and their connections, ensuring proper installation, and facilitating troubleshooting of the electrical system. Understanding the various symbols and their meanings is essential for effectively utilizing the wiring diagram and maintaining a fully functioning motorcycle.
Step-by-Step Guide to Reading an Ultima Wiring Diagram
If you are new to electrical systems or are working on an Ultima vehicle and need to understand the wiring diagram, this step-by-step guide will help you make sense of it. The Ultima wiring diagram is a visual representation of the electrical connections and components in the vehicle, and it can be a valuable tool for troubleshooting or modifying the electrical system.
1. Understand the symbols: The first step in reading an Ultima wiring diagram is to familiarize yourself with the symbols used to represent different components. These symbols can vary slightly between diagrams, so it’s important to refer to the diagram’s legend or key for accurate interpretation. Common symbols include squares for switches, circles for lights, and lines for wires.
2. Identify the power source: The next step is to locate the power source in the diagram. This is usually represented by a battery symbol or the letter “B” followed by a number. Understanding the power source and its connection points will help you trace the path of electrical current throughout the diagram.
3. Trace the circuit: Once you have identified the power source, start tracing the circuit by following the paths of wires or lines. Pay attention to how the components are connected and where the connections occur. By understanding the flow of electricity, you can identify potential issues or make modifications as needed.
4. Determine component functions: As you trace the circuit, identify the functions of each component. This can be done by referring to the legend or key provided with the wiring diagram. Understanding what each component does will help you troubleshoot problems or make modifications with accuracy.
5. Note any special instructions: Some Ultima wiring diagrams may include special instructions or notes that are important for understanding the electrical system. These instructions may include information about specific connectors, wire colors, or wiring configurations. Make sure to read and follow these instructions carefully.
6. Use a multimeter: If you encounter any discrepancies or issues while reading the wiring diagram, using a multimeter can help you test the continuity or voltage of electrical connections. This can be particularly useful for troubleshooting and verifying the accuracy of the wiring diagram.
7. Refer to the manual: If you are unsure about any aspect of the wiring diagram or need further clarification, refer to the Ultima vehicle’s manual or contact a professional for assistance. It’s important to have a comprehensive understanding of the electrical system before making any modifications or repairs.
Reading an Ultima wiring diagram may seem daunting at first, but by following these steps and gaining familiarity with the symbols and components, you can easily decipher the information it provides. Remember to always prioritize safety and consult professionals when necessary.
Troubleshooting Common Wiring Issues in Ultima Motorcycles
In Ultima motorcycles, electrical wiring issues can cause various problems, ranging from minor inconveniences to major safety hazards. It is important to identify and resolve these issues in a timely manner to ensure the smooth operation of the motorcycle. Here are some common wiring issues that riders may encounter, along with troubleshooting steps to address them.
1. Blown Fuses
One of the most common wiring issues in Ultima motorcycles is blown fuses. This can happen due to a short circuit, overloading, or a faulty component. When a fuse blows, it interrupts the electrical flow and can cause certain systems or components to stop working. To troubleshoot this issue, start by identifying the fuse that has blown. Check the corresponding circuit and look for any signs of a short circuit or overload. Replace the blown fuse with a new one of the correct rating and address the underlying cause of the issue.
2. Loose or Corroded Connections
Another common wiring issue in Ultima motorcycles is loose or corroded connections. Over time, vibrations and exposure to moisture can cause connectors to come loose or develop corrosion. Loose connections can disrupt the electrical flow, while corrosion can impede the transfer of electrical signals. To troubleshoot this issue, visually inspect all the connections and terminals, paying attention to any signs of looseness or corrosion. Clean the affected connections with an appropriate electrical contact cleaner and ensure they are securely fastened.
3. Grounding Problems
Inadequate grounding can also lead to wiring issues in Ultima motorcycles. A faulty ground connection can cause various electrical problems, such as poor spark, intermittent electrical failure, or even engine stalling. To troubleshoot this issue, inspect the ground connections, including the battery ground strap and any other ground wires. Ensure that the connections are clean, tight, and free from corrosion. If necessary, clean the grounding points and tighten the connections to ensure a proper grounding.
4. Faulty Wiring Harness
A faulty or damaged wiring harness can cause a range of electrical issues in Ultima motorcycles. The wiring harness is responsible for carrying electrical signals throughout the motorcycle, and any damage or defects in this component can disrupt the entire electrical system. To troubleshoot this issue, visually inspect the wiring harness for any signs of damage, such as frayed wires or broken connectors. If any issues are found, consider replacing the damaged section of the wiring harness or the entire harness if necessary.
These are just a few common wiring issues that riders may encounter in Ultima motorcycles. It is important to address these issues promptly and effectively to ensure the optimal performance and safety of the motorcycle. If you are unsure about troubleshooting or resolving any wiring issues, it is recommended to seek the assistance of a professional mechanic or an authorized Ultima service center.
Tips for Properly Wiring Your Ultima Motorcycle
Wiring your Ultima motorcycle correctly is essential to ensure that all electrical components function properly and safely. Whether you are building a custom Ultima bike or performing maintenance on an existing one, these tips will help you navigate the wiring process with ease.
1. Plan Your Wiring Layout
Before starting the wiring process, it is crucial to plan out your wiring layout. Make sure you have a clear understanding of how all the electrical components, such as the ignition switch, lights, and horn, will be connected. This will help prevent any confusion or mistakes during the installation.
2. Use the Right Tools and Materials
Using the right tools and materials is vital when wiring your Ultima motorcycle. Invest in high-quality wires, connectors, and soldering equipment to ensure a secure and reliable connection. Additionally, make sure you have wire strippers, crimping tools, and heat shrink tubing to properly terminate and protect your wiring connections.
3. Label Your Wires
Labeling your wires is a simple yet effective way to avoid confusion during the wiring process. Use adhesive labels or colored electrical tape to clearly mark each wire’s function or connection point. This will save you time and headaches when troubleshooting or performing future maintenance.
4. Follow the Wiring Diagram

Ultima motorcycles usually come with a wiring diagram specific to the model. Consult the wiring diagram carefully and follow it step by step. The wiring diagram will provide you with the necessary guidance and ensure that you make the correct connections.
5. Test Your Connections
Once you have completed the wiring process, it is crucial to test your connections before fully reassembling the motorcycle. Use a multimeter to test the continuity and voltage at various connection points. This will help you identify any faulty connections or components before hitting the road.
By following these tips, you can properly wire your Ultima motorcycle and ensure a reliable and safe electrical system. Take your time, double-check your connections, and don’t rush through the process. Good luck!
Conclusion
In conclusion, finding the right Ultima wiring diagram for your motorcycle model is crucial for proper installation and troubleshooting. Whether you are a seasoned mechanic or a DIY enthusiast, having access to accurate and detailed wiring diagrams can save you time, money, and frustration.
During your search, make sure to consider the year, make, and model of your Ultima motorcycle, as well as any specific modifications or customizations you have made. This will help you narrow down your options and ensure that you find a wiring diagram that matches your specific needs.
Once you have found the right Ultima wiring diagram, take the time to carefully study and understand it. Pay attention to the colors, symbols, and connections, as well as any additional notes or instructions provided. This will enable you to confidently install, repair, or modify the electrical system of your motorcycle.
Remember, when working with electrical systems, it is important to exercise caution and follow proper safety protocols. If you are unsure about any aspect of the wiring diagram or feel uncomfortable performing the necessary tasks, it is always best to seek the assistance of a professional. They can provide guidance, ensure proper installation, and help prevent any potential damage to your motorcycle or personal injury.
By utilizing the right Ultima wiring diagram and taking the necessary precautions, you can effectively maintain and enhance the electrical system of your motorcycle, allowing you to enjoy a safe and reliable riding experience.