
If you are looking to upgrade your home lighting system, Lutron 3-way switch wiring is an excellent option to consider. Lutron is a leading brand in the lighting control industry, and their 3-way switches are designed to provide convenience, energy efficiency, and a stylish look to any room.
So, what exactly is a 3-way switch? In simple terms, it allows you to control a single light fixture from two different locations. This is particularly useful in large rooms or long hallways where one switch may not be easily accessible. With Lutron’s 3-way switch, you can easily control your lights from either end of the room.
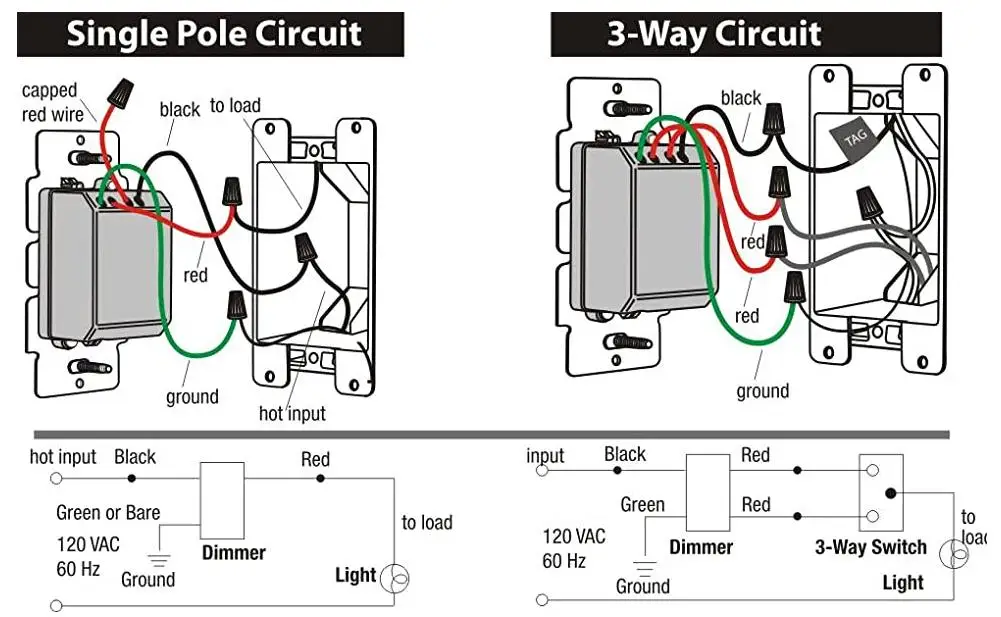
But how does the wiring process work? Lutron 3-way switch wiring is relatively straightforward, even for those with little electrical experience. The kit typically includes two switches – one for each location – as well as a 3-way dimmer switch for added versatility. The wiring itself involves connecting the switches to the power source, as well as to the light fixture, using specific color-coded wires.
In summary, Lutron 3-way switch wiring is a simple yet effective solution for controlling your home lighting system from multiple locations. With convenient features like dimming capabilities and easy installation, these switches offer an upgrade to traditional lighting control methods. Whether you are looking to enhance your home’s functionality or simply add a touch of sophistication to your living space, Lutron 3-way switch wiring is worth considering.
Lutron 3-Way Switch Wiring

When it comes to controlling your lights, Lutron 3-way switches offer a convenient and flexible solution. These switches allow you to control the lights from multiple locations, making it easy to turn them on or off from different parts of your home. Understanding how to correctly wire a Lutron 3-way switch is essential for proper installation and functionality.
A Lutron 3-way switch consists of two switches and one light fixture. The switches are located in different locations, and they are connected together to control the light. One switch is the “master” switch, while the other is the “remote” switch. The master switch is usually installed near the light fixture, while the remote switch can be placed in a different room or hallway.
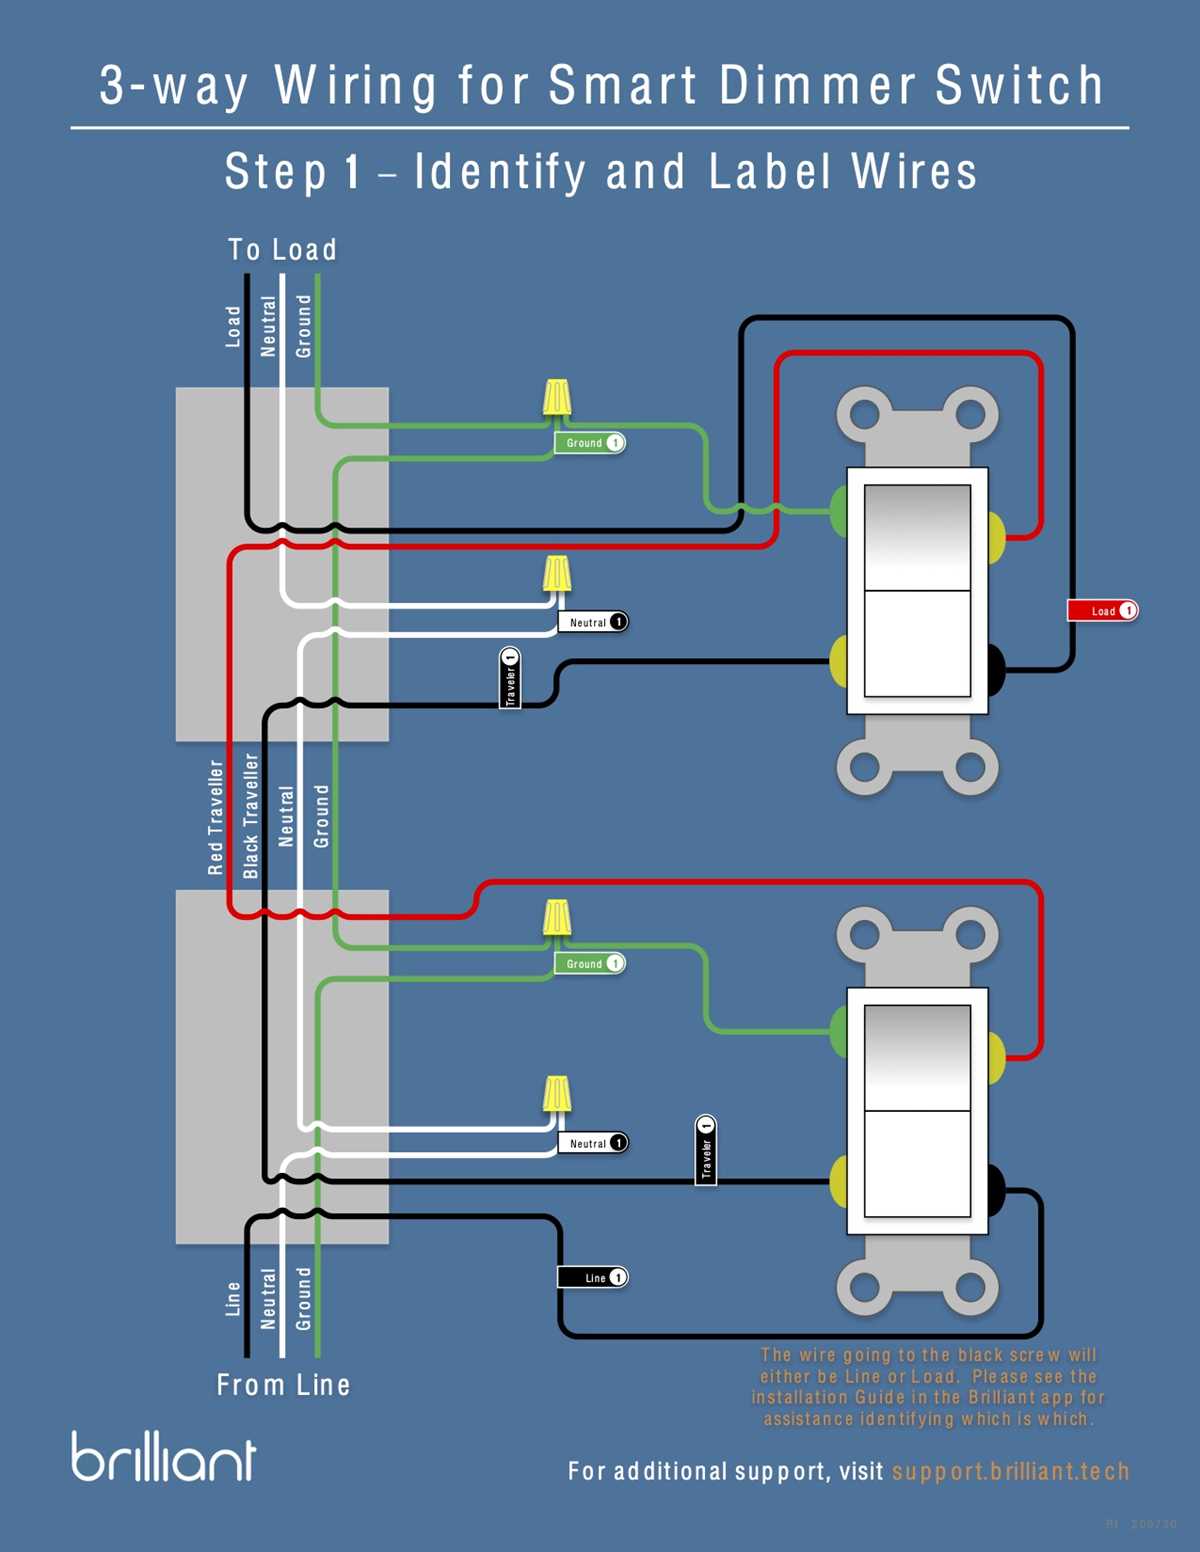
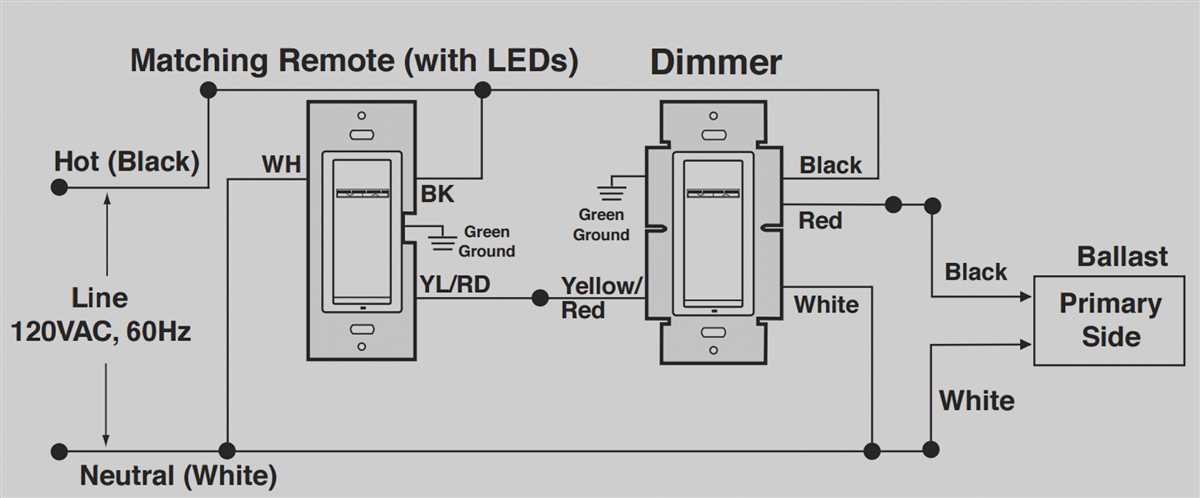
To properly wire a Lutron 3-way switch, you will need to follow a specific wiring diagram provided by Lutron. This diagram is specific to the model of switch you are using and will show you which wires need to be connected to each terminal. It’s important to carefully follow the diagram to ensure proper installation and avoid any electrical issues.
When wiring a Lutron 3-way switch, it’s important to turn off the power to the circuit before beginning any work. This can be done by flipping the circuit breaker for that particular circuit. Once the power is turned off, you can begin wiring the switch according to the diagram.
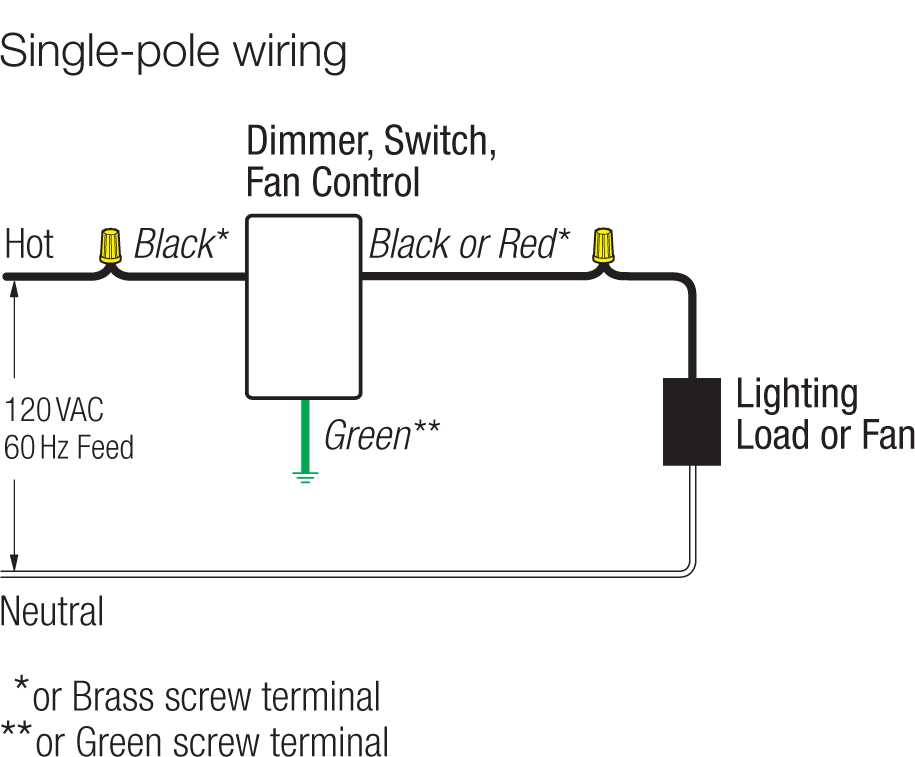
- Start by connecting the black wire from the power source to the common terminal of the master switch.
- Connect the black wire from the light fixture to the common terminal of the remote switch.
- Connect the white wire from the power source to the white wire from the light fixture.
- Connect the red and black traveler wires from the master switch to the corresponding traveler terminals on the remote switch.
- Finally, connect the ground wires from the power source, light fixture, and switches together.
Once all the wires are securely connected, you can turn the power back on and test the switches. If everything is wired correctly, you should be able to control the light from both switches. If the light does not turn on or you encounter any issues, double-check your wiring and consult the Lutron instructions for troubleshooting tips.
In summary, wiring a Lutron 3-way switch requires following a specific diagram provided by Lutron. Properly connecting the wires and following safety precautions are essential for a successful installation and functioning switches. With the ability to control your lights from multiple locations, Lutron 3-way switches offer convenience and flexibility in your home lighting system.
What is 3-Way Switch Wiring?
3-way switch wiring is a method of connecting and controlling lighting fixtures from two different locations using two switches. It is commonly used in staircases, hallways, and large rooms where multiple switches are needed to control the same set of lights.
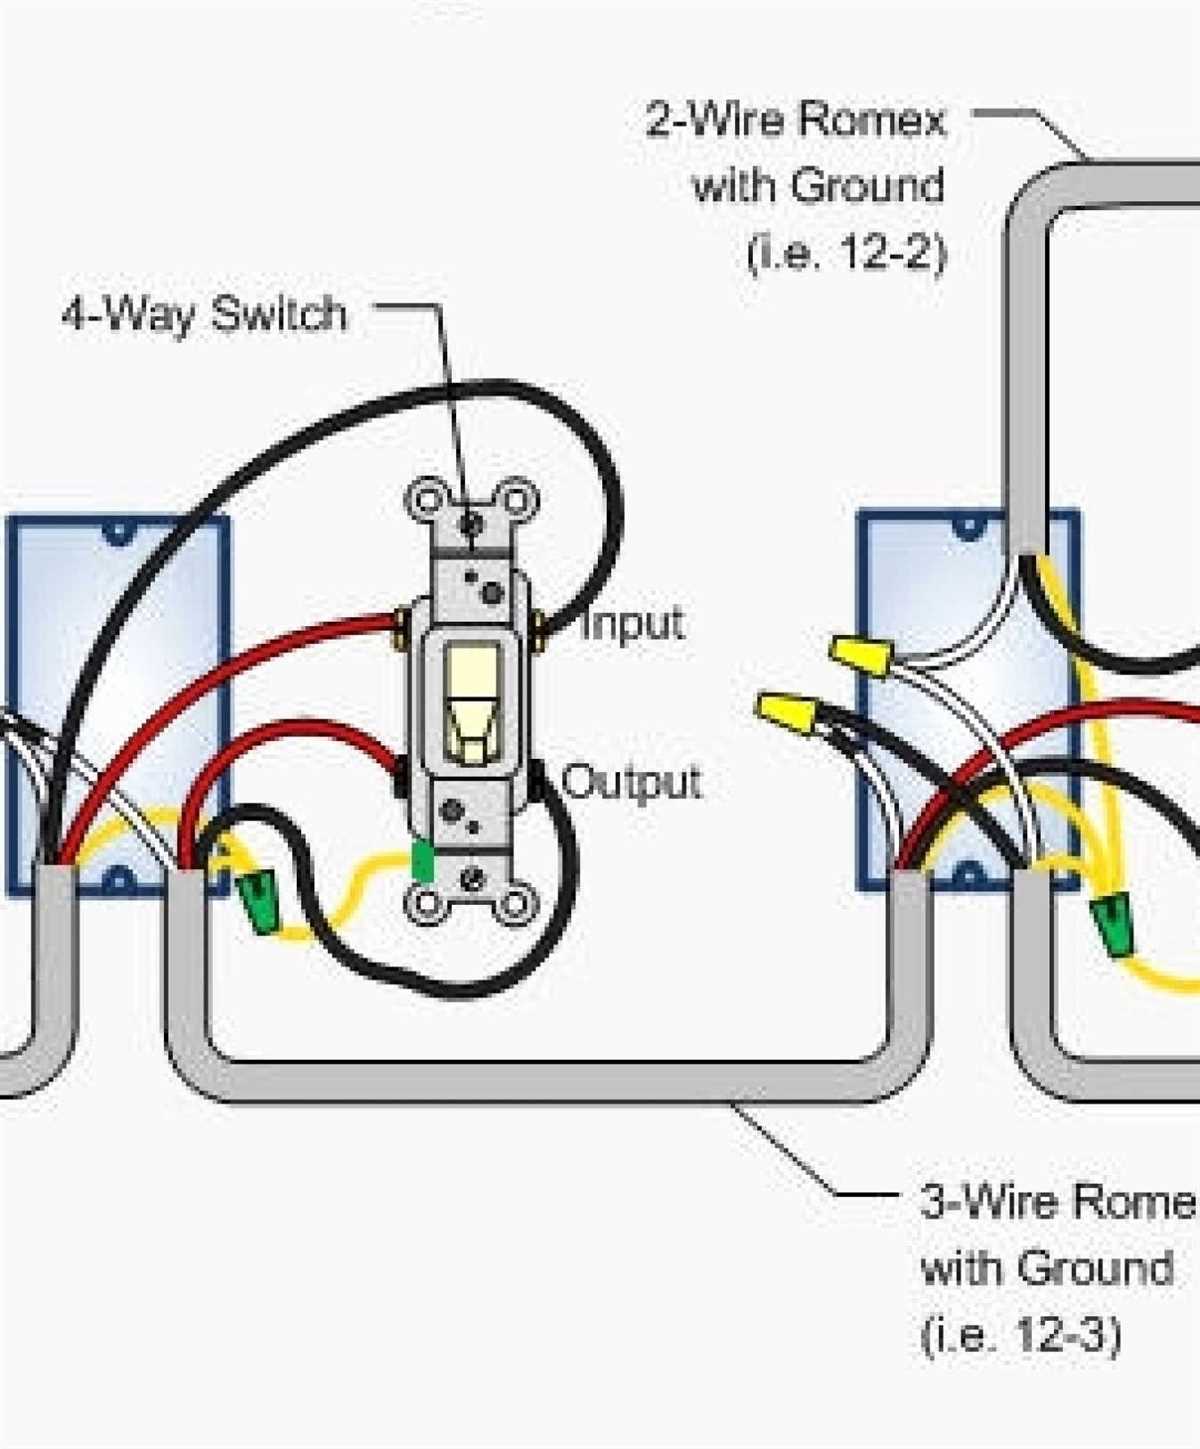
To understand how 3-way switch wiring works, let’s break it down. In a typical setup, there are two switches: one at each end of the circuit. The power source is connected to the common terminal of the first switch, and the other two terminals are connected to the traveler wires. The traveler wires then connect to the corresponding terminals on the second switch.
In this configuration, both switches can be used to turn the lights on and off. When one switch is toggled, it sends a signal through the traveler wires to the other switch, which then changes the state of the lights. This allows you to control the lights from either location, providing convenience and flexibility.
3-way switch wiring is often labeled as “line,” “load,” and “traveler” to differentiate between the different terminals and wires. It requires careful wiring and proper installation to ensure everything is connected correctly and the switches work as intended.
In conclusion, 3-way switch wiring is a way to control lighting fixtures from two different locations using two switches. It provides convenience and flexibility, allowing you to turn the lights on and off from either switch. Proper understanding and installation of the wiring are crucial to ensure the system functions correctly and safely.
Understanding the Components
In order to properly wire a Lutron 3-way switch, it is important to understand the different components involved in the installation process. These components include the switch itself, the switchplate, and the wiring connectors.
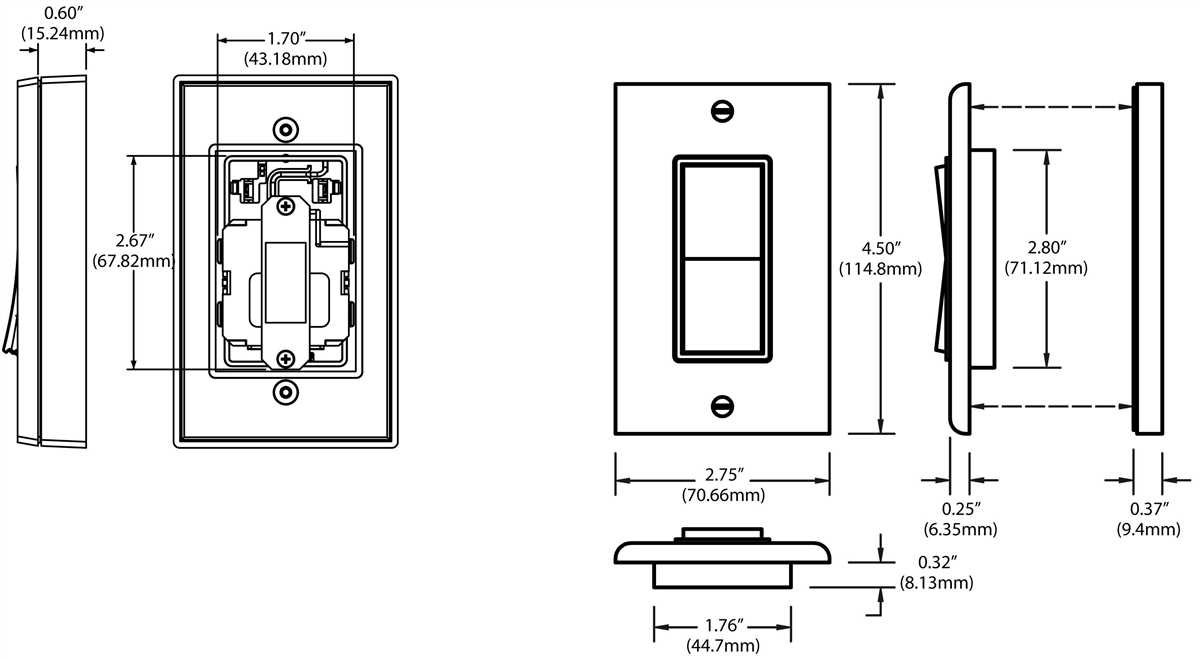
The Lutron 3-way switch is a key component of the system, as it allows for control of a light or group of lights from multiple locations. This type of switch is designed to work in conjunction with other switches to create a three-way lighting system. The Lutron switch is typically a square or rectangular device, with two or three small buttons on the front for controlling the lights.
The switchplate is another important component of the Lutron 3-way switch system. This plate is typically made of plastic or metal and is used to cover the electrical box that houses the switch. The switchplate not only serves a functional purpose by protecting the wiring connections, but it also provides a finishing touch to the overall look of the switch.
Finally, the wiring connectors are essential for properly connecting the switch to the electrical system. These connectors are typically small plastic parts that allow for secure and reliable connections between the switch and the wires. It is important to use the appropriate wiring connectors for the specific type of switch and wire being used to ensure a safe and effective installation.
Overall, understanding the different components of a Lutron 3-way switch system is crucial for a successful installation. By familiarizing yourself with the switch, switchplate, and wiring connectors, you can ensure that your wiring project is completed correctly and provides the desired functionality for controlling your lights.
Step-by-Step Guide to Lutron 3-Way Switch Wiring
Wiring a Lutron 3-way switch may seem complicated at first, but with the right instructions, it can be easily accomplished. Follow this step-by-step guide to ensure a successful installation.
Step 1: Gather the necessary tools and materials
- Lutron 3-way switch kit
- Wire stripper
- Screwdriver
- Electrical tape
- Wire nuts
Step 2: Turn off the power
Before starting any electrical work, it is important to turn off the power to the circuit you will be working on. Locate the circuit breaker or fuse box and switch off the power to the specific circuit.
Step 3: Remove the existing switches
Remove the cover plate from the existing switches and unscrew them from the electrical box. Disconnect the wires connected to the switches and separate them for later use.
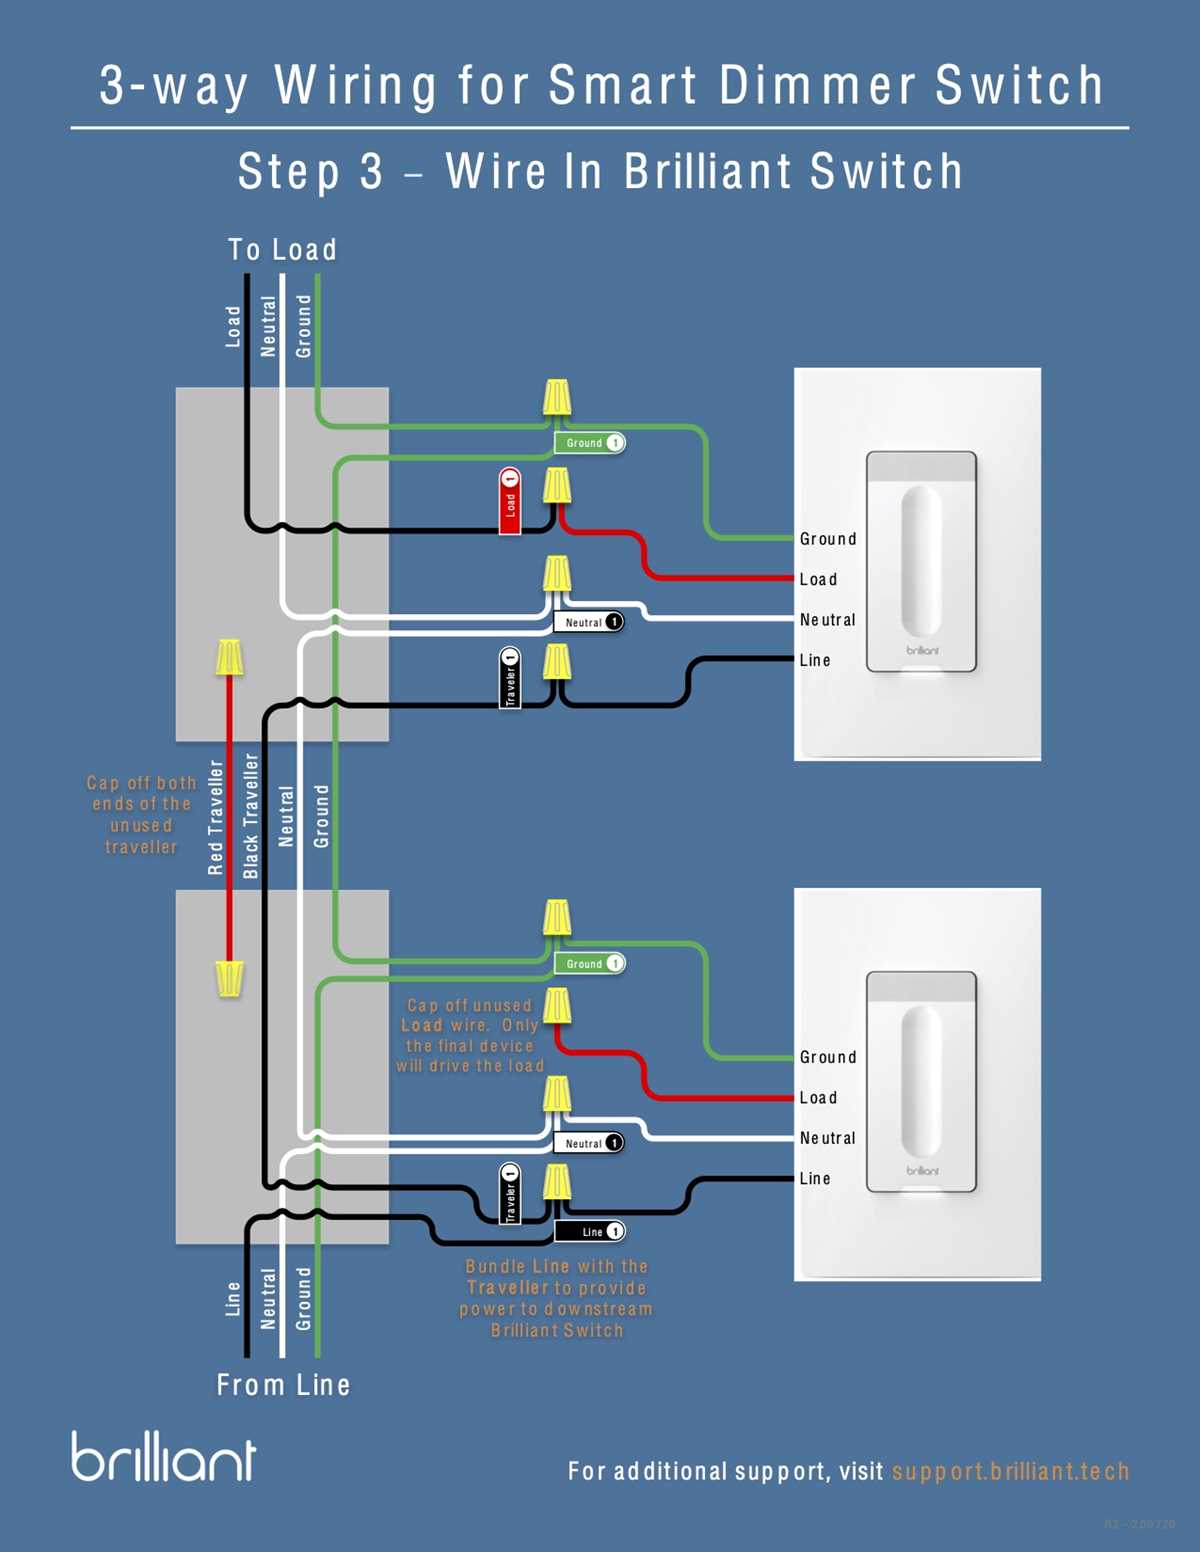
Step 4: Install the new Lutron 3-way switch
Follow the manufacturer’s instructions to install the Lutron 3-way switch. Connect the wires from the existing circuit to the corresponding terminals on the new switch. Use wire nuts to securely connect the wires.
Step 5: Install the companion switch
If your setup requires a companion switch, follow the manufacturer’s instructions to install it. Connect the wires from the existing circuit to the corresponding terminals on the companion switch using wire nuts.
Step 6: Test the switches
Once the switches are installed, restore power to the circuit and test the switches to ensure they are functioning properly. Flip the switches and observe the lights or other electrical devices connected to the circuit to verify the correct operation.
Step 7: Secure the switches and cover plate
Once the switches are tested and functioning correctly, secure them to the electrical box using the provided screws. Replace the cover plate to complete the installation.
Step 8: Label the switches
Using a label maker or tape and a marker, label each switch to indicate its function. This will make it easier to remember which switch controls which lights or devices in your home.
Following these steps will help you successfully wire a Lutron 3-way switch and enjoy the convenience of controlling your lights or other electrical devices from multiple locations.
Tips and Considerations
When wiring a Lutron 3-way switch, there are a few tips and considerations to keep in mind to ensure proper installation and functionality. These switches allow you to control a single light fixture from multiple locations, providing convenience and flexibility.
1. Familiarize yourself with the wiring diagram: Before starting the installation process, it is important to carefully review the wiring diagram provided by Lutron. This will help you understand the correct wiring connections and ensure that you wire the switch correctly.
2. Identify the common wire: In a 3-way switch setup, one wire serves as the common wire, while the other two are called traveler wires. It is crucial to identify the common wire before making any wiring connections. Typically, the common wire will be a different color from the traveler wires.
3. Use proper wire connectors: When connecting the wires, it is important to use appropriate wire connectors to ensure a secure and reliable connection. Twist-on wire connectors or push-in wire connectors are commonly used for this purpose. Make sure to strip and expose enough wire to make a secure connection.
4. Test the switch before finalizing the installation: After wiring the switch, it is recommended to test it before proceeding with the final installation. This can be done by turning on the power and checking if the switch functions as intended. If any issues are encountered, double-check the wiring connections and consult the wiring diagram.
5. Consider the load capacity: Lutron 3-way switches have a specified load capacity, which refers to the maximum amount of electrical current they can handle. It is important to consider the load capacity of the switch and ensure that it is compatible with the light fixture or devices being controlled.
6. Follow safety precautions: Always ensure that the power is turned off before starting any electrical work. Use appropriate safety gear, such as gloves and safety glasses, to protect yourself during the installation process. If you are unsure about any step of the wiring process, it is advisable to consult a professional electrician.
By following these tips and considerations, you can successfully wire a Lutron 3-way switch and enjoy the convenience of controlling your light fixture from multiple locations.
Common Mistakes to Avoid
When it comes to wiring a Lutron 3-way switch, there are a few common mistakes that people often make. These mistakes can lead to problems with the switch not working properly or even pose a risk of electrical hazards. In order to avoid these issues, it is important to be aware of the common mistakes and take precautions to prevent them.
1. Incorrect Wiring Connections
One of the most common mistakes is making incorrect wiring connections. It is crucial to follow the manufacturer’s instructions and ensure that the wires are properly connected to the switch. This includes making sure the hot wire is connected to the common terminal, the traveler wires are connected to the appropriate terminals, and the ground wire is properly connected.
2. Using the Wrong Type of Switch
Another mistake is using the wrong type of switch for the 3-way configuration. Lutron 3-way switches require a specific type of switch that allows for control of the lights from multiple locations. Using a regular single-pole switch instead of a 3-way switch will not provide the desired functionality and can cause issues with the wiring.
3. Overloading the Switch
It is important to consider the load capacity of the switch and avoid overloading it. Each switch has a maximum wattage rating, and exceeding this limit can cause the switch to malfunction or even pose a fire hazard. Make sure to properly calculate the wattage of the lights or devices connected to the switch and choose a switch with a suitable wattage rating.
4. Neglecting Grounding
Another common mistake is neglecting proper grounding. Grounding is crucial for preventing electrical shocks and providing a safe electrical system. Make sure to properly connect the ground wire and ensure it is securely fastened to a suitable grounding point. Neglecting grounding can lead to safety hazards and may even fail an electrical inspection.
5. Failing to Test the Switch
Lastly, one of the mistakes often made is failing to test the switch after installation. It is important to test the switch to ensure that it is working properly and all connections are secure. This can be done by turning the switch on and off and verifying that the lights respond accordingly. Testing the switch will help identify any issues or mistakes that may require correction.
By avoiding these common mistakes, you can ensure the proper installation and functioning of your Lutron 3-way switch. Remember to always follow the manufacturer’s instructions and take necessary precautions to ensure safety and functionality.
Troubleshooting Lutron 3-Way Switch Wiring
Despite following the correct wiring procedures for Lutron 3-way switches, there may be instances where problems arise. In this section, we will discuss some common troubleshooting steps to help you identify and fix issues with your Lutron 3-way switch wiring.
1. Check the Wiring Connections
The first step in troubleshooting your Lutron 3-way switch wiring is to verify the wiring connections. Ensure that all wires are properly connected to their respective terminals and that there are no loose or disconnected wires. Double-check your wiring against the Lutron installation instructions to make sure it aligns with their recommended wiring configuration.
2. Verify Power Supply
Confirm that there is a stable power supply to the switch. Check the circuit breaker or fuse panel to see if any breakers have tripped or fuses have blown. If necessary, reset the breaker or replace the fuse. Also, use a voltage tester to check if there is power at the switch terminals.
3. Test the Switch
If the wiring connections and power supply are verified, the next step is to test the switch itself. Follow these steps:
- Turn off the power to the switch at the circuit breaker or fuse panel.
- Remove the switch cover plate and ensure that the wiring is secure.
- Use a multimeter or continuity tester to check for continuity across the switch terminals. If there is no continuity, the switch may be faulty and needs to be replaced.
- If the switch passes the continuity test, reassemble the switch and turn on the power.
4. Seek Professional Help
If you are unable to identify or resolve the issue with your Lutron 3-way switch wiring, it is advisable to seek professional assistance. An electrician with expertise in switch wiring can diagnose and fix the problem, ensuring your switch operates safely and correctly.
Remember, troubleshooting electrical wiring should always be done with caution. If you are unsure or inexperienced, it is best to consult a professional to avoid any potential hazards or further damage.