
LED strip lights have become increasingly popular in recent years for their versatility and energy efficiency. Whether you’re looking to add ambient lighting to your home, create a stunning light display for a special event, or provide functional lighting for your outdoor space, LED strip lights are a great option. One of the key considerations when using LED strip lights is how to power them, and wiring them to a 12V battery is a common choice.
Wiring LED strip lights to a 12V battery is a straightforward process that can be done by anyone with basic electrical knowledge. The first step is to choose the appropriate type and length of LED strip lights for your project and ensure they are compatible with a 12V power supply. LED strip lights typically come with a positive wire and a negative wire, which need to be connected to the battery to complete the circuit.
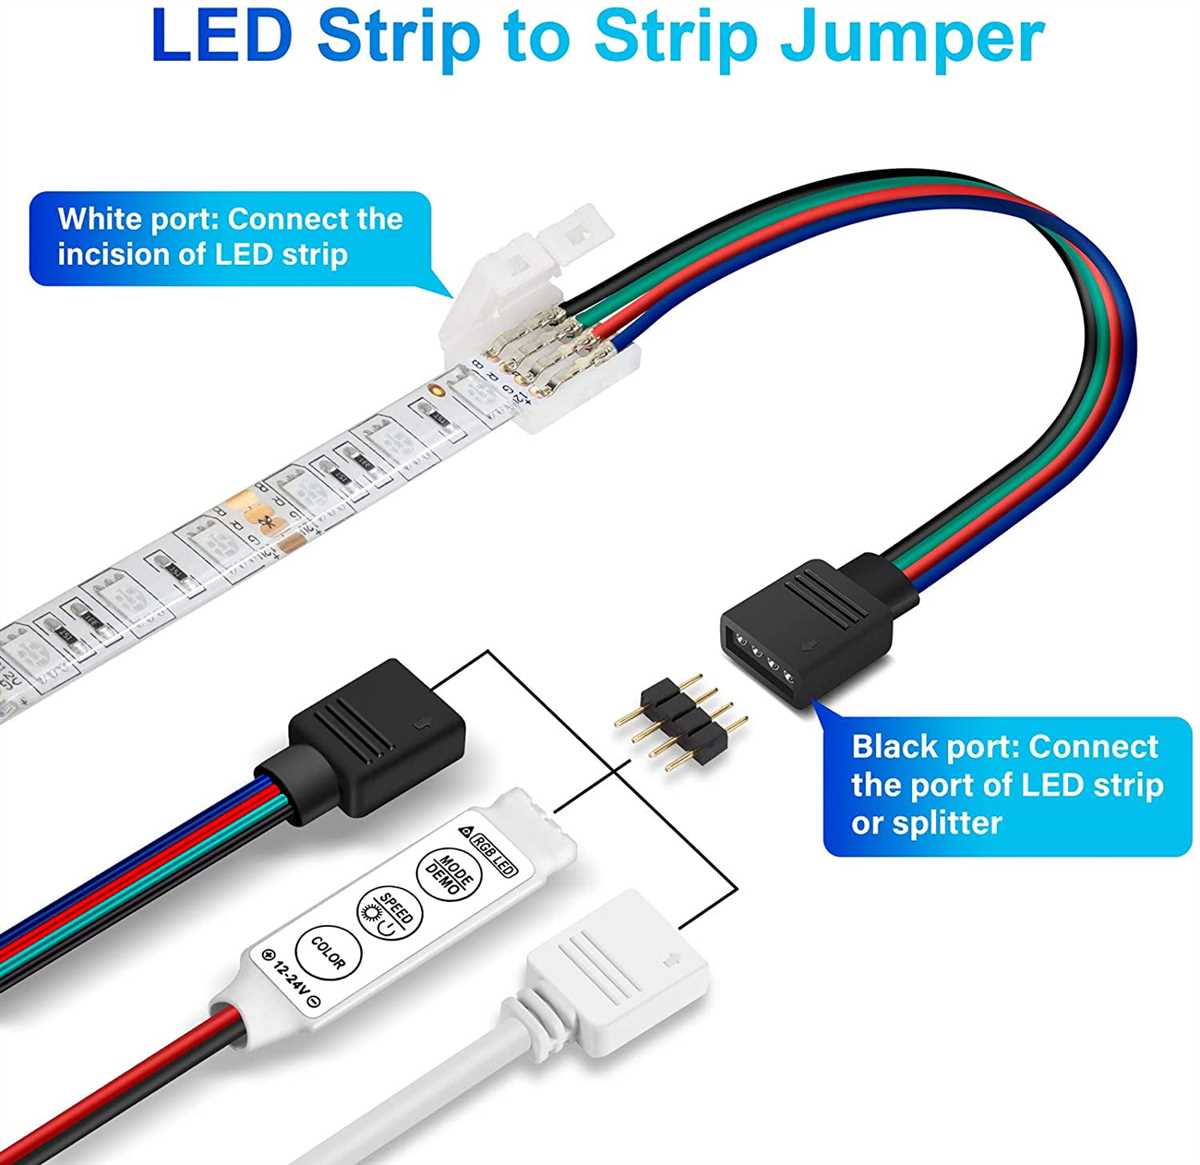
When wiring the LED strip lights to the battery, it is important to use the correct connectors and wires to ensure a secure and reliable connection. It is recommended to use wires with a gauge that can handle the current required by the LED strip lights. Additionally, using connectors that are specifically designed for LED strip lights can help prevent any loose connections or potential electrical hazards.
Once the LED strip lights are connected to the 12V battery, they can be controlled using a separate controller or dimmer switch. This allows you to adjust the brightness, color, and effects of the LED strip lights to suit your needs and preferences. With the right wiring and setup, you can create a beautiful lighting display that enhances the atmosphere of any space.
How to Wire LED Strip Lights to a 12V Battery
LED strip lights are a popular and versatile lighting option for various applications. Whether you want to add some ambiance to your home or enhance the visibility of your workspace, LED strip lights provide a bright and customizable solution. To power these lights, you can easily wire them to a 12V battery, making them portable and easy to use in any location.
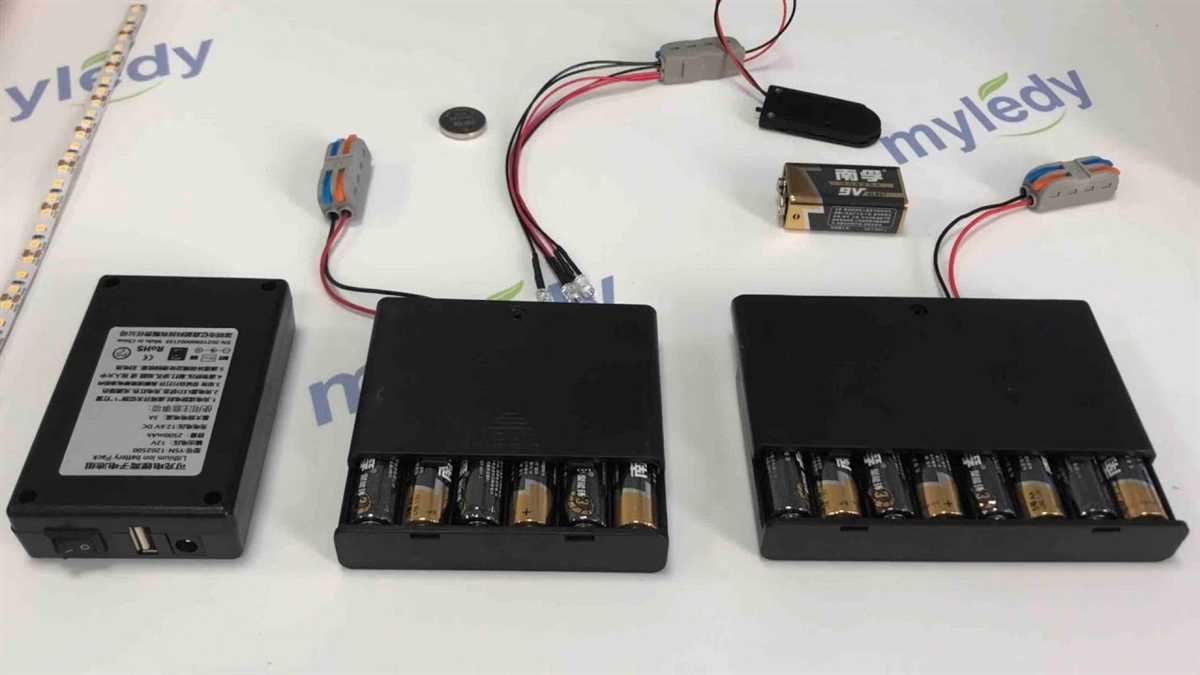
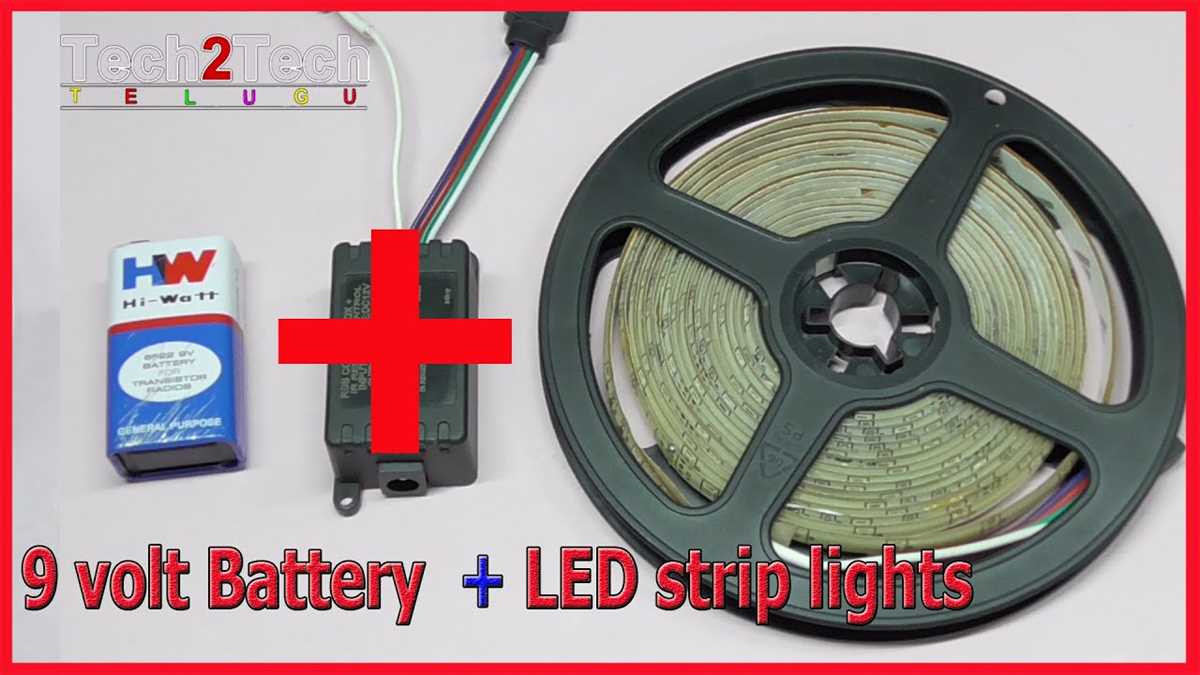
To wire LED strip lights to a 12V battery, you’ll need a few basic materials. These include the LED strip lights, a 12V battery, a power switch, and some wire connectors. Before starting the wiring process, make sure to turn off the battery and disconnect it from any power source to avoid any accidents.
First, determine the required length of LED strip lights for your project and cut them accordingly. Next, identify the positive and negative terminals on both the LED strip lights and the 12V battery. Connect the positive terminal of the LED strip lights to the positive terminal of the battery using a wire connector, ensuring a secure connection.
Similarly, connect the negative terminal of the LED strip lights to the negative terminal of the battery using another wire connector. This completes the basic wiring of the LED strip lights to the 12V battery.
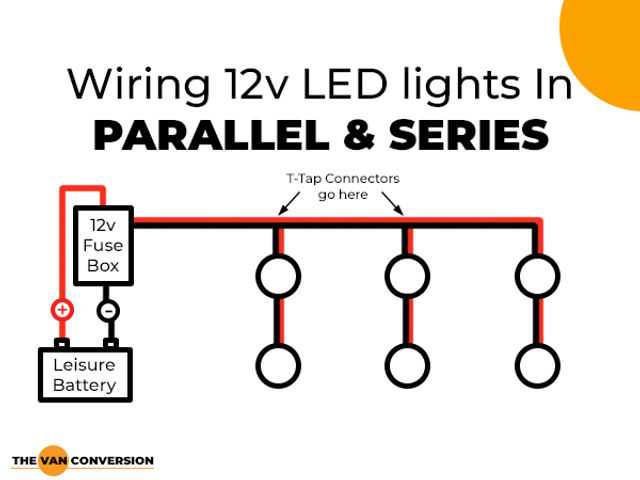
If you want to add a power switch to easily turn the lights on and off, you can connect it between the positive terminal of the battery and the positive terminal of the LED strip lights. This allows you to control the power supply to the lights without having to constantly disconnect the battery.
It’s essential to double-check all the connections before testing the functionality of your wired LED strip lights. Once you’re satisfied with the wiring, reconnect the battery to its power source and turn it on. The LED strip lights should illuminate brightly, creating a vibrant and captivating lighting effect.
Choosing the Right LED Strip Lights
LED strip lights are a versatile and energy-efficient lighting option that can be used for various purposes, such as creating ambiance, accentuating architectural features, or providing functional lighting in specific areas. When choosing LED strip lights, there are several factors to consider to ensure you get the right product for your needs.
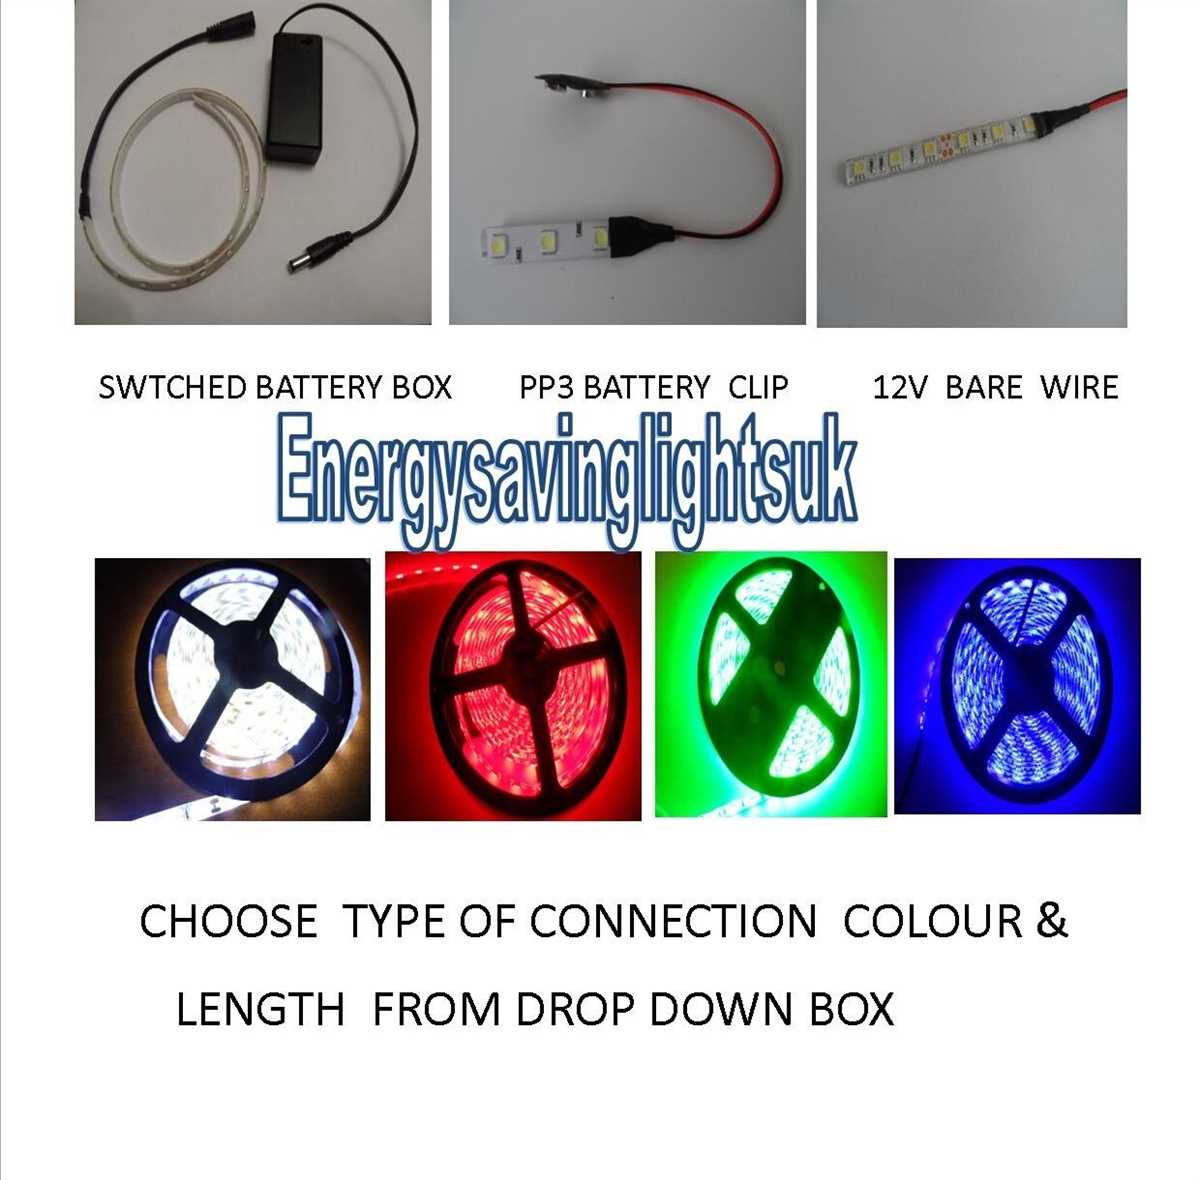
1. Color Temperature: LED strip lights come in different color temperatures, ranging from warm white to cool white. The color temperature can have a significant impact on the overall atmosphere and mood of the space. Warm white is often used for creating a cozy and inviting ambiance, while cool white is commonly used for task lighting or in areas where a bright and crisp light is needed.
2. Brightness: The brightness of LED strip lights is measured in lumens. Before choosing a light strip, consider the desired level of brightness required for your specific application. If you need functional lighting, such as for a workspace or kitchen counter, opt for a higher lumen output. For decorative or ambient lighting, a lower lumen output may be sufficient.
3. IP Rating: If you plan to install LED strip lights in areas where they may come into contact with moisture or dust, it is essential to consider the Ingress Protection (IP) rating. The IP rating indicates the level of protection against solids and liquids. For example, an IP65-rated strip light is dust-tight and protected against low-pressure water jets, making it suitable for outdoor use or in environments where moisture or dust may be present.
4. Length and Cutability: LED strip lights come in various lengths, and some models can be customized by cutting them at designated cut points. Consider the length of the area you need to illuminate and ensure the strip light can be easily cut to fit your specific requirements. Some strip lights may also have solder pads or connectors for easy installation and extension.
5. Power Source Compatibility: LED strip lights typically operate on low voltage, most commonly 12V or 24V. Before purchasing, ensure that the strip light is compatible with your power source, such as a 12V battery or transformer. Additionally, consider the wattage and power consumption of the strip light to ensure it can be safely powered by your chosen power source.
Gathering the Necessary Materials
Before you can begin wiring LED strip lights to a 12V battery, you will need to gather a few essential materials. These materials will ensure that you have everything you need to successfully complete the wiring process.
The first and most important material you will need is, of course, the 12V battery itself. Make sure you have a fully charged battery before proceeding, as this will ensure that your LED strip lights have sufficient power to operate.
Next, you will need the LED strip lights. These lights are available in various lengths and colors, so choose the ones that best suit your needs. It’s important to double-check the voltage requirements of the LED strip lights to ensure they are compatible with the 12V battery.
In addition to the 12V battery and LED strip lights, you will also need some basic tools and accessories. These may include wire cutters, wire strippers, soldering iron, solder, heat shrink tubing, electrical tape, and connectors. These tools and accessories will allow you to properly connect and secure the wiring of the LED strip lights.
Once you have gathered all the necessary materials, you will be ready to proceed with wiring the LED strip lights to the 12V battery. It’s important to follow safety precautions and double-check all connections to ensure a safe and effective installation. With the right materials and proper wiring, you can enjoy the beautiful illumination of LED strip lights powered by a 12V battery.
Preparing the LED Strip Lights
Before wiring the LED strip lights to a 12V battery, it is important to properly prepare the lights to ensure they are ready for installation. Here are some steps to follow:
1. Check the LED Strip Lights
Inspect the LED strip lights to ensure they are in good condition and working properly. Look for any visible damage, such as torn or detached wires, broken LEDs, or other signs of wear and tear. If any issues are found, it may be necessary to repair or replace the lights before proceeding.
2. Measure and Cut the Strip Lights
Measure the length of LED strip lights required for your project and cut them to the desired size. Many LED strip lights come with cutting points marked along the length of the strip, making it easy to trim them to the desired length. Use scissors or a sharp knife to make a clean cut along the marked cutting point.
3. Clean the Surface
Before attaching the LED strip lights to the desired surface, it is important to clean the surface thoroughly. Use a mild cleanser or rubbing alcohol to remove any dirt, dust, or grease from the surface. This will ensure a strong bond between the LED strip lights and the surface, preventing them from falling off over time.
4. Attach Mounting Clips or Adhesive
Depending on the type of LED strip lights you have, you may need to attach mounting clips or use adhesive to secure them in place. Some LED strip lights come with built-in adhesive backing, while others require the use of mounting clips or other attachment methods. Follow the instructions provided with your LED strip lights to properly attach them to the surface.
5. Test the Lights
After preparing the LED strip lights, connect them to a 12V power source to test if they are functioning correctly. This will allow you to identify any issues or defects before permanent installation. Make sure to follow the instructions provided with the LED strip lights for proper wiring and connection to the power source.
By following these steps and properly preparing the LED strip lights, you can ensure a successful wiring and installation process, providing a bright and colorful lighting solution for your project.
Connecting the LED Strip Lights to the 12V Battery
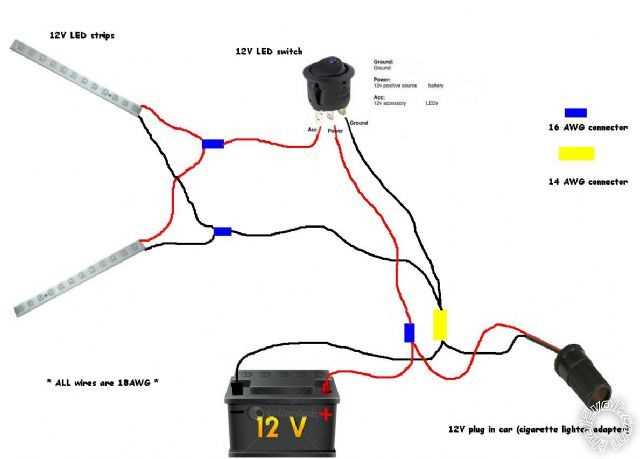
When it comes to connecting LED strip lights to a 12V battery, there are a few important steps to follow to ensure a safe and efficient installation. Before getting started, make sure you have all the necessary materials including the LED strip lights, a 12V battery, a fuse holder, an on/off switch, and some wire connectors.
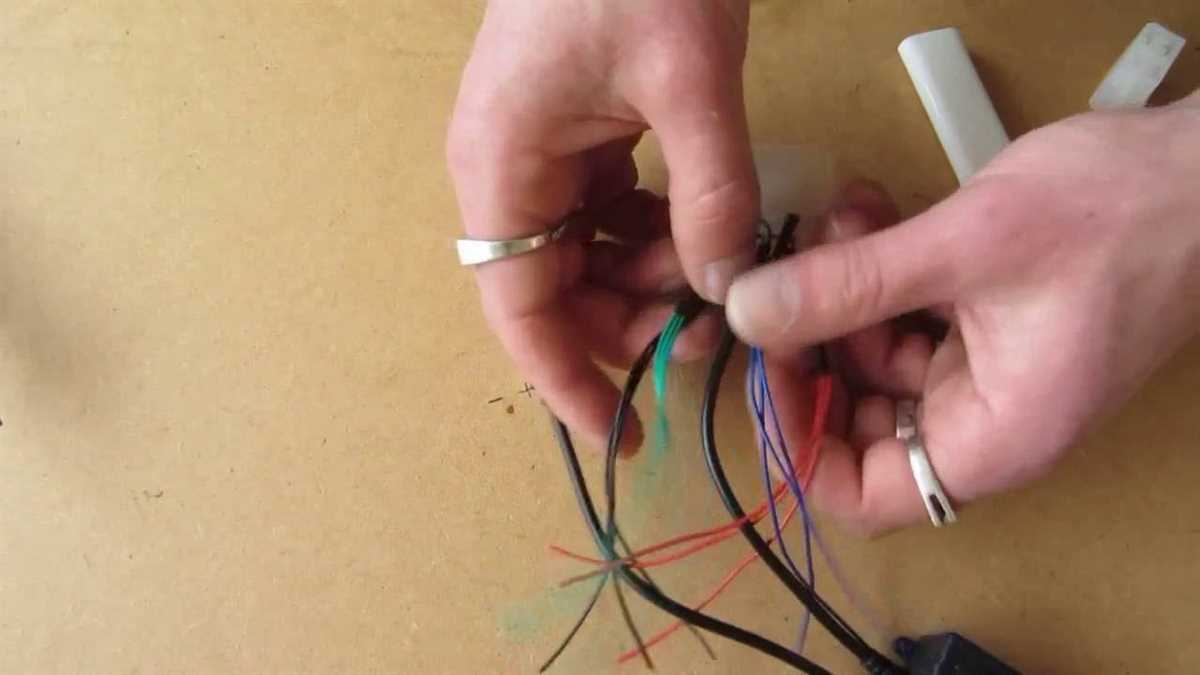
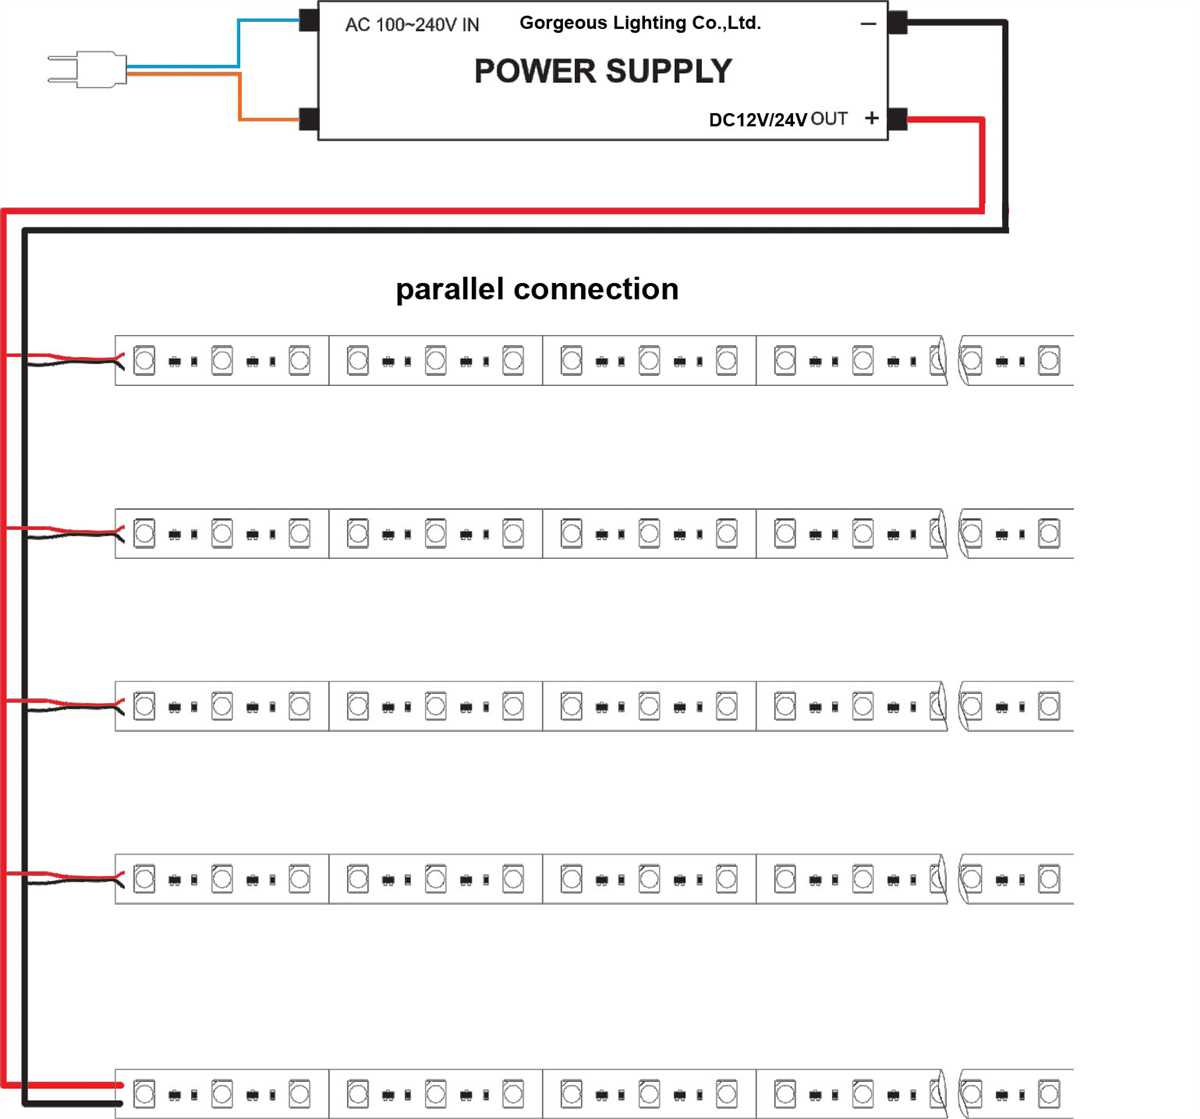
The first step is to identify the positive and negative terminals of both the LED strip lights and the 12V battery. The positive terminal is usually indicated by a “+” symbol, while the negative terminal is indicated by a “-” symbol. It’s important to connect the positive terminals together and the negative terminals together to ensure the lights function properly.
Next, cut the LED strip lights to the desired length and attach wire connectors to both ends. The wire connectors will allow you to easily attach the LED strip lights to the battery without the need for soldering. Make sure to connect the positive terminal of the LED strip lights to the positive terminal of the battery, and the negative terminal of the LED strip lights to the negative terminal of the battery.
Once the LED strip lights are securely connected to the battery, it’s a good idea to install a fuse holder in-line with the positive wire. This will help protect the lights from any potential electrical shorts or overloads. Simply insert the positive wire into the fuse holder and connect the other end of the fuse holder to the positive terminal of the battery.
To control the on/off function of the LED strip lights, you can install an on/off switch in-line with the positive wire. This will allow you to easily turn the lights on and off without having to disconnect them from the battery. Simply insert the positive wire into one end of the switch and connect the other end of the switch to the positive terminal of the battery.
Once all the connections are made, double check that everything is secure and properly insulated. Avoid any exposed wires or loose connections that could cause a short circuit. Finally, test the LED strip lights to ensure they are functioning correctly before finalizing the installation.
Testing and Troubleshooting
After wiring the LED strip lights to a 12V battery, it is important to test the setup to ensure everything is working correctly. There are a few steps you can take to troubleshoot any issues that may arise.
1. Check the connections:
First, double-check all the connections to make sure they are secure. Inspect the wiring to ensure there are no loose or exposed wires. If any connections are loose, tighten them carefully. If you find any exposed wires, cover them with electrical tape to prevent short circuits.
2. Measure the voltage:
Using a multimeter, measure the voltage across the LED strip lights. Make sure the voltage matches the expected 12V. If the voltage is significantly lower, it could indicate a wiring issue or a problem with the battery. If the voltage is higher, it could potentially damage the LED strip lights.
3. Test the LED strip lights:
Connect the LED strip lights to the 12V battery and turn on the power. Check if the lights are functioning properly. If they are not turning on, check the connections and make sure the polarity is correct. LED strip lights usually have a positive and negative wire, so make sure they are connected to the corresponding terminals on the battery.
4. Inspect the controller:
If the LED strip lights are controlled by a separate controller, check the controller for any issues. Make sure it is receiving power and that the settings are properly configured. If the controller has a remote, ensure the batteries are not dead.
5. Consult the user manual:
If you are still experiencing issues, refer to the user manual for the LED strip lights, the battery, and the controller (if applicable). The manual may have specific troubleshooting steps or troubleshooting codes that can help identify and resolve the problem.
- Final Note:
If you are unable to resolve the issues after performing these troubleshooting steps, it may be best to seek assistance from a professional electrician or the manufacturer of the LED strip lights. They will have the expertise to diagnose and fix any complex problems that may be affecting the functionality of the lights.
Proper Maintenance and Safety Tips
Wiring LED strip lights to a 12v battery can be a great way to create portable lighting solutions for various applications. However, it is important to follow proper maintenance and safety tips to ensure the longevity of the lights and prevent any accidents or damages.
Maintenance Tips:
- Regularly clean the LED strip lights to remove dust and dirt build-up. This can be done using a soft, lint-free cloth or a gentle cleaning solution. Avoid using abrasive materials or harsh chemicals that may damage the lights.
- Inspect the wiring connections periodically to ensure they are secure and properly insulated. Loose or exposed wires can lead to short circuits or electrical shocks.
- Check the battery’s voltage regularly to ensure it is not depleted. Recharge or replace the battery as needed to maintain optimal performance.
- If you notice any flickering or dimming of the LED lights, check for loose connections or damaged wiring. Address any issues promptly to prevent further damage.
Safety Tips:
- Always use a fuse or circuit breaker to protect the LED strip lights and the battery from overloads or short circuits. This will help prevent overheating and potential fire hazards.
- Ensure that the wiring and connections are properly insulated and protected from moisture or water exposure. Use waterproof or weatherproof materials if the lights will be used in outdoor or wet environments.
- Do not exceed the recommended voltage and current specifications for the LED strip lights. This can cause the lights to overheat, shorten their lifespan, or even result in a safety hazard.
- If using the LED strip lights in a vehicle, make sure to connect them to the battery’s accessory circuit rather than the ignition circuit. This will prevent draining the vehicle’s battery when the engine is turned off.
By following these maintenance and safety tips, you can ensure the proper functioning of your LED strip lights and reduce the risk of accidents or damages. Remember to always read and follow the manufacturer’s instructions and consult a professional if you are unsure about any aspect of the installation or maintenance process.