
Installing a Nest thermostat can help you save energy and control the temperature of your home with ease. However, before you begin the installation process, it’s important to understand the wiring diagram specific to your HVAC system.
The Nest thermostat wiring diagram provides guidance on how to connect the wires from your HVAC system to the Nest thermostat. This diagram is crucial in ensuring a successful installation, as it helps you identify the correct terminals and wires for your specific system.
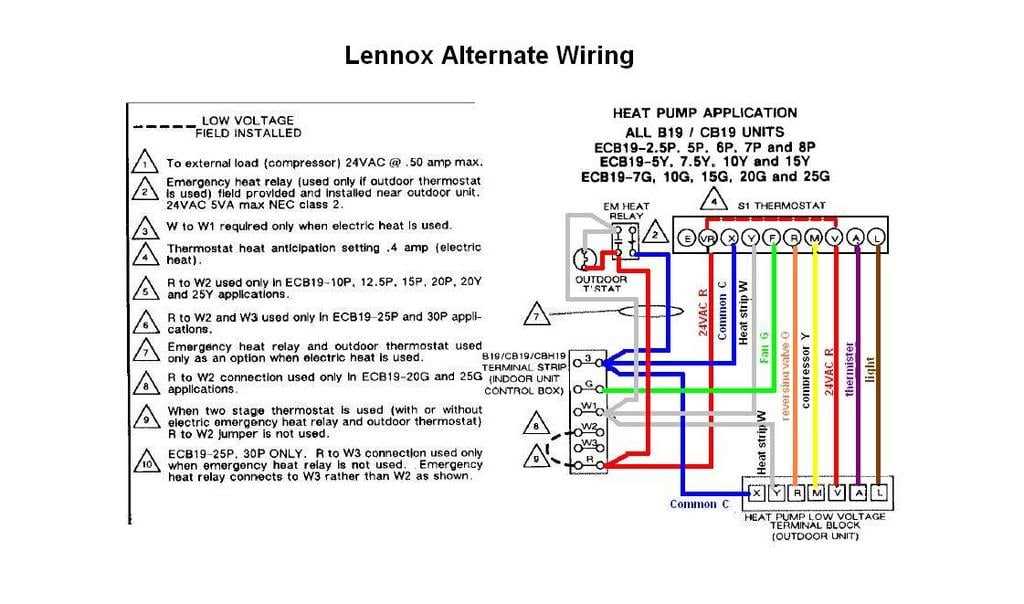
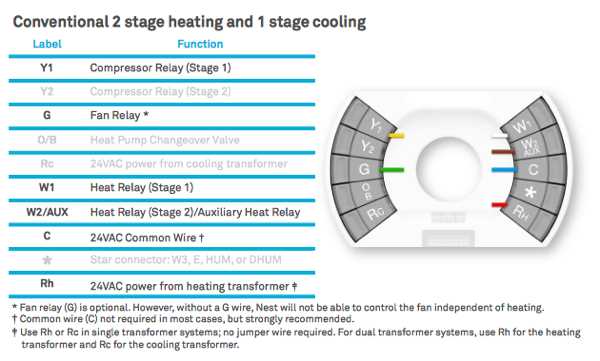
Typically, the Nest thermostat uses a standardized set of terminal labels, such as R, C, Y, W, G, and O/B, to indicate where each wire should be connected. However, it’s important to note that not all HVAC systems use the same terminal labels, so it’s essential to refer to your system’s wiring diagram to ensure proper installation.
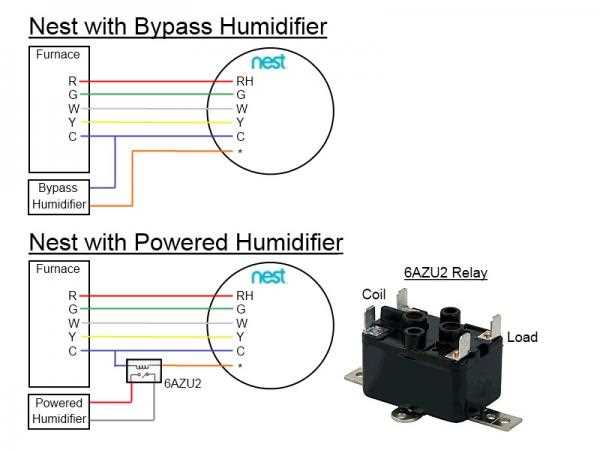
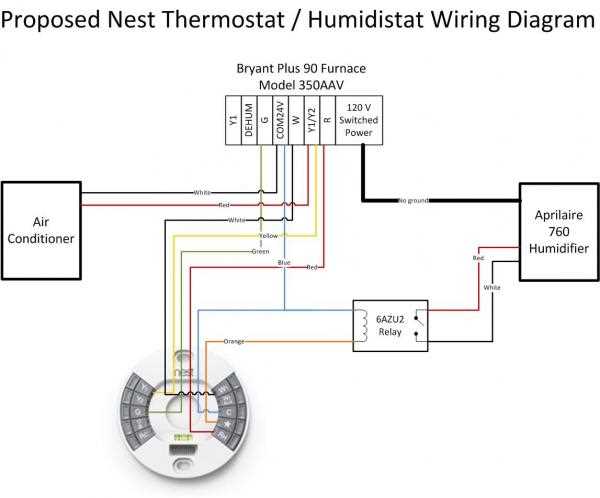
In addition to the terminal labels, the Nest thermostat installation wiring diagram also illustrates the specific wiring connections for features such as air conditioning, heat pumps, humidifiers, and more. This information is vital as it ensures that your Nest thermostat is properly configured and can perform all of its intended functions.
By referencing the Nest thermostat installation wiring diagram and following the provided instructions, you can confidently install your Nest thermostat and start enjoying the benefits of energy-efficient and customized temperature control in your home.
Nest Thermostat Installation Wiring Diagram: A Step-by-Step Guide for Easy Setup
Installing a Nest thermostat in your home can provide you with greater control over your heating and cooling system while also saving energy and reducing costs. However, figuring out the wiring can be a daunting task for some homeowners. That’s where a Nest thermostat installation wiring diagram comes in handy. This step-by-step guide will help you understand the different wires and their connections, making the installation process easy and stress-free.
1. Familiarize Yourself with the Wiring Diagram
Before you begin the installation, it’s essential to review the Nest thermostat installation wiring diagram specific to your system. The diagram will outline the different wires and terminals you will be working with, providing you with a clear understanding of how everything connects.
2. Shut Off the Power
Prior to working with any electrical wiring, it’s crucial to turn off the power to your heating and cooling system. Locate the circuit breaker connected to your HVAC system and switch it off to ensure your safety during installation.
3. Label the Existing Wires
Once the power is off, carefully remove the existing thermostat from the wall, taking note of the wires and their corresponding terminals. Label each wire with the corresponding letter or number, as indicated on the wiring diagram. This step will make it easier to connect the wires correctly to the Nest thermostat later.
4. Connect the Wires to the Nest Thermostat
Using the wiring diagram as a reference, connect each labeled wire to its designated terminal on the Nest thermostat. Push the wires into the connectors until they click into place and ensure a secure connection. The Nest thermostat will guide you through this process with on-screen instructions.
5. Attach the Nest Thermostat to the Wall
After wiring the thermostat, you can attach it to the wall using the provided screws and mounting plate. Make sure the thermostat is level and securely fastened to ensure optimal functionality.
6. Restore Power and Complete Set Up
Once the Nest thermostat is securely installed, restore power to your heating and cooling system by turning on the circuit breaker. The Nest thermostat will guide you through the setup process, prompting you to connect it to your Wi-Fi network and customize your preferences.
By following this step-by-step guide and referring to the Nest thermostat installation wiring diagram, you can easily install your Nest thermostat and enjoy the benefits of energy-efficient temperature control in your home.
Understanding the Basics: What is a Nest Thermostat and Why Should You Install One?
A Nest thermostat is a smart home device that allows you to control your home’s heating and cooling system. It is designed to be user-friendly and energy-efficient, making it a popular choice for homeowners looking to save money on their energy bills. The Nest thermostat learns your preferences and adjusts the temperature accordingly, helping you stay comfortable all year round.
One of the main advantages of installing a Nest thermostat is the ability to control it remotely. With the accompanying mobile app, you can easily adjust the temperature settings from anywhere using your smartphone or tablet. This feature is especially useful if you are away from home and want to ensure that your house is at a comfortable temperature when you return.
Energy savings:
- One of the key benefits of a Nest thermostat is its ability to save energy. By learning your temperature preferences and automatically adjusting the settings, the Nest thermostat can help you reduce your energy consumption and lower your utility bills.
- Additionally, the Nest thermostat provides detailed energy usage reports, allowing you to track how much energy you are using and make adjustments as needed.
Easy installation:
- The installation process for a Nest thermostat is relatively simple and can usually be done by the homeowner without professional assistance.
- The thermostat comes with clear instructions and a wiring diagram, making it easy to connect it to your existing heating and cooling system.
- If you are unsure about the installation process, Nest provides helpful resources and customer support to guide you through the process.
Smart features:
- In addition to its energy-saving capabilities, the Nest thermostat offers a range of convenient features that make it a valuable addition to any home.
- It can be programmed to create personalized schedules based on your daily routines, ensuring that your home is always at the desired temperature when you need it.
- The thermostat also has the ability to detect when no one is at home and adjust the temperature accordingly, further saving energy.
- Furthermore, the Nest thermostat is compatible with other smart home devices, allowing you to integrate it with your existing smart home system.
In conclusion, installing a Nest thermostat offers numerous benefits, including energy savings, easy installation, and smart features. Whether you want to reduce your energy consumption, have greater control over your home’s temperature, or integrate it with other smart devices, a Nest thermostat is a worthwhile investment.
Tools and Materials: What You’ll Need for a Successful Installation
Before you begin the installation process for your Nest thermostat, it’s important to gather all the necessary tools and materials to ensure a smooth and successful installation. Here are the key items you’ll need:
1. Screwdriver Set:
A good screwdriver set is essential for removing the cover plates of your old thermostat and connecting the wires to the Nest thermostat. Make sure you have both flathead and Phillips head screwdrivers of various sizes to accommodate different types of screws.
2. Wire Label Stickers:
Since the Nest thermostat uses a different wiring system than traditional thermostats, it’s important to label each wire before disconnecting them from your old thermostat. This will make the installation process much easier and minimize the risk of mixing up wires.
3. Wire Strippers:
You’ll need wire strippers to strip the insulation off the ends of the wires and expose the copper conductor. This will allow you to connect the wires to the appropriate terminals on the Nest thermostat.
4. Voltage Tester:
A voltage tester is an essential safety tool that allows you to check if there is any voltage present in the wires before working on them. This helps prevent any electrical accidents or damage during the installation process.
5. Level:
For a professional-looking installation, it’s important to make sure your Nest thermostat is level on the wall. A small spirit level or a digital level can help you ensure that the thermostat is perfectly horizontal.
6. Pencil and Tape Measure:
Measuring and marking the position of the Nest thermostat on the wall is important for a clean and accurate installation. A tape measure and pencil will help you accurately measure and mark the position of the mounting screws.
7. Drill and Drill Bits:
If your Nest thermostat requires drilling holes for mounting, you’ll need a drill and the appropriate drill bits. Make sure you have the right size and type of drill bits for the wall material you’ll be drilling into.
By having these tools and materials readily available before you start the installation process, you’ll be well-equipped to handle any challenges that may arise and ensure a successful installation of your Nest thermostat.
Identifying Existing Wiring: How to Determine Your Home’s Heating and Cooling System
Before installing a Nest thermostat, it’s important to identify the existing wiring in your home’s heating and cooling system. This will help you understand how to properly connect the Nest thermostat and ensure it functions correctly. Here are some steps to help you determine your home’s heating and cooling system:
1. Locate Your HVAC System
Start by locating your home’s HVAC system. This is usually found in a basement, garage, or utility closet. It may be a furnace, boiler, or heat pump, depending on the type of heating system you have. Identify the main components, such as the blower, compressor, and control panel.
2. Examine the Existing Thermostat
Next, examine the existing thermostat. Remove the cover to access the wiring behind it. Take note of the color-coded wires and their corresponding terminals. The terminals are usually labeled with letters, such as R, W, Y, G, C, and O/B. This will help you understand the wiring configuration.
3. Use a Voltage Tester
To ensure your safety, use a voltage tester to check if the power is off before removing any wires. Carefully test each wire to ensure there is no voltage present. If voltage is detected, turn off the circuit breaker for your HVAC system before proceeding.
4. Take Photos and Label Wires
Before disconnecting any wires, take photos of the existing wiring configuration. This will serve as a reference when installing the Nest thermostat. Additionally, label each wire with the corresponding terminal letter to avoid confusion later on.
5. Consult the Nest Compatibility Checker
Lastly, consult the Nest compatibility checker to determine if your existing wiring is compatible with the Nest thermostat. This online tool will guide you through a series of questions about your HVAC system and provide recommendations based on your answers.
By following these steps, you can identify the existing wiring in your home’s heating and cooling system and ensure a smooth installation of your Nest thermostat.
Step-by-Step Guide: Wiring Your Nest Thermostat for Compatibility
Installing a Nest thermostat is a quick and easy way to upgrade your home’s heating and cooling system. However, before you can start enjoying the benefits of this smart device, you’ll need to properly wire it for compatibility. Follow this step-by-step guide to ensure a successful installation.
1. Turn off the Power
Before you begin working with the wiring, it’s crucial to turn off the power to your HVAC system. Locate your circuit breaker panel and flip the switch that corresponds to the heating and cooling system. This will prevent any electrical accidents during the installation process.
2. Remove the Old Thermostat
Once the power is off, carefully remove the cover of your old thermostat. Take note of the labels and colors of the wires connected to it. This will help you correctly wire your new Nest thermostat.
3. Identify the Wires
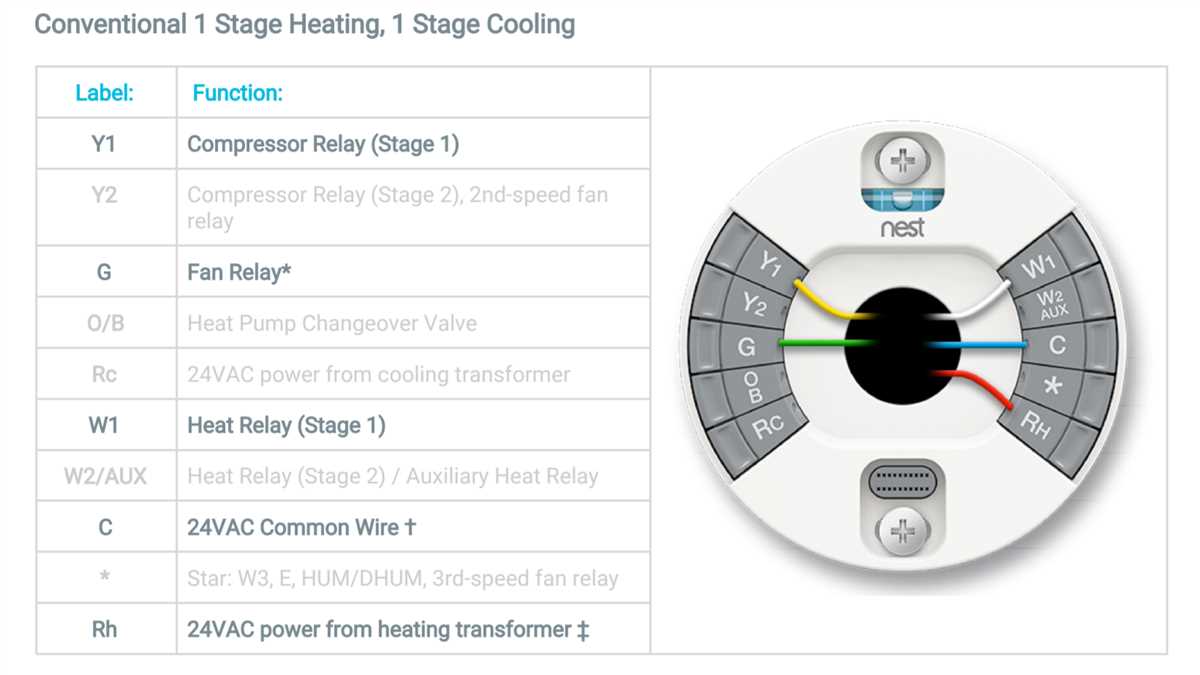
Now it’s time to identify the wires. Match each wire to its corresponding label and write down the information for future reference. Common wires include R, W, Y, G, and C. If your old thermostat has more than five wires, consult the Nest compatibility guide or contact a professional for assistance.
4. Disconnect the Wires
Gently disconnect the wires from your old thermostat. Avoid pulling on the wires themselves, as this can damage the connections. Instead, pull from the plastic connectors attached to the wires.
5. Connect the Wires to the Nest Thermostat Base
Take the base of your Nest thermostat and locate the labeled terminals. Carefully insert each wire into its corresponding terminal and ensure a secure connection. Use the Nest wiring diagram or the instructions provided with your thermostat to guide you through this process.
6. Attach the Nest Thermostat Base
Once all the wires are connected, attach the Nest thermostat base to the wall using the screws provided. Ensure that the base is level and securely fastened. This will ensure proper functionality and accurate temperature readings.
7. Install the Nest Thermostat
With the base securely in place, align the thermostat with the base and press down firmly until it clicks into position. The Nest thermostat should now be securely attached to the wall and ready for configuration.
Follow these steps to wire your Nest thermostat for compatibility and enjoy the convenience and energy savings that come with this smart home device.
Finalizing the Installation: Connecting Your Nest Thermostat to the Power Source
Once you have secured the Nest thermostat base to the wall and connected the necessary wires according to the wiring diagram provided, the final step is to connect your Nest thermostat to the power source. This step is crucial for the thermostat to function properly and provide you with optimal heating and cooling control in your home.
To connect your Nest thermostat to the power source, you will need to locate the control panel or circuit breaker box that supplies power to your HVAC system. Once you have found the correct breaker or fuse, turn it off to ensure your safety during the installation process.
After turning off the power, double-check the wiring connections on the Nest thermostat base to make sure they are secure and properly attached to the corresponding terminals. This will help prevent any potential issues or malfunctions.
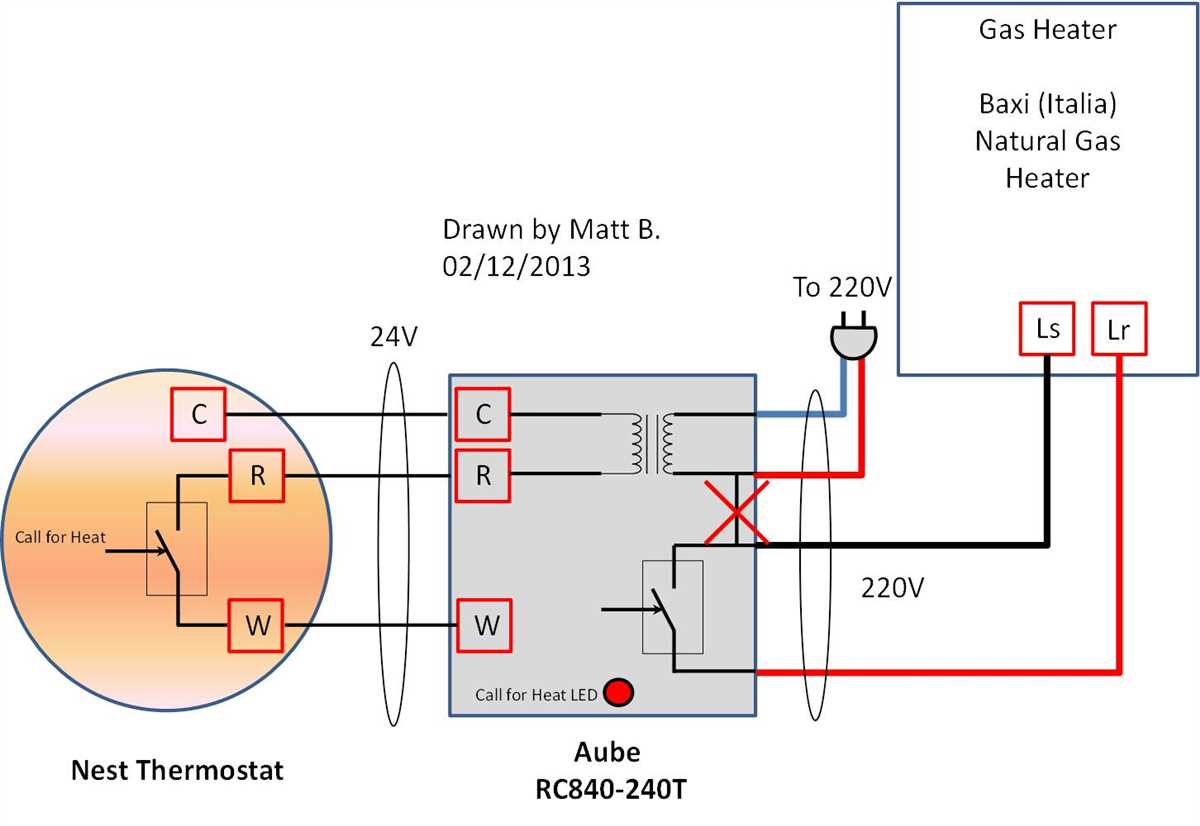
Next, take the red wire from the bundle of thermostat wires and connect it to the Rh (or Rc) terminal on your Nest thermostat base. If your system has a separate cooling transformer and you have both Rh and Rc terminals, you can connect the red wire to either terminal.
Once the red wire is securely connected, take the white wire and connect it to the W terminal on your Nest thermostat base. This wire is responsible for controlling the heat in your HVAC system.
If you have a heat pump system, you will also need to connect the O/B wire to the O/B terminal, the yellow wire to the Y terminal, and the green wire to the G terminal on your Nest thermostat base.
Lastly, connect the blue wire, if available, to the C terminal on your Nest thermostat base. This wire provides the necessary common or neutral connection for the thermostat’s power supply.
After connecting all the wires, carefully tuck them into the wall cavity and attach the Nest thermostat display to the base. Once everything is securely in place, go back to your circuit breaker box and turn the power back on.
Your Nest thermostat should now be connected to the power source and ready for use. Follow the on-screen instructions provided by the thermostat to complete the setup and configuration process, and enjoy the convenience and energy savings that your Nest thermostat offers.
Troubleshooting Tips: Common Issues During Nest Thermostat Installation
Installing a Nest thermostat can greatly improve the comfort and energy efficiency of your home, but sometimes, things don’t go as smoothly as planned. Here are some common issues that you may encounter during the installation process and some troubleshooting tips to help you overcome them:
-
No power to the thermostat: If your Nest thermostat is not receiving power, check the circuit breaker to ensure it is not tripped. Verify that the wiring is correctly connected, and ensure that the wires are securely attached to their respective terminals. If the issue persists, consult a professional electrician for further assistance.
-
Incompatible wiring: Different HVAC systems can have different wiring setups. If your Nest thermostat is displaying an error message related to incompatible wiring, refer to the Nest compatibility guide or consult a professional HVAC technician to determine the best course of action.
-
Wi-Fi connectivity issues: If your Nest thermostat is having trouble connecting to your home Wi-Fi network, ensure that the network name and password are entered correctly during the setup process. Try restarting your router and the thermostat to refresh the connection. If the issue persists, consult your internet service provider or the Nest support team for further assistance.
-
Heating or cooling issues: If your Nest thermostat is not properly heating or cooling your home, double-check the temperature settings to ensure they are correctly configured. Verify that the system is set to the appropriate mode (heating or cooling) and that the desired temperature is within the acceptable range. If the problem continues, consult a professional HVAC technician to inspect your system.
-
Display or touchscreen issues: If the display or touchscreen of your Nest thermostat is not functioning properly, try restarting the device by removing it from its base and reattaching it. If the issue persists, contact Nest customer support for further assistance or to arrange a replacement if necessary.
Remember, if you encounter any issues during the installation of your Nest thermostat, it’s always a good idea to consult the official Nest documentation or reach out to their customer support for guidance. By following these troubleshooting tips, you can overcome common installation issues and enjoy the benefits of a properly installed Nest thermostat.
Q&A:
Why is my Nest Thermostat not turning on?
If your Nest Thermostat is not turning on, make sure that it is properly connected to your heating and cooling system. Check the wiring connections and ensure they are secure. Also, ensure that the circuit breaker for your HVAC system is not tripped.
Why is my Nest Thermostat not connecting to Wi-Fi?
If your Nest Thermostat is not connecting to Wi-Fi, check your internet connection and verify that it is working properly. Make sure that your Wi-Fi network is not hidden and that you are entering the correct network credentials. You may also want to try restarting your Wi-Fi router and the Nest Thermostat to see if that resolves the issue.
Why is my Nest Thermostat not detecting my HVAC system?
If your Nest Thermostat is not detecting your HVAC system, make sure that the wiring connections are correct and secure. Double-check that the wires are properly connected to the corresponding terminals on the thermostat. If everything looks correct, try resetting the thermostat and running the equipment test in the Nest app to re-detect your HVAC system.
Why is my Nest Thermostat not heating or cooling?
If your Nest Thermostat is not heating or cooling, check the temperature settings on the thermostat to ensure they are set correctly. Make sure that the thermostat is set to the desired mode (heat or cool) and that the target temperature is set appropriately. Also, check the filter on your HVAC system and replace it if necessary, as a dirty filter can affect the performance of your heating and cooling system.