
When it comes to upgrading your car audio system, one of the most common things people want to do is install a new CD player. Pioneer is a popular brand known for producing high-quality audio equipment, and their CD players are no exception. However, installing a new CD player can be a daunting task, especially if you are not familiar with car electronics. That’s where a wiring diagram comes in handy.
A wiring diagram is a visual representation of how the electrical components of a system are connected. In the case of a car’s CD player, the wiring diagram shows the various wires that connect the player to the car’s electrical system. This diagram is essential because it helps you understand which wire is responsible for which function, such as power supply, ground connection, speaker connections, and so on.
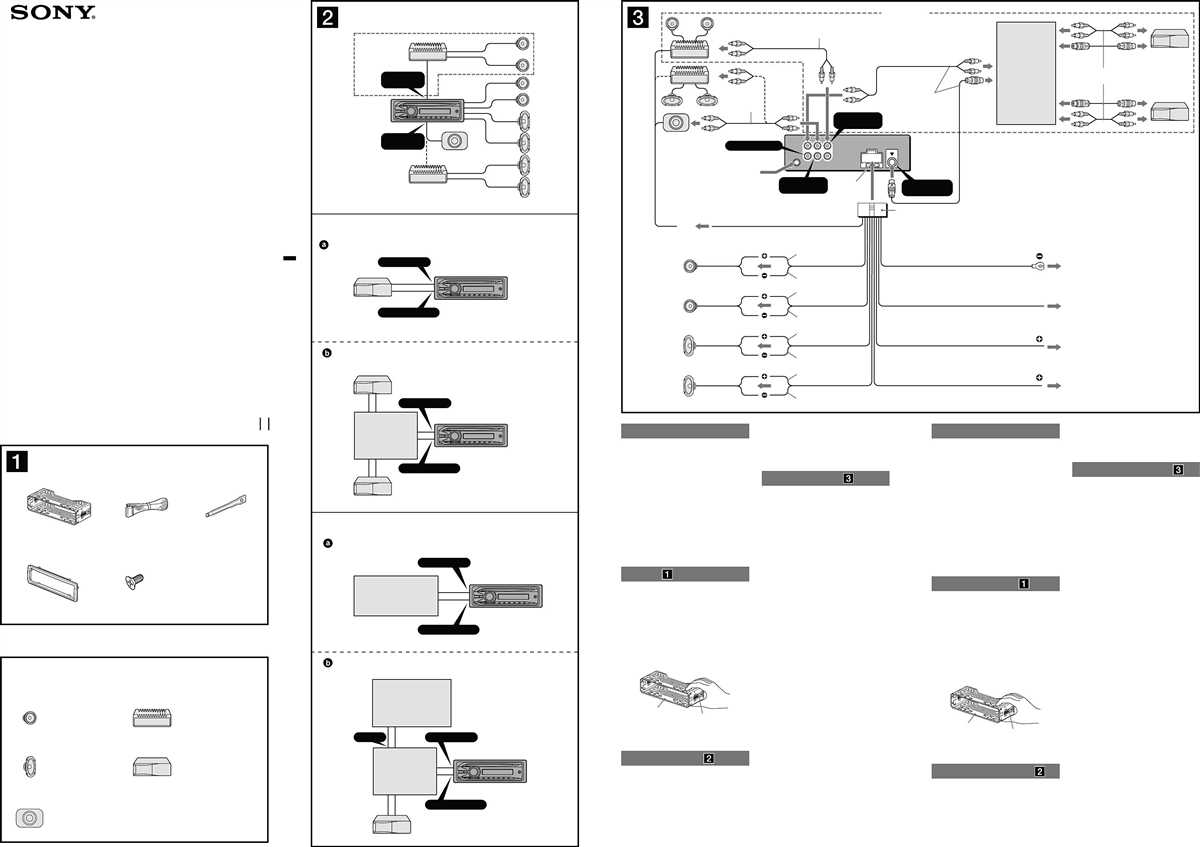
When installing a Pioneer CD player, it is crucial to follow the wiring diagram specific to your model. This diagram is usually provided in the user manual or can be found online on the manufacturer’s website. It is essential to use the correct wiring diagram for your CD player model because different models may have different wire connections, even if they are from the same brand.
By using a wiring diagram, you can easily identify the wires that need to be connected to their respective terminals. This will prevent any damage to the CD player or the car’s electrical system. Additionally, a wiring diagram will help ensure that you connect the wires correctly, allowing for proper functionality and optimal sound quality from your Pioneer CD player.
Pioneer CD Player Wiring Diagram: Everything You Need to Know
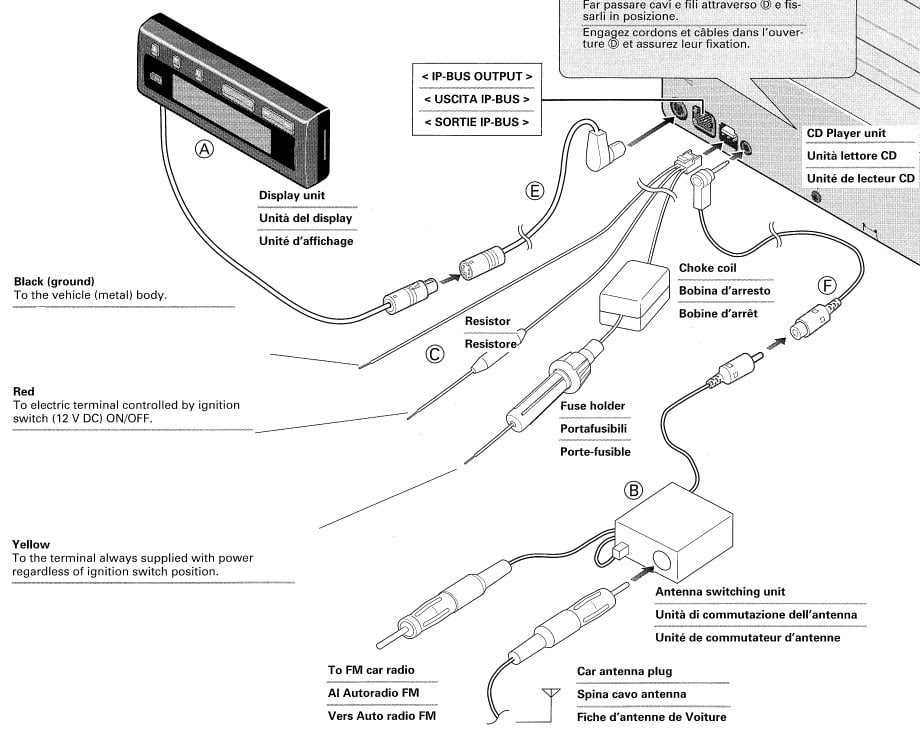
If you are planning on installing a Pioneer CD player in your vehicle, it is important to understand the wiring diagram. The wiring diagram provides a visual representation of the connections and electrical components involved in the CD player system. By understanding the wiring diagram, you can properly connect the CD player to your vehicle’s electrical system, ensuring optimal performance and functionality.
One key component in the wiring diagram is the power source. The CD player requires a power supply to function properly. In most cases, the power source is connected to the vehicle’s battery or fuse box. The wiring diagram will indicate the specific wires that need to be connected to the power source, as well as any additional components such as fuses or relays.
Another important aspect of the wiring diagram is the audio connections. The CD player needs to be connected to the vehicle’s speakers in order to produce sound. The wiring diagram will show the specific wires that need to be connected from the CD player to the speakers, as well as any necessary connectors or adapters.
Additionally, the wiring diagram may include information about additional features or functionalities of the CD player, such as Bluetooth connectivity or auxiliary input options. This information can be useful when customizing the installation or troubleshooting any issues that may arise.
Overall, understanding the Pioneer CD player wiring diagram is essential for a successful installation and optimal performance. By familiarizing yourself with the diagram and following the instructions provided, you can ensure that your CD player is properly connected and functioning as intended.
The Basics of Pioneer CD Player Wiring
When installing a Pioneer CD player in your vehicle, it is important to understand the basics of wiring to ensure proper installation and functionality. A wiring diagram is a useful tool that provides a visual representation of the electrical connections needed for your specific CD player model.
Power Wiring: The first step in wiring your Pioneer CD player is to connect the power wires properly. The red wire should be connected to the positive terminal of your vehicle’s battery, while the black wire should be connected to the negative terminal. This will provide the necessary power for the CD player to function.
Speaker Wiring: Next, you will need to connect the speaker wires. The wiring diagram will indicate which wires need to be connected to the positive and negative terminals of each speaker. It is important to ensure that the wires are connected correctly to avoid any sound distortion or damage to the speakers.
Ground Wiring: The ground wire is essential for the proper functioning of your Pioneer CD player. This wire should be connected to a metal part of your vehicle’s chassis to ensure a solid ground connection. It is recommended to use a wiring harness or a ground wire with a ring terminal for a secure and reliable ground connection.
Accessory Wiring: The accessory wire is used to control the power supply to the CD player. This wire should be connected to an accessory power source, which is typically the ignition switch. This allows the CD player to turn on and off with the vehicle’s ignition.
Additional Wiring: Depending on your specific CD player model and the features you want to utilize, there may be additional wiring connections required. These can include connections for amplifier integration, steering wheel controls, or auxiliary input. Refer to the wiring diagram provided with your CD player for guidance on these additional connections.
By understanding the basics of Pioneer CD player wiring and following the provided wiring diagram, you can ensure a proper and functional installation in your vehicle. It is always recommended to consult the user manual or seek professional assistance if you are unsure about any aspect of the wiring process.
Understanding Pioneer CD Player Wiring Diagram

When it comes to installing or troubleshooting an audio system in your car, having a good understanding of the wiring diagram is crucial. The Pioneer CD player wiring diagram provides you with information about the various connections and wires involved in setting up your CD player. By understanding this diagram, you can easily identify the different components and their corresponding connections, making it easier for you to install or diagnose any issues.
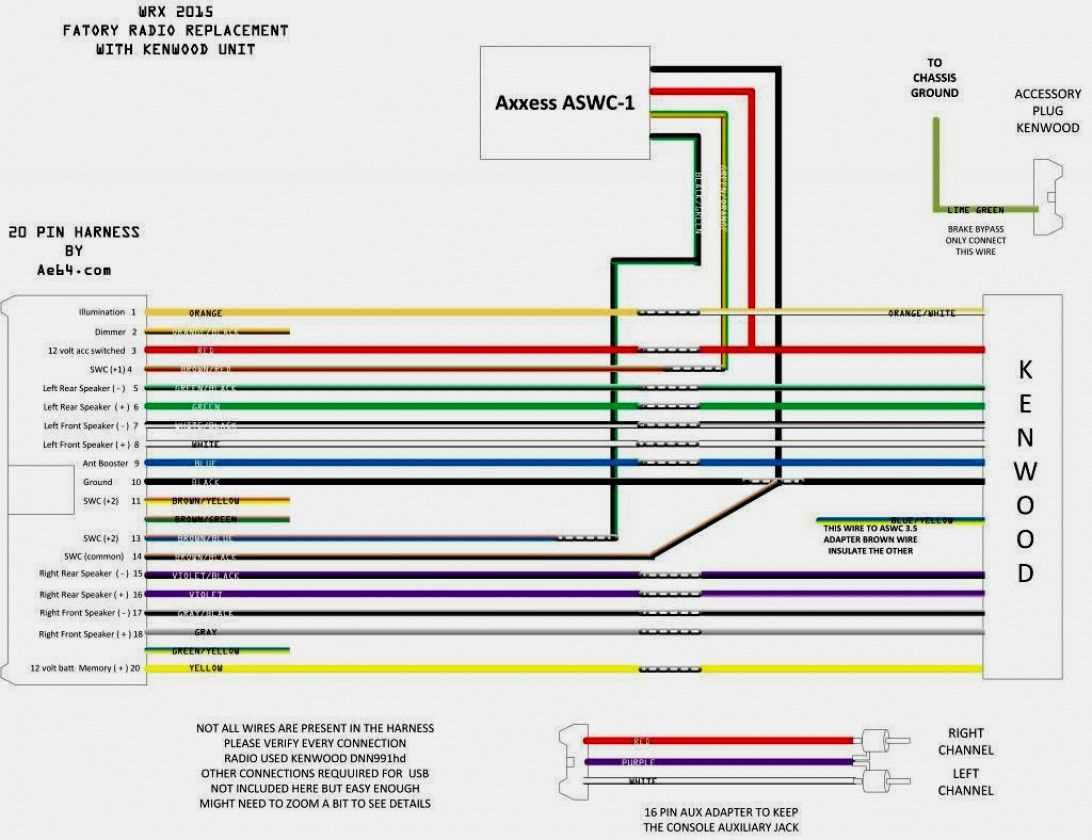
The wiring diagram typically consists of labeled symbols representing different components such as the CD player, amplifier, speakers, and power supply. Each symbol is connected with lines that indicate the flow of the electrical current. Additionally, the diagram may include color-coded wires to help you identify the positive and negative connections.
One common feature in Pioneer CD player wiring diagrams is the use of harnesses. A harness acts as a connector that joins various components together, making the installation process simpler. The wiring diagram will often provide details on which wires from the CD player should be connected to the corresponding harness wires. This information ensures that the connections are made correctly and prevents any mix-ups.
It is important to carefully study the Pioneer CD player wiring diagram before beginning the installation or troubleshooting process. This will help you avoid any potential mistakes or damage to your audio system. If you are unsure about any aspect of the wiring diagram, it is recommended to consult a professional or seek assistance from an experienced car audio technician.
- Key points to remember:
- Understanding the wiring diagram is crucial for installing or troubleshooting a Pioneer CD player.
- The diagram typically consists of symbols representing components and lines indicating the electrical flow.
- Color-coded wires and harnesses are often used to simplify the installation process.
- Consulting a professional or experienced technician is recommended if you are unsure about any aspect of the wiring diagram.
Common Pioneer CD Player Wiring Issues
When installing a Pioneer CD player in your car, it is important to be aware of the common wiring issues that may arise. These issues can cause functionality problems and affect the overall performance of your CD player. By understanding these common wiring issues, you can troubleshoot and resolve them efficiently, ensuring a smooth and hassle-free installation process.
1. Incorrect Wiring Connections: One common issue is incorrect wiring connections. This can happen when the wires are not properly connected to their corresponding terminals. It is crucial to refer to the wiring diagram provided by Pioneer, ensuring that the wires are connected correctly to the power source, speakers, and other components. Double-checking the connections before finalizing the installation can help avoid any potential issues.
2. Loose or Damaged Wires: Another common issue is loose or damaged wires. During the installation process, wires can become loose due to improper handling or inadequate securing. Additionally, wires can get damaged if they are pinched or bent too sharply. It is important to ensure that all wires are securely connected and properly insulated to prevent any issue with power delivery or audio signal loss.
3. Improper Grounding: Improper grounding is also a common issue that can affect the performance of your Pioneer CD player. If the CD player is not properly grounded, it can result in distorted sound, electrical noise, and even compatibility issues with other components of your car’s audio system. It is crucial to follow the manufacturer’s instructions and properly ground the CD player to avoid any grounding-related problems.
4. Incompatibility with the Car’s Wiring System: Lastly, some Pioneer CD players may not be compatible with certain car models or their wiring systems. This can result in issues such as incorrect connections, mismatched wiring harnesses, or even a complete failure to work. To avoid this problem, it is recommended to check the compatibility of the CD player with your car’s wiring system before purchasing or installing it.
By being aware of these common wiring issues and taking necessary precautions, you can ensure a successful installation of your Pioneer CD player. It is important to read the manufacturer’s instructions, refer to the wiring diagram, and seek professional assistance if needed to ensure optimal performance and longevity of your CD player.
Step-by-Step Guide on How to Wire a Pioneer CD Player
Wiring a Pioneer CD player is a simple process that can be completed by following a few easy steps. Whether you are installing a new CD player or replacing an old one, this guide will provide you with the necessary instructions to successfully wire your Pioneer CD player.
Step 1: Gather the Required Tools and Materials
Before you begin, make sure you have all the necessary tools and materials. This includes a wire stripper, crimping tool, electrical tape, wire connectors, and the wiring harness adapter specific to your Pioneer CD player model.
Step 2: Disconnect the Battery
For safety reasons, it is important to disconnect the negative terminal of your car’s battery before starting the wiring process. This will prevent any electrical accidents or shorts from occurring during the installation.
Step 3: Remove the Old CD Player
If you are replacing an old CD player, you will need to remove it from the dashboard. Carefully remove any screws or bolts holding the CD player in place and gently disconnect the wiring harness and antenna cable from the back of the unit.
Step 4: Connect the Wiring Harness Adapter
Take the wiring harness adapter specific to your Pioneer CD player model and connect it to the wiring harness of your car. Match the color-coded wires on both the adapter and the car’s wiring harness and use wire connectors to secure the connections. Use electrical tape to wrap each connection and prevent any potential shorts.
Step 5: Connect the Antenna Cable
Locate the antenna cable of your car and plug it into the corresponding port on the back of the Pioneer CD player. Ensure it is securely connected to guarantee optimal reception.
Step 6: Secure the CD Player
Once all the connections are made, carefully slide the Pioneer CD player into the dashboard and reattach any screws or bolts that were removed during the removal process. Make sure the unit is securely in place to prevent any movement or vibration while driving.
Step 7: Reconnect the Battery
After completing the wiring process and ensuring all connections are secure, reconnect the negative terminal of your car’s battery. This will restore power to the CD player and allow you to test its functionality.
Following these step-by-step instructions will ensure a successful and hassle-free wiring of your Pioneer CD player. Enjoy your favorite tunes while on the road!
Tips for Troubleshooting Pioneer CD Player Wiring
If you are experiencing issues with your Pioneer CD player’s wiring, there are a few troubleshooting tips that you can try before seeking professional help. These tips can help you identify and resolve common wiring problems that may be affecting the performance of your CD player.
- Check the connections: Make sure that all the wiring connections are securely plugged in. Loose connections can cause intermittent audio or no sound at all. Verify that the power, ground, and speaker wires are properly connected.
- Inspect the wires: Carefully examine the wires for any signs of damage. Look for cuts, fraying, or exposed wires. Damaged wiring can lead to poor audio quality or complete failure. If you find any damaged wires, they may need to be repaired or replaced.
- Test the power source: Ensure that the CD player is receiving power from a reliable source. Check the fuse connected to the power wire to see if it is blown. If the fuse is faulty, replace it with a new one of the same rating. Additionally, verify that the CD player is properly grounded to prevent electrical issues.
- Inspect the CD player unit: Open up the CD player unit and inspect the internal wiring. Look for loose or disconnected wires, especially around the audio output connections. Reconnect any loose wires and ensure they are securely attached.
- Test with different speakers: If you are experiencing issues with the audio output, try connecting different speakers to the CD player. This will help you determine if the problem lies with the CD player’s wiring or the speakers themselves. If the new speakers work fine, the issue is likely with the original speakers.
By following these troubleshooting tips, you can effectively diagnose and address wiring issues with your Pioneer CD player. If the problem persists or you are unsure about performing any repairs yourself, it is recommended to consult a professional technician or contact Pioneer customer support for further assistance.