
Installing a powerful horn blaster in your vehicle can greatly enhance its presence on the road and provide an added safety measure. However, proper wiring is crucial to ensure the horn blaster functions efficiently and reliably. This comprehensive guide will walk you through a step-by-step process and provide a wiring diagram to assist you in the installation of your horn blaster.
First and foremost, it is important to gather all the necessary materials and tools before beginning the installation. This includes the horn blaster kit, wiring harness, relay, switch, fuse, and various connectors. Additionally, ensure you have all the required safety equipment such as gloves and goggles to protect yourself during the installation process.
The wiring diagram for your horn blaster will serve as a visual representation of how to properly connect the various components. It will provide detailed instructions on where to connect the positive and negative wires, as well as the ground wire. Additionally, the diagram will illustrate how to connect the relay, switch, and fuse in the correct sequence for optimal performance.
When it comes to installing a horn blaster system in your vehicle, having a wiring diagram is essential. This step-by-step guide will walk you through the process of wiring your horn blaster system correctly and efficiently. With a clear understanding of the wiring diagram, you can ensure that your horn blaster system functions properly and provides the desired level of sound.
Gather the necessary materials
Before starting the installation process, gather all the necessary materials and tools. This includes the horn blaster system, wiring harness, fuse, relay, connectors, wire strippers, and electrical tape. It is crucial to have all these items on hand to avoid any delays or interruptions during the installation process.
Study the wiring diagram
Take some time to study the wiring diagram provided with your horn blaster system. This diagram will show you the correct connections and wiring layout needed for the system to operate effectively. Pay close attention to the different colors of wires and their corresponding connections. Understanding the diagram will ensure that you make the right connections during the installation process.
Prepare the wiring harness
Start by preparing the wiring harness. Strip the necessary length of insulation from the wires using wire strippers, and crimp connectors onto the exposed ends of the wires. Refer to the wiring diagram to determine the appropriate connectors and wire colors for each connection. This step will make it easier to connect the horn blaster system to your vehicle’s power source.
Connect the wires
Begin by connecting the wires according to the wiring diagram. Make sure to connect the positive and negative terminals of the horn blaster system to the corresponding power source in your vehicle. Use the connectors and crimps prepared earlier to secure the connections. It is important to ensure that all connections are secure and tight to avoid any electrical issues or loose connections.
Install the fuse and relay
After the wiring connections are complete, install the fuse and relay. These components protect the electrical system and regulate the power supply to the horn blaster system. Follow the instructions provided with your horn blaster system to install the fuse and relay in the appropriate locations. Double-check the connections and make sure everything is properly secured.
Test the system
Once the installation is complete, you can test the horn blaster system. Turn on your vehicle’s power and activate the horn blaster. Listen for the sound and ensure that it is operating as expected. If there are any issues or the system is not functioning properly, refer back to the wiring diagram and double-check your connections.
By following this step-by-step guide and using the provided wiring diagram, you can easily install your horn blaster system and enjoy the powerful sound it produces. Take your time, make sure all connections are secure, and always refer to the wiring diagram to ensure correct wiring. With the right tools and knowledge, you’ll have your horn blaster system up and running in no time.
Understanding the basics of a horn blaster
A horn blaster is a popular accessory in vehicles that allows the driver to produce a loud sound to alert others. Whether used for safety reasons or just for fun, a horn blaster can be a great addition to any vehicle. In this article, we will explore the basics of a horn blaster, including its components and wiring diagram.
Components of a horn blaster
A typical horn blaster system consists of several key components. These components include:
- Horn compressor: This is the main unit responsible for generating compressed air to create the loud sound.
- Horn trumpets: These are the actual horns that produce the sound. They come in different sizes and shapes to create various tones and volumes.
- Relay: The relay acts as a switch to control the flow of electric current to the horn compressor.
- Wiring: The wiring connects all the components together, allowing them to work in harmony.
- Control switch: This is the button or switch that the driver uses to activate the horn blaster system.
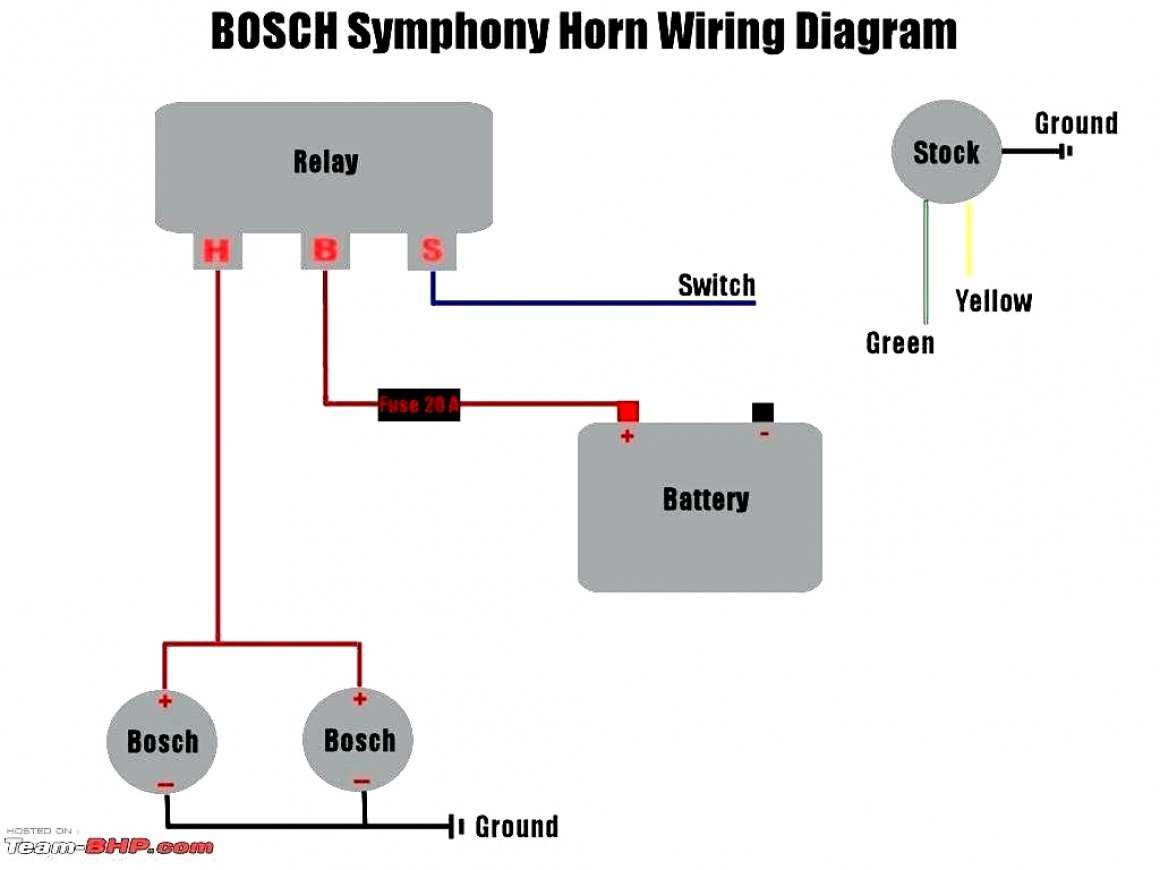
Wiring diagram
The wiring diagram of a horn blaster system may vary depending on the specific model and manufacturer. However, the general principle remains the same. The control switch is connected to the relay, which in turn is connected to the horn compressor. Power is supplied to the control switch through a fuse, ensuring safety and preventing any electrical issues. It is important to follow the manufacturer’s instructions and recommendations when wiring a horn blaster system to ensure proper installation and functionality.
Overall, understanding the basics of a horn blaster can help you make informed decisions about its installation and use. Whether you’re looking to improve your vehicle’s safety or simply want to have some fun, a horn blaster can be a valuable addition.
Gathering the necessary tools and materials
Before you begin wiring your horn blaster, it’s important to gather all the necessary tools and materials. Having everything on hand will make the installation process much smoother and ensure that you have everything you need to complete the job correctly.
Here is a list of the tools and materials you will need:
- Horn blaster kit: Make sure you have purchased a horn blaster kit that includes all the components you need, such as the horn, compressor, wiring harness, and mounting hardware.
- Wire strippers: These are essential for removing the insulation from the wires so you can make proper connections.
- Electrical tape: This will be used to secure and protect the connections you make.
- Wire connectors: These connectors will allow you to join wires together securely.
- Fuse holder and fuse: It’s important to have a fuse in the wiring system to protect against electrical faults. Make sure you have a fuse holder that can accommodate the size of fuse recommended by the horn blaster kit.
- Mounting hardware: Depending on the specific horn blaster kit you have, you may need mounting brackets, screws, or other hardware to properly secure the components.
- Power source: You will need a power source for the horn blaster, such as a dedicated horn relay or a connection to the vehicle’s battery. Make sure you have the necessary wiring and connectors for the chosen power source.
- Electrical tester: This will help you check for power and test your connections to ensure they are functioning correctly.
Having these tools and materials ready before you begin will save you time and prevent any delays or interruptions during the installation process. Make sure to read and follow the instructions provided with your horn blaster kit, and always prioritize safety when working with electrical systems.
Identifying the wiring components
When looking at a wiring diagram for a horn blaster system, it is important to be able to identify the different wiring components. These components are crucial for the proper functioning of the system and understanding their roles can help in troubleshooting and installation.
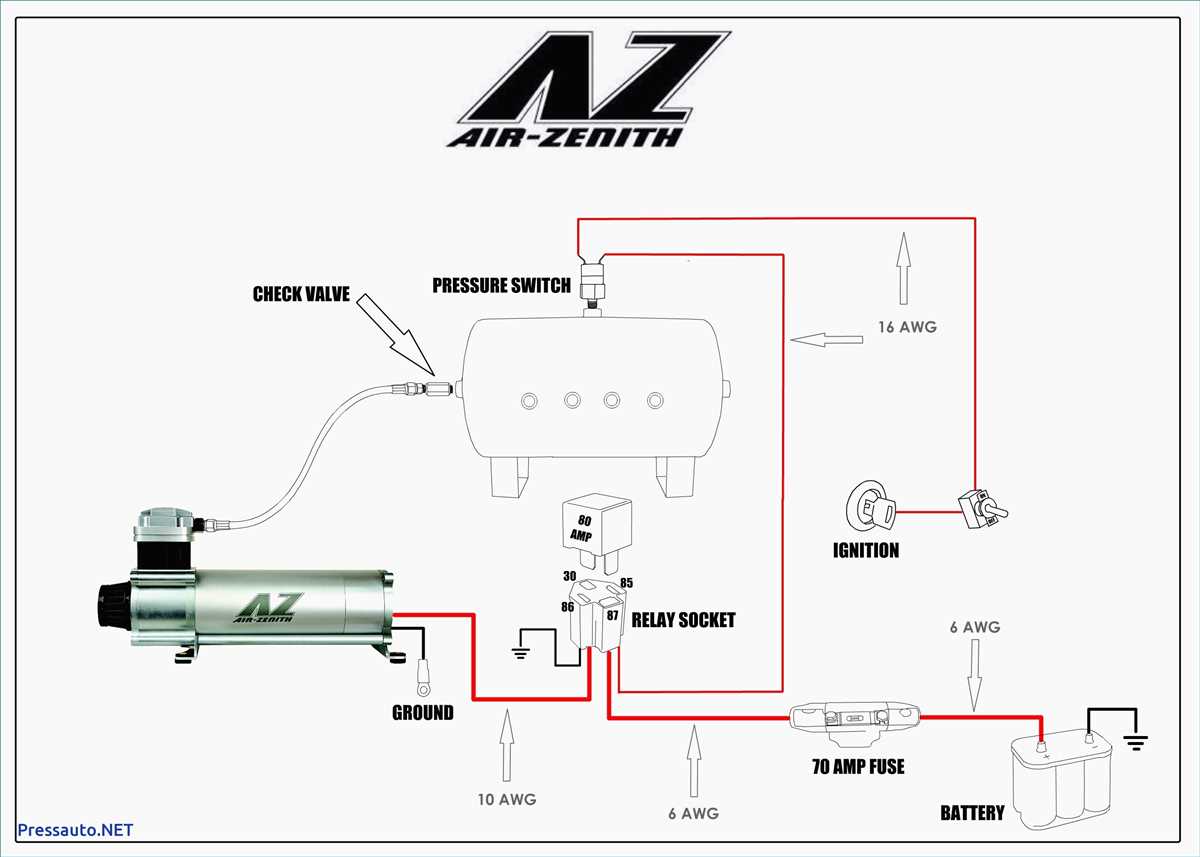
1. Fuse: The fuse is a safety device that protects the wiring and other components from excessive current. It is usually located near the power source and will blow if there is a short circuit or overload.
2. Relay: The relay is an electromagnetic switch that controls the flow of current to the horn. It is activated by a signal from the horn button or an electronic control unit. The relay allows for the use of a lower current switch to control a higher current horn.
3. Horn(s): The horn is the actual sound-producing device in the system. It is typically an electromagnetic horn that vibrates a diaphragm to produce sound waves. The number of horns may vary depending on the system, with some setups having multiple horns for a louder sound.
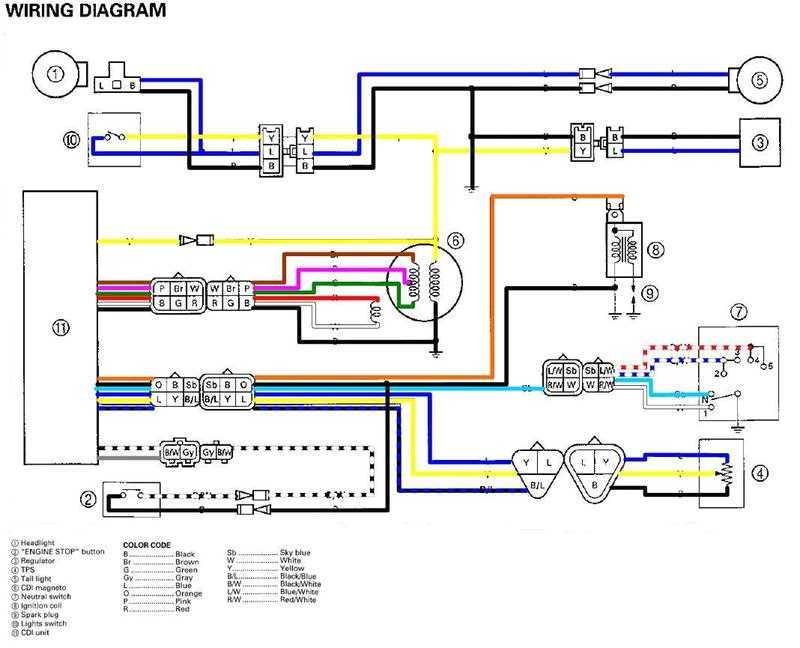
4. Wiring harness: The wiring harness is a group of wires that connects the different components of the horn blaster system. It provides the necessary connections for power, ground, and control signals. The harness is usually color-coded for easy identification of the different wires.
5. Button or switch: The button or switch is the control device that activates the horn system. It can be a simple push-button or a more advanced switch integrated into the vehicle’s steering wheel. The button or switch sends a signal to the relay to activate the horns.
6. Power source: The power source provides the electrical energy to the horn blaster system. It is typically the vehicle’s battery, although in some cases, an auxiliary power source may be used. It is important to ensure that the power source can supply enough current for the horns to function properly.
- Fuse: Protects the wiring and other components from excessive current.
- Relay: Controls the flow of current to the horn.
- Horn(s): The sound-producing device in the system.
- Wiring harness: Connects the different components of the system.
- Button or switch: Activates the system.
- Power source: Provides electrical energy to the system.
By understanding the roles and functions of these wiring components, individuals can successfully install and troubleshoot a horn blaster system. It is important to refer to the specific wiring diagram of the system being used for accurate identification and connection of the components.
Connecting the power source to the horn blaster
When it comes to installing a horn blaster, one of the most crucial steps is connecting the power source to the device. This ensures that the horn blaster has the necessary electricity to function properly. The power source can vary depending on the specific setup and preferences of the user.
Typically, the power source for a horn blaster is the battery of the vehicle. This allows the horn blaster to draw power directly from the battery, ensuring a consistent and reliable source of electricity. To connect the power source to the horn blaster, several steps need to be followed.
Step 1: Locate the battery
First, the battery of the vehicle needs to be located. This is usually found under the hood of the vehicle, in the engine compartment. It may be necessary to remove any covers or panels to access the battery.
Step 2: Identify the positive and negative terminals
The battery has two terminals, one positive (+) and one negative (-). It is important to correctly identify these terminals to ensure proper connection. The positive terminal is usually marked with a “+,” while the negative terminal is marked with a “-“.
Step 3: Connect the power wire
Once the terminals are identified, the power wire of the horn blaster can be connected. The power wire typically has a ring terminal on one end, which is connected to the positive terminal of the battery. The other end of the power wire is connected to the positive terminal of the horn blaster.
Step 4: Ground the horn blaster
In addition to connecting the power wire, it is also important to ground the horn blaster. This ensures that any excess electrical current is safely directed away from the device. To ground the horn blaster, a grounding wire with a ring terminal is connected to the negative terminal of the battery and the grounding point on the horn blaster.
Following these steps will help ensure a successful connection of the power source to the horn blaster. It is important to double-check all connections before testing the horn blaster to ensure proper functionality and avoid any potential electrical issues.
Wiring the Horn Button and Relay
Wiring the horn button and relay is an essential step in installing a horn blaster in your vehicle. The horn button is the switch that activates the horn, while the relay is responsible for creating a high current circuit to power the horn. Proper wiring ensures that the horn can be easily activated and operates effectively when needed.
Before starting the wiring process, it is important to gather the necessary materials, including a horn button, a relay, wiring connectors, and electrical tape. It is also crucial to consult the wiring diagram provided by the horn blaster manufacturer to ensure proper connections.
1. Mounting the horn button:
Start by selecting a suitable location for the horn button, ensuring that it is easily accessible for the driver. Using a drill, create a hole for mounting the button and secure it in place using screws or adhesive.
2. Connecting the horn button:
Refer to the wiring diagram to identify the appropriate terminals on the horn button. Connect the wires from the horn button to their corresponding terminals, typically labeled as positive (+) and negative (-) or ground. Use wiring connectors to securely attach the wires, ensuring proper electrical conductivity.
3. Wiring the relay:
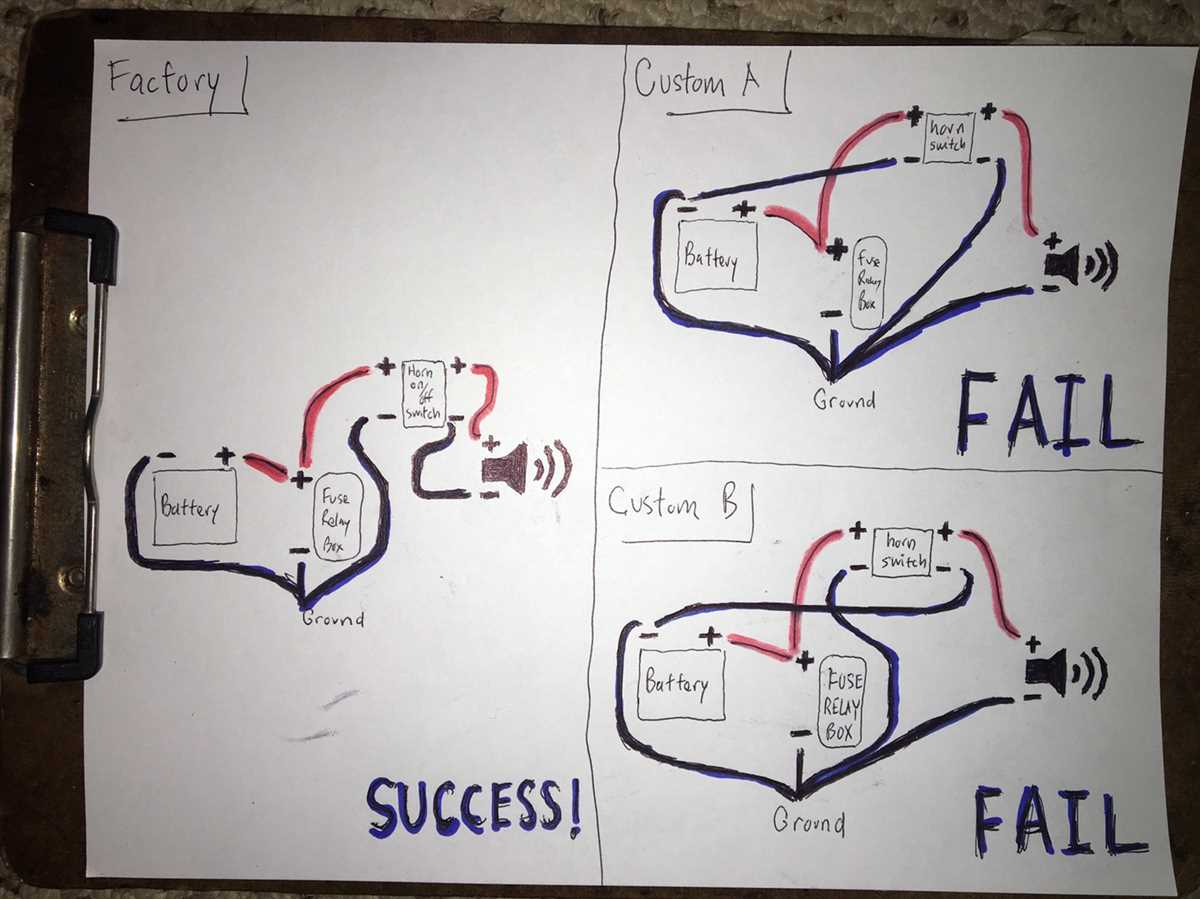
Locate a suitable location for mounting the relay near the horn. Connect the wire from the positive terminal of the horn button to terminal 86 on the relay. Connect a wire from the negative terminal of the horn button to a suitable ground point on the vehicle.
Connect a wire from the battery positive terminal to terminal 30 on the relay. Then, connect a wire from terminal 87 on the relay to the positive terminal of the horn. Finally, connect a wire from the negative terminal of the horn to a suitable ground point on the vehicle.
4. Securing and testing the wiring:
Once all the connections are made, use electrical tape to secure the wiring and prevent any potential short circuits. It is crucial to test the horn before finalizing the installation to ensure that all connections are functioning correctly. Press the horn button, and if the horn sounds, the wiring is successful. If not, double-check the connections and consult the wiring diagram if necessary.
Properly wiring the horn button and relay is essential for the effective operation of the horn blaster. Following the wiring diagram, securely connecting the wires, and conducting a thorough testing process will ensure that the horn functions reliably when needed.
Testing and Troubleshooting the Horn Blaster
After installing the horn blaster and wiring it according to the provided diagram, it is important to test and troubleshoot the system to ensure proper functionality. Follow these steps to test the horn blaster:
- Check the connections: Ensure that all the wiring connections are secure and properly connected. Inspect the wires and connectors for any signs of damage or loose connections. A poor or incomplete connection can cause the horn blaster to malfunction.
- Check the power source: Verify that the battery or power source supplying power to the horn blaster is functioning correctly. Use a multimeter to measure the voltage at the horn blaster’s power input to ensure it meets the required specifications.
- Activate the horn blaster manually: Activate the horn blaster manually using the provided switch or button. If the horn blaster does not sound, check the connections and power source again. There may be an issue with the wiring or the horn blaster itself.
- Test the horn blaster with the vehicle’s horn button: Connect the horn blaster to the vehicle’s existing horn button or switch and test it. Press the horn button and listen for the horn blaster sound. If there is no sound, there may be an issue with the compatibility between the horn button and the horn blaster wiring.
If you encounter any issues during the testing process, it is recommended to consult the horn blaster’s user manual or contact the manufacturer for further assistance. Proper troubleshooting will help identify and resolve any problems with the horn blaster system.
In conclusion, testing and troubleshooting the horn blaster is essential to ensure its proper functionality. By carefully inspecting the connections, verifying the power source, and testing the horn blaster with both manual activation and the vehicle’s horn button, any issues can be identified and resolved. With a properly functioning horn blaster, you can enjoy the powerful and attention-grabbing sound it produces.