
If you’re planning to install a Pioneer DEH-15 car stereo in your vehicle, it’s important to have the proper wiring diagram. The DEH-15 is a popular choice for car enthusiasts due to its sleek design and advanced features, such as CD playback and AUX input. However, without a wiring diagram, it can be challenging to properly connect the stereo to your vehicle’s electrical system.
A wiring diagram acts as a guide, illustrating the various connections and color codes needed to successfully install the DEH-15. It shows the power and ground connections, as well as the connections for the speakers and other devices. By following the wiring diagram, you can ensure that the stereo is properly connected and functioning correctly.
The wiring diagram for the Pioneer DEH-15 typically includes color-coded wires, making it easier to identify each connection. For example, the power wires are usually red and yellow, while the ground wire is typically black. The diagram will also indicate which wires are for the speakers, subwoofers, and any other devices you may have connected to the stereo.
Whether you’re a DIY enthusiast or a professional installer, having a wiring diagram for the Pioneer DEH-15 can save you time and frustration. It eliminates the guesswork and ensures that you connect all the wires correctly. By following the diagram, you can enjoy your new car stereo without any issues and enjoy all its features to the fullest.
Pioneer DEH-15 Wiring Diagram: Everything You Need to Know
If you are looking for a reliable and user-friendly wiring diagram for your Pioneer DEH-15 car stereo, you have come to the right place. In this article, we will provide you with all the information you need to understand and utilize the wiring diagram for your DEH-15 model.
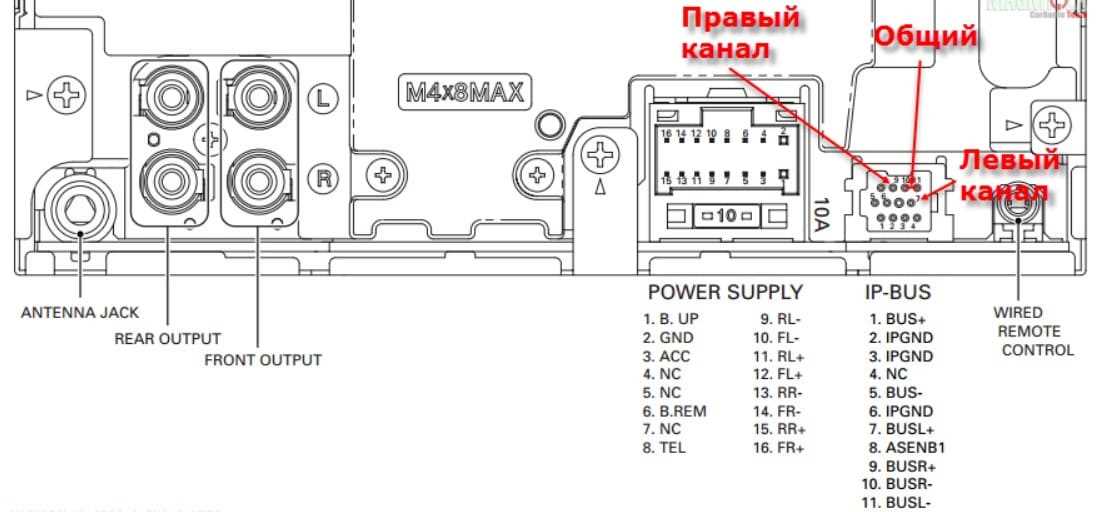
The Pioneer DEH-15 wiring diagram is a visual representation of the electrical connections of the car stereo. It shows the various wires and their corresponding functions, allowing you to identify the correct wires for installation or troubleshooting purposes. The diagram typically includes information about the power supply, speakers, amplifier connections, and any additional accessories you may have connected to the stereo.
How to Interpret a Pioneer DEH-15 Wiring Diagram:
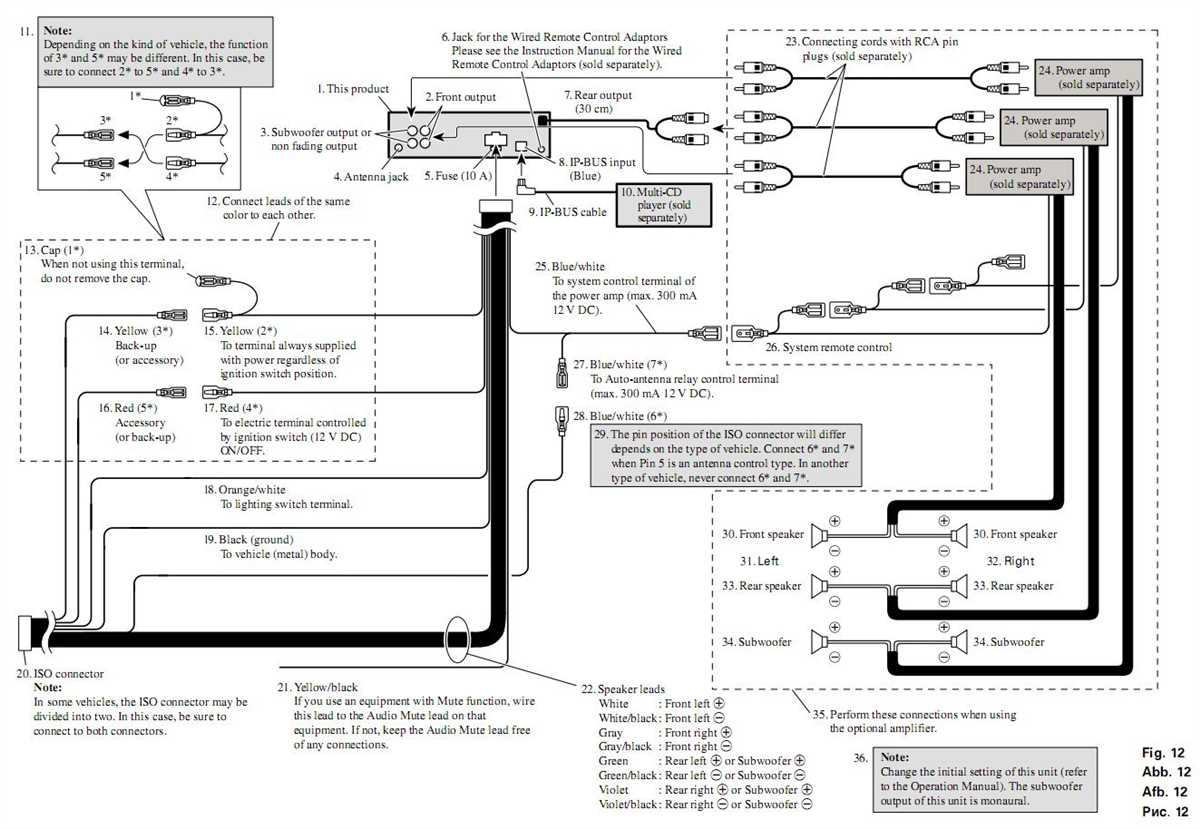
- Power Supply: The wiring diagram will indicate the power supply connections, such as the positive and negative terminals of the battery, as well as the ignition and accessory wires.
- Speaker Connections: It will show the color-coded wires for each speaker, enabling you to connect them correctly to the corresponding outputs on the stereo.
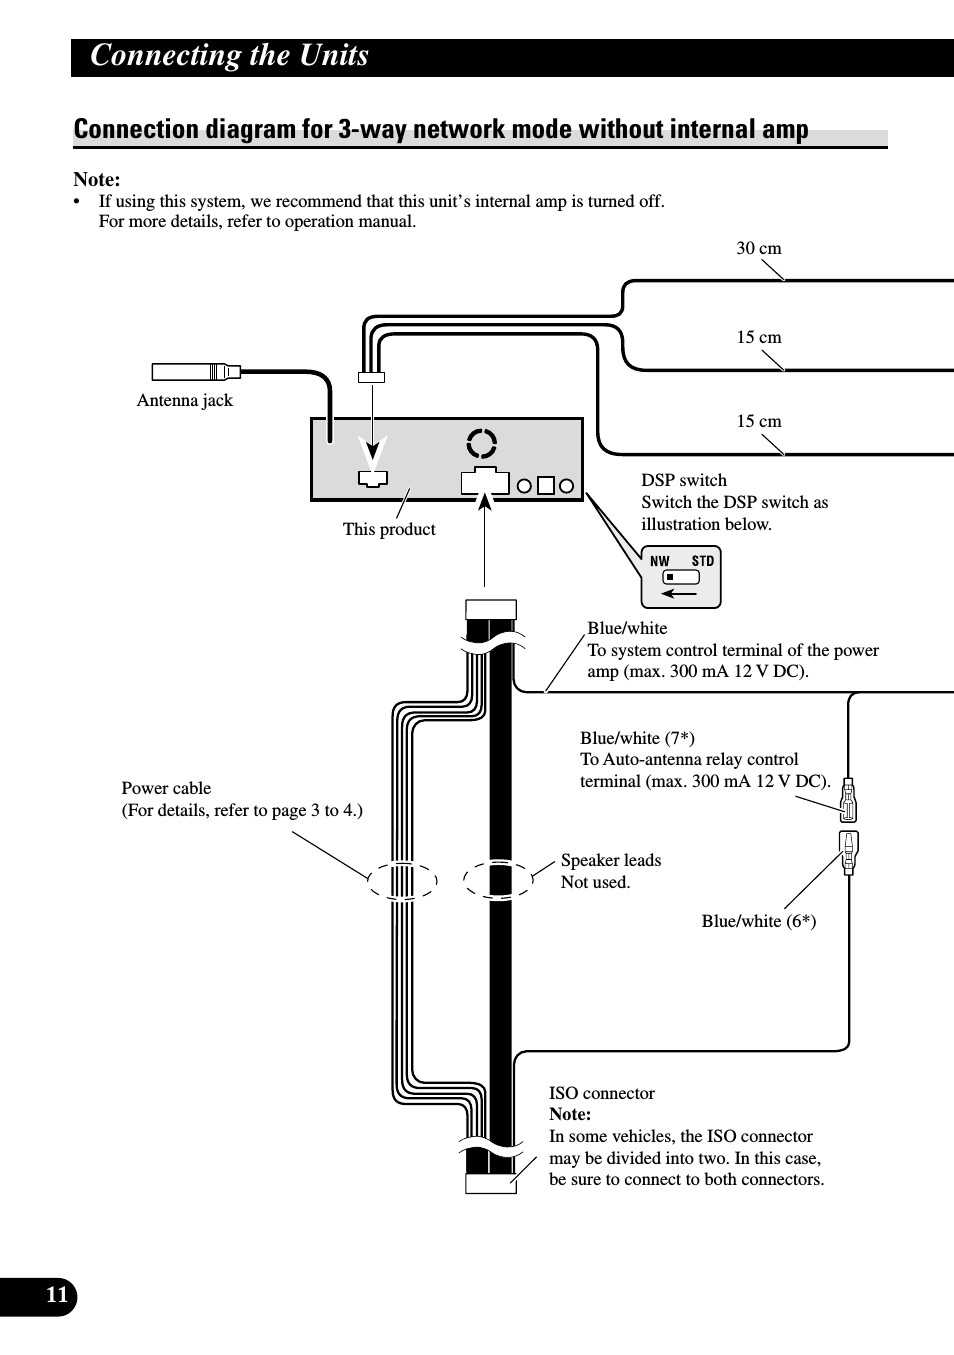
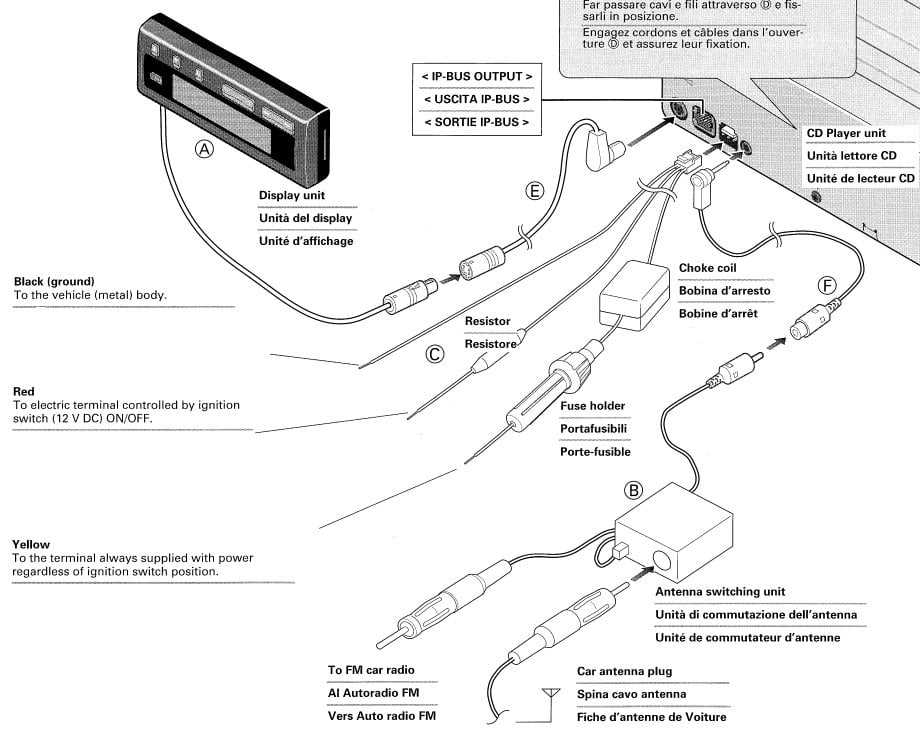
- Amplifier Connections: If you have an external amplifier connected to your Pioneer DEH-15, the wiring diagram will assist you in identifying the input and output connections between the stereo and the amplifier.
- Additional Accessories: The diagram may also include information about any additional accessories you have connected to your car stereo, such as Bluetooth adapters, USB connectors, or steering wheel controls.
By referring to the Pioneer DEH-15 wiring diagram, you can ensure a proper and hassle-free installation of your car stereo. It allows you to make accurate connections, reducing the risk of damaging the stereo or other components. If you are experiencing any issues with your DEH-15, the wiring diagram can also be helpful in troubleshooting the problem and identifying any wiring faults.
In conclusion, the Pioneer DEH-15 wiring diagram provides essential information for the installation, connection, and troubleshooting of your car stereo. It is a valuable resource for both professionals and DIY enthusiasts, ensuring a successful and reliable audio system in your vehicle.
What is a Pioneer DEH-15?
Pioneer DEH-15 is a car stereo receiver produced by Pioneer Electronics, a renowned manufacturer of audio and video products. It is a single-DIN receiver that is designed to fit into standard car stereo slots.
The Pioneer DEH-15 features a variety of functions and features that enhance the overall audio experience in a car. It has a built-in amplifier with a power output of up to 50 watts per channel to provide high-quality sound. The receiver also includes a CD player that can play CDs, CD-Rs, and CD-RWs, allowing users to enjoy their favorite music while on the road.
In addition to playing CDs, the Pioneer DEH-15 has AM/FM radio tuner with preset station memory, allowing users to easily switch between their favorite radio stations. The receiver also includes an auxiliary input that allows users to connect external devices like smartphones or MP3 players, providing flexibility in audio sources.
The Pioneer DEH-15 also features a detachable faceplate for added security, as well as a remote control for convenient operation. Its user-friendly interface and intuitive controls make it easy to navigate through menus and customize the sound settings according to personal preferences.
Overall, the Pioneer DEH-15 is a reliable and feature-packed car stereo receiver that offers high-quality sound and versatile audio options. It is a popular choice among car owners who prioritize audio performance and functionality while on the road.
Understanding the Wiring Diagram
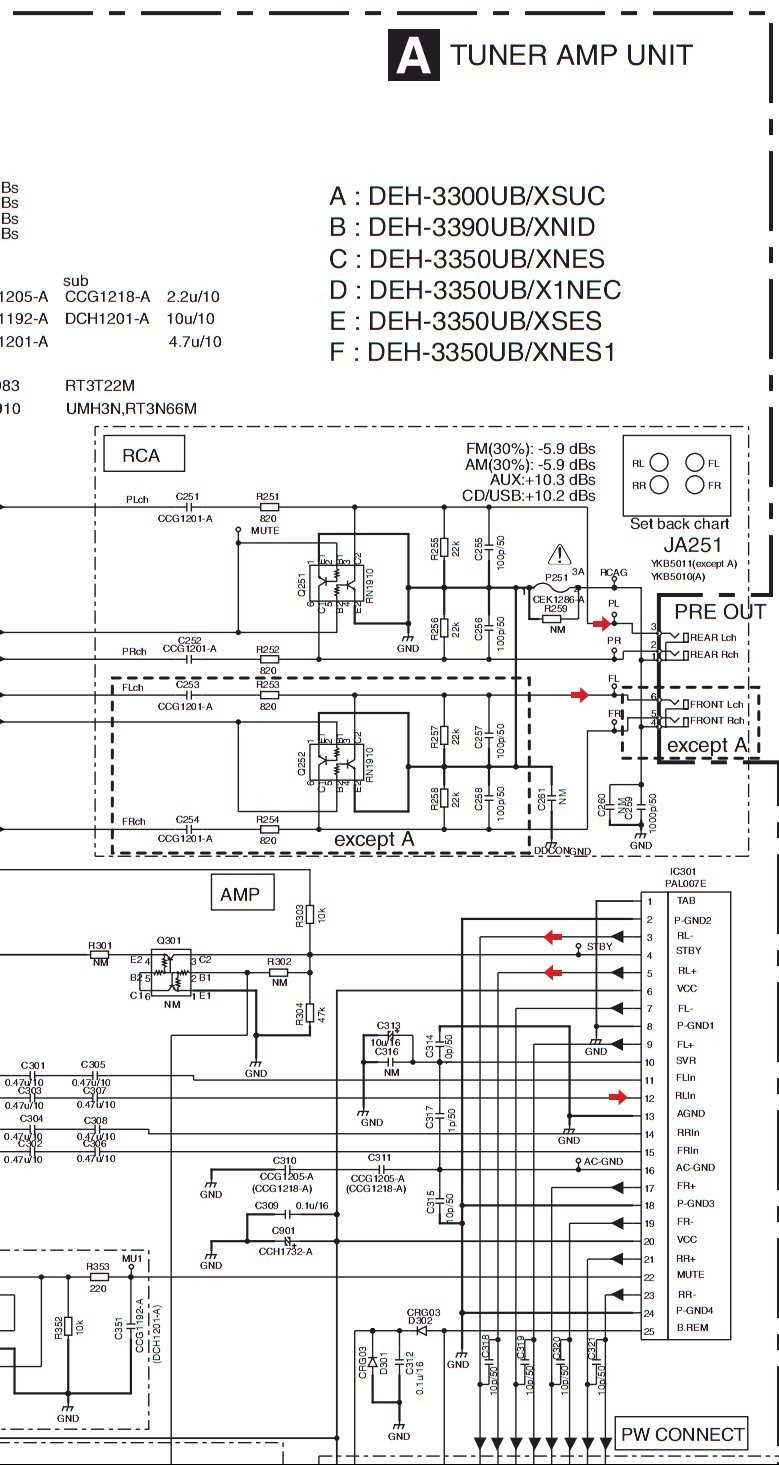
The wiring diagram is a crucial tool for understanding and troubleshooting the electrical system of the Pioneer DEH-15 car stereo. It provides a visual representation of the connections between various components and helps identify potential issues or errors in the wiring.
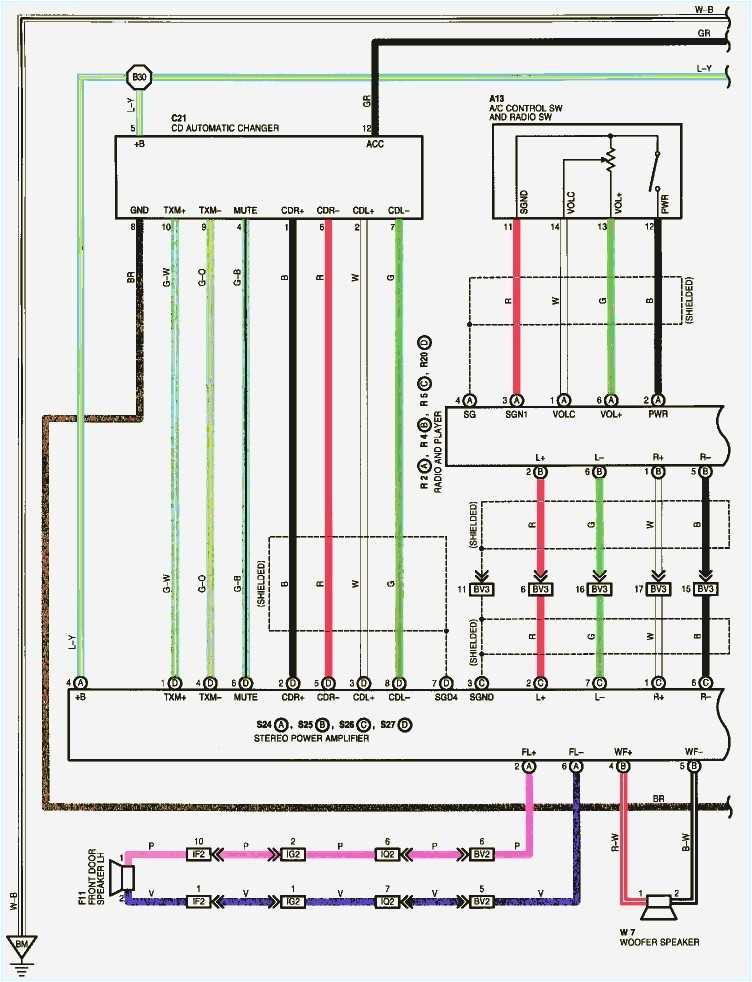
When examining the wiring diagram, it is important to familiarize yourself with the various symbols and codes used. These symbols represent different types of electrical connections, such as power supply, ground, speaker inputs, and control signals.
The wiring diagram also illustrates the specific color coding used for the wires in the system. This can be useful when connecting or repairing components, as it ensures that the right connections are made.
Following the flow of the wiring diagram, you can trace the path of the electrical signals and identify any potential points of failure. This can be helpful in diagnosing issues such as a malfunctioning speaker or a faulty power supply.
Overall, understanding the wiring diagram is essential for anyone working with the Pioneer DEH-15 car stereo. It allows for effective troubleshooting, accurate installation, and proper maintenance of the electrical system.
Wire Color Guide
When installing a Pioneer DEH-15 car stereo, it is important to be able to identify the various wire colors and their corresponding functions. Here is a guide to help you understand the wiring diagram:
- Yellow – This wire is for the memory power source. It should be connected to a constant power source that is not affected by the ignition switch.
- Red – This wire is for the ignition power source. It should be connected to a power source that is only active when the ignition switch is turned on.
- Black – This wire is for the ground connection. It should be connected to a metal part of the vehicle’s chassis to provide a proper ground.
- Blue/White – This wire is for the amplifier remote turn-on. If you have an external amplifier, you will need to connect this wire to the remote turn-on lead of the amplifier.
- Blue – This wire is for the power antenna control. If your vehicle has a power antenna, you will need to connect this wire to the power antenna control lead.
- Orange/White – This wire is for the illumination control. It should be connected to the vehicle’s dimmer control wire, so that the stereo’s display can be dimmed when the headlights are turned on.
- Orange – This wire is for the constant 12-volt battery power source. It should be connected to a constant power source that is not affected by the ignition switch.
- Green and Green/Black – These wires are for the left rear speaker connections. The green wire is for the positive (+) speaker terminal, while the green/black wire is for the negative (-) speaker terminal.
- Purple and Purple/Black – These wires are for the right rear speaker connections. The purple wire is for the positive (+) speaker terminal, while the purple/black wire is for the negative (-) speaker terminal.
- Gray and Gray/Black – These wires are for the right front speaker connections. The gray wire is for the positive (+) speaker terminal, while the gray/black wire is for the negative (-) speaker terminal.
- White and White/Black – These wires are for the left front speaker connections. The white wire is for the positive (+) speaker terminal, while the white/black wire is for the negative (-) speaker terminal.
By understanding the wire color guide, you can confidently install a Pioneer DEH-15 car stereo and enjoy its features and functionality without any issues.
Step-by-Step Installation Instructions

Installing a Pioneer DEH-15 car stereo requires careful attention to detail and a good understanding of your vehicle’s wiring system. Follow these step-by-step instructions to ensure a successful installation process.
1. Prepare the necessary tools and materials.
- Wire strippers
- Crimping pliers
- Electrical tape
- Wire connectors
- Mounting screws
- Pioneer DEH-15 car stereo
2. Disconnect the negative battery terminal.
Before beginning any electrical work on your vehicle, it is important to disconnect the negative battery terminal to prevent any accidental short circuits.
3. Remove the existing car stereo.
- Use appropriate tools to remove the trim panel that surrounds the car stereo.
- Unscrew and remove the existing car stereo from the mounting bracket.
- Disconnect the wiring harness and antenna cable from the back of the car stereo.
4. Connect the wiring harness to the Pioneer DEH-15 car stereo.
Refer to the wiring diagram provided with the Pioneer DEH-15 car stereo for the appropriate wire connections. Use wire strippers to strip the insulation off the wires, and crimp wire connectors to securely connect the wires together.
5. Mount the Pioneer DEH-15 car stereo.
- Slide the Pioneer DEH-15 car stereo into the mounting bracket.
- Secure the car stereo in place using the mounting screws.
- Reconnect the wiring harness and antenna cable to the back of the car stereo.
6. Reconnect the negative battery terminal.
Once the Pioneer DEH-15 car stereo is securely installed, reconnect the negative battery terminal to restore power to the vehicle.
7. Test the functionality of the Pioneer DEH-15 car stereo.
Turn on the car stereo and test all the features to ensure proper installation. Make any necessary adjustments or repairs if needed.
By following these step-by-step installation instructions, you can successfully install a Pioneer DEH-15 car stereo in your vehicle. Enjoy your new audio system!
Troubleshooting Common Issues
If you are experiencing any issues with your Pioneer DEH-15 car stereo wiring, here are some common problems and their possible solutions:
No Sound
If there is no sound coming from your speakers, check the following:
- Make sure the volume is turned up and not muted.
- Check the speaker connections to ensure they are securely plugged in.
- Verify that the speaker wires are connected to the correct terminals on the stereo unit.
- Check the speaker wires for any damage or breakage. Replace them if necessary.
- If you are using an external amplifier, make sure it is powered on and working properly.
Poor Sound Quality
If you notice that the sound quality is not up to par, try the following:
- Adjust the tone controls (bass, treble, balance, and fader) to optimize the sound.
- Ensure that the speaker wires are properly insulated and not touching any metal surfaces.
- Check the speaker connections for any corrosion or loose connections. Clean or tighten as necessary.
- Replace any damaged or worn-out speakers for improved sound reproduction.
Display Issues
If the display on your Pioneer DEH-15 is not working or showing strange characters, try the following:
- Check the wiring connections for the display module to ensure they are properly connected.
- Inspect the display for any damage or discoloration. Replace if necessary.
- Reset the stereo unit by disconnecting the power source for a few minutes and then reconnecting it.
- If the issue persists, contact Pioneer customer support for further assistance.
Overall Performance Issues
If you are experiencing overall performance issues with your Pioneer DEH-15, try the following:
- Check the wiring connections for any loose or disconnected wires. Reconnect or secure them as necessary.
- Make sure the stereo unit is receiving proper power from the vehicle’s electrical system.
- Clean the CD player’s lens with a lens cleaning kit to improve disc playback.
- If none of the above solutions work, consider seeking professional help or contacting Pioneer customer support for further assistance.
By troubleshooting these common issues, you can ensure that your Pioneer DEH-15 car stereo wiring functions properly and enjoy uninterrupted audio experience in your vehicle.