
When it comes to setting up a telephone network, one of the most important components is the network interface box. This box serves as the connection point between the outside telephone lines and the inside wiring of your home or office. Proper wiring of the network interface box is essential for ensuring that your telephone service functions correctly and efficiently.
The wiring inside the network interface box can vary depending on the specific setup of your telephone service. However, there are some general guidelines that you can follow to ensure that your wiring is done correctly. It is important to remember that telephone wiring can be dangerous if not handled properly, so it is always best to consult a professional if you are unsure of what you are doing.
One of the key aspects of wiring the network interface box is connecting the incoming telephone lines to the appropriate terminals. Generally, there will be designated terminals for the incoming line, as well as terminals for connecting additional telephone jacks inside your home or office. It is crucial to make sure that the correct wires are connected to the correct terminals, as this will determine which lines are active and which are not.
Telephone Network Interface Box Wiring
The telephone network interface box is an essential component of the telephone system, responsible for connecting your home’s telephone wiring to the telephone company’s network. It is usually located on the exterior of your house and is the point where the telephone company’s line enters your property. Understanding how to properly wire the interface box is crucial for ensuring the functionality and reliability of your phone service.
Before attempting any wiring work on the telephone network interface box, it is important to first ensure your safety. Make sure the power to the box is turned off and use appropriate safety equipment, such as gloves and goggles, to protect yourself from any potential hazards.
Once you have taken the necessary safety precautions, you can begin the wiring process. Start by opening the interface box to access the wiring connections. Inside the box, you will typically find terminals or screws where you can attach the wires. Each wire should be stripped of its insulation, leaving approximately half an inch of bare wire exposed.
It is important to follow the specific wiring instructions provided by your telephone company, as they may vary. However, in most cases, you will need to connect the colored wires from your home’s telephone wiring to the corresponding terminals in the interface box. For example, the red wire is usually connected to the “R” terminal, the green wire to the “G” terminal, and so on.
Once all the wires are properly connected, you can secure them in place by tightening the screws or terminals. It is also a good idea to use wire connectors or electrical tape to further protect the connections and prevent any accidental disconnections.
After completing the wiring, you can close the interface box and turn on the power. You may also need to contact your telephone company to activate your phone service or troubleshoot any issues that may arise. By properly wiring the telephone network interface box, you can ensure a reliable and functional telephone connection in your home.
What is a Telephone Network Interface Box?

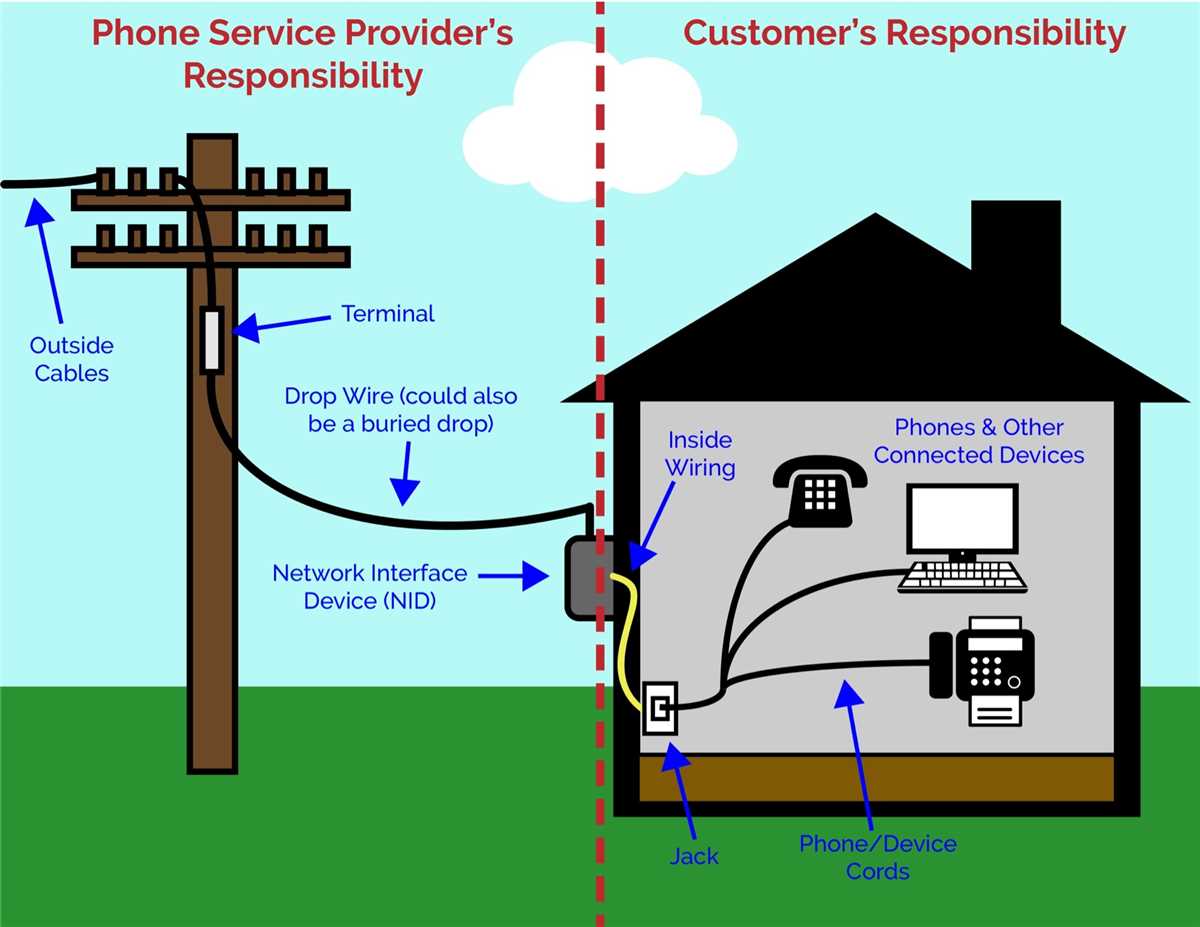
A Telephone Network Interface Box, also known as a Network Interface Device (NID) or a Demarcation Point, is a telecommunications box that connects the telephone company’s network to the wiring inside a building or a residence. It serves as the demarcation point between the phone company’s responsibility and the customer’s responsibility for the telephone wiring.
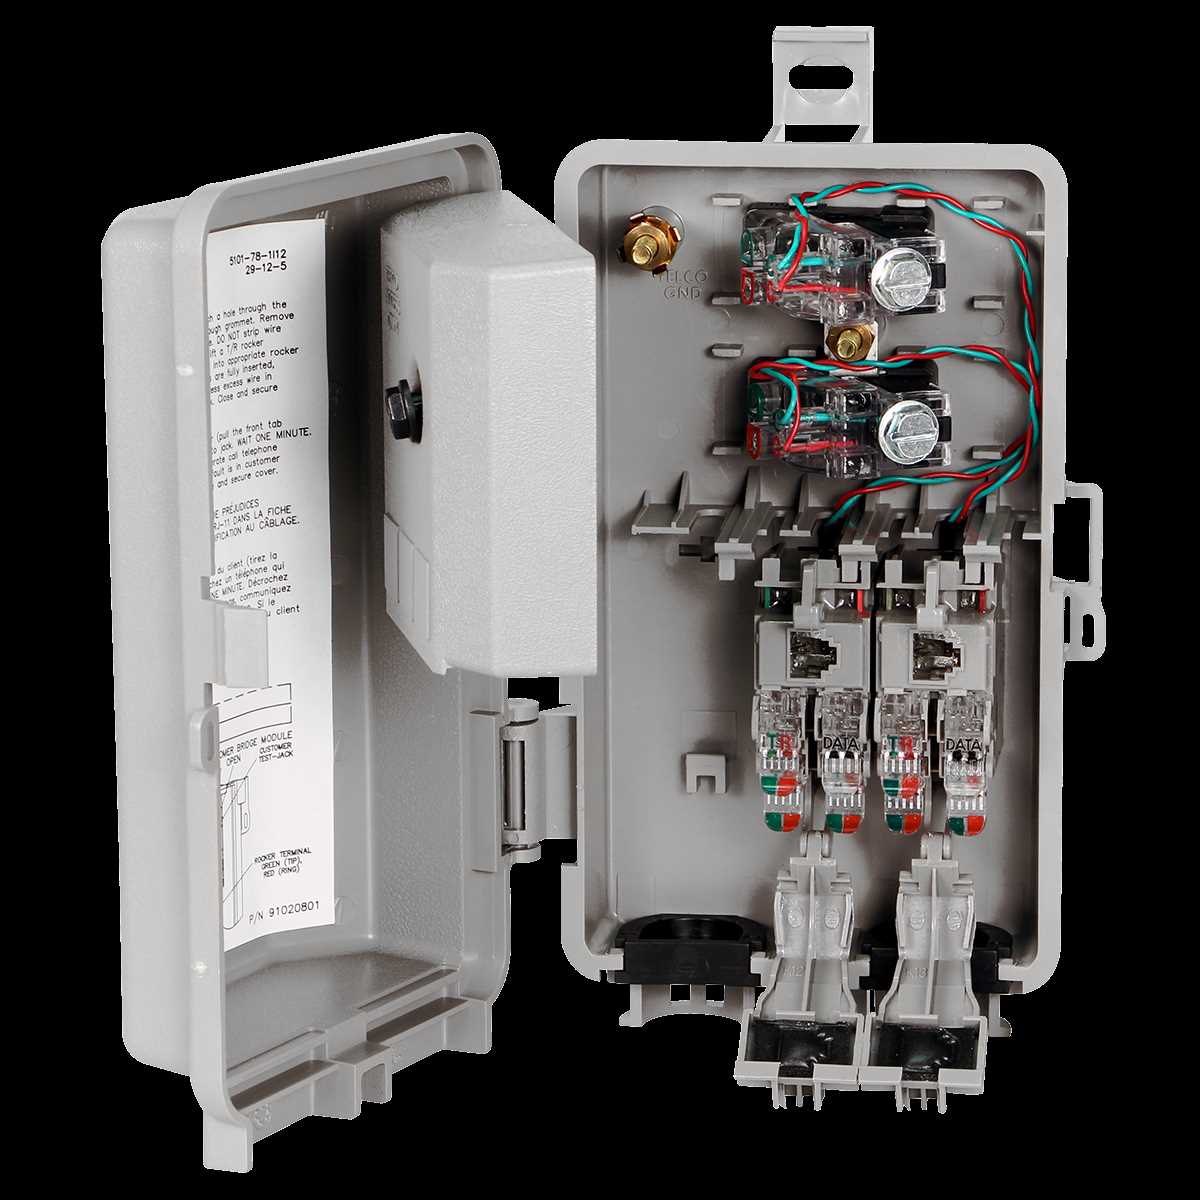
The Telephone Network Interface Box is typically located on the exterior of a building, and it contains multiple connection points for different telephone lines. These connection points allow the telephone company to easily connect and disconnect their lines as needed. The box is usually made of durable materials, such as plastic or metal, to protect the connections from environmental elements.
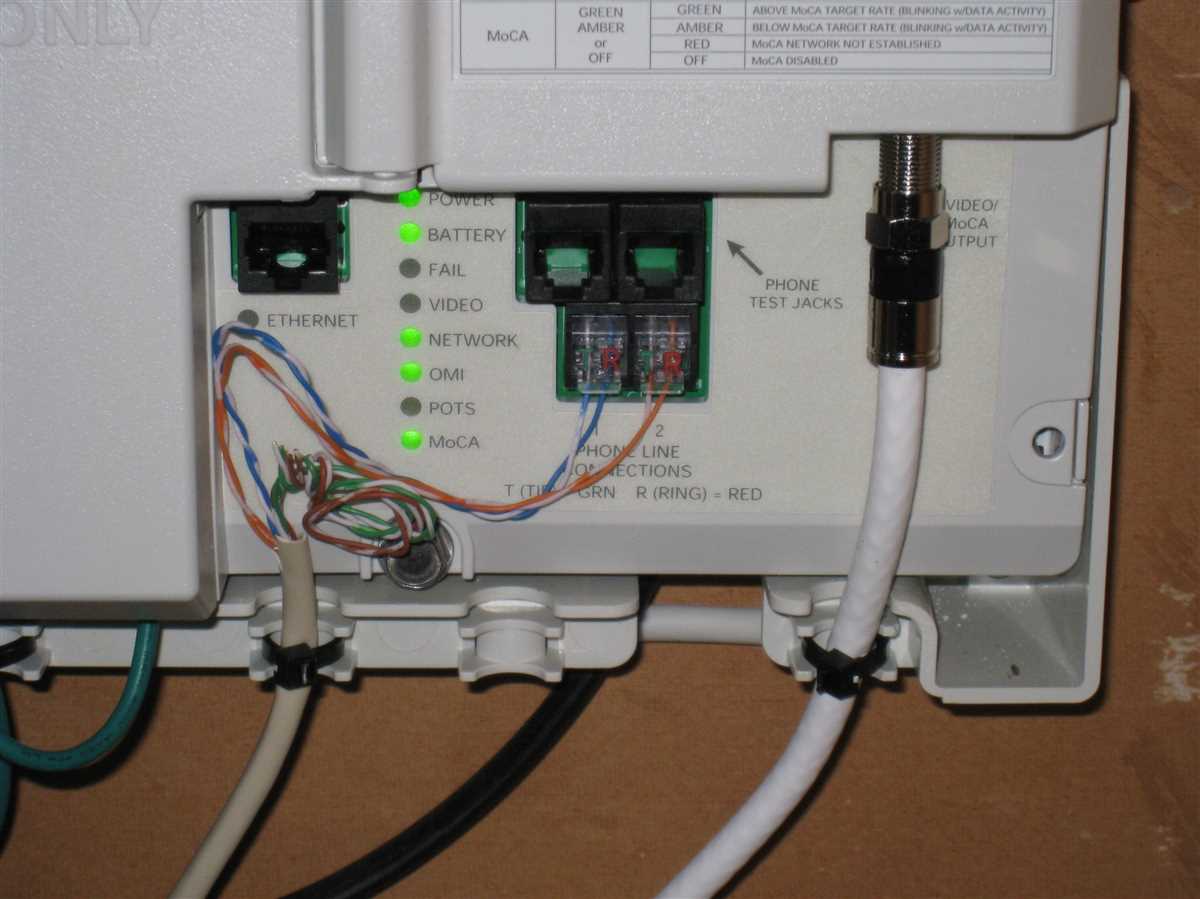
Inside the Telephone Network Interface Box, there are various components that help facilitate the connection between the telephone company’s network and the customer’s telephone lines. These components may include line jacks, test jacks, fuses, surge protectors, and grounding terminals. Additionally, there may be labeling or documentation inside the box to indicate which connection is associated with each telephone line.
When a telephone line issue arises, the Telephone Network Interface Box is a crucial point for troubleshooting. Since it marks the separation between the telephone company’s responsibility and the customer’s responsibility, any issues identified at this point help determine the party responsible for resolving the problem.
In summary, a Telephone Network Interface Box is a vital component of a telephone network, as it enables the connection between the telephone company and the customer’s telephone wiring. It serves as a demarcation point and contains various components to facilitate this connection. Understanding the purpose and functionality of the Telephone Network Interface Box is important for troubleshooting telephone line issues.
Understanding the Wiring Inside the Network Interface Box
When it comes to telephone network connections, the network interface box plays a crucial role. It serves as the point of connection between your telephone line and the external network. Inside this box, you will find various wiring components that are essential for the functioning of your telephone service.
First and foremost, the network interface box contains a demarcation point, which is where the responsibility for the telephone line changes from the service provider to the customer. This demarcation point is usually marked by a test jack or a screw terminal. It is important to understand this demarcation point as it determines who is responsible for any issues with the telephone line.
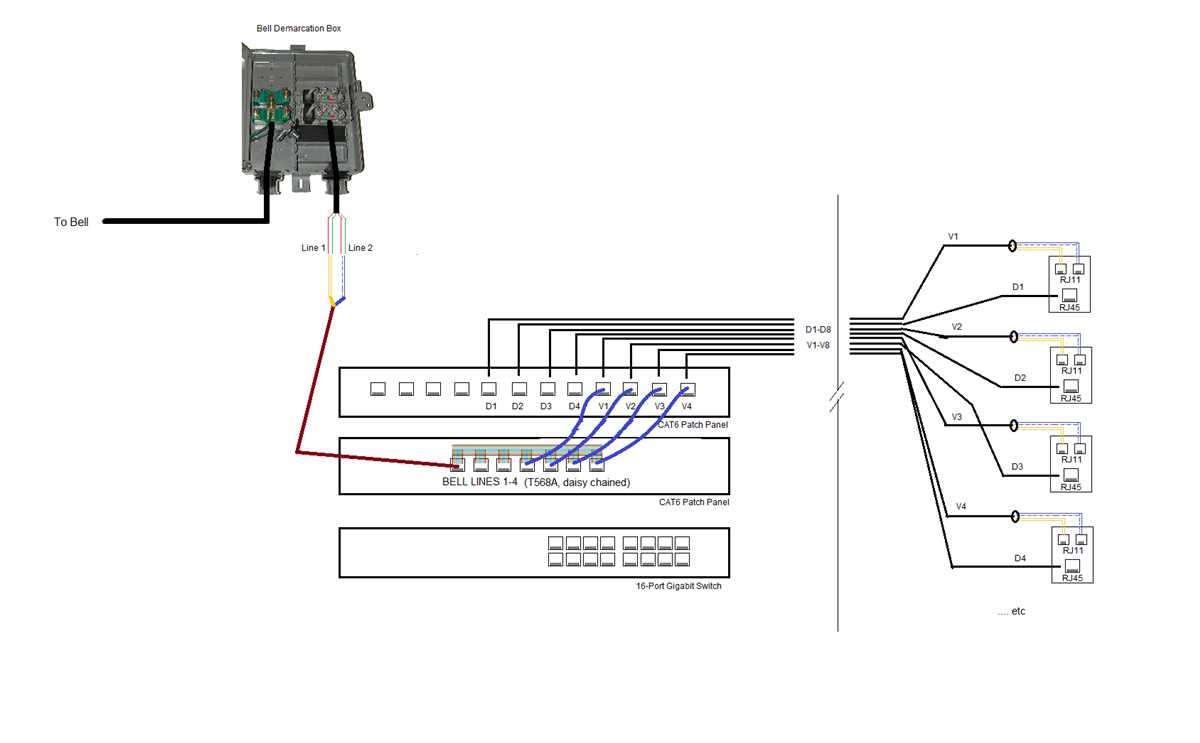
Inside the network interface box, you will also find a distribution block. This block is responsible for distributing the telephone signal to different locations within your home or office. It consists of terminals where the telephone wires from the external network and the internal telephone lines connect. The distribution block allows for easy troubleshooting and maintenance of the telephone system.
The wiring inside the network interface box is typically color-coded for easy identification. The most common color coding scheme is the “tip and ring” system, where the tip wire is usually green and the ring wire is red. However, different service providers may use different color codes, so it is important to refer to the documentation provided by your specific provider.
In addition to the wiring components mentioned above, the network interface box may also contain surge protection devices, grounding connections, and other necessary equipment to ensure the proper functioning of your telephone service.
In conclusion, understanding the wiring inside the network interface box is essential for anyone who wants to troubleshoot or maintain their telephone connection. By familiarizing yourself with the demarcation point, distribution block, and color coding scheme, you can easily identify and resolve any issues with your telephone system.
Step-by-Step Guide to Wiring the Telephone Network Interface Box
Wiring the telephone network interface box is an essential step in setting up your telephone line and ensuring proper communication. This guide will walk you through the process, providing detailed instructions on each step to help you successfully wire the network interface box.
Step 1: Locate the Network Interface Box
Begin by locating the network interface box, which is typically installed on the outside of your home or building. It is a small, weather-resistant box that connects the telephone company’s wiring to the internal wiring of your premises. Once you have found the box, open it using a screwdriver or a key, depending on the design.
Step 2: Disconnect the Old Wiring
Next, you will need to disconnect the old wiring from the network interface box. Carefully remove any tape or wire connectors, and take note of how the wires were connected. You may want to take photos or label the wires to ensure proper reconnection later.
Step 3: Prepare the Network Interface Box
With the old wiring disconnected, prepare the network interface box for the new wiring. Clean out any dirt or debris inside the box, and ensure that the terminals are in good condition. If any terminals are damaged, replace them before proceeding.
Step 4: Connect the New Wiring
Now it’s time to connect the new wiring. Strip the ends of the wires to expose the copper strands, and attach them to the appropriate terminals inside the network interface box. Consult the wiring diagram provided by your telephone service provider to ensure proper placement of each wire.
Step 5: Test the Connection
After connecting the new wiring, it’s important to test the connection to ensure everything is working correctly. Use a telephone handset to make a test call and check for dial tone and clear communication. If there are any issues, double-check your wiring connections and consult your telephone service provider for assistance.
- Summary:
- Locate the network interface box on the outside of your home or building.
- Disconnect the old wiring from the network interface box.
- Clean and prepare the network interface box for the new wiring.
- Strip the ends of the new wiring and connect them to the appropriate terminals.
- Test the connection using a telephone handset to ensure proper functionality.
By following this step-by-step guide, you can confidently wire the telephone network interface box and ensure a reliable telephone connection in your home or building.
Troubleshooting Common Issues with Telephone Network Interface Box Wiring
When it comes to troubleshooting issues with telephone network interface box wiring, there are a few common problems that you may encounter. These issues can often be easily resolved by following some simple troubleshooting steps.
One common problem is a loose or improperly connected wire in the network interface box. This can result in poor or no telephone line connection. To fix this issue, carefully inspect the wiring inside the box to ensure all wires are securely connected. If you find any loose wires, tighten them using a screwdriver or reconnect them properly. Ensure that the connections are made according to the wiring diagram provided by your telephone service provider.
Another issue you may encounter is a damaged wire in the network interface box. Over time, wires can become frayed or damaged, which can affect the quality of your telephone connection. If you notice any damaged wires, they will need to be replaced. Carefully remove the damaged wire from the box and replace it with a new one. Be sure to follow the correct wiring pattern to ensure proper connectivity.
In some cases, the problem may not lie with the wiring in the network interface box, but rather with the wiring inside your home. Faulty or outdated telephone jacks or splitters can cause connection issues. Inspect the telephone jacks and splitters inside your home, and replace any that appear damaged or outdated. Additionally, ensure that all connections to the telephone jacks and splitters are secure and properly connected.
When troubleshooting telephone network interface box wiring, it’s important to follow all safety precautions, such as turning off power to the box before making any adjustments or repairs. If you are unsure about how to troubleshoot or fix any issues with the wiring, it is always best to contact a professional technician to ensure safe and proper resolution.
Best Practices for Maintaining Telephone Network Interface Box Wiring: Conclusion
Ensuring the proper maintenance of telephone network interface box wiring is crucial for maintaining a reliable and efficient telephone connection. By following the best practices outlined in this guide, you can minimize the risk of connectivity issues and ensure that your telephone network remains in optimal condition.
Key takeaways to remember:
- Regularly inspect the network interface box for any physical damage or signs of wear and tear.
- Keep the box clean and free from debris to prevent interference with the wiring.
- Avoid making any unauthorized modifications or additions to the wiring.
- Use proper tools and techniques when repairing or replacing any wiring components.
- Label and organize the wiring within the box to facilitate future maintenance and troubleshooting.
- Follow safety guidelines and regulations when working with telephone network interface box wiring.
By implementing these best practices, you can ensure that your telephone network interface box wiring is well-maintained and capable of delivering clear and uninterrupted communication. Remember to consult with a qualified professional if you are unsure about any aspect of maintaining your telephone network interface box wiring.