
A convex lens is a type of lens that is thicker in the middle and thinner at the edges. It is commonly used in various optical devices such as cameras, telescopes, and eyeglasses. Understanding how a convex lens works and how light behaves when passing through it is crucial in designing and analyzing these optical systems.
One way to visualize the behavior of light passing through a convex lens is by using a ray diagram. A ray diagram is a diagram that represents the path of light rays as they pass through a lens or other optical device. It allows us to understand how light rays interact with the lens and how they are refracted, or bent, as they pass through it.
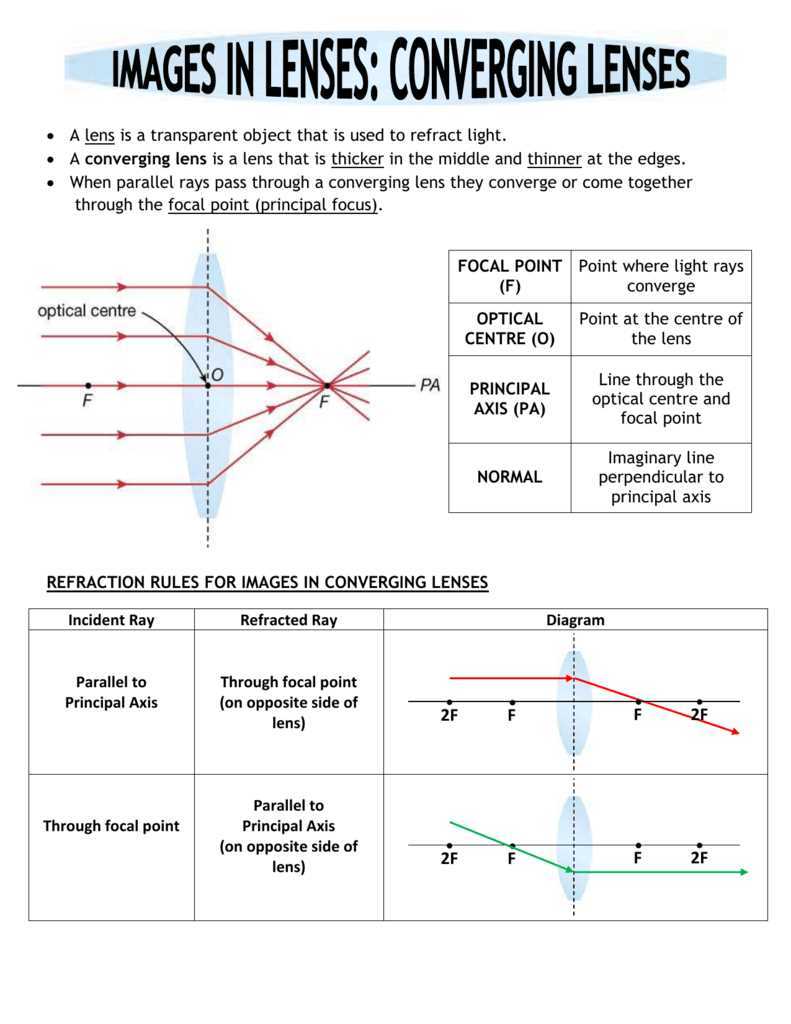
In a convex lens, light rays that are parallel to the principal axis (the central line of the lens) converge, or come together, at a point called the focal point. The focal point is located on the opposite side of the lens from where the light rays are coming from. By drawing rays from the object through the lens, we can determine where the image of the object will be formed, and whether it will be real or virtual, inverted or upright.
Ray Diagram of Convex Lens
A convex lens is a transparent optical component with curved surfaces that converge or bend light rays towards a focal point. Understanding how light rays interact with a convex lens is crucial in studying its properties and applications.
When drawing a ray diagram of a convex lens, we can follow a few basic rules to determine the path of light rays passing through the lens:
- Rule 1: Parallel rays of light that are incident on a convex lens will converge towards the focal point on the opposite side of the lens.
- Rule 2: Rays that pass through the center of the lens will continue in a straight line without any deviation.
- Rule 3: Rays that are directed towards the focal point on one side of the lens will emerge parallel to the principal axis on the other side.
Based on these rules, we can construct a ray diagram that accurately represents the path of light rays through a convex lens. By tracing multiple rays from different points on the object, we can determine the position and characteristics of the image formed by the lens.
The ray diagram of a convex lens helps us understand and visualize the behavior and properties of light as it passes through the lens. It enables us to calculate important parameters such as the position and magnification of the image formed by the lens, which have applications in various optical systems and devices.
What is a Ray Diagram?
A ray diagram is a graphical representation of the path that light takes as it travels from a source, such as an object, through a lens, and then to the image formed by the lens. It allows us to visualize and analyze the behavior of light rays in order to understand how an image is formed by a lens.
In a ray diagram, light rays are represented by straight lines with arrows indicating the direction of travel. The rays can be classified into three types: incident rays, which are the rays that originate from the object and enter the lens; refracted rays, which are the rays that change direction as they pass through the lens; and emergent rays, which are the rays that leave the lens and form the image.
A ray diagram helps us determine the size, position, and nature of the image formed by a lens. By tracing the path of multiple rays, we can identify the location where all the rays intersect or appear to intersect, known as the image point. This image point represents the position where a focused image is formed.
Additionally, a ray diagram allows us to determine various characteristics of the image, such as its size and orientation. By measuring the distances between the object, lens, and image, we can calculate the magnification of the lens and determine whether the image formed is real or virtual, upright or inverted.
In summary, a ray diagram is a useful tool for studying the behavior of light rays in a lens system. It enables us to visualize the path of light and determine the characteristics of the resulting image. By understanding ray diagrams, we can gain insights into how lenses form images and apply this knowledge to various optical systems and applications.
Convex Lens Ray Diagram Rules
A convex lens is a type of lens that is thicker in the middle and thinner at the edges. It is also referred to as a converging lens, as it brings parallel rays of light to a focus. Understanding how light rays interact with a convex lens is crucial in creating accurate ray diagrams.
Here are some important rules to keep in mind when drawing ray diagrams for convex lenses:
- Rule 1: Parallel rays of light that pass through the center of the lens continue in a straight line.
- Rule 2: Rays of light that pass through the focal point on one side of the lens emerge parallel to each other on the other side.
- Rule 3: Rays of light that are parallel to the principal axis are refracted through the focal point on the other side of the lens.
- Rule 4: Rays of light that pass through the principal focus on one side of the lens emerge parallel to the principal axis on the other side.
- Rule 5: Rays of light that pass through the optical center of the lens are not refracted and continue in a straight line.
Using these rules, one can accurately draw ray diagrams to determine the position, size, and nature of the image formed by a convex lens. It is important to remember that ray diagrams are a simplified representation of how light interacts with a lens and may not account for all possible scenarios.
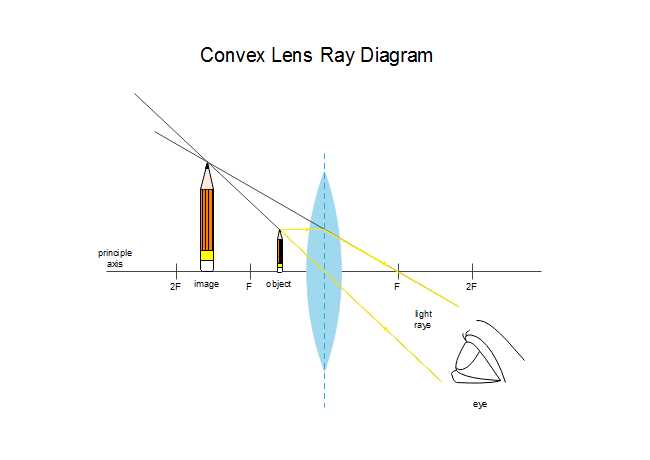
How to Draw a Ray Diagram of a Convex Lens
A convex lens is a lens that bulges outward in the middle, and it is commonly used in various optical devices such as cameras, binoculars, and telescopes. Drawing a ray diagram of a convex lens can help us understand how light behaves as it passes through the lens and how it forms an image.
To draw a ray diagram of a convex lens, follow these steps:
- Start by drawing a vertical line to represent the principal axis of the lens. This line should be straight and pass through the center of the lens.
- Draw a horizontal line perpendicular to the principal axis to represent the object. The object can be placed at any distance from the lens, but for simplicity, let’s assume it is located to the left of the lens.
- Draw two rays from the top of the object towards the lens. One ray should pass through the center of the lens, and the other should be parallel to the principal axis.
- Draw two more rays from the bottom of the object towards the lens. Again, one ray should pass through the center of the lens, and the other should be parallel to the principal axis.
- Extend the rays after they pass through the lens. The ray that passed through the center of the lens will continue in a straight line. The other ray will converge towards a point on the principal axis called the focal point.
- Locate the point where the rays intersect after passing through the lens. This point represents the image formed by the lens. The image can be either real or virtual, depending on the object’s position and the type of lens.
By drawing a ray diagram of a convex lens, we can visualize how the lens bends and converges light to form an image. This diagram helps us understand the basic principles of optics and how lenses are used to magnify and focus light.
Types of Images Formed by a Convex Lens
Real Images:
A real image is formed when light rays converge after passing through a convex lens. It is usually projected onto a screen and can be captured by a photographic film or sensor. Real images are always inverted and can be either magnified or diminished, depending on the position of the object with respect to the lens.
The position and characteristics of a real image formed by a convex lens can be determined using the ray diagram. This diagram consists of three rays – the incident ray parallel to the principal axis, the incident ray passing through the focal point, and the incident ray passing through the center of the lens. By tracing these rays, the location and size of the real image can be determined.
Virtual Images:
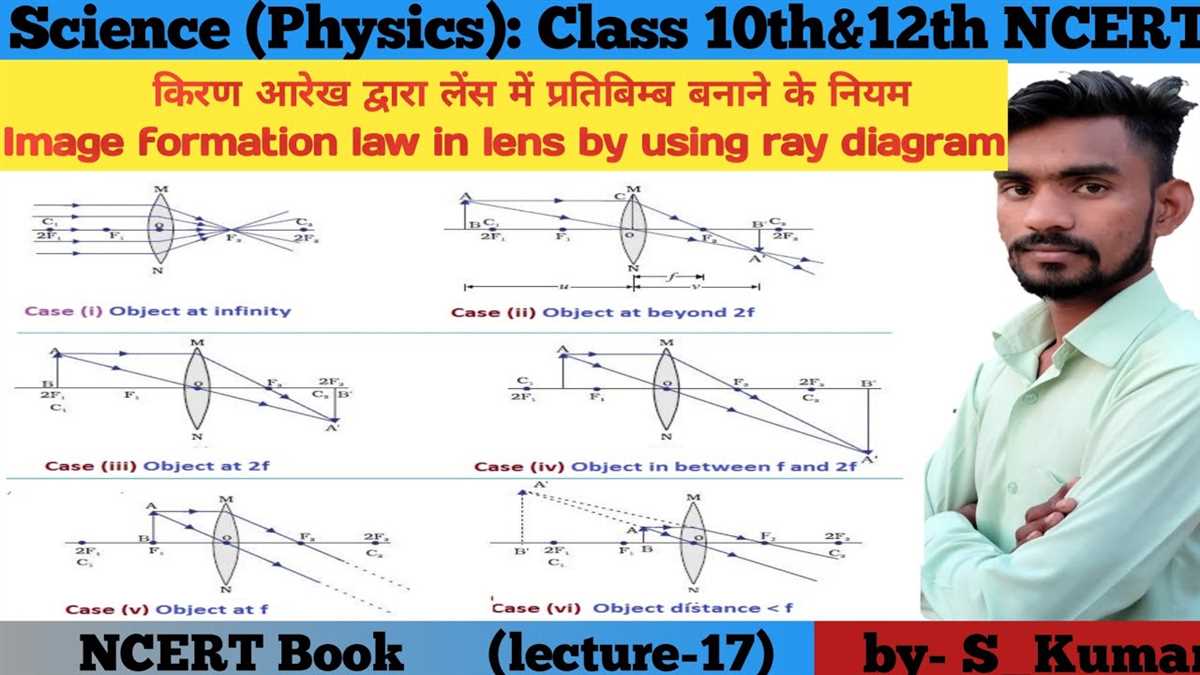
A virtual image is formed when light rays appear to diverge after passing through a convex lens. Unlike real images, virtual images cannot be projected onto a screen or captured by a film or sensor. They can only be seen when looking through the lens.
Virtual images formed by a convex lens are always erect (upright) and magnified. They are formed when the object is placed within the focal length of the lens. In this case, the rays diverge but appear to converge when traced back, creating a virtual image.
In summary, a convex lens can form both real and virtual images. Real images are formed when the light rays converge and can be projected onto a screen, while virtual images are formed when the rays appear to diverge and can only be seen when looking through the lens.