
When it comes to maintaining and repairing your Ry252cs, having a parts diagram can be incredibly helpful. This diagram provides a visual representation of all the different components that make up the trimmer, making it easier to identify and locate specific parts.
With a Ry252cs parts diagram, you can easily find replacement parts for your trimmer. Whether you’re looking for a new carburetor, fuel filter, or spark plug, the diagram will point you in the right direction. This saves you time and effort spent searching for the correct part, ensuring that your trimmer is back up and running in no time.
In addition, the parts diagram can also help you understand how your Ry252cs works. By seeing how each component fits together and interacts with the others, you can gain a better understanding of how the overall system functions. This knowledge can be valuable when it comes to troubleshooting issues or making adjustments to improve performance.
Overall, a Ry252cs parts diagram is an essential resource for anyone who owns or works with this trimmer. Whether you’re a DIY enthusiast or a professional landscaper, having access to this visual representation of the trimmer’s components can make maintenance and repairs much easier and more efficient.
Ry252cs Parts Diagram: Everything You Need to Know
If you own a Ryobi Ry252cs trimmer and need to repair or replace any of its parts, having a clear understanding of the parts diagram is essential. The parts diagram provides a visual representation of all the different components of the trimmer, allowing you to easily identify and locate the specific parts you need. Whether you are a seasoned DIYer or a beginner, familiarizing yourself with the Ry252cs parts diagram will help you troubleshoot and maintain your trimmer with ease.
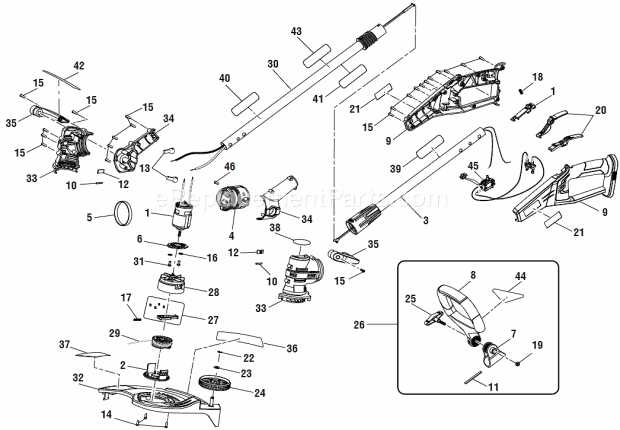
The Ry252cs parts diagram is divided into several sections, each representing a different part of the trimmer. The diagram typically includes components such as the air filter, spark plug, carburetor, fuel tank, shaft assembly, cutting head, and various other hardware and accessories. Each part is labeled with a unique reference number, making it easy to identify and order the correct replacement part.
When using the Ry252cs parts diagram, it’s important to have a basic understanding of the trimmer’s anatomy. The air filter, for example, is responsible for preventing debris from entering the engine and should be regularly checked and cleaned. The spark plug plays a crucial role in starting the engine and should be inspected and replaced if necessary. Understanding the function and placement of each part will help you maintain and repair your Ry252cs trimmer effectively.
Common Parts in the Ry252cs Parts Diagram:
- Air filter: Filters incoming air to prevent debris from entering the engine.
- Spark plug: Ignites the fuel-air mixture to start the engine.
- Carburetor: Mixes air and fuel for combustion in the engine.
- Fuel tank: Stores fuel for the trimmer’s operation.
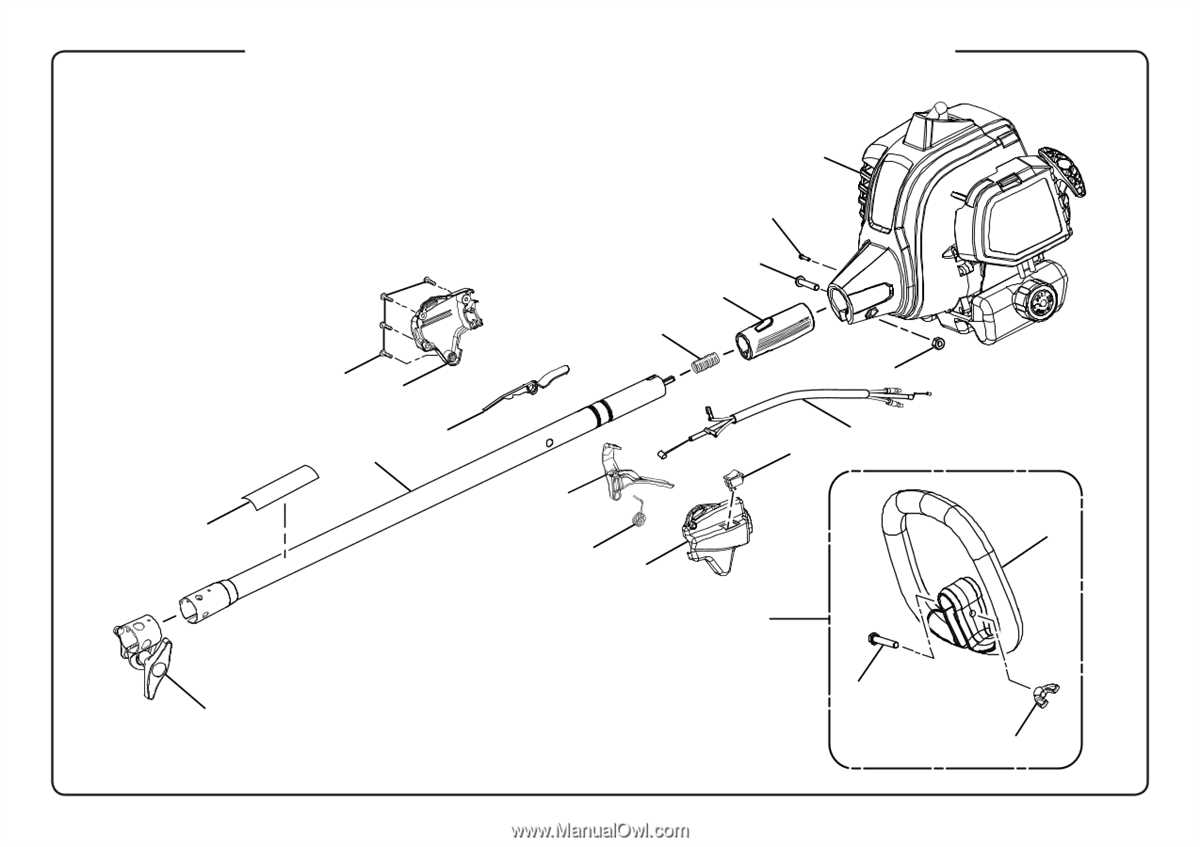
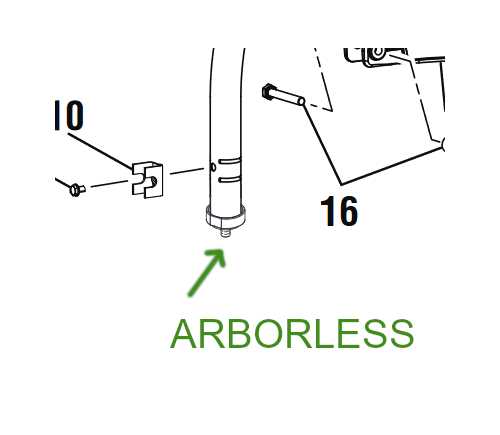
- Shaft assembly: Connects the engine to the cutting head.
- Cutting head: Houses the cutting line and allows for precise trimming.
By familiarizing yourself with the Ry252cs parts diagram and understanding the function of each component, you can confidently maintain and repair your trimmer. Whether you need to replace a worn-out part or troubleshoot an issue, the parts diagram is your go-to resource for a successful repair. Remember to always refer to the manufacturer’s instructions and guidelines when working on your Ry252cs trimmer to ensure safe and proper operation.
About the Ry252cs Trimmer
The Ry252cs Trimmer is a versatile and powerful tool designed for all your trimming needs. Whether you need to maintain a small yard or tackle a larger area, this trimmer is up to the task. With its durable construction and ergonomic design, it is built to last and provide maximum comfort during use.
The Ry252cs Trimmer features a 25cc 2-cycle engine, which delivers ample power and performance for cutting through thick grass and weeds. The engine is easy to start, thanks to the included StartEasy™ starting system, which eliminates the need for excessive pulling and priming. This system ensures a quick and reliable start every time.
Equipped with a 17-inch cutting swath, the Ry252cs Trimmer allows you to cover a large area with each pass, reducing the overall time spent on your trimming tasks. The dual-line bump feed head makes it easy to advance the trimmer line when needed, ensuring uninterrupted operation.
Featuring a Straight shaft design, the Ry252cs Trimmer provides extended reach and allows for easy trimming and edging along fences, yard borders, and other tight spaces. The included Split-Boom design makes it compatible with various attachments, expanding its functionality to include other yard maintenance tasks, such as hedge trimming and leaf blowing.
In conclusion, the Ry252cs Trimmer is a reliable and efficient tool that combines power, durability, and versatility. Whether you need to maintain a small yard or tackle larger trimming tasks, this trimmer is a great choice. With its user-friendly features and robust construction, it is a tool that will quickly become an essential part of your lawn care routine.
Exploring the Ry252cs Trimmer Parts
When it comes to maintaining your Ry252cs trimmer, it’s important to understand its various parts and their functions. By familiarizing yourself with the different components, you can easily identify and replace any worn or broken parts for optimal performance. Here, we will explore the key parts of the Ry252cs trimmer and their significance.
1. Fuel Tank:
The fuel tank is where the trimmer’s gasoline is stored. It is important to regularly check the fuel level and refill as needed to ensure uninterrupted operation. In case of leaks or damage, it is crucial to replace the fuel tank to avoid any accidents or damage to the trimmer.
2. Carburetor:
The carburetor is responsible for mixing the fuel and air in the correct proportions before being injected into the engine. It plays a vital role in the trimmer’s performance and must be properly maintained to prevent clogging or malfunctioning. Regular cleaning and adjustment of the carburetor will ensure smooth operation.
3. Cutting Head:
The cutting head is the part of the trimmer that houses the cutting line or blades. It is responsible for cutting grass, weeds, and other vegetation. The cutting head should be checked regularly for wear and tear, and if necessary, the cutting line or blades should be replaced for efficient trimming.
4. Starter Rope and Recoil Starter:
The starter rope and recoil starter are essential for starting the trimmer. The rope is pulled to rotate the engine’s crankshaft and start the combustion process. Over time, these parts may wear out or become damaged, requiring replacement to ensure easy starting of the trimmer.
5. Spark Plug:
The spark plug is a small component that provides the electrical spark needed for the combustion process in the engine. It is important to regularly check and clean the spark plug to ensure proper ignition. If the spark plug is damaged or worn out, it should be replaced to maintain the trimmer’s performance.
By understanding the importance of each part in the Ry252cs trimmer, you can effectively maintain and replace any necessary components for optimal performance and longevity. Regular maintenance and inspection of these parts will ensure that your trimmer operates smoothly and efficiently, allowing you to tackle any trimming tasks with ease.
How to Identify and Replace Common Ry252cs Trimmer Parts
When it comes to maintaining your Ry252cs trimmer, it’s important to be able to identify and replace common parts that may become worn or damaged over time. By learning how to recognize these parts and having the necessary replacements on hand, you can keep your trimmer running smoothly and efficiently. Here are some tips on identifying and replacing common Ry252cs trimmer parts:
1. Spark Plug
The spark plug is a key component of the trimmer’s engine and is responsible for igniting the fuel mixture. Over time, the spark plug can become fouled or worn, leading to decreased performance or difficulty starting. To replace the spark plug, locate it on the engine and use a spark plug wrench to carefully remove the old plug. Install a new spark plug and tighten it securely to ensure proper operation.
2. Trimmer Line
The trimmer line is what allows the trimmer to cut through grass and weeds. It can become worn or break over time, requiring replacement. To identify the trimmer line, look for a spool or reel located near the cutting head. Remove any remaining line and measure the length and diameter of the old line to ensure you purchase the correct replacement. Follow the manufacturer’s instructions for winding the new line onto the spool or reel.
3. Air Filter
The air filter on the trimmer prevents dirt and debris from entering the engine, which can cause damage and decrease performance. A dirty or clogged air filter can lead to engine issues, so it’s important to regularly inspect and clean or replace it as needed. To locate the air filter, look for a rectangular or cylindrical housing near the engine. Remove the cover and inspect the filter for dirt or damage. Clean the filter using compressed air or replace it with a new one if necessary.
4. Fuel Filter
The fuel filter is responsible for removing impurities from the gasoline before it reaches the engine. Over time, the fuel filter can become clogged, affecting the trimmer’s performance. To identify the fuel filter, locate the fuel line near the fuel tank. The filter may be inside the fuel tank or attached to the end of the fuel line. Carefully remove the old filter and replace it with a new one, ensuring it is properly seated and the fuel lines are securely attached.
By being able to identify and replace common Ry252cs trimmer parts like the spark plug, trimmer line, air filter, and fuel filter, you can keep your trimmer in top shape and ensure it performs at its best. Regular maintenance and replacement of worn or damaged parts will prolong the life of your trimmer and provide you with reliable and efficient trimming power.
Understanding the Ry252cs Parts Diagram

When it comes to maintaining and repairing your Ryobi Ry252cs trimmer, it’s important to have a good understanding of its parts diagram. This diagram provides a detailed breakdown of all the components that make up the trimmer, allowing you to identify and locate specific parts when needed. By familiarizing yourself with this diagram, you can effectively troubleshoot any issues and ensure the proper replacement of damaged parts.
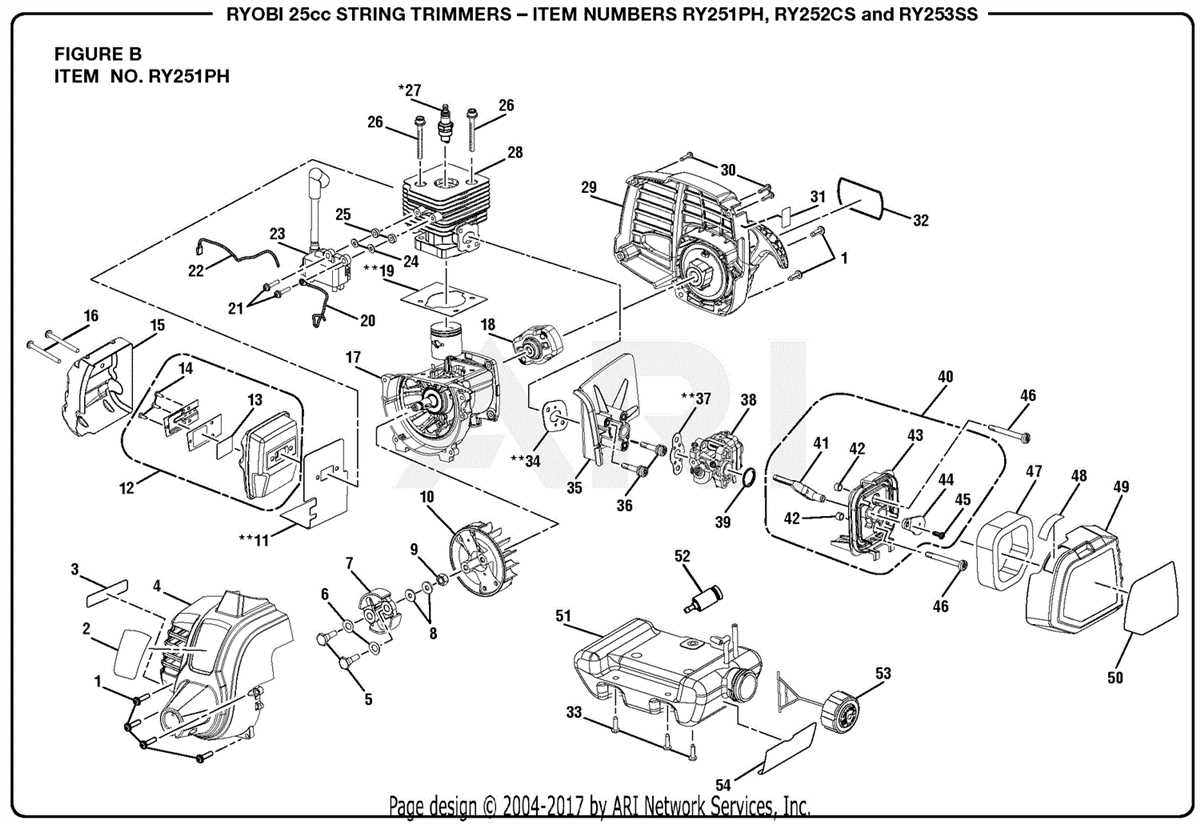
The Ry252cs parts diagram consists of various sections, each representing a different part of the trimmer. These sections are typically labeled and numbered for ease of reference. Some of the key components that you’ll find in the diagram include the engine assembly, handle assembly, throttle control, fuel tank, cutting head, and spark plug. Each of these parts plays a crucial role in the functioning of the trimmer, and understanding their placement and connections is essential for proper maintenance.
The engine assembly is one of the most critical sections in the parts diagram. It includes components such as the carburetor, air filter, ignition module, and recoil starter. By referring to the diagram, you can easily locate and inspect these parts, ensuring they are clean and functioning properly. If any issues arise, the diagram can help you identify the specific part that may need to be repaired or replaced.
- The handle assembly section of the diagram provides a breakdown of the various parts that make up the trimmer’s handle, including the throttle trigger, ON/OFF switch, and debris shield. This section is crucial for understanding how to properly grip and operate the trimmer, as well as for troubleshooting any handle-related issues.
- The cutting head section of the diagram showcases the different parts involved in the trimmer’s cutting mechanism, such as the trimmer head, trimmer line, and blade guard. By referring to this section, you can ensure that the cutting head is properly assembled and that the trimmer line is correctly threaded.
- The fuel tank section provides an overview of the parts involved in the trimmer’s fuel system, including the fuel cap, fuel lines, and fuel filter. This section is especially important for troubleshooting fuel-related problems, such as clogged fuel lines or a faulty fuel filter.
- The spark plug section highlights the location and connections of the trimmer’s spark plug. This component plays a vital role in igniting the fuel mixture in the engine, and if it becomes worn or damaged, it can lead to poor engine performance. The diagram can help you identify the spark plug and ensure that it is properly connected and functioning.
Overall, understanding the Ry252cs parts diagram is essential for maintaining and repairing your trimmer. By familiarizing yourself with the various sections and components, you can effectively troubleshoot problems, identify damaged parts, and ensure the proper functioning of your trimmer. Whether you need to replace a specific part or perform routine maintenance, the parts diagram will serve as a valuable resource.
Tips and Tricks for Maintaining Your Ry252cs Trimmer
Maintaining your Ry252cs trimmer is essential to ensure its optimal performance and longevity. Regular maintenance not only helps to keep your trimmer running smoothly but also prevents potential issues and extends its lifespan. Here are some tips and tricks to help you maintain your Ry252cs trimmer:
1. Clean the Air Filter Regularly
The air filter in your Ry252cs trimmer plays a crucial role in preventing dust and debris from entering the engine. Over time, the air filter can become clogged with dirt, affecting the engine’s performance. To maintain your trimmer, make sure to clean the air filter regularly. Remove the air filter cover, take out the air filter, and clean it with compressed air or soapy water. Allow it to dry completely before reinstalling.
2. Check and Replace the Spark Plug
The spark plug is another important component of your trimmer’s engine. It ignites the fuel mixture, enabling the engine to start. Over time, the spark plug can become dirty or worn out, resulting in poor performance or difficulty starting the trimmer. Check the spark plug regularly and clean or replace it if necessary. Refer to the manufacturer’s guidelines for the correct spark plug and replacement procedure.
3. Inspect the Trimmer Head
The trimmer head is responsible for cutting and trimming vegetation. Over time, the trimmer head can get clogged with grass, weeds, and debris, preventing it from spinning freely. Inspect the trimmer head regularly and remove any accumulated debris. If the trimmer head is worn or damaged, consider replacing it to maintain optimal cutting performance.
4. Lubricate Moving Parts
The moving parts of your Ry252cs trimmer, such as the throttle trigger and shaft, benefit from regular lubrication. Use a lubricant recommended by the manufacturer to reduce friction and ensure smooth operation. Apply the lubricant to the specified areas according to the user manual’s instructions.
5. Store Your Trimmer Properly
When not in use, it is essential to store your Ry252cs trimmer properly. Clean the trimmer thoroughly, remove any fuel, and store it in a dry and secure place. Avoid exposing the trimmer to extreme temperatures or moisture, as it can damage the engine and other components.
By following these tips and tricks, you can ensure that your Ry252cs trimmer remains in excellent condition and provides reliable performance for years to come.
Frequently Asked Questions about Ry252cs Parts
Here are some frequently asked questions about Ry252cs parts:
1. Which parts are included in the Ry252cs trimmer?
The Ry252cs trimmer typically includes the following parts:
- Engine housing
- String trimmer head
- Shaft assembly
- Handle assembly
- Throttle trigger
- Spark plug
- Air filter
- Fuel cap
- Other related parts and accessories
2. Can I replace the parts of my Ry252cs trimmer by myself?
Yes, you can replace the parts of your Ry252cs trimmer by yourself. However, it is recommended to refer to the user manual or seek professional assistance for complex replacements or repairs.
3. Where can I find genuine Ry252cs parts?
Genuine Ry252cs parts can be found at authorized dealerships, online retailers, and the official website of Ryobi. It is important to purchase genuine parts to ensure compatibility and optimal performance.
4. How often should I replace the air filter and spark plug in my Ry252cs trimmer?
The air filter and spark plug of the Ry252cs trimmer should be regularly inspected and replaced as needed. It is recommended to replace the air filter and spark plug at least once a year or as per the manufacturer’s guidelines.
5. What should I do if a specific part of my Ry252cs trimmer is not working properly?
If a specific part of your Ry252cs trimmer is not working properly, you can try troubleshooting steps mentioned in the user manual. If the issue persists, it is advisable to contact customer support or take the trimmer to an authorized service center for further assistance.
In conclusion, understanding the various parts of the Ry252cs trimmer and knowing where to find genuine replacements can help ensure the longevity and optimal performance of the trimmer.