
When it comes to controlling the temperature in your home, a thermostat is an essential device. One popular and innovative option on the market is the Nest thermostat. The Nest thermostat offers smart features and seamless integration with other smart home devices. But before you can start enjoying the benefits of a Nest thermostat, you need to understand its wiring diagram.
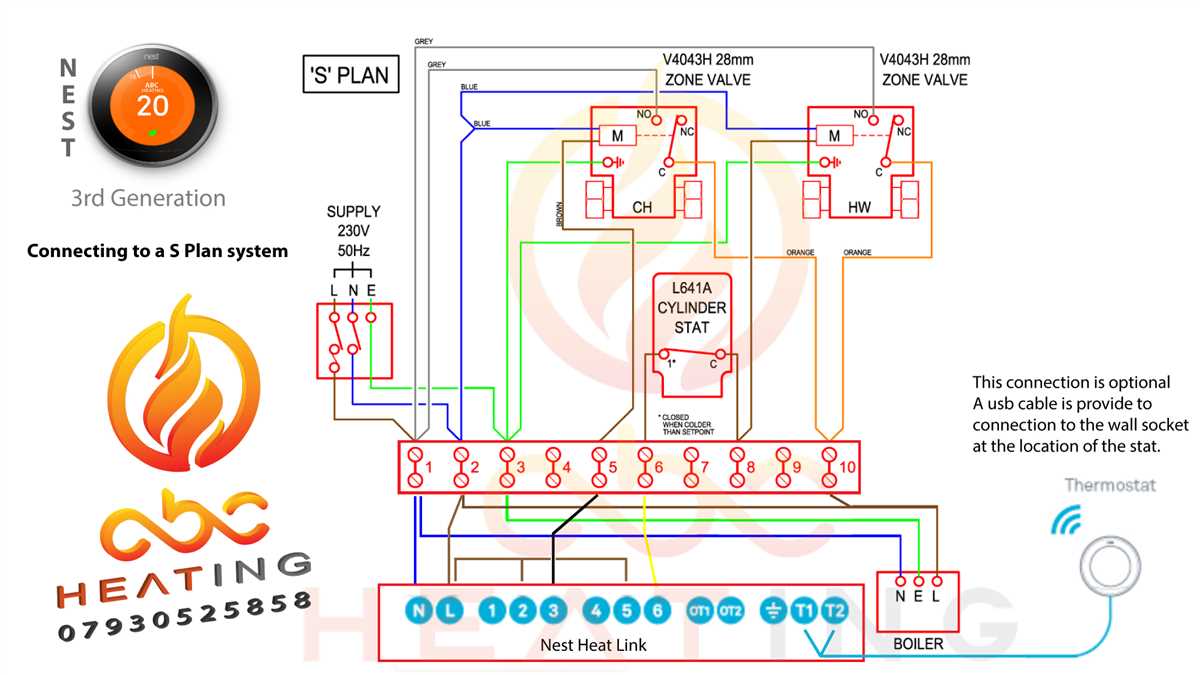
The Nest thermostat wiring diagram provides a visual representation of how the thermostat is connected to your heating and cooling system. It shows the different wires and terminals that connect the thermostat to the system, allowing you to understand the functionality of each wire. This is important because proper wiring ensures the thermostat can communicate with your HVAC system effectively.
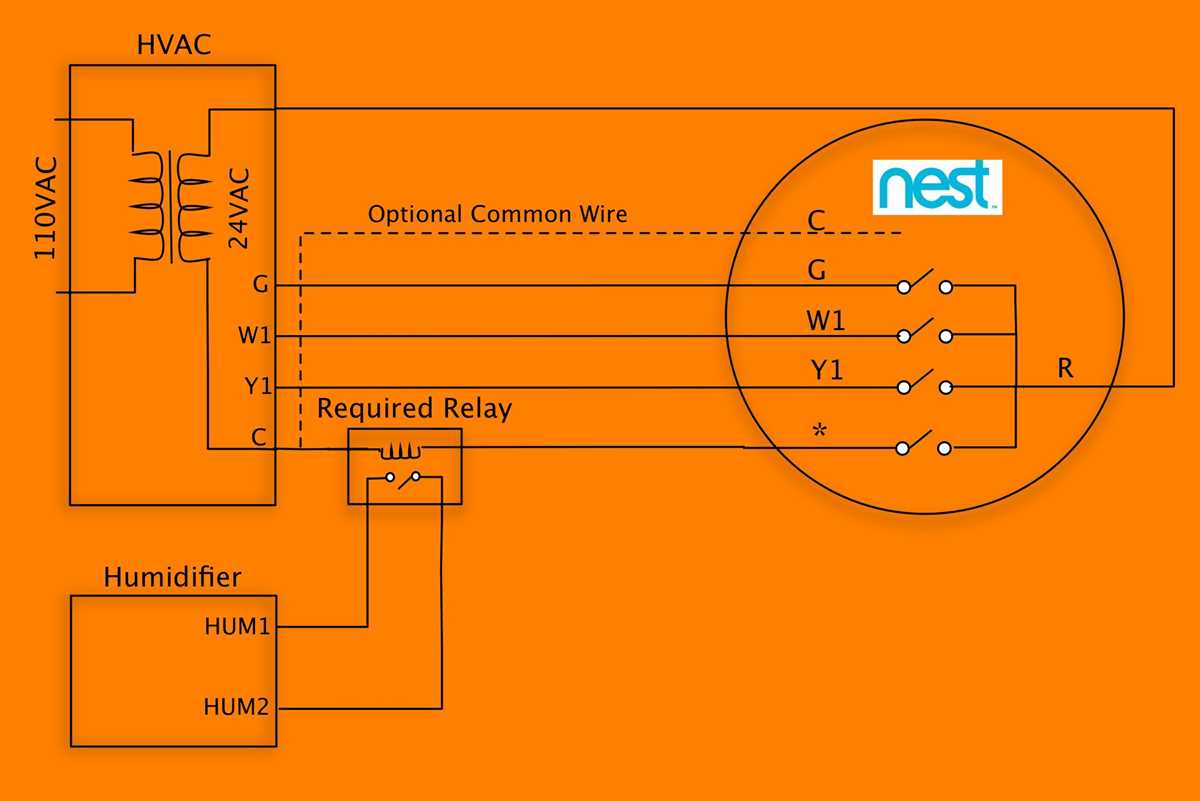
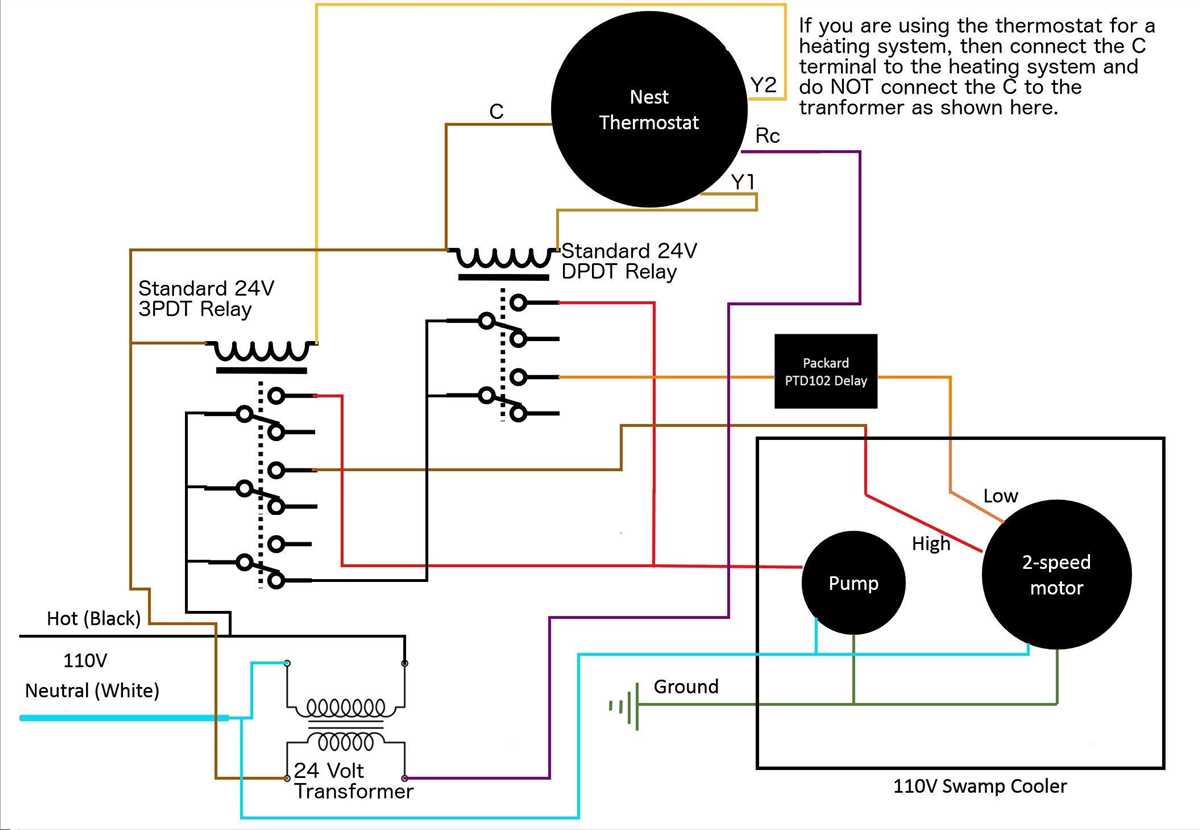
The wiring diagram typically includes labels for each wire, indicating its purpose. These labels could include W1 and W2 for heating, Y1 and Y2 for cooling, G for fan control, and C for the common wire. Understanding these labels helps you identify which wire is connected to which terminal on the thermostat and the HVAC system.
By referring to the thermostat wiring diagram for Nest, you can confidently install or troubleshoot your Nest thermostat. It ensures that you make the right connections and avoid damaging the thermostat or your HVAC system. Whether you’re a DIY enthusiast or hiring a professional, having a clear understanding of the wiring diagram is crucial for a successful installation and optimal performance of your Nest thermostat.
What is a Thermostat Wiring Diagram?
A thermostat wiring diagram is a schematic representation of the electrical connections and wiring configuration for a thermostat. It provides a visual guide for identifying and connecting the different wires from the HVAC system to the thermostat. This diagram is essential for correctly installing and troubleshooting a thermostat, as it shows the proper wiring connections and color codes.
The thermostat wiring diagram typically includes labels or color-coded letters for each wire, such as R, W, Y, G, C, and O/B. These letters correspond to specific functions or terminals on the thermostat and HVAC system. The diagram also indicates how the wires should be connected, whether they should be twisted together, soldered, or connected with wire nuts.
Importance of a Thermostat Wiring Diagram
A thermostat wiring diagram is essential for several reasons. Firstly, it ensures that the thermostat is wired correctly to the HVAC system, allowing for proper control of heating and cooling. It helps prevent common wiring mistakes, such as connecting the wrong wires or reversing polarity, which could damage the equipment or cause malfunctions.
Secondly, a thermostat wiring diagram serves as a reference for troubleshooting. When there is an issue with the thermostat or HVAC system, the diagram helps identify potential wiring problems, such as loose connections or damaged wires. This allows HVAC technicians or homeowners to troubleshoot and fix the issue more efficiently.
In summary, a thermostat wiring diagram is a crucial tool for installing, configuring, and troubleshooting thermostats. It provides a clear and visual representation of how the wires should be connected, ensuring proper functionality and preventing wiring errors.
Understanding the Basics

When it comes to installing a Nest thermostat, it’s important to understand the basics of thermostat wiring. The wiring diagram for a Nest thermostat can help guide you through the installation process, ensuring you connect everything correctly.
Wires: The thermostat wiring consists of several wires, each with a specific purpose. Common wire labels include R, C, Y, W, G, and O/B. The R wire is the power wire, connecting to the heating and cooling system’s transformer. The C wire is the common wire, providing a constant source of power. The Y wire controls the air conditioning system, the W wire is for heating, the G wire is for the fan, and the O/B wire controls the heat pump system.
Circuits: Understanding the circuit connections is crucial for a successful installation. The Nest thermostat can have multiple connections, such as Rc and Rh for separate heating and cooling systems. It’s important to follow the wiring diagram and ensure each wire is connected to the correct terminal, avoiding any crossed wires or incorrect connections.
Compatibility: Before installing a Nest thermostat, it’s important to check if your heating and cooling system is compatible. The Nest thermostat is compatible with most systems, including gas, electric, oil, and heat pump systems. However, some systems may require additional wires or adapters. The wiring diagram can help determine if your system is compatible and guide you through any necessary adjustments.
- Installation: Once you have a good understanding of the wiring diagram and compatibility, you can proceed with the installation. Start by turning off the power to the heating and cooling system. Then, remove the old thermostat and disconnect any wires. Follow the wiring diagram to connect the wires to the corresponding terminals on the Nest thermostat. Finally, mount the Nest thermostat on the wall and restore power to the system.
- Troubleshooting: If you encounter any issues during the installation or after, the wiring diagram can be a helpful troubleshooting tool. It can help identify any wiring errors or compatibility issues. Additionally, the Nest app and online resources provide further assistance for resolving common installation problems.
By understanding the basics of thermostat wiring and using the wiring diagram as a guide, you can install a Nest thermostat with confidence. Whether you’re replacing an old thermostat or installing a new one, taking the time to understand the wiring and ensuring it’s connected correctly is essential for optimal performance and energy efficiency.
The Importance of a Properly Wired Thermostat
A thermostat is a crucial component in any heating and cooling system, as it controls the temperature and helps maintain a comfortable indoor environment. However, it is equally important to ensure that the thermostat is properly wired to function effectively and avoid any potential issues.
One of the main reasons why a properly wired thermostat is important is because it ensures accurate temperature control. The thermostat relies on the correct wiring connections to communicate with the heating or cooling system accurately. If the wiring is incorrect or poorly connected, the thermostat may not be able to properly read or adjust the temperature, resulting in discomfort and inefficient operation.
Another reason why proper wiring is essential is for safety purposes. Incorrectly wired thermostats can pose a fire hazard, as faulty wiring can cause overheating or short circuits. By following the manufacturer’s instructions and properly connecting the wires, you can minimize the risk of electrical accidents and ensure the safety of your home or building.
Additionally, a properly wired thermostat can contribute to energy efficiency. When the thermostat is wired correctly, it can communicate with the heating or cooling system more effectively, allowing it to efficiently regulate the temperature and reduce energy consumption. This not only helps save on energy costs but also benefits the environment by reducing greenhouse gas emissions.
In conclusion, ensuring that your thermostat is properly wired is essential for effective temperature control, safety, and energy efficiency. By following the wiring diagram provided by the thermostat manufacturer and seeking professional assistance if needed, you can ensure that your thermostat functions optimally and provides a comfortable and efficient indoor environment.
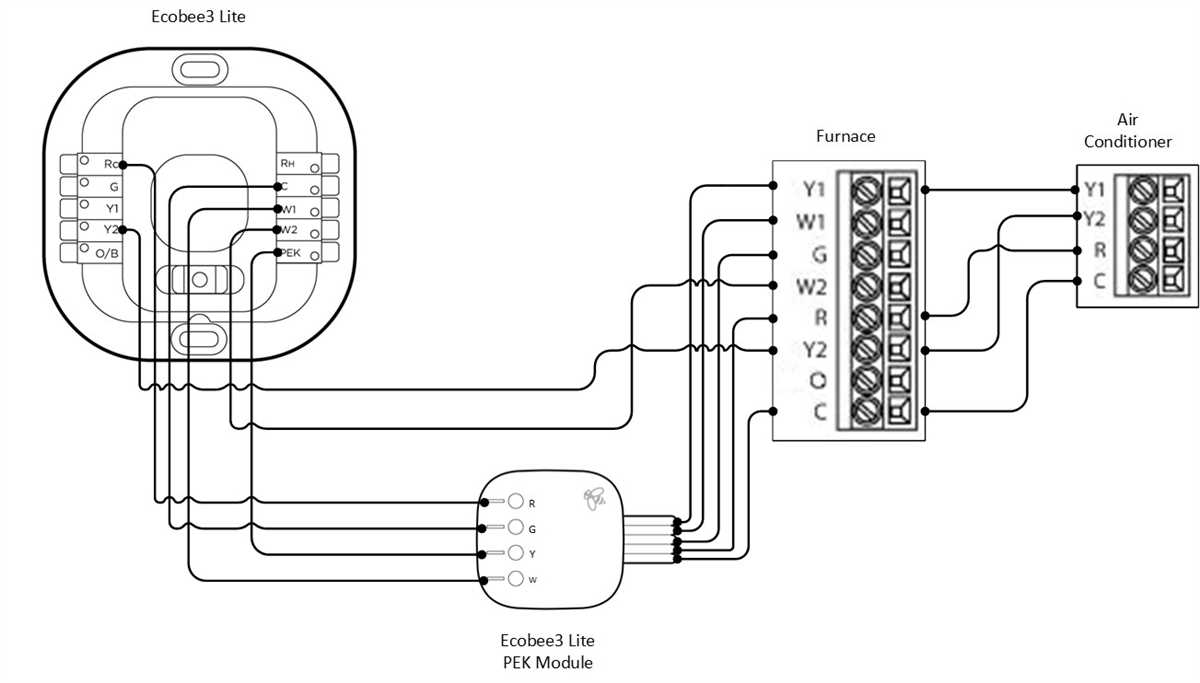
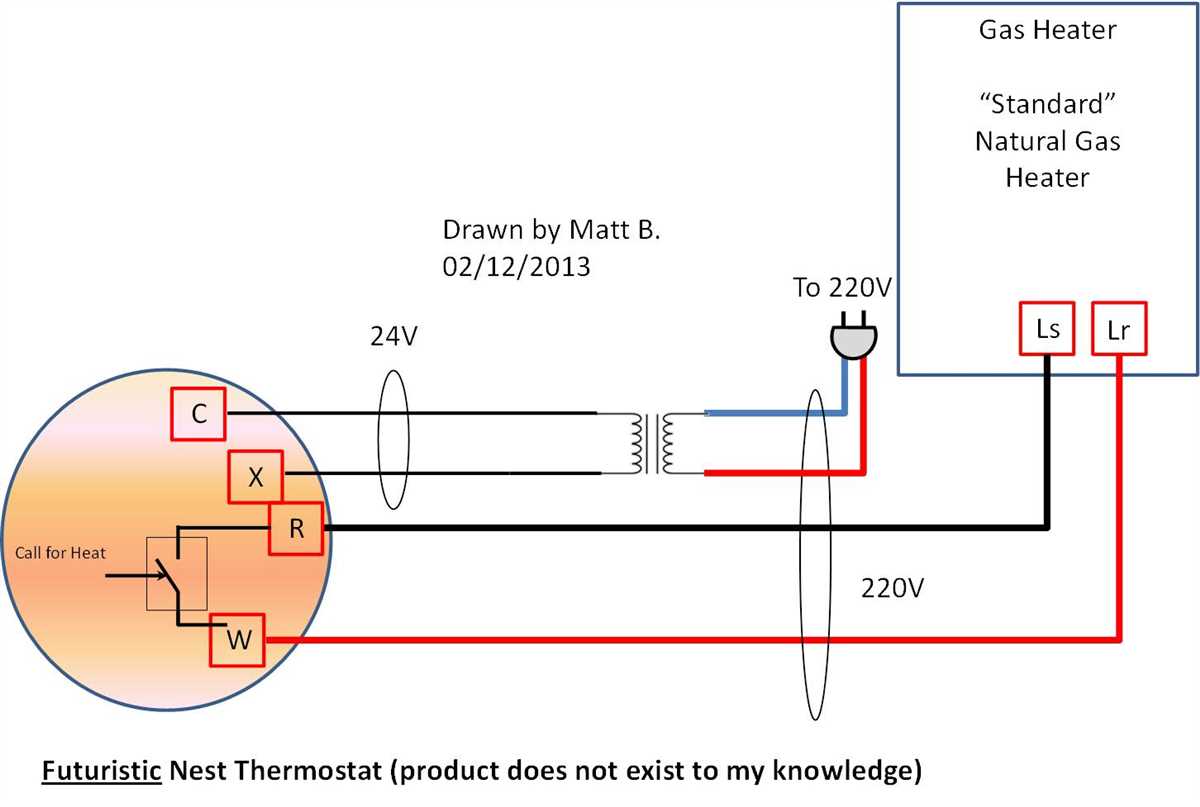
Common Nest Thermostat Wiring Diagram
When it comes to installing a Nest thermostat, it is important to understand the wiring diagram for proper installation. The Nest thermostat is equipped with several terminals that correspond to different HVAC components, and each terminal needs to be wired correctly to ensure proper functioning of the thermostat.
Here is a common wiring diagram for the Nest thermostat:
- Rh or Rc: This terminal is for the 24V power supply from the heating or cooling system.
- W: This terminal is for the heating control wire, which is typically connected to the W terminal on the furnace control board.
- Y: This terminal is for the cooling control wire, which is typically connected to the Y terminal on the air conditioner control board.
- G: This terminal is for the fan control wire, which is typically connected to the G terminal on the furnace or air handler control board.
- C: This terminal is for the common wire, which provides a continuous 24V power supply for the thermostat. This wire is typically connected to the C terminal on the furnace or air handler control board.
It is important to note that the wiring diagram may vary depending on the specific HVAC system and the wiring configuration. Some systems may require additional wires or have different terminal labels. It is recommended to consult the Nest thermostat installation guide or contact a professional HVAC technician for help with the wiring if you are unsure.
Step-by-Step Guide: Wiring Your Nest Thermostat

Installing a Nest thermostat can help improve the overall energy efficiency of your home. One key step in the installation process is wiring the thermostat correctly to ensure it functions properly. This step-by-step guide will walk you through the wiring process for your Nest thermostat.
Step 1: Turn off Power

Before starting the wiring process, it is crucial to turn off the power to your HVAC system. This can typically be done by switching off the power at the circuit breaker controlling your HVAC system.
Step 2: Remove Old Thermostat
Next, carefully remove your old thermostat from the wall. This may involve unscrewing it from the wall plate or detaching it in other ways. Be sure to follow the manufacturer’s instructions for your specific thermostat model.
Step 3: Identify Wiring
Once the old thermostat is removed, you will need to identify the wires connected to it. These wires control various functions of your HVAC system such as heating, cooling, and fan. Common wire labels include R, C, Y, G, W, and others. Make note of which wires are connected to which terminals.
Step 4: Match Wires to Nest
Now, refer to the wiring diagram provided by Nest and match the wires from your old thermostat to the corresponding terminals on the Nest thermostat. The diagram will help you understand which wires go where and ensure proper connectivity.
Step 5: Connect Wires
Gently insert the wires into the corresponding terminals on the Nest thermostat and use a screwdriver to secure them in place. Double-check that each wire is securely connected to the correct terminal before proceeding.
Step 6: Attach Nest Thermostat
With the wiring complete, carefully attach the Nest thermostat to the wall plate according to the manufacturer’s instructions. Make sure it is level and secure before continuing.
Step 7: Power on and Test
Once the Nest thermostat is securely attached, switch the power back on at the circuit breaker. The thermostat will power on and guide you through the setup process. Follow the on-screen instructions to connect your thermostat to your Wi-Fi network and customize your settings.
By following this step-by-step guide, you can confidently wire your Nest thermostat and enjoy the energy-saving benefits it offers.
Troubleshooting and Tips
When troubleshooting any issues with your Nest thermostat wiring, there are a few things to keep in mind. Here are some common problems and tips for resolving them:
- No power to the thermostat: Check if the power is connected properly and if the circuit breaker is on. Make sure the wires are securely connected to the corresponding terminals.
- Incorrect wiring: Double-check the wiring connections and compare them with the wiring diagram provided by Nest. Ensure that each wire is connected to the correct terminal.
- Compatibility issues: Verify that your HVAC system is compatible with the Nest thermostat. Some systems may require additional wiring or a different setup. Refer to the Nest compatibility guide for more information.
- Wire labeling: If the wires are not labeled, use a multimeter to identify the correct wire function. This will help ensure proper wiring connections.
- Thermostat configuration: Make sure you have set up your Nest thermostat correctly using the Nest app. Check the settings and ensure they are appropriate for your HVAC system.
- Inconsistent temperature readings: If you notice temperature discrepancies, recalibrate the thermostat using the Nest app. This will help improve accuracy.
If you encounter any other issues or have further questions about wiring your Nest thermostat, refer to the Nest support website or contact their customer support for assistance. Remember to always follow safety precautions and consult a professional if you are unsure about any aspect of thermostat wiring.
| Problem | Solution |
|---|---|
| No power to the thermostat | Check power connection and circuit breaker |
| Incorrect wiring | Double-check wiring connections |
| Compatibility issues | Verify HVAC system compatibility |
| Wire labeling | Use multimeter to identify wire function |
| Thermostat configuration | Ensure proper setup with Nest app |
| Inconsistent temperature readings | Recalibrate thermostat using Nest app |
By following these troubleshooting tips, you should be able to resolve most common issues with your Nest thermostat wiring. Remember to consult the Nest support resources or seek professional assistance if needed. Enjoy the convenience and energy savings provided by your Nest thermostat!