
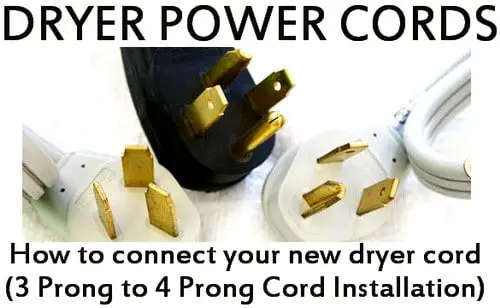
When it comes to connecting a dryer to a power source, it’s important to use the correct cord and wiring. In the past, most dryers were equipped with a three-prong cord, but newer models now require a four-prong cord for safety reasons. Understanding the differences between these two types of cords is crucial to ensure proper functioning of your dryer and to avoid any potential electrical hazards.
The three-prong dryer cord consists of three wires – two hot wires and one neutral wire – that provide power to the dryer. The hot wires carry the current from the circuit breaker to the dryer, while the neutral wire completes the circuit and returns the current back to the panel. This type of cord is commonly used in older homes where the electrical systems are not equipped with a grounding wire.
However, modern electrical codes now require the use of a four-prong dryer cord. The additional wire in the four-prong cord is the grounding wire, which helps to protect against electrical shocks and increases the overall safety of the dryer. By connecting the grounding wire to a metal rod or other grounded object, it allows any excess electrical energy to be safely discharged, rather than potentially causing damage or injury.
What is a three prong dryer cord?
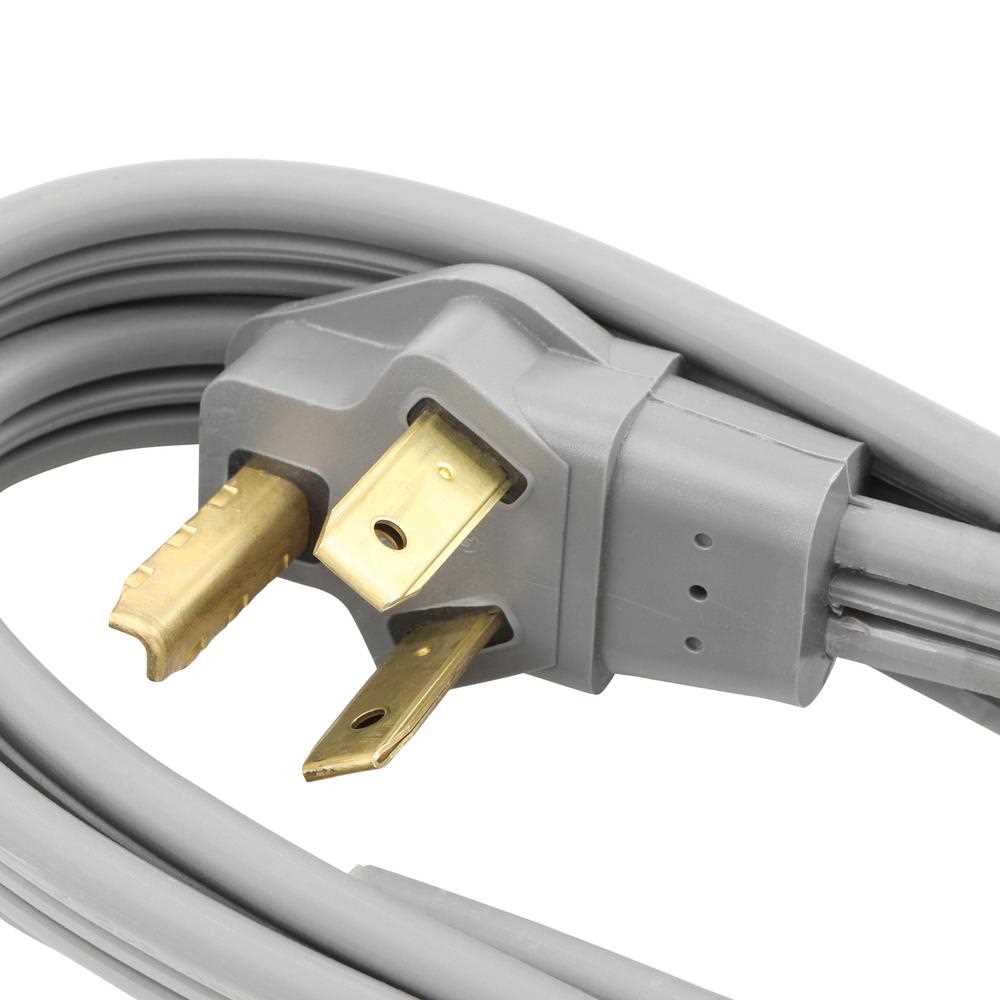
A three prong dryer cord is a type of electrical cord that is used to connect a dryer to a power source. It is designed specifically for use with dryers and has three prongs or pins, which correspond to the specific electrical connections on the dryer. This type of cord is essential for providing the necessary electrical power for the dryer to function properly.
The three prongs on the dryer cord are usually color-coded for easy identification. The two outer prongs are usually flat and the center prong is usually round. These prongs correspond to the hot, neutral, and ground wires in an electrical circuit. The hot wires carry the current from the power source to the dryer, the neutral wire provides a return path for the current, and the ground wire helps to protect against electrical shock.
- Hot wires: These are usually the black and red wires and carry the current from the power source to the dryer.
- Neutral wire: This is usually the white wire and provides a return path for the current.
- Ground wire: This is usually the green wire and is connected to the dryer’s metal frame to protect against electrical shock.
When installing a three prong dryer cord, it is important to ensure that the cord is properly connected to the corresponding wires in the electrical circuit. Improper installation can result in electrical hazards or damage to the dryer. It is also important to check the dryer’s manufacturer instructions and local electrical codes for any specific requirements or recommendations.
A brief explanation of three prong dryer cords and their purpose
Three prong dryer cords are electrical cords used to connect dryers to power outlets. They consist of three wires or prongs, each serving a specific purpose in the electrical circuit. The three prongs are usually color-coded for easy identification and installation.
The first prong is typically the grounding wire, which is connected to the metal frame of the dryer. Its purpose is to provide a path for electrical current to flow safely into the ground in the event of a malfunction or electrical surge. This helps prevent electrical shocks and protects the dryer and its users from potential harm.
The second prong is the neutral wire, which carries the current back to the power source. It completes the electrical circuit and helps balance the electrical load. This prong is usually color-coded white.
The third prong is the hot wire, which carries the current from the power source to the dryer. It is responsible for providing the necessary electrical energy to power the dryer’s components and heat the drying air. This prong is typically color-coded black or red.
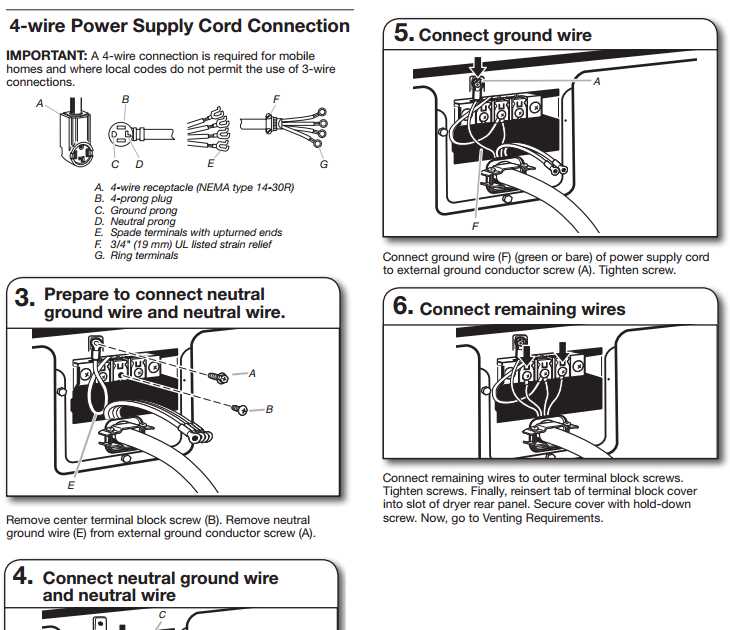
It is important to note that some older homes may have a different type of power outlet that only accepts a four prong dryer cord. In such cases, an adapter or an electrician may be required to install the correct outlet or modify the dryer’s cord.
Understanding the three prong dryer cord diagram
The three prong dryer cord diagram is an essential guide for homeowners who need to install or replace the electrical cord on their dryer. It provides a visual representation of the correct wiring connections for the dryer, ensuring a safe and efficient operation.
Key components in the diagram:
- Green wire: The green wire in the diagram represents the grounded conductor, also known as the equipment grounding conductor. It is responsible for providing a safe path for electrical current in case of a malfunction or electrical surge.
- White wire: The white wire is the neutral conductor. It carries the return current from the dryer back to the electrical panel. It is important to ensure that the white wire is properly connected and isolated from the other wires in the dryer cord.
- Black wire: The black wire is the hot conductor, carrying the current from the electrical panel to the dryer. It is essential to connect the black wire to the correct terminal to avoid any electrical hazards or damage to the dryer.
- Red wire (optional): Some dryer models may have a red wire instead of a black wire. The red wire serves the same purpose as the black wire, carrying the hot current to the dryer. It should be connected to the appropriate terminal according to the manufacturer’s instructions.
By referring to the three prong dryer cord diagram, homeowners can ensure that they make the correct connections and avoid any potential electrical hazards. It is important to follow the diagram and any additional instructions provided by the dryer manufacturer to ensure a safe and efficient installation.
An overview of the components and connections in the diagram
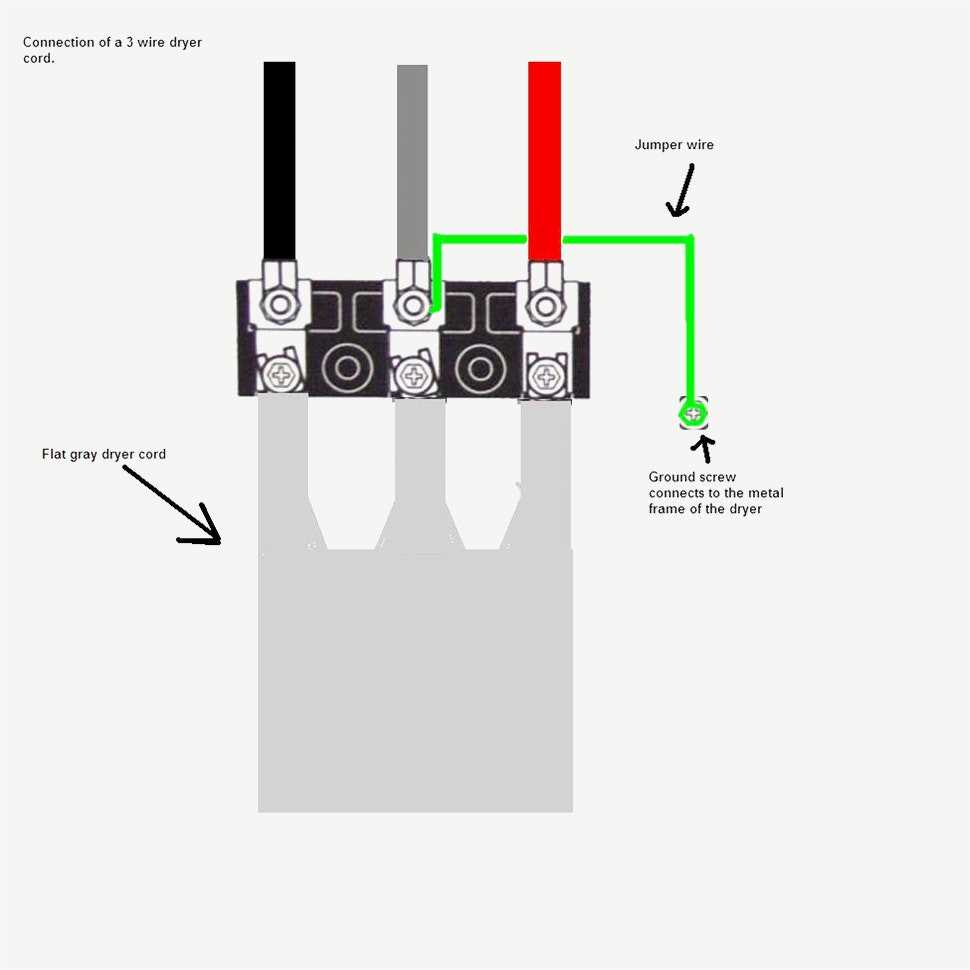
The three prong dryer cord diagram illustrates the various components and connections involved in setting up a dryer with a three-prong power cord.
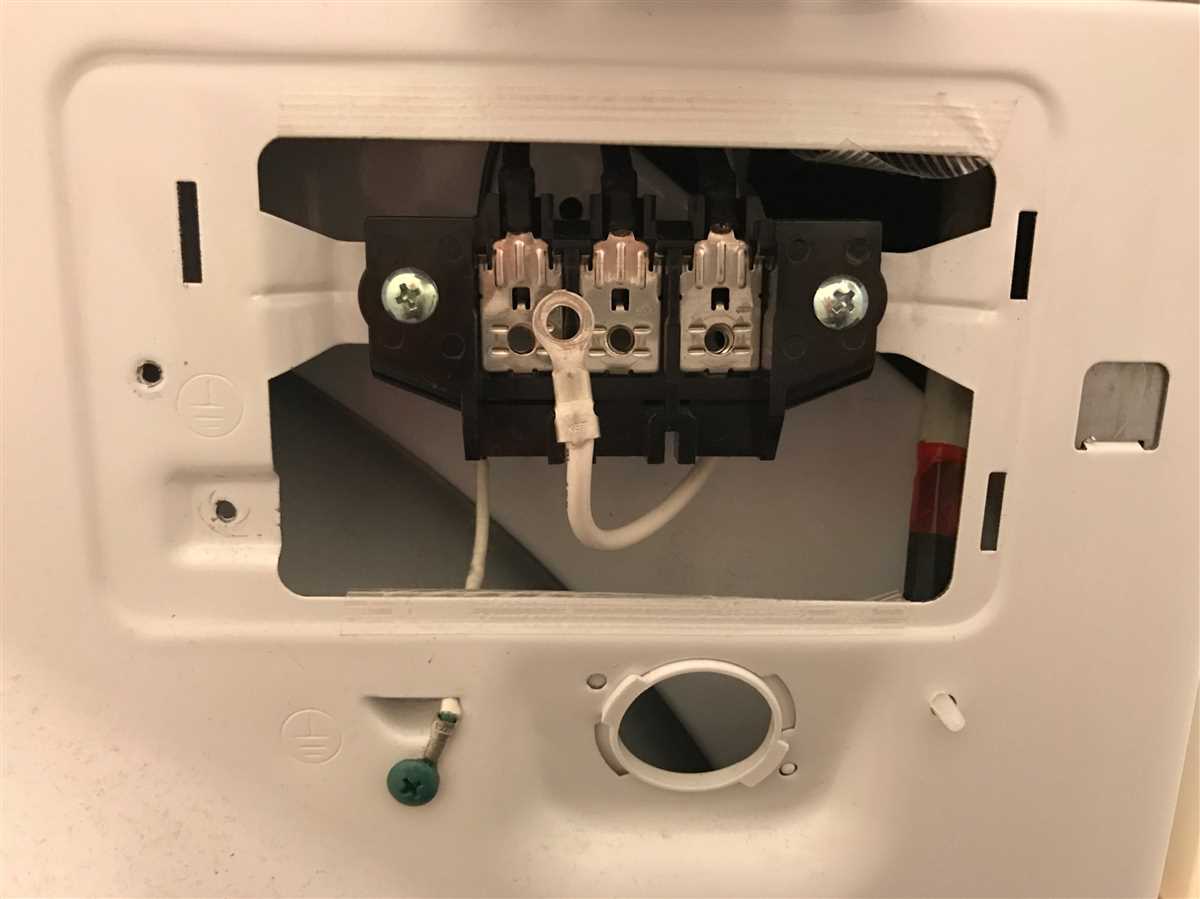
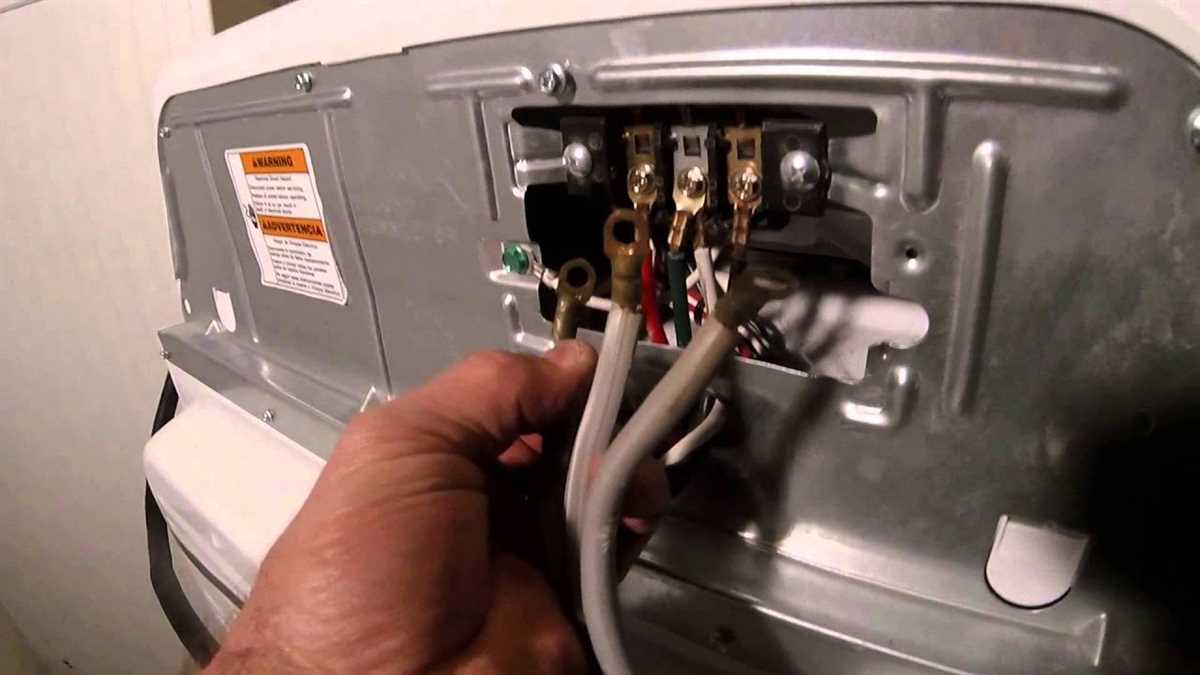
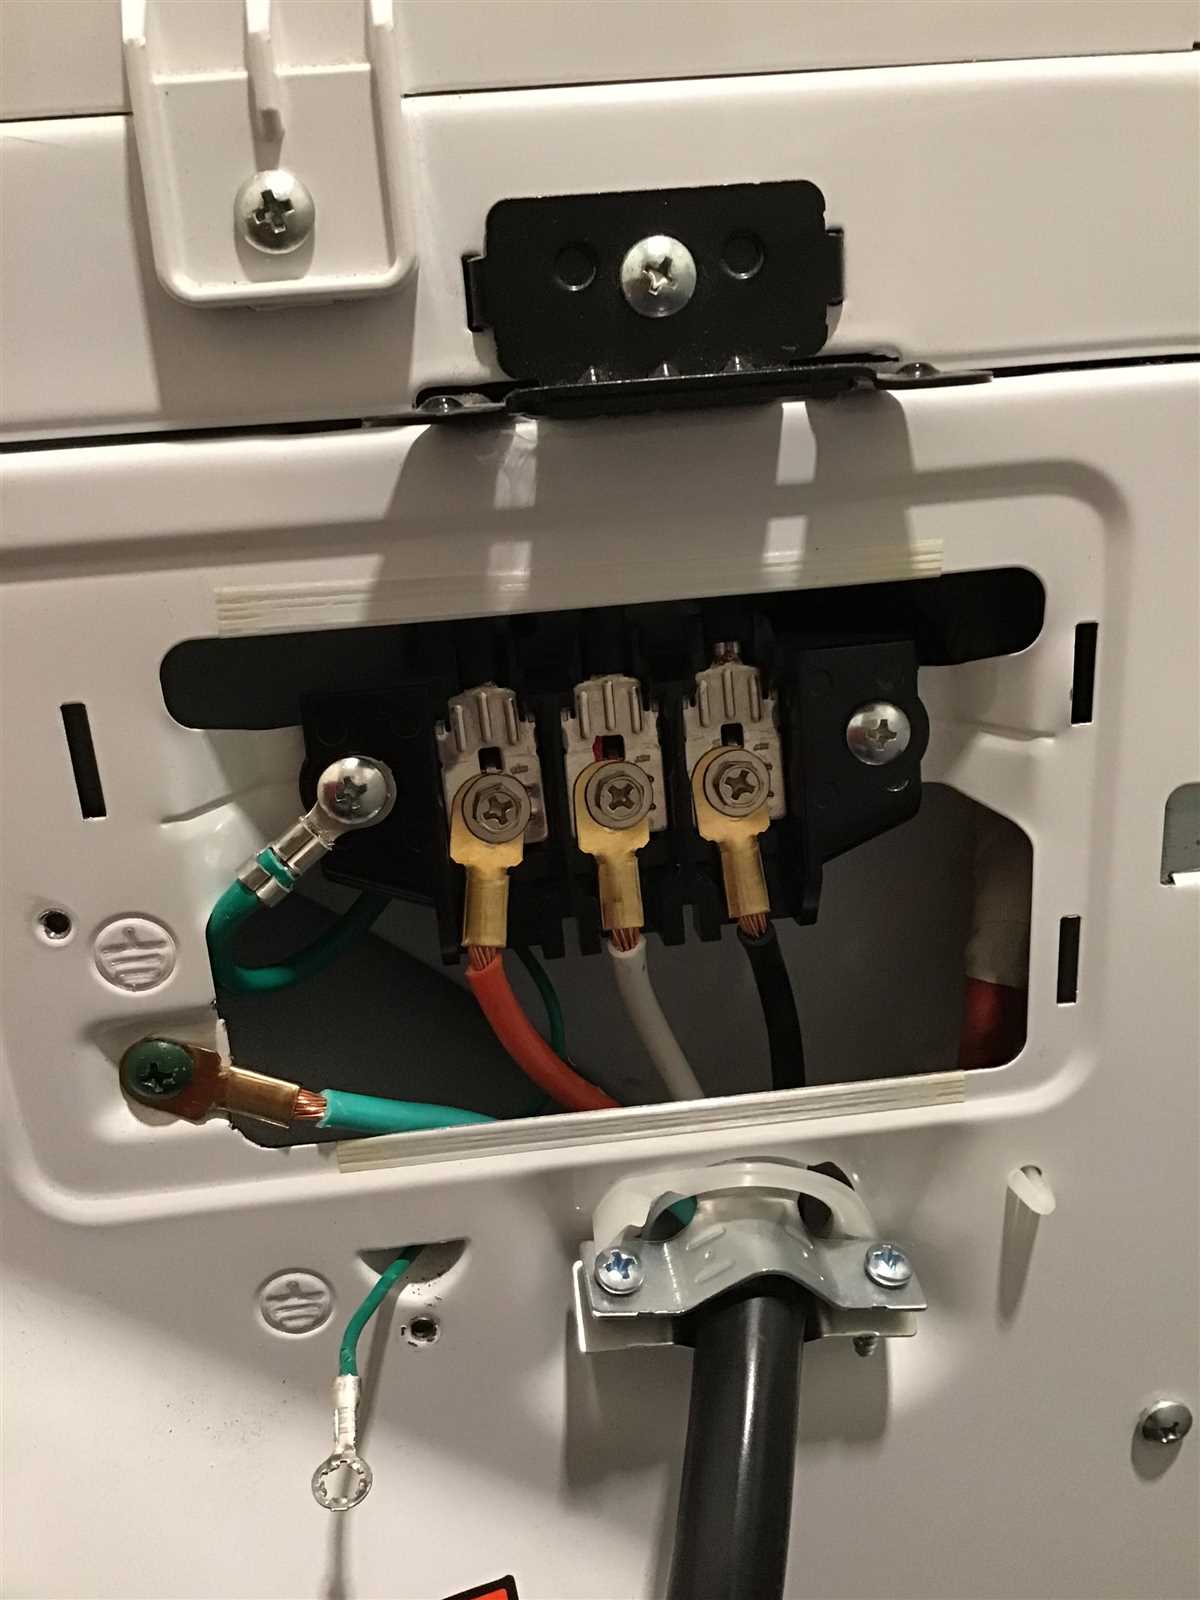
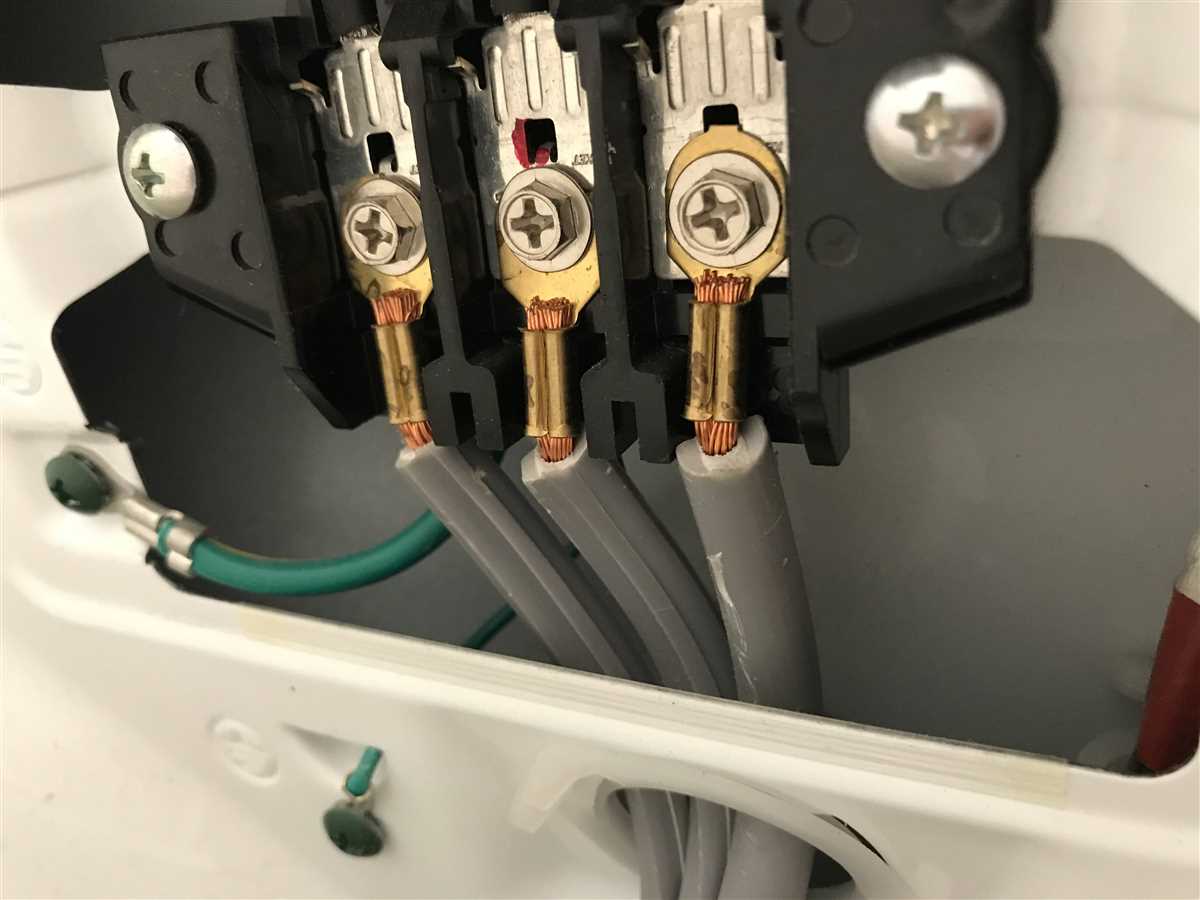
At the center of the diagram is the dryer itself, with a power cord receptacle located on the back. The power cord receptacle has three slots, each designed to receive a specific prong on the power cord. The slots are labeled as “L1,” “L2,” and “N” for line 1, line 2, and neutral, respectively.
Connected to the power cord receptacle is the power cord itself, which consists of three wires. The first wire is called the “hot wire,” and it is typically black in color. This wire connects to the L1 slot on the power cord receptacle. The second wire, also a hot wire, is typically red in color and connects to the L2 slot. Finally, the neutral wire, which is usually white, connects to the N slot on the power cord receptacle.
In addition to the power cord connections, the diagram also depicts the grounding wire. The grounding wire is typically green or bare copper and serves to provide a path for electrical currents in the event of a fault or short circuit. The grounding wire connects to a grounding screw located on the back of the dryer.
Overall, the three prong dryer cord diagram provides a visual representation of the necessary components and connections required to safely and effectively power a dryer with a three-prong power cord.
Step-by-step guide to installing a three prong dryer cord
When it comes to installing a new dryer or replacing an existing one, it’s essential to properly connect the dryer cord to the electrical outlet. In the case of a three prong dryer, it’s important to follow the correct steps to ensure a safe and efficient installation. This step-by-step guide will walk you through the process of installing a three prong dryer cord.
Step 1: Gather the necessary tools and materials
Before you begin, make sure you have all the tools and materials necessary for the installation. This includes a three prong dryer cord, wire strippers, a screwdriver, and a voltage tester. It’s important to use a dryer cord that matches the electrical requirements of your dryer and the outlet.
Step 2: Disconnect the old cord
Start by unplugging the dryer from the electrical outlet and turning off the circuit breaker that powers the dryer. Use the screwdriver to remove the cover plate of the dryer cord receptacle. Carefully loosen the screws that hold the wires in place and remove the old cord.
Step 3: Prepare the wires
Strip the outer insulation from the wires of the new three prong dryer cord using wire strippers. Make sure to expose the appropriate length of wire for attaching to the terminals of the dryer. If the wires are color-coded, follow the instructions in the dryer’s manual to determine which wire goes to which terminal.
Step 4: Attach the wires to the dryer
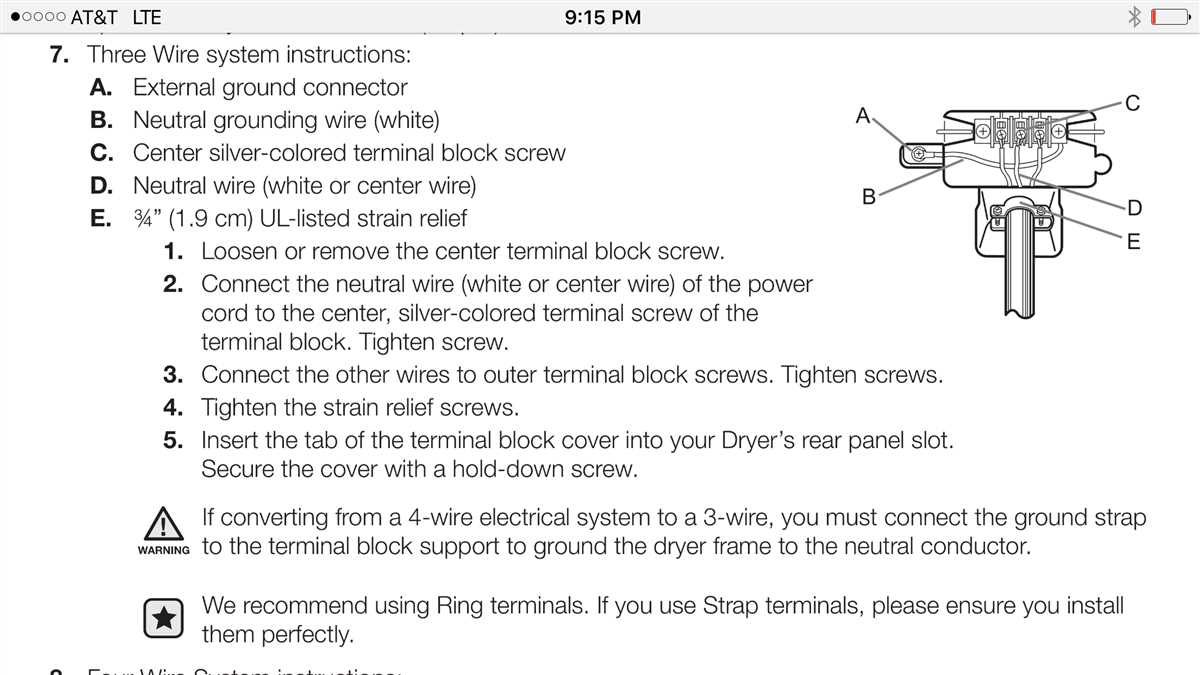
After stripping the wires, attach them to the dryer’s terminal block according to the color-coded instructions or the dryer’s manual. The ground wire should be connected to the center terminal, the neutral wire to the outer terminal, and the hot wires to their respective terminals. Tighten the screws to secure the wires in place.
Step 5: Attach the cord to the electrical outlet
With the wires securely attached to the dryer, you can now connect the dryer cord to the electrical outlet. Make sure to match the prongs on the cord with the corresponding slots in the outlet. Push the cord into the outlet until it is fully inserted and secure.
Step 6: Test the connection
Once the cord is securely connected, plug the dryer back into the electrical outlet. Turn on the circuit breaker and use a voltage tester to ensure that power is flowing correctly. If the tester indicates that there is no power or if there are any other issues, disconnect the dryer and double-check all connections before trying again.
By following these step-by-step instructions, you can easily and safely install a three prong dryer cord. Remember to always prioritize safety and consult the dryer’s manual for specific instructions related to your particular model.
Instructions for Safely Replacing a Dryer Cord in Your Home
Replacing a dryer cord in your home can be a simple and safe task if done correctly. Whether you are installing a new dryer or replacing an old cord, it is important to follow these instructions to ensure a safe and reliable connection.
1. Gather the necessary materials
Before beginning the replacement process, make sure you have all the necessary materials on hand. You will need a new dryer cord that matches the electrical rating of your dryer and the outlet in your home. Additionally, you will need a set of screwdrivers, wire strippers, and electrical tape.
2. Unplug the dryer and disconnect the old cord
Before working on any electrical appliance, always remember to unplug it from the power source. Once the dryer is unplugged, locate the access panel on the back of the dryer. Remove the screws holding the panel in place and carefully disconnect the old cord from the terminal block.
3. Prepare the new cord
Using your wire strippers, carefully remove approximately 1/2 an inch of insulation from the ends of each of the three wires on the new cord. This will expose the copper wires underneath. Make sure to separate the wires so they do not touch each other once connected.
4. Connect the new cord
Attach the wires of the new dryer cord to the terminal block of the dryer in the same configuration as the old cord. The center wire, typically white or gray, should be connected to the center terminal. The other two wires, usually black and red, should be connected to the outer terminals. Use the screwdriver to securely tighten the screws on the terminal block.
5. Secure the connections
Once the wires are connected, wrap each individual wire and the entire terminal block with electrical tape. This will provide extra insulation and prevent any accidental contact between the wires and the metal housing of the dryer.
6. Test the connection and plug in the dryer
Double-check that all connections are secure and that the wires are properly insulated. Plug in the dryer and test that it is working correctly. If everything appears to be functioning properly, replace the access panel on the back of the dryer and secure it with the screws.
By following these instructions and taking the necessary precautions, you can safely replace a dryer cord in your home. Remember to always consult the manufacturer’s instructions and, if you are unsure of any steps or do not feel confident working with electricity, it is best to seek the assistance of a professional.
Common issues with three prong dryer cords
Three prong dryer cords are commonly used in older homes or buildings where the electrical wiring may not be up to code. While these cords are still functional, they can sometimes cause issues that need to be addressed.
One common problem with three prong dryer cords is that they may not provide a secure connection between the dryer and the electrical outlet. Over time, the prongs can become loose, which can result in intermittent power or even electrical sparks. It is important to regularly check the tightness of the prongs and replace the cord if necessary.
Another issue with three prong dryer cords is that they do not include a grounding wire. This means that any electrical currents that escape from the dryer will not be directed safely into the ground. Instead, they can potentially travel through the dryer and build up, leading to the risk of electric shock or even fire. It is important to use caution when using a dryer with a three prong cord and consider upgrading to a four prong cord for added safety.
In conclusion, while three prong dryer cords can still be functional, they can present certain issues such as loose connections and lack of grounding. It is important to address these issues to ensure the safe and reliable operation of your dryer. Consider consulting a professional electrician to assess the electrical wiring in your home and determine the best course of action for upgrading your dryer cord.
Troubleshooting Tips and Resolutions for Potential Problems
In the process of connecting a three prong dryer cord, you may encounter some difficulties or issues. Here are some common troubleshooting tips for potential problems and how to resolve them:
- Problem: Dryer is not heating up.
- Problem: Dryer is not tumbling.
- Problem: Dryer produces strange noises.
- Problem: Dryer is not drying clothes adequately.
Possible solution: Check if the dryer is properly plugged in and if the circuit breaker or fuse associated with the dryer has tripped. If the problem persists, there may be an issue with the heating element or the thermal fuse. Consult a professional or refer to the dryer’s manual for further assistance.
Possible solution: Ensure that the dryer door is fully closed and the start button is pressed. Verify that the drum belt is intact and properly installed. If the issue persists, there may be a problem with the motor or the drive belt. Seek professional help or consult the dryer’s manual for guidance.
Possible solution: Inspect the dryer drum for any foreign objects that may be causing the noise. Ensure that the dryer is properly leveled and not vibrating excessively. If the noise continues, there may be an issue with the motor, drum rollers, or bearings. Consult a professional technician or refer to the dryer’s manual for further instructions.
Possible solution: Check if the dryer vent hose is properly connected and not clogged. Make sure that the lint filter is clean and not obstructed. If the problem persists, there may be a problem with the heating element, thermostat, or airflow. Consult a professional technician for diagnosis and repair.
Summary
Connecting a three prong dryer cord is a simple task that requires attention to detail and safety precautions. By following the correct diagram and utilizing the appropriate techniques, you can ensure a safe and reliable connection. In case of any troubleshooting, it is essential to identify potential problems and try to resolve them systematically. However, for complex issues or when in doubt, it is always advisable to seek professional help or consult the dryer’s manual for specific instructions.
Q&A:
What should I do if my computer won’t turn on?
If your computer won’t turn on, first check to make sure it is properly plugged in and that the power outlet is working. If everything is connected correctly, try pressing the power button on the computer for a few seconds to see if it powers on. If that doesn’t work, you may need to check the power supply or contact a professional for help.
Why is my internet connection slow?
There could be several reasons why your internet connection is slow. First, check to see if other devices on your network are also experiencing slow speeds. If they are, it may be an issue with your service provider. If it’s only your device that is slow, try restarting your router and modem. You can also try clearing your browser cache or running a virus scan to rule out any other causes.
What should I do if my phone freezes?
If your phone freezes, the first step is to try restarting it by holding down the power button for a few seconds. If that doesn’t work, you can try performing a soft reset by removing the battery (if possible) or holding down a combination of buttons. If your phone still won’t respond, you may need to perform a factory reset, but be aware that this will erase all data on your device.
How can I fix a printer that won’t print?
If your printer won’t print, there are a few things you can check. First, make sure it is properly connected to your computer or network. If it is connected wirelessly, try restarting your router and printer. If it is connected via USB, try unplugging and reconnecting the cable. You should also check to make sure the printer has enough ink or toner and that there are no paper jams or errors on the display.
What should I do if my laptop overheats?
If your laptop is overheating, the first step is to make sure it is on a hard, flat surface that allows for proper airflow. You should also check to see if the vents are blocked by dust or debris and clean them if necessary. If the problem persists, you can try using a laptop cooling pad or adjusting the power settings to reduce the strain on your computer. If none of these solutions work, you may need to contact a professional for further assistance.
What should I do if my computer won’t turn on?
If your computer won’t turn on, first make sure it is properly plugged in and receiving power. Check the power outlet and verify that the power cord is securely connected to both the computer and the outlet. If it is plugged in correctly, try pressing the power button for a few seconds to reset the device. If the problem persists, it could be a hardware issue and you may need to contact a technician for further assistance.