
When it comes to towing a trailer, having the proper wiring connection is crucial. Not only does it ensure the safety of both the trailer and the vehicle, but it also allows for the operation of essential features such as brake lights and turn signals. In this article, we will provide you with a comprehensive trailer towing wiring diagram that will guide you through the process of properly connecting your trailer.
Firstly, it is important to understand the different components involved in the towing wiring system. These include the trailer connector, the vehicle’s electrical system, and various wiring harnesses. The trailer connector is usually located at the rear of the vehicle and serves as the main link between the trailer and the vehicle’s electrical system. It typically consists of multiple pins or terminals, each assigned to a specific function.
One of the most critical connections in a trailer wiring system is the ground connection. This ensures that the trailer’s electrical system is properly grounded to the vehicle’s electrical system, preventing any potential electrical issues. It is essential to ensure that the ground connection is made securely and that any corrosion or rust is removed to achieve a solid connection.
In addition to the ground connection, the trailer towing wiring diagram will illustrate how to properly connect the various lighting and braking components. This may include connections for the trailer’s brake lights, turn signals, tail lights, and reverse lights. It is crucial to properly match the appropriate wires from the trailer connector to the corresponding wires on the trailer’s lighting system.
By following a trailer towing wiring diagram, you can ensure that your trailer is connected safely and efficiently. Taking the time to understand the wiring system and make the proper connections will provide you with peace of mind while towing and ensure that you are in compliance with all necessary safety and regulatory standards.
Trailer Towing Wiring Diagram: The Complete Guide
When it comes to towing a trailer, having the right wiring diagram is essential. Trailer towing wiring diagrams provide a detailed overview of the electrical connections that need to be made between your vehicle and the trailer. Having a clear understanding of these connections is important for ensuring that your trailer lights, brakes, and other electrical components function properly.
Why Do You Need a Trailer Towing Wiring Diagram?
A trailer towing wiring diagram is necessary because it provides a visual representation of how the electrical system of your vehicle should be connected to the trailer. This diagram includes information on the color codes of the wiring, the type of connections to be made, and the location of the various electrical components.
By following a trailer towing wiring diagram, you can avoid errors and ensure that the electrical connections are made correctly. This is crucial for maintaining the safety of your trailer and complying with road regulations. Without a proper wiring diagram, you may encounter issues such as non-functioning lights, faulty brakes, or even damage to your vehicle’s electrical system.
What Does a Trailer Towing Wiring Diagram Include?
A trailer towing wiring diagram typically includes the following information:
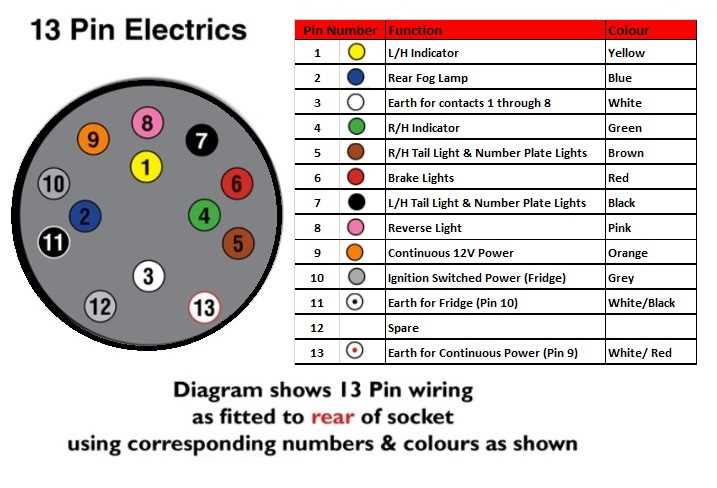
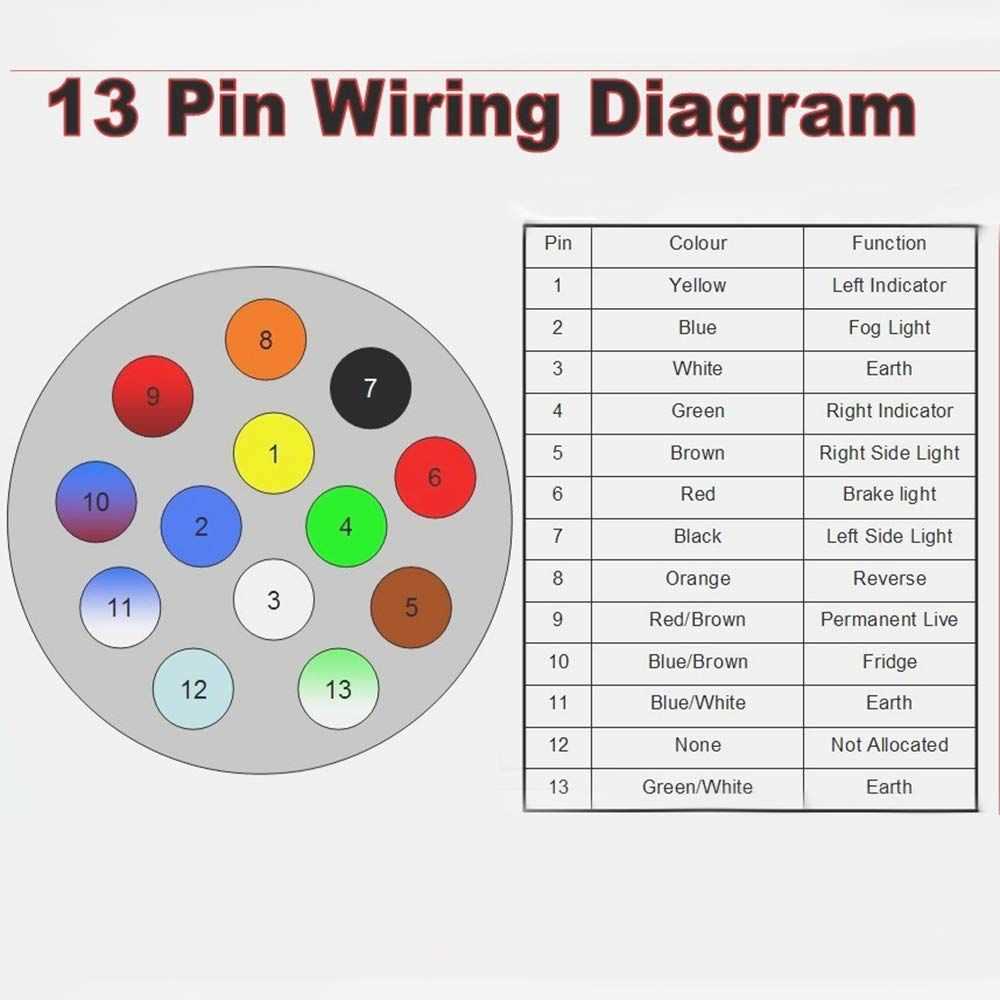
- Color codes: The diagram will specify the color codes for the wiring connections. This allows you to easily identify the correct wires and make the right connections.
- Wire functions: The diagram will outline the functions of each wire, such as turn signals, brake lights, running lights, and ground connections. This ensures that each wire is correctly connected to the appropriate component.
- Connector types: The diagram will indicate the types of connectors used for the wiring connections. This helps you select the appropriate connectors for your vehicle and trailer.
- Location of components: The diagram will show the location of important electrical components, such as the fuse box, relay box, and connector ports. This provides you with a clear understanding of where these components are located in your vehicle.
Where Can You Find a Trailer Towing Wiring Diagram?
A trailer towing wiring diagram can be found in various sources, including the owner’s manual of your vehicle, the manufacturer’s website, or an aftermarket trailer wiring kit. You can also consult with a professional mechanic or trailer expert who can provide you with the appropriate diagram for your specific vehicle and trailer.
It is important to note that different vehicles and trailers may have different wiring configurations, so it is crucial to use the correct diagram for your specific setup. Additionally, it is recommended to double-check the wiring connections and test the trailer’s electrical system before hitting the road to ensure everything is functioning properly.
By following a trailer towing wiring diagram and properly connecting the electrical system of your vehicle to the trailer, you can ensure a safe and hassle-free towing experience. Understanding the wiring connections and having the necessary components in place will help you avoid potential issues and ensure that your trailer’s lights, brakes, and other electrical systems work as intended.
What is a trailer towing wiring diagram?
A trailer towing wiring diagram is a visual representation or schematic of the electrical connections and components required to tow a trailer behind a vehicle. It outlines the various wires, connectors, and circuits that are involved in the towing process, allowing for easy installation and troubleshooting.
The diagram typically includes information on the different types of trailer connectors, such as 4-way, 5-way, 6-way, or 7-way plugs, and the corresponding wire colors and functions. It also indicates the necessary connections between the vehicle’s electrical system and the trailer, including the brake lights, turn signals, taillights, and power supply.
Components typically found on a trailer towing wiring diagram:
- Trailer connector types (4-way, 5-way, 6-way, 7-way)
- Wire colors and functions
- Vehicle’s electrical system connections
- Trailer brake lights and turn signals
- Trailer taillights and power supply
A trailer towing wiring diagram is an essential tool for anyone planning to tow a trailer, as it ensures that the electrical connections are properly set up and functioning correctly. It can be used by both experienced tow vehicle owners and those new to towing, providing clear instructions on how to connect the trailer wiring to the vehicle’s electrical system.
Additionally, a trailer towing wiring diagram is useful for troubleshooting any electrical issues that may arise during the towing process. By referring to the diagram, individuals can easily identify and resolve problems with the trailer’s lights or other electrical components, ensuring a safe and efficient towing experience.
Why is a trailer towing wiring diagram important?
When it comes to towing a trailer with your vehicle, having a proper wiring system is essential. A trailer towing wiring diagram is an important tool that provides a visual representation of the electrical connections and wiring required for safe and efficient trailer towing. It outlines the various components and their connections, helping you understand how to properly connect your vehicle’s electrical system to the trailer.
One of the main reasons why a trailer towing wiring diagram is important is because it ensures that the electrical connection between your vehicle and the trailer is correct and functioning properly. Incorrect or faulty wiring can result in a variety of issues, such as malfunctioning trailer lights, brake failure, or even damage to the vehicle’s electrical system. By following a wiring diagram, you can ensure that all the necessary connections are made correctly, minimizing the risk of any electrical issues during towing.
A trailer towing wiring diagram also helps you understand the different electrical functions of your trailer. It shows you how to connect the various components, such as the brake lights, turn signals, and running lights. This knowledge is crucial for ensuring that your trailer is visible to other drivers on the road, allowing for safe and efficient towing. Additionally, understanding the wiring diagram can help troubleshoot any electrical issues that may arise during towing, saving you time and money in costly repairs.
In conclusion, a trailer towing wiring diagram is an important tool for anyone who plans to tow a trailer. It provides a visual guide to understanding and correctly connecting the electrical components of your vehicle and trailer, ensuring safe and efficient towing. By following the diagram, you can avoid potential electrical issues and ensure that your trailer is properly visible to other drivers on the road.
Types of Trailer Towing Wiring Diagrams
Trailer towing wiring diagrams are essential for connecting the electrical system of a vehicle to a trailer. They provide instructions and guidance on how to properly wire the trailer’s lights, brakes, and other electrical components to ensure safe and functional towing. There are several types of wiring diagrams available, each designed for specific trailer configurations and connector types.
1. 4-Pin Wiring Diagram:
The 4-pin wiring diagram is the most basic and common type of trailer towing wiring diagram. It is used for trailers with basic electrical systems that require only the essential lights, such as brake lights, turn signals, and taillights. The 4-pin wiring diagram typically uses four colored wires: yellow for left turn and brake lights, green for right turn and brake lights, brown for running lights, and white for ground.
2. 5-Pin Wiring Diagram:
The 5-pin wiring diagram is similar to the 4-pin wiring diagram, but with an additional wire for auxiliary power. It is commonly used for trailers that require power for accessories such as interior lights or electric brake controllers. In addition to the four colored wires used in the 4-pin wiring diagram, the 5-pin wiring diagram includes a blue wire for auxiliary power.
3. 7-Pin Wiring Diagram:
The 7-pin wiring diagram is the most versatile and commonly used wiring diagram for trailers. It is suitable for trailers with more complex electrical systems and multiple accessories, such as charging systems, reverse lights, and backup cameras. The 7-pin wiring diagram includes all the wires from the 4-pin and 5-pin wiring diagrams, along with additional wires for auxiliary power, backup lights, and electric brakes.
It is important to select the appropriate wiring diagram based on the trailer’s electrical requirements and the vehicle’s connector type. Following the correct wiring diagram ensures a proper and reliable electrical connection, enhancing safety and functionality while towing a trailer.
How to read a trailer towing wiring diagram
Reading a trailer towing wiring diagram is essential when it comes to understanding the electrical connections necessary to safely tow a trailer. These diagrams provide a visual representation of the wiring system, which includes the connections between the vehicle and the trailer.
1. Understand the symbols: In a trailer towing wiring diagram, various symbols are used to represent different components and connections. It is crucial to familiarize yourself with these symbols to accurately interpret the diagram. Common symbols include different types of connectors, wires, lights, and switches.
2. Identify the components: The diagram will typically include different components involved in the trailer’s electrical system, such as the towing vehicle’s wiring harness, trailer connector, battery, and various lights (brake lights, turn signals, taillights). By identifying these components, you can better understand how they are interconnected.
3. Follow the wiring paths: The diagram will show the paths of the wiring from one component to another. It is important to follow these paths to ensure proper connectivity. For example, you can trace the wiring from the towing vehicle’s brake lights to the trailer’s brake lights to understand how the braking system is linked.
4. Note the color codes: Wiring diagrams often include color codes to distinguish different wires. These color codes can help you identify which wire corresponds to a specific function. For example, red wires might represent brake lights, while green wires might represent right turn signals. Familiarize yourself with these color codes to make accurate connections.
5. Check for additional information: Some trailer towing wiring diagrams may include additional information, such as wire gauge recommendations or fuse locations. Pay attention to these details as they can help ensure the wiring system is properly installed and protected.
By understanding how to read a trailer towing wiring diagram, you can confidently connect the electrical components of a trailer to a towing vehicle. This knowledge is crucial for ensuring safe and effective operation while towing.
Step-by-step guide to installing a trailer towing wiring system
Installing a trailer towing wiring system is essential for safely towing a trailer with your vehicle. It allows you to connect the trailer’s electrical components, such as lights and brakes, to your vehicle’s electrical system. Follow these steps to install a trailer towing wiring system:
1. Gather the necessary tools and materials
Before you begin the installation process, make sure you have all the necessary tools and materials. This includes wire cutters, wire strippers, electrical tape, connectors, and a wiring harness kit that is compatible with your vehicle’s make and model.
2. Locate the vehicle’s wiring connection point
Next, locate the vehicle’s wiring connection point. This is typically located near the rear bumper or inside the trunk. Consult your vehicle’s owner manual or wiring diagram to find the exact location.
3. Prepare the vehicle’s wiring connection point
Once you have located the wiring connection point, prepare it by cleaning any dirt or debris and removing any existing connections. This will ensure a clean and secure connection for the new wiring system.
4. Install the wiring harness
Take the wiring harness kit and connect it to the vehicle’s wiring connection point. Follow the instructions provided with the kit to correctly attach the wires and connectors. Use wire connectors or soldering to secure the connections.
5. Test the connections
After installing the wiring harness, test the connections to ensure they are working properly. Connect the trailer to your vehicle and turn on the headlights, brake lights, and turn signals. Check if all the lights on the trailer are functioning correctly. If not, recheck the connections and make any necessary adjustments.
6. Secure and protect the wiring
Once you have confirmed that the connections are working, secure and protect the wiring. Use electrical tape or wire loom to cover the exposed wires and prevent any damage. Make sure the wiring is properly routed and secured to avoid any interference with moving parts or potential accidents.
By following these step-by-step instructions, you can install a trailer towing wiring system and ensure a safe and functional connection between your vehicle and the trailer. Remember to always refer to your vehicle’s wiring diagram and follow the instructions provided with the wiring harness kit for the best results.
Troubleshooting Common Issues with Trailer Towing Wiring Systems
Trailer towing wiring systems are essential for ensuring the proper functioning of trailers and their lights. However, like any electrical system, these wiring systems can encounter problems that may result in issues with the trailer’s lights or brakes. In this section, we will discuss some common problems that may arise and provide troubleshooting tips to resolve them.
1. Faulty or Loose Connections
One of the most common issues with trailer towing wiring systems is faulty or loose connections. These connections may become corroded over time, resulting in a poor electrical connection or no connection at all. To troubleshoot this problem, it is advisable to check all the connections and clean them if necessary. Make sure they are properly secured and tight.
2. Damaged Wires
Another common issue is damaged wires. Over time, wires can get exposed to the elements, leading to fraying, cuts, or other types of damage. Check the entire wiring harness for any visible damage or wear and replace any damaged wires. It is important to use the appropriate gauge wire for the trailer’s electrical needs.
3. Blown Fuses
If the trailer’s lights are not working, it may be due to blown fuses. Check the vehicle’s fuse box for any blown fuses related to the trailer towing wiring system. Replace any blown fuses with the correct rating to restore the electrical circuit.
4. Incompatible Wiring Systems
Sometimes, the trailer’s wiring system may not be compatible with the vehicle’s wiring system. This can lead to issues such as mismatched wiring or improper grounding. In such cases, it is important to consult the vehicle and trailer’s user manuals or seek professional assistance to ensure compatibility and proper wiring installation.
5. Battery or Grounding Issues
If the trailer’s lights are dim or not working properly, it may be due to battery or grounding issues. Check the battery connections and ensure they are secure and free of corrosion. Additionally, check the grounding connections and make sure they are properly grounded to the vehicle’s chassis.
In conclusion, troubleshooting common issues with trailer towing wiring systems requires a methodical approach and attention to detail. By checking and repairing faulty or loose connections, replacing damaged wires, addressing blown fuses, ensuring compatibility, and resolving battery or grounding issues, trailer owners can resolve most wiring system problems and enjoy safe towing experiences.