
When it comes to understanding the working mechanism of a Whirlpool dryer, having an electrical diagram can be extremely helpful. This diagram provides a visual representation of the electrical circuits and connections within the dryer, allowing technicians and DIY enthusiasts to troubleshoot and repair any issues that may arise.
Whirlpool dryers are equipped with a wide range of electrical components, such as thermostats, heating elements, timers, switches, and motors. The electrical diagram illustrates how these components are interconnected, allowing users to follow the flow of electricity and identify potential problem areas.
With the help of an electrical diagram, users can easily locate and test specific components and circuits, ensuring accurate diagnosis and effective repairs. It is important to note that Whirlpool dryers may have different electrical diagrams depending on the model and year of production, so it is crucial to obtain the correct diagram for the specific dryer being worked on.
Understanding the Basics of Whirlpool Dryer Electrical Diagram
When it comes to troubleshooting electrical issues in a Whirlpool dryer, having a good understanding of the electrical diagram can be incredibly helpful. The electrical diagram is a visual representation of the circuitry inside the dryer, showing how the various components are connected and how electricity flows through the system. By understanding the basics of the electrical diagram, you can effectively diagnose and repair problems with your Whirlpool dryer.
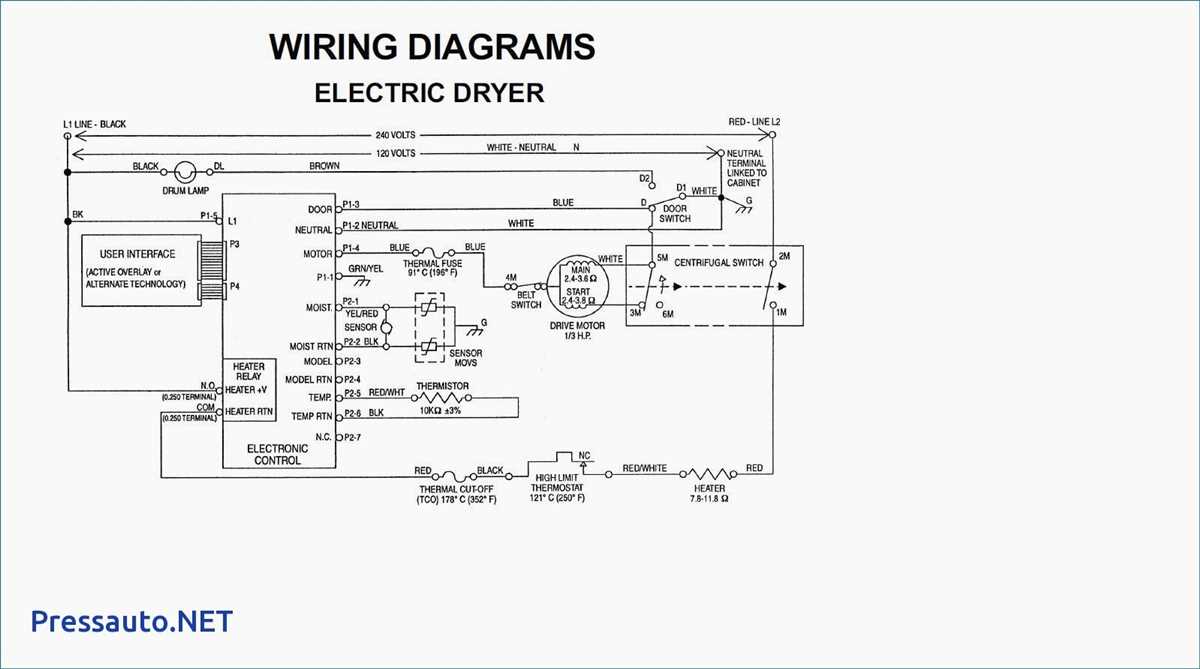
The electrical diagram of a Whirlpool dryer typically includes several key components, such as the heating element, thermostat, motor, timer, and various switches. These components are interconnected through a series of wires and connections, forming a circuit that allows electricity to flow and power the different functions of the dryer. Each component has a specific role in the drying process, and any malfunction or break in the circuit can lead to issues with the dryer’s performance.
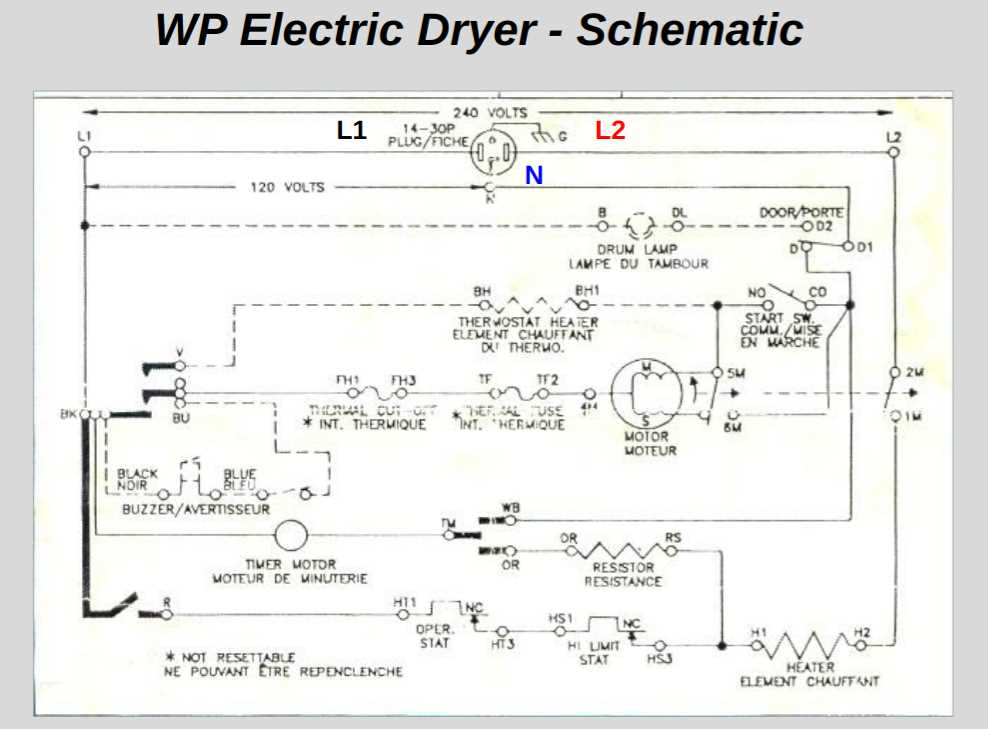
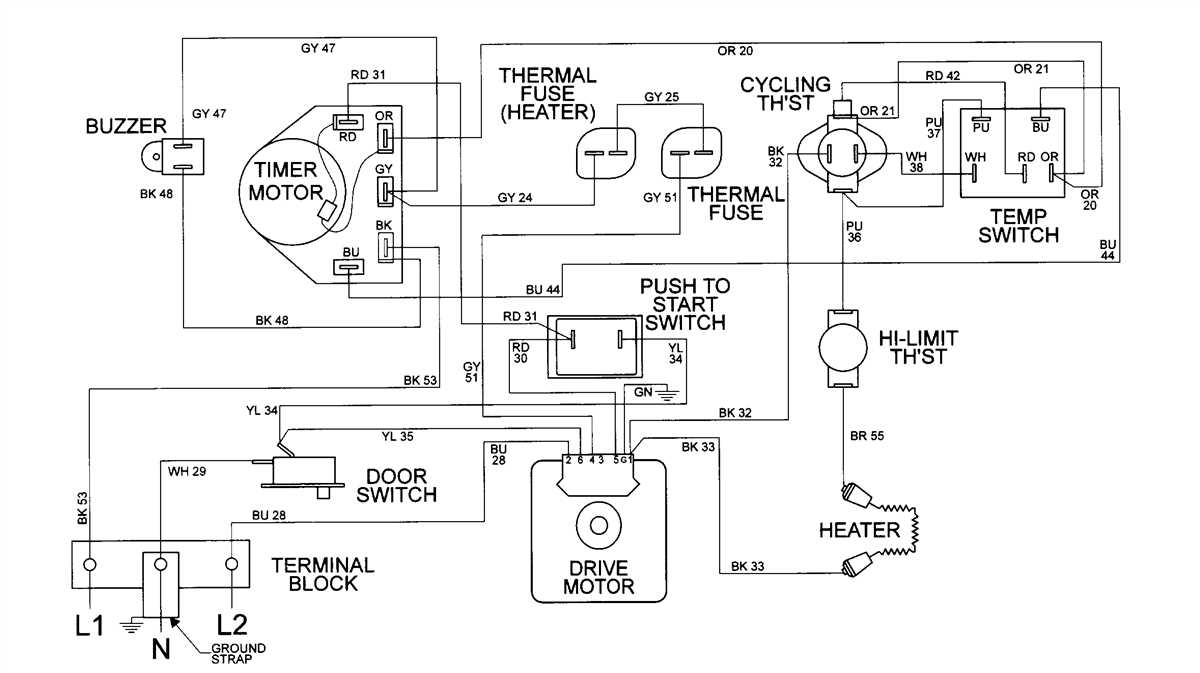
One important thing to note about the Whirlpool dryer electrical diagram is that it typically includes both a schematic diagram and a wiring diagram. The schematic diagram shows the electrical circuits in a simplified and abstract way, using symbols to represent the different components and their connections. On the other hand, the wiring diagram provides a more detailed and realistic representation of the physical connections, showing the actual layout of the wires and connections inside the dryer.
When troubleshooting electrical issues in a Whirlpool dryer, it is essential to have a copy of the electrical diagram to refer to. This diagram will help you identify and understand the different components and their connections, making it easier to pinpoint the source of the problem. By following the electrical diagram and using a multimeter to test various points in the circuit, you can systematically diagnose and repair issues with your Whirlpool dryer’s electrical system.
Key Takeaways:
- The electrical diagram of a Whirlpool dryer is a visual representation of the circuitry inside the dryer.
- Understanding the basics of the electrical diagram can help in diagnosing and repairing electrical issues.
- The diagram typically includes key components like the heating element, thermostat, motor, timer, and switches.
- There is a schematic diagram and a wiring diagram in the electrical diagram of a Whirlpool dryer.
- Having a copy of the electrical diagram is essential for troubleshooting and repairing the dryer’s electrical system.
The Importance of Whirlpool Dryer Electrical Diagram
When it comes to repairing or troubleshooting a Whirlpool dryer, having access to an electrical diagram is crucial. This diagram provides a visual representation of the dryer’s electrical system, allowing technicians to identify and understand the various components and their connections.
A Whirlpool dryer electrical diagram typically includes information about the wiring, circuitry, and electrical controls of the appliance. It shows how power flows through the different parts of the dryer and helps technicians diagnose and fix any electrical issues that may arise.
Identifying Faulty Components: With a Whirlpool dryer electrical diagram, technicians can easily identify which component is causing the problem. Whether it’s a faulty heating element, a malfunctioning thermostat, or a defective motor, the diagram helps pinpoint the exact part that needs to be replaced or repaired.
Troubleshooting Electrical Problems: The electrical diagram also aids in troubleshooting electrical problems. By following the diagram and tracing the electrical connections, technicians can determine if there are any loose wires, damaged circuits, or other issues affecting the dryer’s performance.
Ensuring Proper Repairs: Having a Whirlpool dryer electrical diagram ensures that repairs are done correctly. It provides a guide for reconnecting wires and components in the right order, preventing potential safety hazards and ensuring the dryer functions properly once the repairs are completed.
Overall, a Whirlpool dryer electrical diagram is an invaluable tool for technicians and DIY enthusiasts working on these appliances. It simplifies the troubleshooting and repair process, allowing for faster and more accurate diagnosis of electrical issues, resulting in efficient repairs and a properly functioning dryer.
Components of a Whirlpool Dryer

A Whirlpool dryer is composed of several key components that work together to effectively dry your clothes. These components include:
- Heating Element: The heating element is responsible for producing the heat necessary to dry your clothes. It is typically made of a coiled wire that heats up when an electrical current passes through it.
- Thermal Fuse: The thermal fuse acts as a safety device to prevent the dryer from overheating. If the temperature inside the dryer exceeds a certain threshold, the thermal fuse will break the electrical circuit, stopping the dryer from running.
- Thermostat: The thermostat is responsible for monitoring the temperature inside the dryer. It regulates the heating element and turns it on or off as needed to maintain a consistent temperature.
- Timer: The timer controls the duration of the drying cycle. It allows you to select the desired drying time and automatically shuts off the dryer when the set time has elapsed.
- Motor: The motor powers the drum of the dryer, rotating it to tumble the clothes. It also drives the blower wheel, which circulates air through the dryer to aid in the drying process.
- Control Panel: The control panel is where you can select different drying settings and operate the dryer. It typically includes buttons or dials to adjust the temperature, cycle duration, and other drying options.
- Door Switch: The door switch is a safety feature that prevents the dryer from starting if the door is not properly closed. When the door is closed, it activates the switch, allowing the dryer to run.
- Lint Filter: The lint filter traps lint and other debris that may come off your clothes during the drying cycle. Regularly cleaning the lint filter helps maintain the efficiency and safety of the dryer.
These components work together to provide efficient and effective drying results in your Whirlpool dryer. Understanding their functions can help you troubleshoot and solve common issues that may arise during the drying process.
Understanding the Wiring Diagram
When troubleshooting or repairing any electrical appliance, it is crucial to have a clear understanding of the wiring diagram. This diagram provides a visual representation of the electrical circuitry in the appliance, allowing technicians to identify and troubleshoot any issues.
One important aspect of understanding the wiring diagram is being able to discern the various electrical components and their connections. This includes identifying switches, fuses, relays, motors, and other key components. By studying the diagram, technicians can determine how the electrical current flows through the appliance and pinpoint any potential areas of concern.
The diagram typically includes symbols and labels to represent different electrical components and their functions. For example, a switch might be represented by a line with an open or closed circle, indicating whether it is on or off. Fuses and relays may be represented by specific shapes or symbols. By familiarizing themselves with these symbols and labels, technicians can quickly decipher the diagram and understand the electrical system at a glance.
Additionally, the wiring diagram may include color-coded lines or numbers to indicate the specific wires and their connections. This further helps technicians identify the correct wiring and troubleshoot any issues related to faulty connections or damaged wires.
In summary, understanding the wiring diagram is essential for effectively troubleshooting and repairing electrical appliances like a Whirlpool dryer. It provides vital information about the electrical circuitry, component connections, and wire identification. By studying the diagram and interpreting the symbols and labels, technicians can diagnose and fix electrical problems with confidence.
Troubleshooting Common Electrical Issues
Electrical issues can be common problems in Whirlpool dryers. Understanding the electrical diagram can help to identify and troubleshoot these issues. Here are some common electrical problems and their solutions:
No power
If your Whirlpool dryer is not powering on at all, there may be an issue with the power supply. Check if the dryer is plugged into a working outlet and ensure that the circuit breaker for the dryer is not tripped. If everything seems to be in order, you may need to test the incoming electrical voltage using a multimeter to ensure that the power supply is reaching the dryer.
Intermittent power
If your dryer is experiencing intermittent power, it may be caused by loose or faulty electrical connections. Check all the connections between the power cord, control panel, and other electrical components. Tighten any loose connections and replace any damaged wiring or connectors. It is also important to inspect the power cord for any signs of damage or wear and replace it if necessary.
No heat
If your dryer is not producing heat, there may be a problem with the heating element or the thermal fuse. Using the electrical diagram, locate these components and test them for continuity using a multimeter. If the heating element or thermal fuse is faulty, they will need to be replaced. Additionally, check the high limit thermostat and the cycling thermostat for any signs of damage or malfunction and replace them if needed.
Overheating
If your dryer is overheating, it could be due to a malfunctioning thermostat or a blocked vent. Check the cycling thermostat and the high limit thermostat for proper functioning. Clean or replace the vent if it is blocked or restricted. In some cases, the control board may also be responsible for regulating the temperature, so it should be inspected and tested if necessary.
Remember to always follow proper safety procedures when working with electrical components. If you are unsure about any electrical repairs, it is recommended to consult a professional technician.
Safety Tips for Dealing with Whirlpool Dryer Electrical Diagram
When working with the electrical diagram of a Whirlpool dryer, it is important to prioritize safety to avoid any accidents or injuries. Here are some safety tips to keep in mind:
- Disconnect the Power: Before starting any work on the dryer electrical system, make sure to unplug the dryer from the power source. This will prevent any electrical shocks or accidents.
- Use Proper Tools: Ensure that you have the right tools for the job, such as insulated screwdrivers and pliers. Using improper tools can increase the risk of injury or damage to the dryer.
- Wear Protective Gear: It is advisable to wear safety goggles and gloves to protect your eyes and hands from any potential hazards. Additionally, wearing non-conductive footwear can prevent electric shock.
- Handle with Care: Treat the electrical components of the dryer with caution. Avoid pulling or tugging on wires, as this can lead to loose connections or damage to the system.
- Refer to the Diagram: Before making any changes or adjustments, carefully review the Whirlpool dryer electrical diagram. Ensure that you understand the wiring and connections properly to prevent any mistakes or hazards.
- Seek Professional Assistance: If you are unsure or uncomfortable working with the electrical system of the dryer, it is best to seek help from a qualified technician. It is better to be safe than to risk causing damage or harm.
By following these safety tips, you can minimize the risks associated with working on a Whirlpool dryer electrical diagram. Always prioritize safety and take necessary precautions to ensure a safe and successful repair.
Q&A:
What should I do if I don’t understand the whirlpool dryer electrical diagram?
If you don’t understand the whirlpool dryer electrical diagram, it is best to seek professional help. Working with electrical components can be dangerous if you are not familiar with them. A professional technician can help you understand the diagram and guide you through any repairs or maintenance that may be needed.