
Wiring a 220 motor may seem like a daunting task at first, but with the right knowledge and tools, it can be a straightforward process. Whether you’re replacing an old motor or installing a new one, understanding the wiring process is essential to ensure a safe and efficient operation.
When it comes to wiring a 220 motor, the first step is to determine the correct voltage and amperage requirements. This information can usually be found on the motor’s nameplate or in the manufacturer’s documentation. Once you have this information, you can move on to selecting the appropriate wiring materials.
There are several types of wiring that can be used for 220 motors, including copper and aluminum. However, copper is generally considered the best choice due to its superior conductivity and longevity. It’s important to use the correct gauge of wire for your motor to avoid potentially dangerous overheating.
Wiring 220 Motor
Wiring a 220V motor requires proper knowledge and caution to ensure safe operation. The process involves connecting the motor to a power source using appropriate wires and connections. Here are some steps to consider when wiring a 220V motor:
1. Determine the motor’s voltage and amperage rating
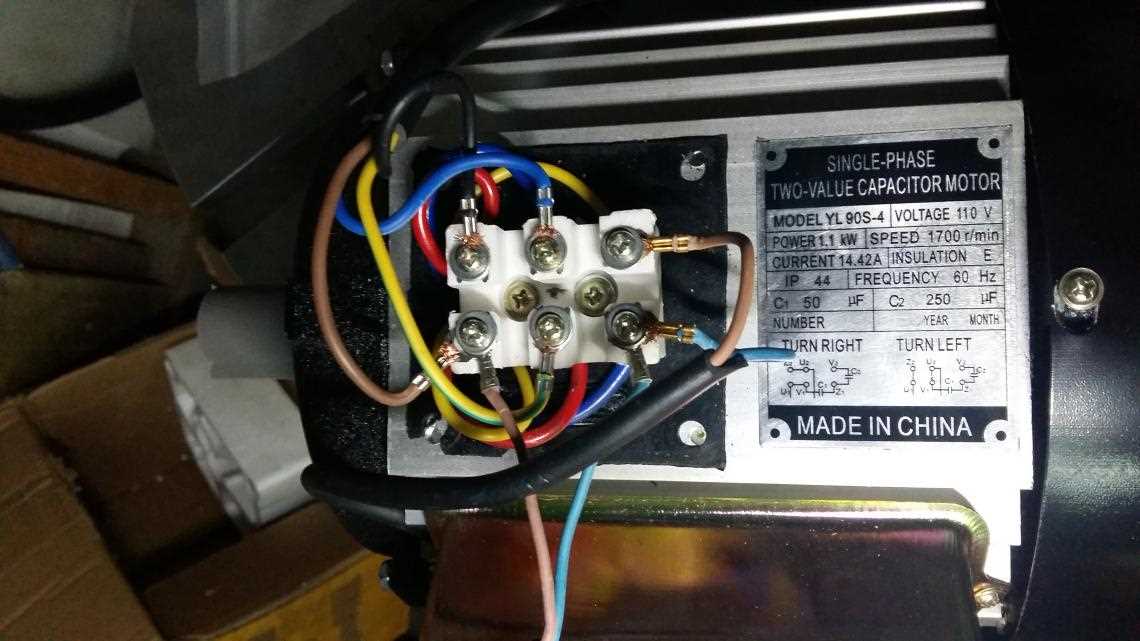
Before proceeding with the wiring, it is essential to check the motor’s voltage and amperage rating. This information can usually be found on the motor’s nameplate. Make sure the power source is compatible with the motor’s requirements.
2. Select the appropriate wire size
Based on the motor’s amperage rating, it is important to choose the correct wire size for the wiring. Refer to a wire size chart to determine the appropriate gauge. Using the wrong wire size can lead to overheating and potentially damaging the motor.
3. Connect the wires
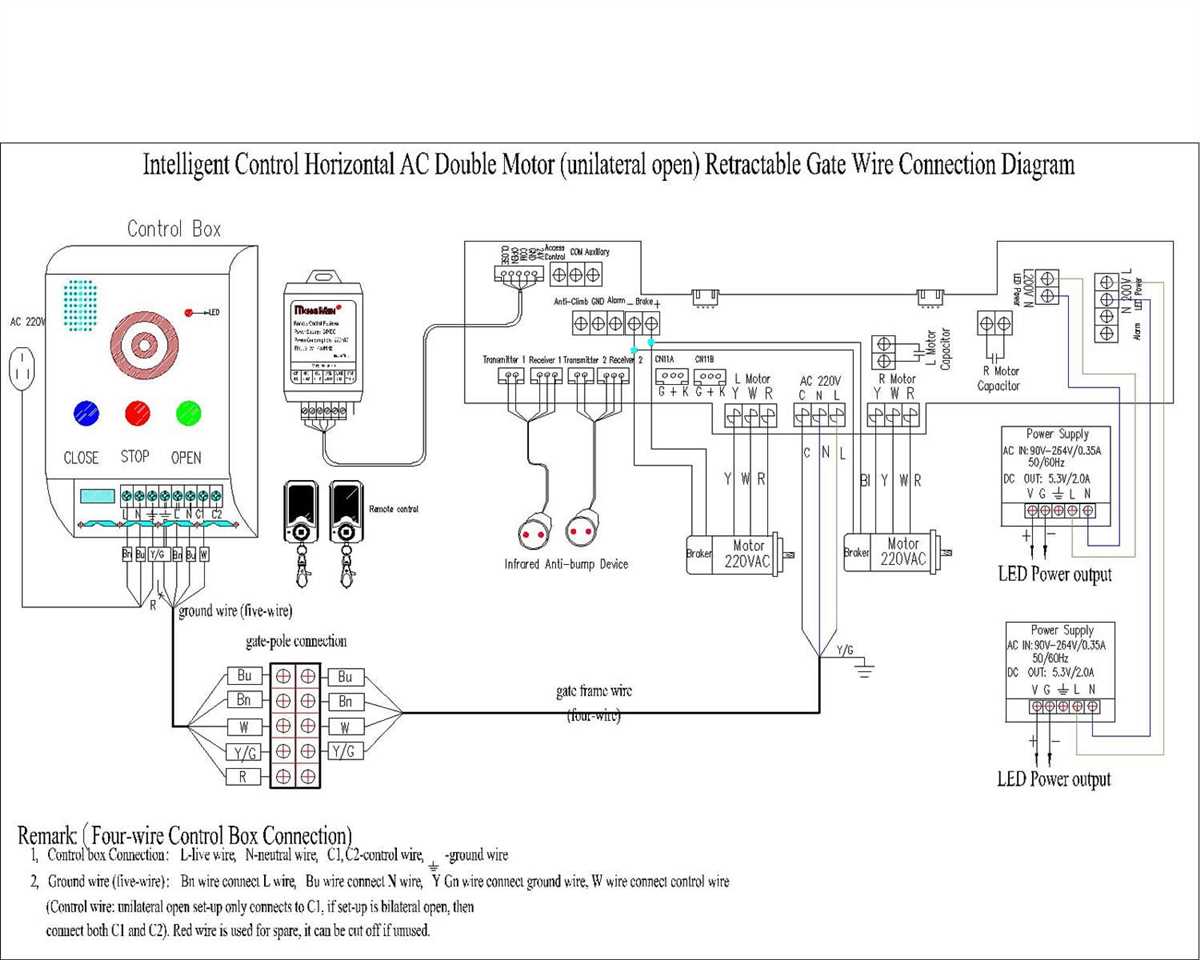
Once the appropriate wire size has been determined, proceed to connect the wires. Strip the insulation off the ends of the wires and use wire connectors or terminal blocks to make secure connections. Follow the wiring diagram provided with the motor or consult a professional if unsure about the connections.
4. Install an appropriate circuit breaker
When wiring a 220V motor, it is crucial to protect it from overcurrent. Install a circuit breaker of the appropriate amperage rating in the electrical panel. This breaker will provide protection in case of any electrical faults or overloads.
5. Test the wiring
After completing the wiring process, it is essential to test the motor’s operation. Switch on the power and observe if the motor starts and runs smoothly. If there are any issues or anomalies, immediately turn off the power and review the wiring connections.
Wiring a 220V motor requires attention to detail and adherence to electrical standards. If unsure about any aspect of the wiring process, it is recommended to consult a qualified electrician for assistance.
Understanding the Basics
When it comes to wiring a 220 motor, it is important to have a basic understanding of the electrical principles and components involved. This knowledge will help ensure that the wiring process is done correctly and safely.
Firstly, it is important to understand that a 220 motor requires a 220-volt power supply. This means that it needs two separate lines, each carrying 110 volts, to operate. These two lines are commonly referred to as “hot” wires, and they are responsible for providing the necessary power to the motor.
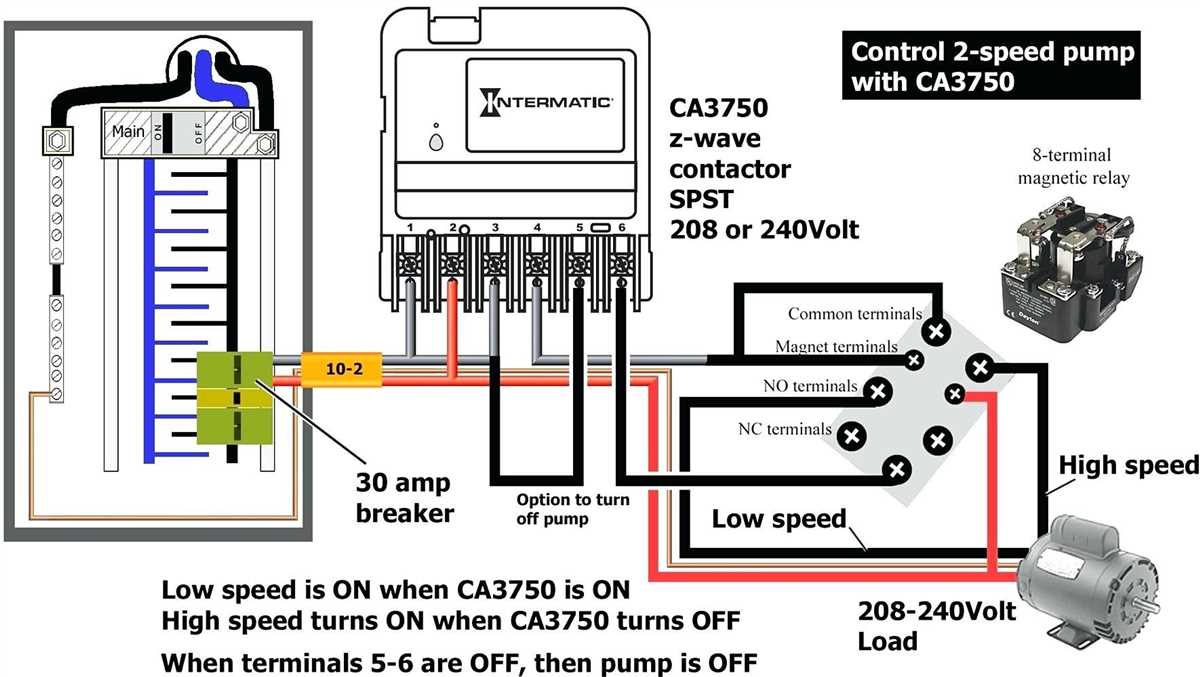
To wire a 220 motor, you will typically need a 220-volt circuit breaker and appropriate wiring, such as 10-gauge or 12-gauge wire. The circuit breaker is designed to protect the motor from electrical overload, and it should be rated accordingly to the motor’s power requirements.
The wiring process involves connecting the hot wires to the appropriate terminals on the motor. These terminals are often labeled L1 and L2 or T1 and T2, and they can be found on the motor’s housing or in the manufacturer’s documentation. It is important to ensure that the hot wires are connected to the correct terminals, as reversing them can lead to motor damage.
Additionally, it is crucial to properly ground the motor to ensure safe operation. This involves connecting the motor’s grounding wire to a ground rod or the building’s electrical grounding system. This grounding connection helps to protect against electrical shocks and prevents damage to the motor and other electrical equipment.
Summary:
- A 220 motor requires a 220-volt power supply with two separate 110-volt hot wires.
- Proper wiring involves connecting the hot wires to the correct terminals on the motor.
- A circuit breaker should be used to protect the motor from electrical overload, and appropriate wiring should be used.
- The motor should be properly grounded to ensure safe operation.
Choosing the Correct Wire Size
When wiring a 220 motor, it is crucial to choose the correct wire size to ensure safe and efficient operation. The wire size refers to the diameter of the wire and is measured in American Wire Gauge (AWG). Using the correct wire size is important because an undersized wire can overheat and pose a safety hazard, while an oversized wire can be expensive and inefficient.
One of the first factors to consider when choosing the wire size for a 220 motor is the motor’s amperage rating. The amperage rating is a measure of the electrical current required to operate the motor. A higher amperage rating will require a thicker wire size to handle the increased current flow. It is important to consult the motor’s specifications or manufacturer’s guidelines to determine the correct amperage rating.
Once the amperage rating is known, the wire size can be determined using a wire gauge chart. The chart provides the recommended wire size based on the amperage rating and the length of the wire run. It is essential to consider the length of the wire run because longer wire runs will have higher resistance, which can affect the voltage and overall performance of the motor. It is generally advisable to err on the side of caution and use a slightly larger wire size for longer runs.
Additionally, it is important to choose the appropriate type of wire for the wiring of a 220 motor. The wire should be rated for the voltage and temperature requirements of the motor. For example, a motor that operates at high temperatures may require wire with a higher temperature rating to withstand the heat generated. The type and quality of the wire used can also affect the motor’s efficiency and longevity.
Overall, choosing the correct wire size for wiring a 220 motor is crucial to ensure safe and efficient operation. By considering the motor’s amperage rating, the length of the wire run, and the appropriate wire type, one can select the right wire size that will support the motor’s electrical needs and provide reliable performance.
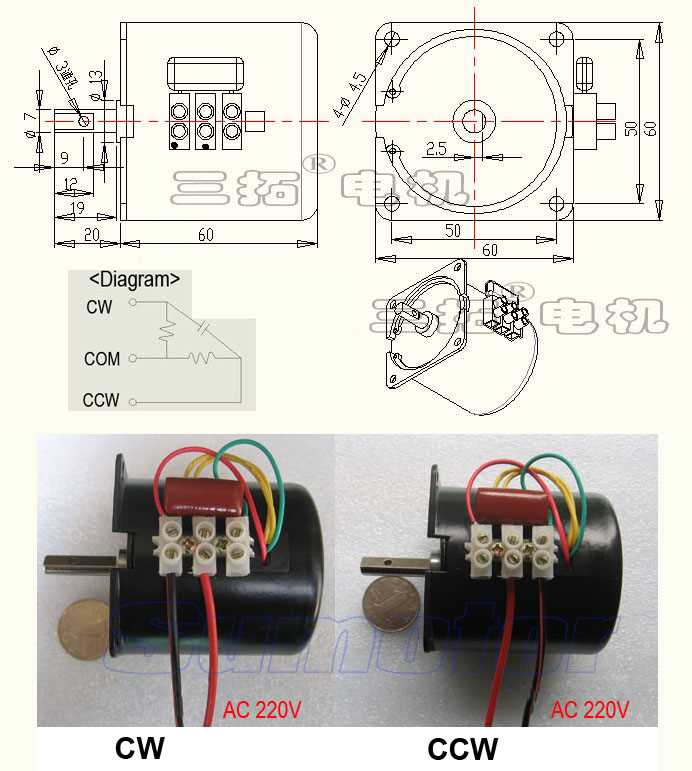
Identifying the Motor Connections
When wiring a 220-volt motor, it is essential to correctly identify the different motor connections. This is important to ensure the motor operates properly and to avoid any potential electrical hazards. It is crucial to consult the motor’s wiring diagram or manufacturer’s instructions to determine the correct connections for your specific motor.
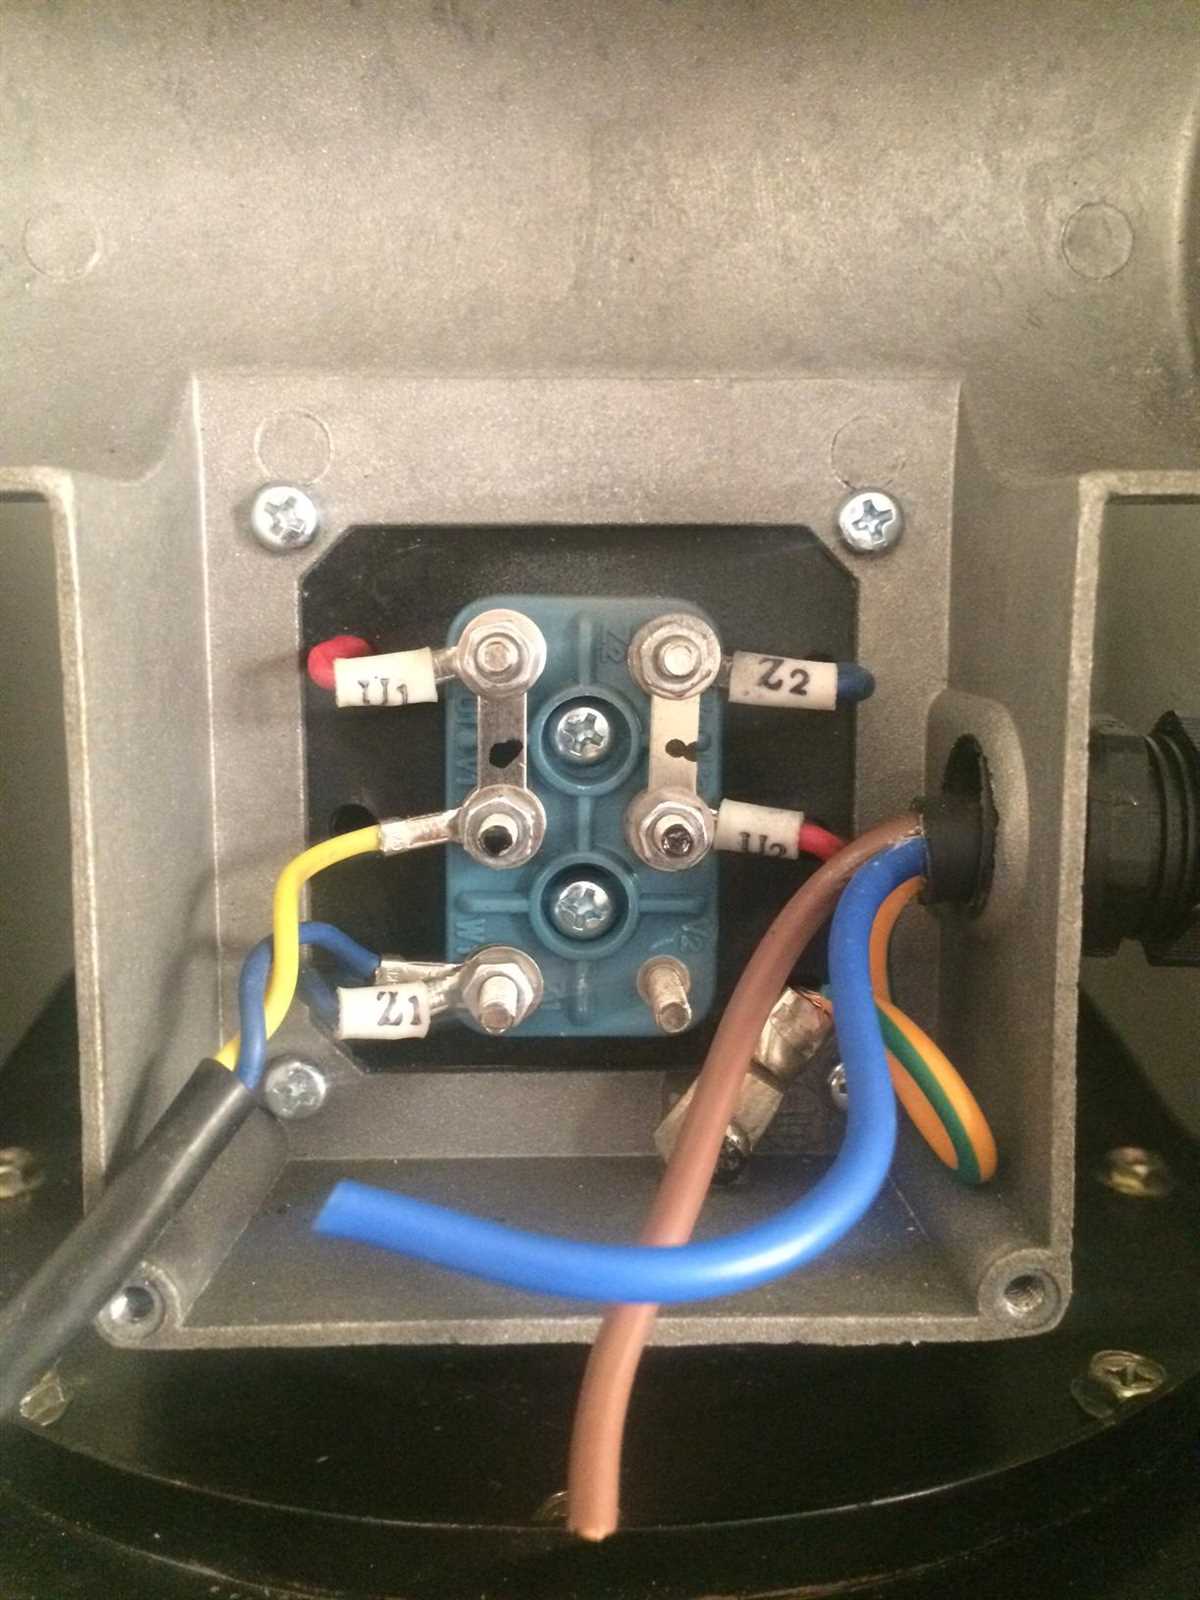
One of the first steps in identifying the motor connections is to locate the motor’s terminal box. This is typically a metal box located on the side or back of the motor. Inside the terminal box, you will find various terminals and wires.
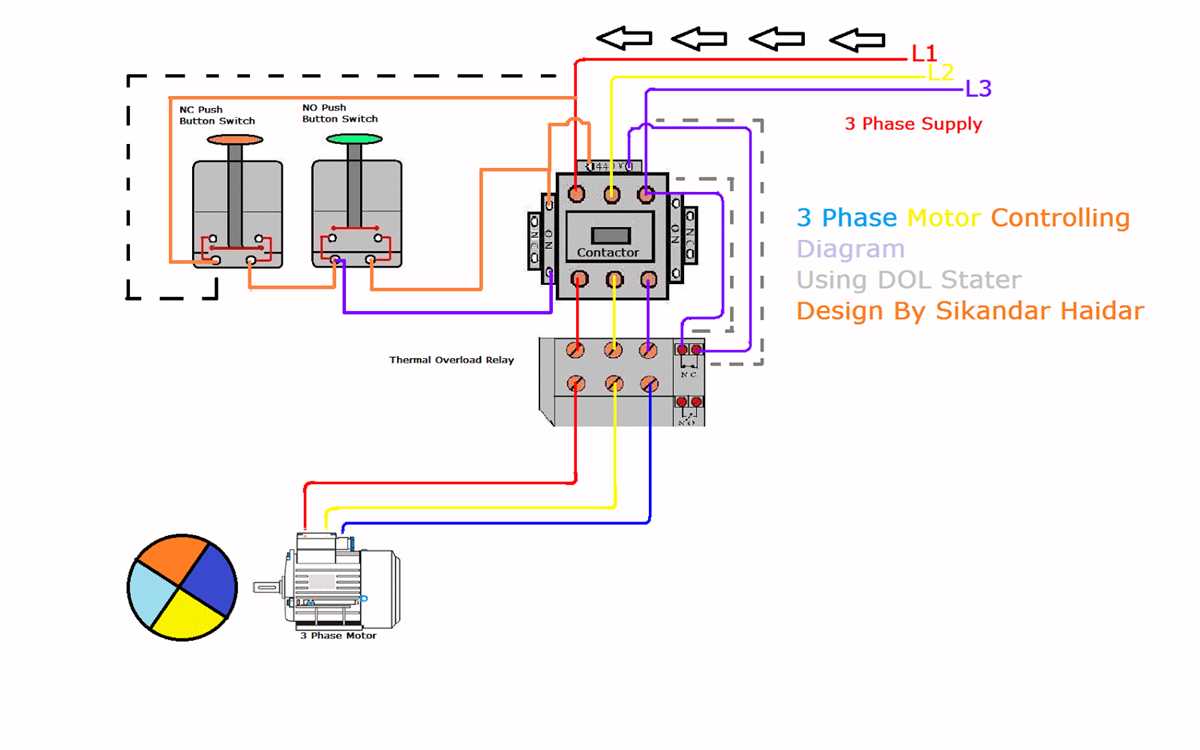
The terminals in the motor’s terminal box may be labeled or color-coded to indicate their purpose. Common terminal labels include L1, L2, L3 for the line voltage supply, and T1, T2, T3 for the motor’s winding connections. It is important to carefully identify each terminal and make note of their labels or colors to ensure correct wiring.
Once the terminals are identified, it is essential to ensure the motor is properly grounded. The motor’s ground wire should be connected to a separate grounding terminal or a designated ground connection point on the terminal box. This is important for safety and to prevent electrical shock.
After identifying the motor’s terminals and ensuring proper grounding, it is necessary to connect the line voltage supply to the appropriate terminals. This typically involves connecting the incoming line wires (from the electrical panel) to the L1, L2, and L3 terminals. It is important to follow the manufacturer’s instructions or wiring diagram to determine the correct connections for your specific motor.
Once all the connections are made, it is essential to properly secure and insulate the wires to prevent any electrical hazards. This can be done using wire nuts or terminal blocks, as recommended by the motor’s manufacturer.
Wiring the Motor for 220V
The process of wiring a motor for 220V involves some specific steps to ensure proper electrical connections and safety. Here are the steps to follow:
1. Verify the Motor’s Voltage Rating: Before starting the wiring process, it is crucial to verify the voltage rating of the motor. Ensure that the motor is specifically designed to operate on 220V.
2. Gather the Necessary Tools: Collect the necessary tools, including wire strippers, electrical tape, wire nuts, screwdrivers, and a voltage tester. These tools will help in making the electrical connections correctly.
3. Disconnect the Power: Ensure that the power supply to the motor is turned off and disconnected before starting the wiring process. This is vital to prevent electrical shocks or accidents.
4. Identify the Motor’s Wiring: Identify the various wires on the motor terminal. Typically, there will be three main wires – one ground wire (typically green or bare copper), one neutral wire (usually white or gray), and one hot wire (usually black or red).
5. Connect the Ground Wire: Connect the ground wire securely to the motor’s grounding terminal. This is an important safety measure to prevent electrical hazards.
6. Connect the Neutral and Hot Wires: Connect the neutral and hot wires to their respective terminals on the motor. Ensure that the connections are tight and secure to prevent any loose connections or electrical arcing.
7. Insulate the Connections: After making the connections, insulate them properly using electrical tape or wire nuts. This will protect the wires and connections from any potential damage or short circuits.
8. Test the Voltage: Once all the wiring is completed, use a voltage tester to check the voltage at the motor terminals. Ensure that the voltage reading matches the desired 220V rating.
9. Secure and Route the Wires: Finally, secure and route the wires neatly to avoid any tangling or interference with other components. Use cable ties or clamps to keep the wires organized and away from moving parts or heat sources.
By following these steps carefully, you can successfully wire a motor for 220V. However, it is always recommended to consult a professional electrician if you are unsure about the process or have any concerns regarding electrical safety.
Double Checking the Wiring
When it comes to wiring a 220 motor, double checking the wiring is essential to ensure safety and proper functionality. Making even a small mistake in the wiring can lead to dangerous situations or damage to the motor. Therefore, it is crucial to meticulously review the wiring before starting the motor.
One of the first steps in double checking the wiring is to verify that the power source matches the motor’s voltage requirements. Most 220 motors require either a single-phase or three-phase power supply, so it is important to confirm that the power source matches the motor’s specifications. This information can usually be found on the motor’s nameplate or in the manufacturer’s documentation.
Next, it is important to confirm that the motor’s wires are properly connected to the power supply. This involves making sure that the correct wires are connected to the corresponding terminals on both the motor and the power source. It is also important to ensure that all connections are secure and tightened properly to prevent any loose wires or potential hazards.
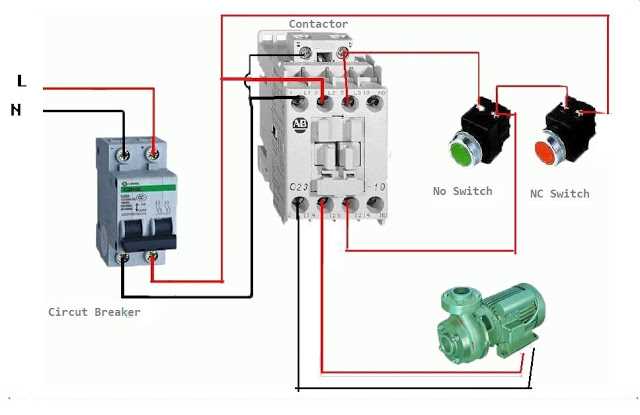
Additionally, it is important to verify that any additional components, such as switches or overload protectors, are connected correctly. These components play a crucial role in protecting the motor from damage and ensuring its safe operation. Double checking that these components are wired correctly can help prevent potential malfunctions or accidents.
In conclusion, double checking the wiring of a 220 motor is a critical step in ensuring safety and proper functioning. By verifying the power source, connections, and additional components, motor operators can minimize the risk of accidents and damage to the motor. Take the time to review the wiring before starting the motor to ensure a safe and successful operation.
Testing the Motor
After wiring the 220 motor, it is important to test it to ensure that it is working correctly. This involves checking for proper rotation and verifying that all connections are secure.
To test the motor, follow these steps:
- Check the connection: Make sure that all wiring connections are tightly secured. This includes checking that the wires are properly connected to the power source, as well as ensuring that any switches or control devices are properly set for operation.
- Power on: Turn on the power supply to the motor. Use caution when working with electricity to avoid any accidents.
- Listen for noise: As the motor powers on, listen for any unusual noises such as grinding, squeaking, or excessive vibration. These could indicate a problem with the motor or its components.
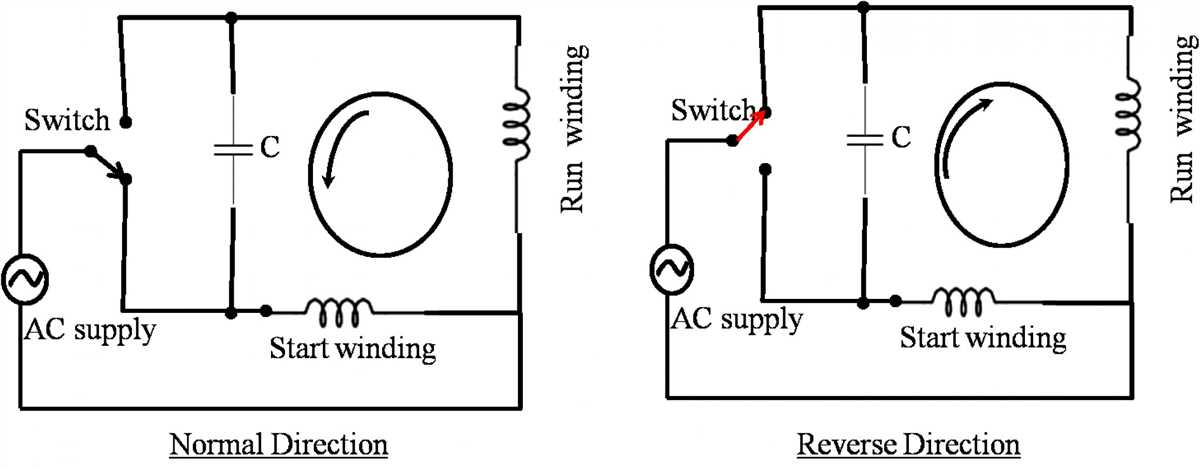
- Observe rotation: Note the direction of rotation of the motor shaft. Most motors will rotate clockwise, but this can vary depending on the specific model. Check the motor’s documentation or consult a professional if unsure.
- Test speed control: If the motor has variable speed control, verify that it is functioning properly. Adjust the speed settings and ensure that the motor responds accordingly.
- Check performance: Connect the motor to any equipment or machinery it will be used with and observe its performance. Ensure that it is able to perform the desired tasks effectively and efficiently.
Overall, testing the motor is crucial to ensure its proper operation and to avoid any potential issues in the future. It is always recommended to consult the motor’s documentation or seek professional assistance if any problems or concerns arise during the testing process.