
Yamaha ATVs have gained immense popularity among outdoor enthusiasts, adventure seekers, and professionals alike. These all-terrain vehicles are treasured for their ruggedness, reliability, and performance. However, to keep your Yamaha ATV in top-notch condition and fix any issues that may arise, it is essential to have a good understanding of its schematics.
Schematics are visual representations of the electrical, mechanical, and hydraulic systems of a vehicle. Yamaha ATV schematics provide detailed diagrams and information about the various components and systems that make up the ATV. They are invaluable tools for troubleshooting, maintenance, and repairs.
In this comprehensive guide, we will delve into the world of Yamaha ATV schematics. We will explore the importance of understanding schematics, how to read and interpret them, and how they can be used to diagnose and fix common issues. Whether you are a Yamaha ATV owner or a technician working on these vehicles, this guide will equip you with the knowledge and skills needed to effectively navigate the schematics and ensure your ATV stays in optimal working condition.
Yamaha ATV Schematics: Everything You Need to Know
Yamaha is a well-known brand in the ATV industry, and their vehicles are loved by off-road enthusiasts all over the world. One of the essential aspects of owning a Yamaha ATV is understanding its schematics. These schematics provide detailed information about the electrical wiring, circuits, and components of the vehicle. By utilizing these schematics, ATV owners can troubleshoot issues, perform maintenance tasks, and even make modifications to their vehicles.
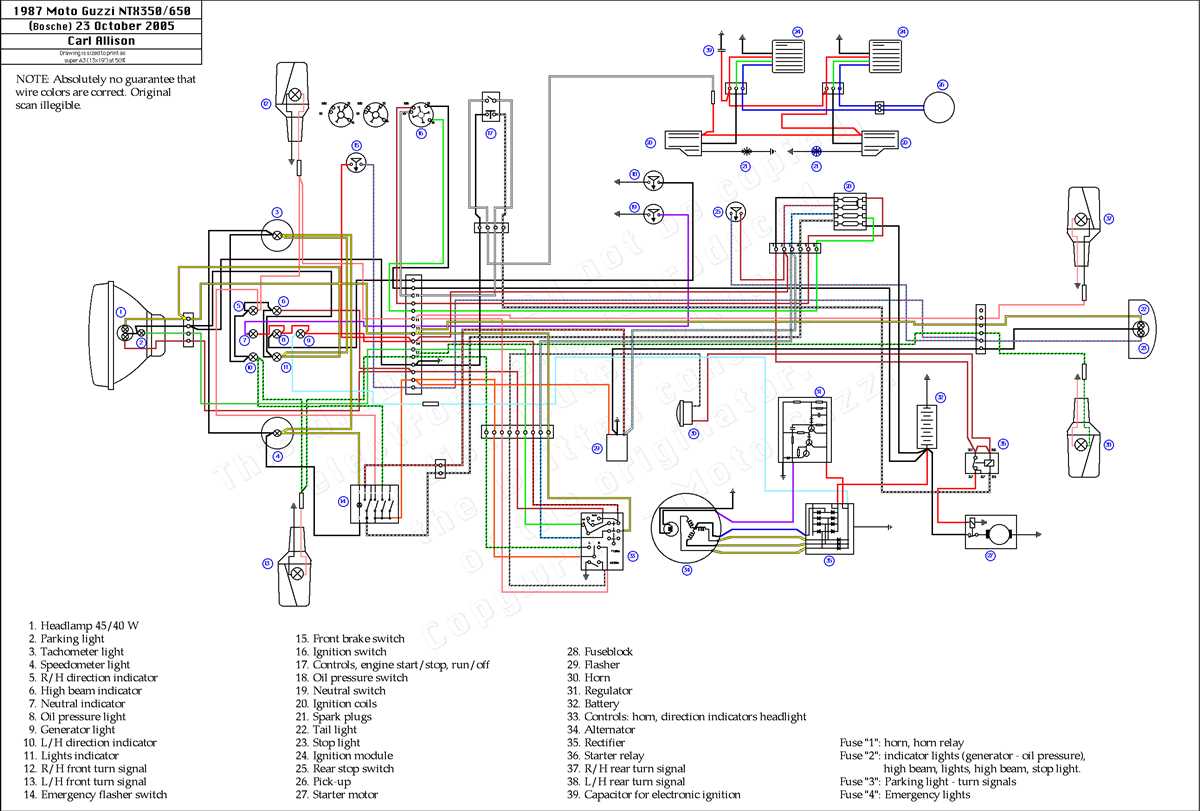
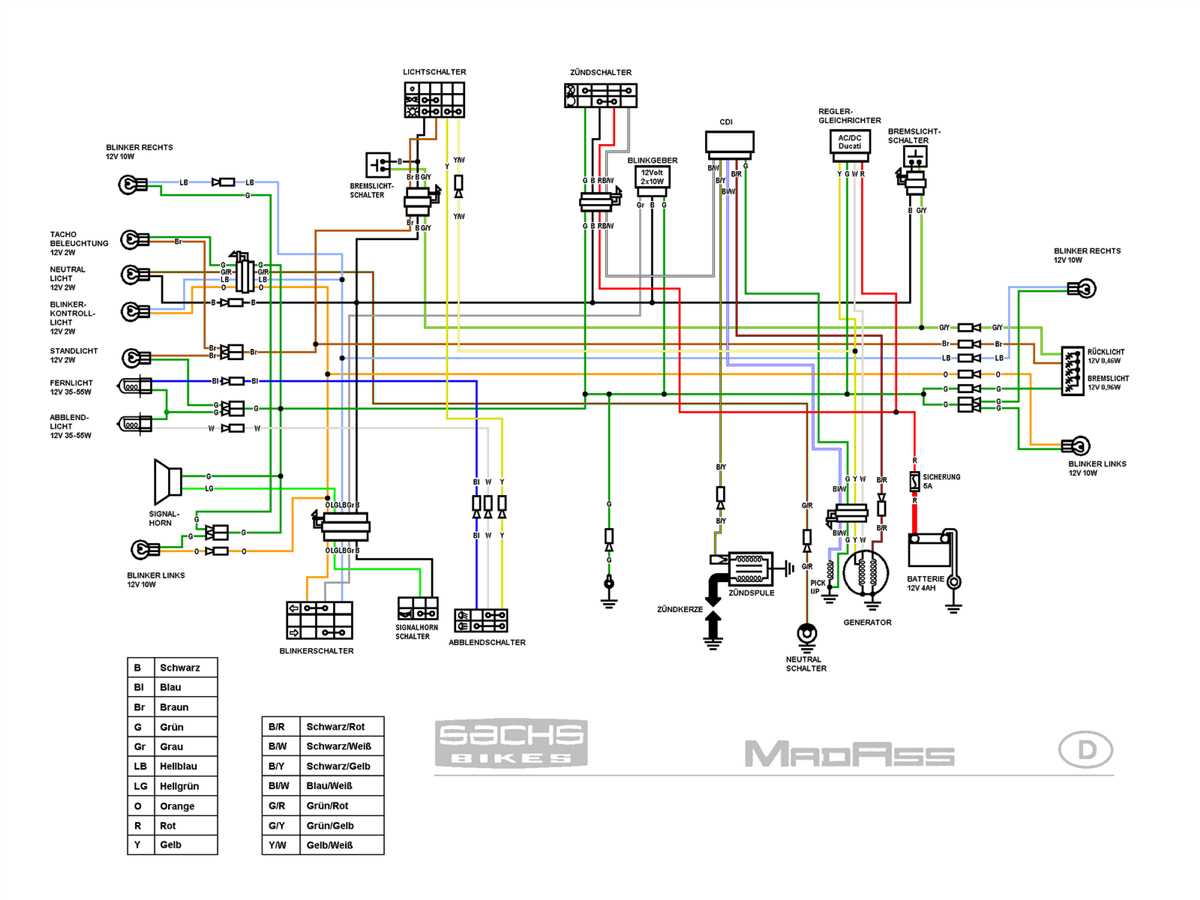
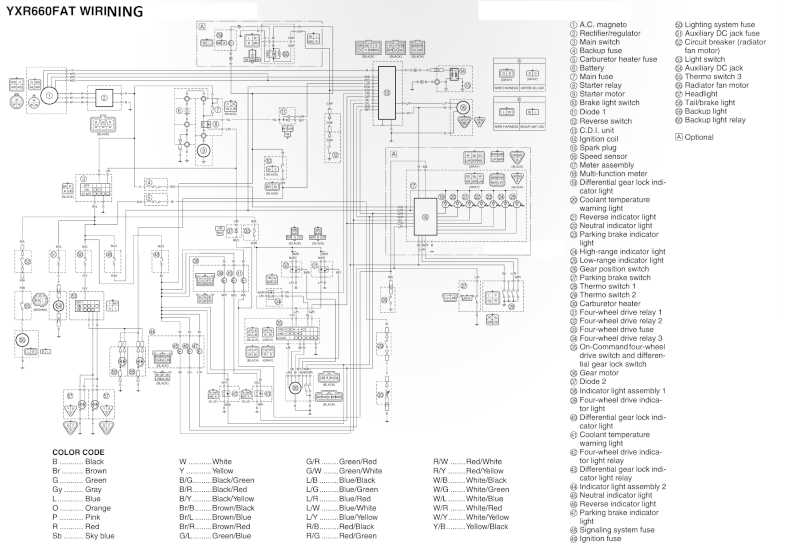
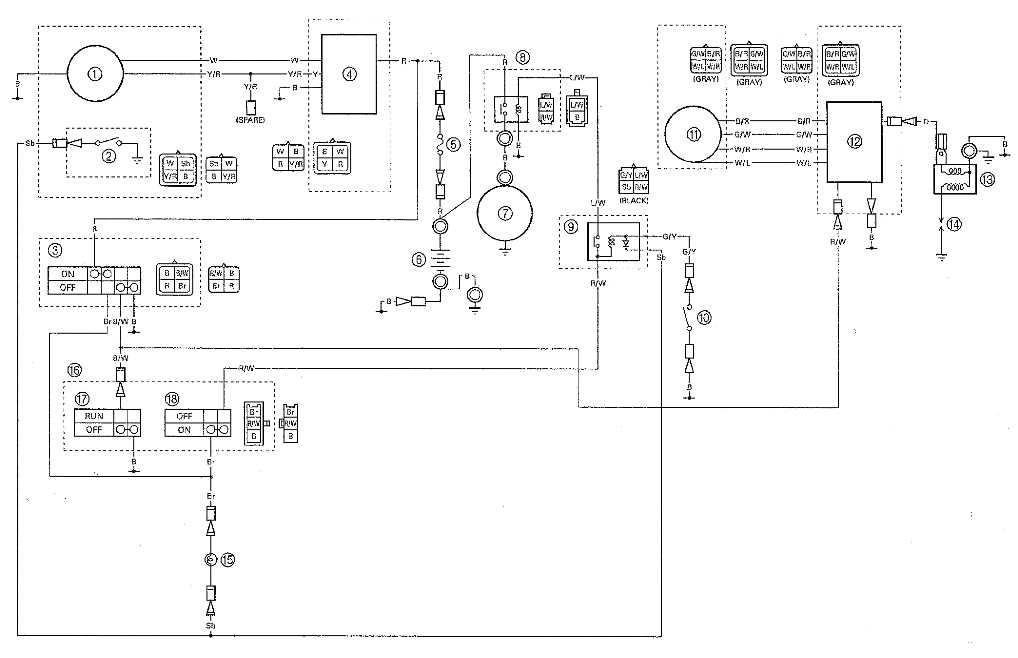
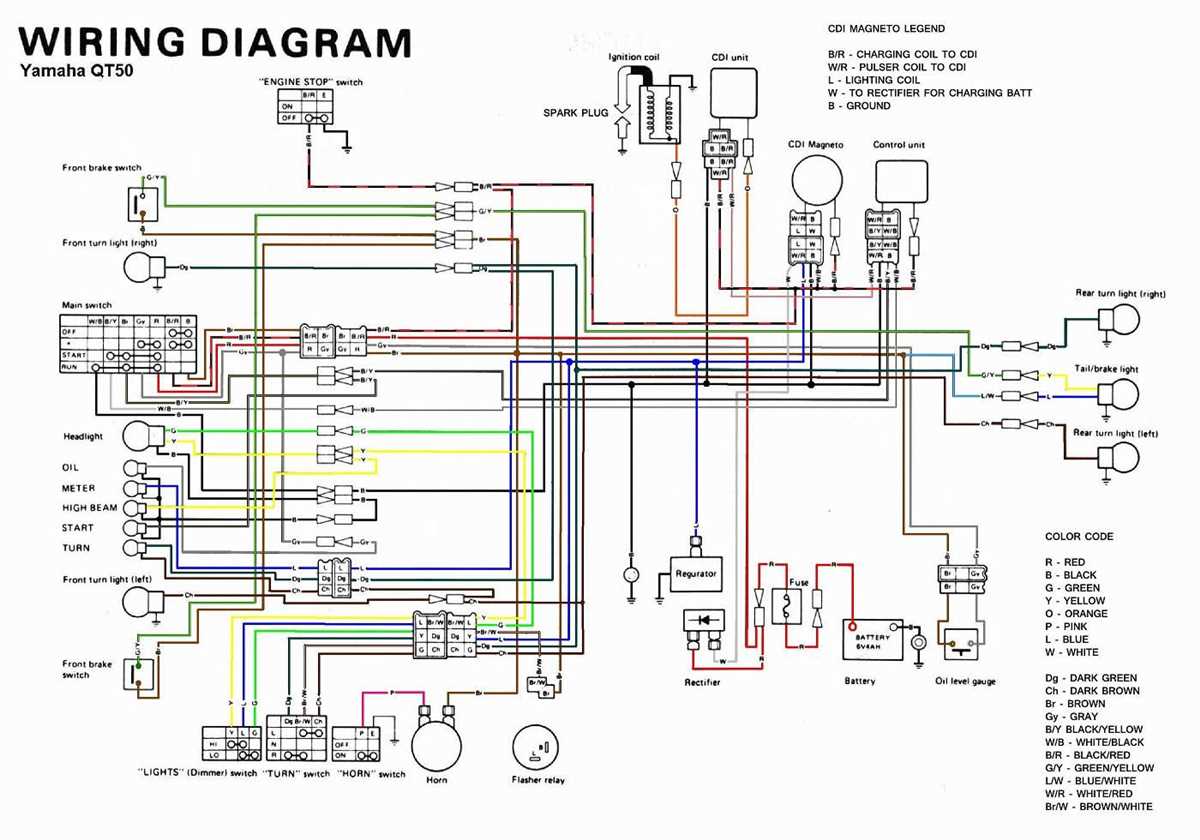
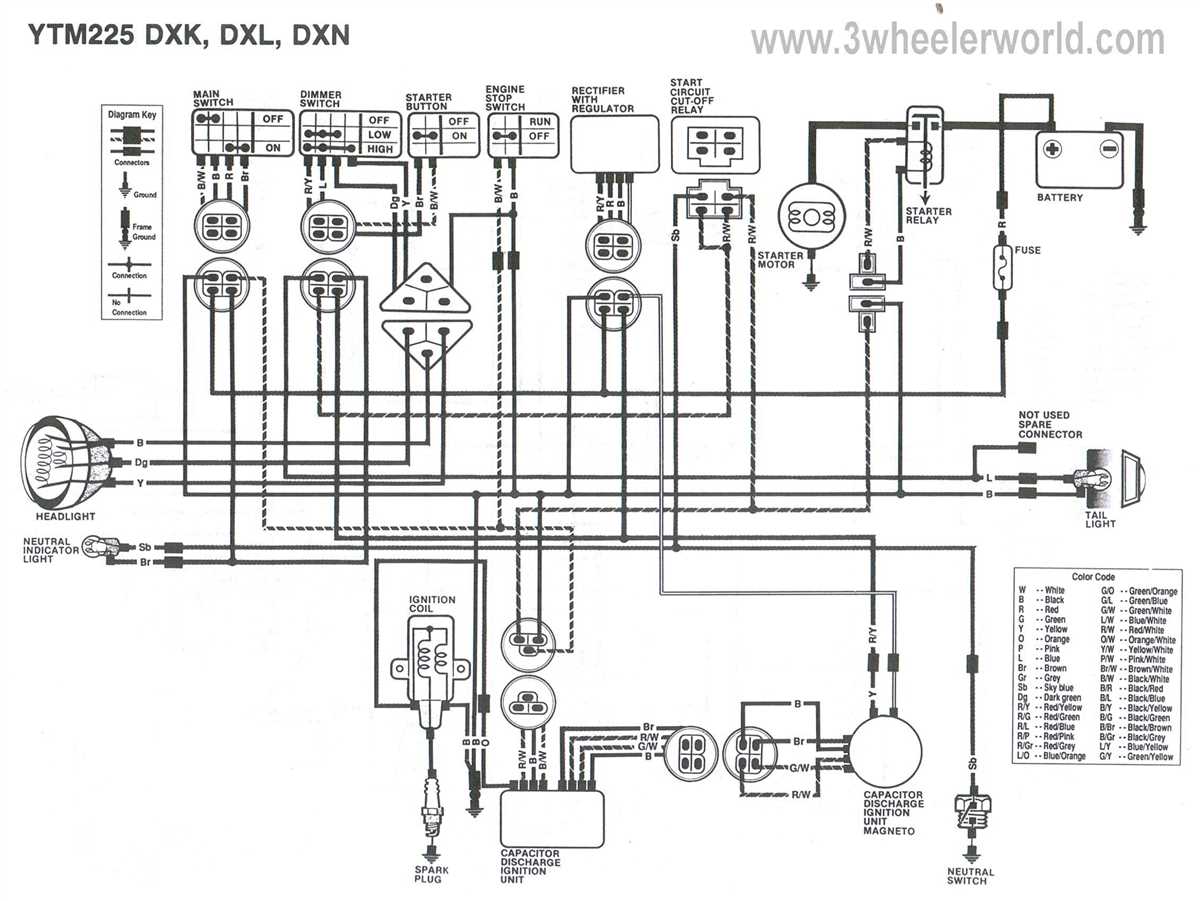
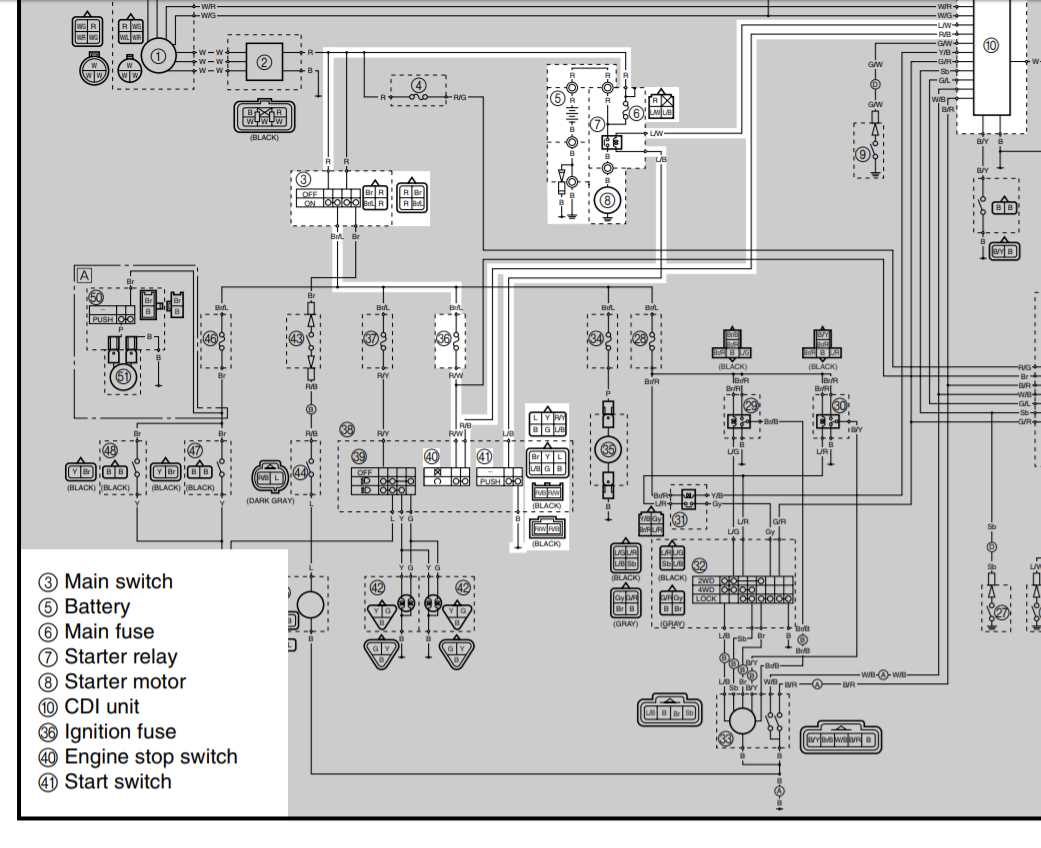
Electrical Schematics: The electrical schematics of a Yamaha ATV are like a map of its electrical system. They illustrate the connections between various components, such as the battery, ignition switch, starter motor, lights, and more. By referring to the electrical schematics, ATV owners can identify faulty connections, broken wires, or malfunctioning components that may be causing electrical issues. This information is invaluable when it comes to diagnosing and fixing problems with the ATV’s electrical system.
Understanding the Symbols:
To make sense of the Yamaha ATV schematics, it is essential to understand the symbols used in the diagrams. These symbols represent different types of components and their connections. For example, a straight line represents a wire, while a circle represents a connection point. Other symbols may include arrows indicating the flow of current or switches representing on/off positions. By familiarizing themselves with these symbols, ATV owners can decipher the schematics and effectively troubleshoot any electrical issues.
- Using Schematics for Maintenance: Yamaha ATV schematics are not just useful for troubleshooting electrical problems. They can also be invaluable for routine maintenance tasks. For example, if an ATV owner wants to change the oil, the schematics can guide them in locating the oil filter, drain plug, and other relevant components. By following the schematics, ATV owners can ensure they perform maintenance tasks correctly and avoid potentially damaging their vehicles.
- Modifications and Upgrades: Finally, Yamaha ATV schematics can also be useful for those looking to make modifications or upgrades to their vehicles. Whether it’s installing a new light bar, adding an audio system, or upgrading the battery, the schematics provide a blueprint of the ATV’s electrical system. By referring to the schematics, ATV owners can determine the best locations to connect new components, ensuring proper functionality and avoiding any adverse effects on the ATV’s electrical system.
In conclusion, Yamaha ATV schematics are an essential tool for ATV owners. Whether it’s troubleshooting electrical issues, performing maintenance tasks, or making modifications, these schematics provide valuable information about the ATV’s electrical system. By understanding and utilizing the schematics, ATV owners can ensure their vehicles are in optimal condition and enjoy a hassle-free off-road experience.
What Are ATV Schematics and Why They Are Important
ATV schematics, also known as wiring diagrams, are graphical representations of the electrical system and wiring components of an ATV (All-Terrain Vehicle). They provide detailed information about the various electrical circuits, connections, and components in the vehicle, including the battery, ignition system, lights, and other electrical systems.
ATV schematics are important for several reasons. First, they serve as a visual reference for understanding and troubleshooting electrical issues in the ATV. By following the lines and symbols in the schematic, technicians and vehicle owners can identify the various components and understand how they are connected. This can be particularly helpful when trying to locate a faulty wire or a loose connection.
Furthermore, ATV schematics are crucial for performing repairs and modifications on the electrical system. Whether it’s installing new lights, adding switches, or upgrading the ignition system, having access to the schematic allows for accurate and efficient work. It provides a roadmap for understanding how the various electrical components interact and ensures that the modifications are done correctly.
ATV schematics are also helpful for those who want to learn more about the electrical system of their vehicle. By studying the schematic, they can gain insights into how the different circuits work and how the electrical system is designed. This knowledge can be valuable for troubleshooting issues, performing basic maintenance, and even designing custom modifications.
To summarize, ATV schematics are invaluable tools for understanding, troubleshooting, and modifying the electrical systems of ATVs. They provide detailed information about the electrical circuits, components, and connections, allowing for efficient repairs and modifications. Whether you are a technician, an ATV enthusiast, or a vehicle owner, having access to schematics can greatly enhance your understanding and ability to work on your ATV.
Understanding Yamaha ATV Schematics: A Beginner’s Guide
Yamaha ATVs are popular vehicles known for their durability and versatility. They are used for various purposes, including recreation, farming, and utility tasks. One important aspect of owning a Yamaha ATV is understanding its electrical system, which is where schematics come into play. Schematics, also known as wiring diagrams, are visual representations of the ATV’s electrical components and their interconnections.
What are schematics and why are they important?
Schematics are detailed diagrams that illustrate the electrical circuits of an ATV. They provide a visual roadmap for understanding how the different components, such as the battery, ignition switch, lights, and relays, are connected. By studying the schematics, ATV owners and enthusiasts can gain a better understanding of how their vehicle’s electrical system works and troubleshoot any potential issues.
Key components of Yamaha ATV schematics:
- Battery: The battery is the source of electrical power for the ATV. It provides energy for starting the engine and powering the various electrical components.
- Ignition switch: The ignition switch controls the flow of electricity to the ATV’s ignition system. It allows the rider to start and stop the engine.
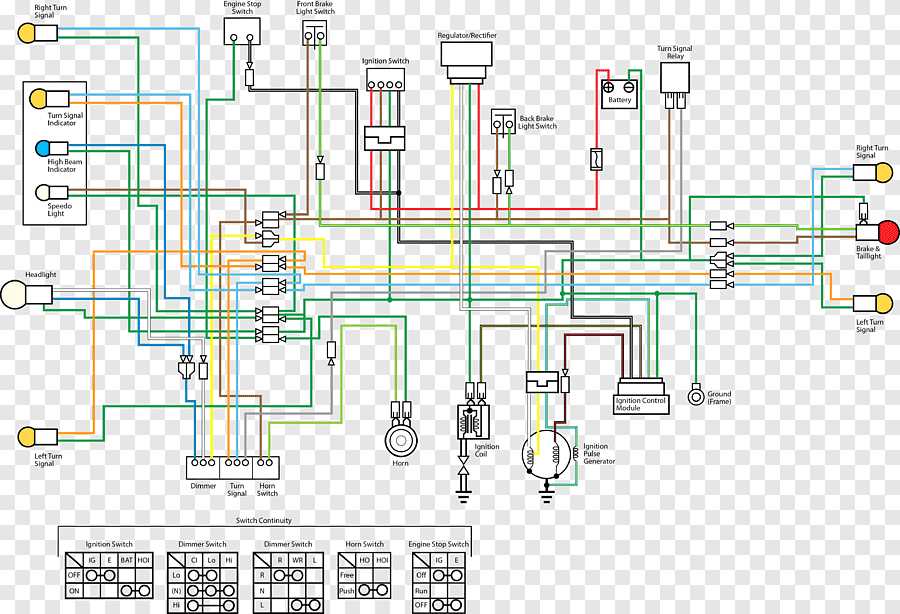
- Lights: The lights on an ATV include the headlights, taillights, and turn signals. The schematics show how these lights are wired and connected to the battery and switches.
- Relays: Relays are electrical switches that control the flow of power to different components. They help protect the electrical system from overload and prevent damage to the ATV’s electrical components.
How to read Yamaha ATV schematics:
Reading Yamaha ATV schematics may seem daunting at first, especially for beginners. However, with some practice and guidance, it becomes easier to understand and interpret the diagrams. Here are some tips for reading Yamaha ATV schematics:
- Start by familiarizing yourself with the symbols and abbreviations used in the schematics. These symbols represent various electrical components and connections.
- Identify the main components of the electrical system, such as the battery, ignition switch, and lights. Follow the lines in the schematic to see how these components are connected.
- Pay attention to the direction of the electrical flow indicated by arrows in the schematics. This will help you understand the path the electricity takes through the system.
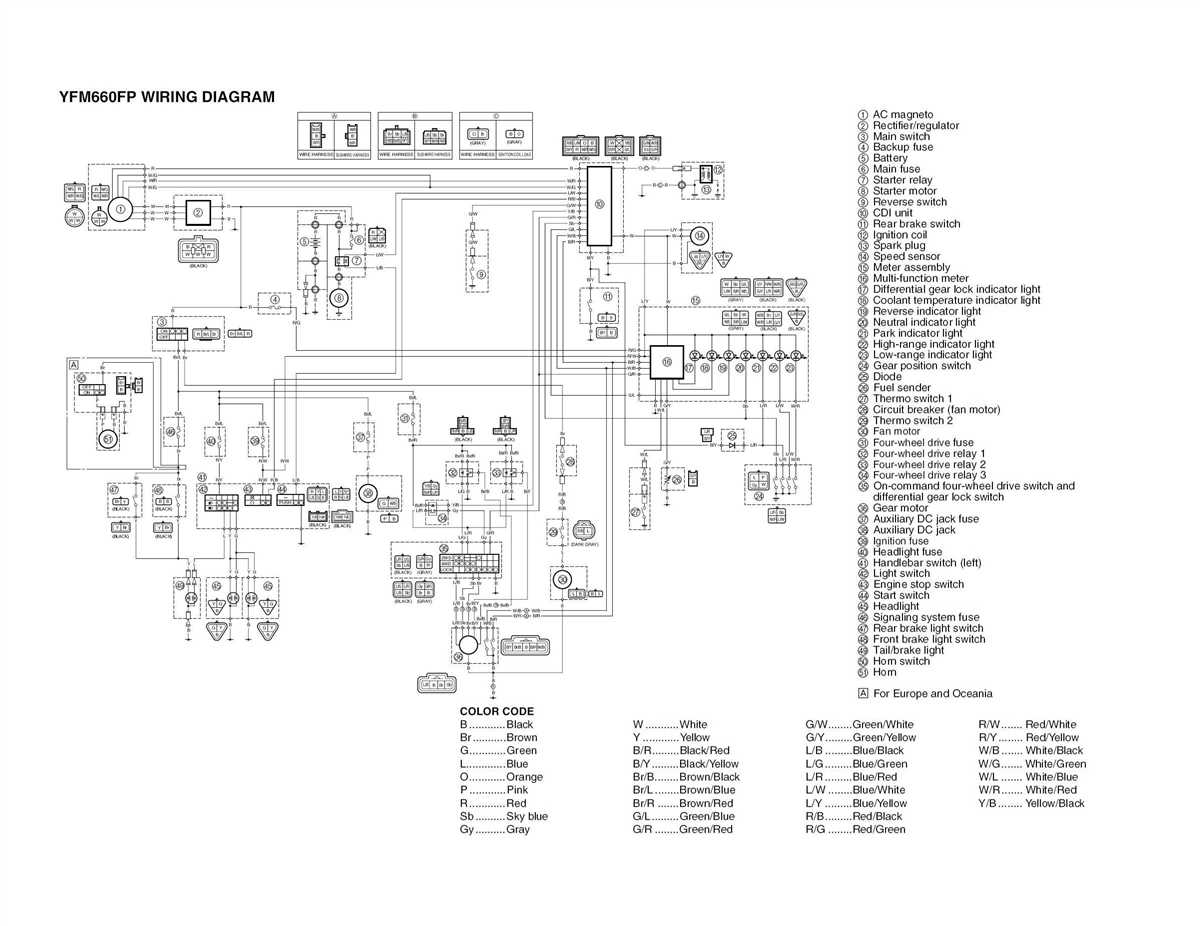
- Refer to the legend or key provided with the schematics to understand the meaning of specific symbols or abbreviations.
- If you encounter any issues with your ATV’s electrical system, refer to the schematics to troubleshoot the problem. Follow the circuitry and check for any loose connections, damaged wires, or faulty components.
By understanding Yamaha ATV schematics, you can gain valuable insight into your ATV’s electrical system and effectively diagnose and fix any electrical issues that may arise. It is an essential skill for every ATV owner, whether you use your ATV for work or recreation.
How to Read Yamaha ATV Schematics Step-by-Step
Yamaha ATV schematics can be complex and intimidating for beginners, but with a step-by-step approach, they can become much easier to understand and interpret. Whether you’re a DIY enthusiast or a professional mechanic, knowing how to read these schematics is crucial for troubleshooting and repairing your Yamaha ATV.
Step 1: Familiarize Yourself with the Symbols
The first step in reading Yamaha ATV schematics is to familiarize yourself with the symbols used in the diagrams. These symbols represent various components such as resistors, capacitors, switches, and connectors. Understanding these symbols is essential to decoding the schematic diagrams effectively. Take the time to study and memorize the most common symbols used in Yamaha ATV schematics.
Step 2: Identify the Components
Once you’re familiar with the symbols, the next step is to identify the components shown in the schematics. This involves locating each symbol in the diagram and determining which component it represents. By referencing the legend or component identification key provided with the schematic, you can easily match the symbols to the actual components found in your Yamaha ATV.
Step 3: Follow the Flow of the Circuits
After identifying the components, you can begin to follow the flow of the circuits in the schematic diagrams. Start at one end of the circuit and trace the path of the electrical current as it passes through various components. By understanding the sequence of the circuits, you can pinpoint any potential issues or areas of concern within your Yamaha ATV’s electrical system.
Step 4: Pay Attention to Wiring Connections
Wiring connections play a vital role in understanding Yamaha ATV schematics. Pay close attention to how the wires are connected between different components and the paths they take throughout the system. By analyzing the wiring connections, you can troubleshoot and diagnose issues related to faulty wiring, loose connections, or short circuits.
Step 5: Consult the Yamaha Service Manual
While the above steps can help you get started with reading Yamaha ATV schematics, it’s essential to consult the official Yamaha service manual for your specific ATV model. The service manual provides comprehensive information, including detailed schematics, wiring diagrams, and troubleshooting guides. This valuable resource will ensure you have the most accurate and up-to-date information to work with.
By following these step-by-step guidelines and practicing regularly, you can become proficient in reading Yamaha ATV schematics. Remember to take your time, stay focused, and continuously improve your understanding of the diagrams. With patience and persistence, you’ll be able to effectively troubleshoot and repair your Yamaha ATV’s electrical system.
Common Symbols and Abbreviations Used in Yamaha ATV Schematics
In order to understand the electrical diagrams and schematics for Yamaha ATV models, it is essential to familiarize yourself with the various symbols and abbreviations used. These symbols and abbreviations are universal and are used in electrical schematics across different industries. Here are some common symbols and abbreviations you may come across in Yamaha ATV schematics:
Symbols
- Circle: A circle represents a point where wires connect. This could be a junction or connection point.
- Line: A line represents a wire. The direction of the line indicates the flow of current.
- Arrow: An arrow indicates the direction of current flow.
- Resistor: A zigzag line represents a resistor, which restricts the flow of current.
- Switch: A switch is represented by a line with a gap where it can be toggled on or off.
- Battery: A battery symbol represents a power source.
- Ground: The ground symbol is a line with three smaller lines branching out, indicating the connection to the ground.
- Diode: A diode is represented by an arrow pointing towards a straight line.
Abbreviations
- V: Voltage
- A: Amperage
- DC: Direct Current
- AC: Alternating Current
- GND: Ground
- IGN: Ignition
- BLK: Black
- RED: Red
Understanding these symbols and abbreviations will help you interpret and troubleshoot electrical issues in your Yamaha ATV. It is important to refer to the specific model’s manual and schematic for accurate representation and interpretation of symbols and abbreviations.
Troubleshooting Yamaha ATV Electrical Issues Using Schematics
When encountering electrical issues with your Yamaha ATV, it can be frustrating to know where to begin troubleshooting. However, by using schematics, you can navigate the electrical system and identify potential problems more effectively.
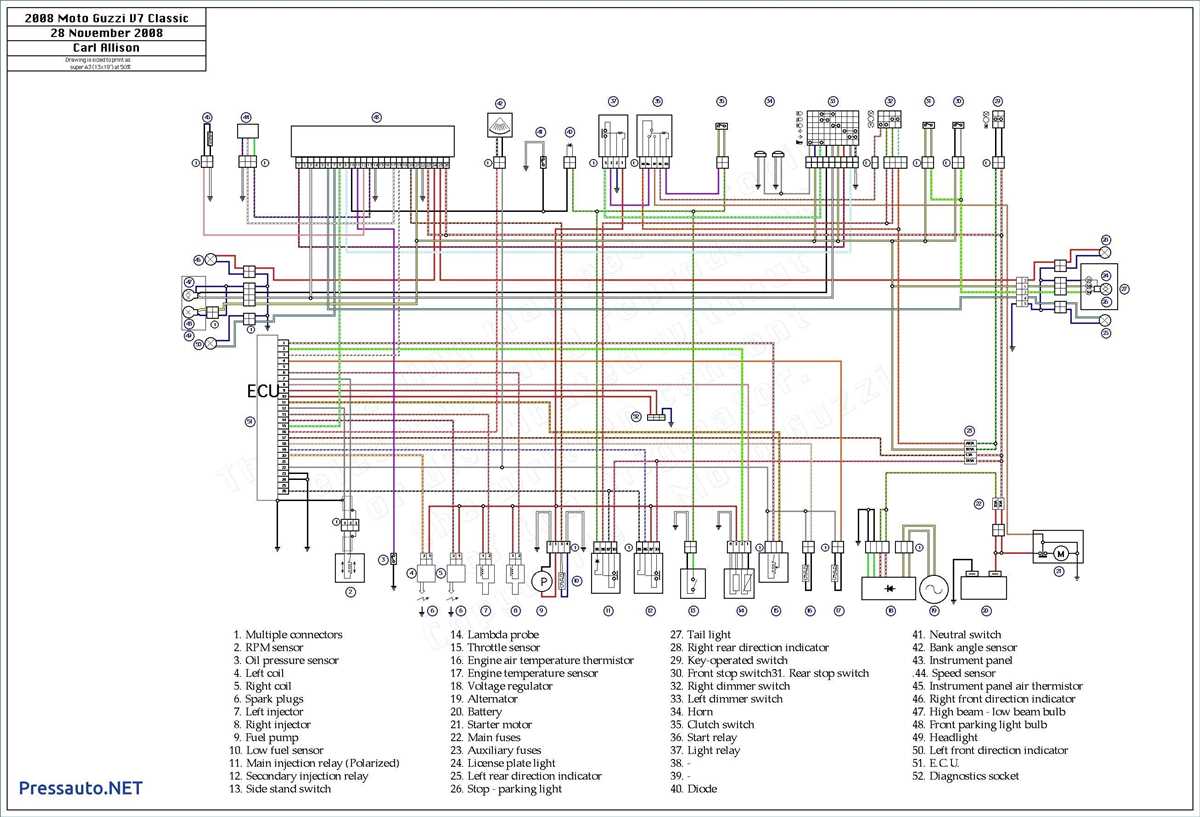
First and foremost, it is important to have a reliable and accurate Yamaha ATV schematic. This diagram will provide you with a visual representation of the electrical components and their connections within the ATV. It will help you understand how electricity flows through the system and allow you to pinpoint any potential areas of concern.
One key step in troubleshooting electrical issues is to check for loose or corroded connections. By referring to the schematic, you can locate the specific connectors and inspect them for any signs of damage or wear. Tightening loose connections or cleaning corroded ones can often resolve intermittent electrical problems.
Additionally, the schematic will help you identify the different electrical components in the system, such as the ignition switch, starter motor, and fuses. By understanding their locations and connections, you can test these components individually to determine if they are functioning correctly. A multimeter can be a valuable tool in measuring voltage, resistance, and continuity.
If you are experiencing a complete loss of electrical power, the schematic can also help you trace the path of power from the battery to the various components. This will allow you to identify any breakages or faults in the wiring harness. By inspecting and repairing or replacing damaged wires, you can restore power to the ATV.
In summary, utilizing Yamaha ATV schematics is an essential tool in troubleshooting electrical issues. It provides a clear visual guide to the electrical system, helps identify potential problems, and allows you to effectively test and repair specific components. By following the schematic and utilizing the proper tools, you can resolve electrical issues and keep your Yamaha ATV running smoothly.
Conclusion
In conclusion, Yamaha ATV schematics are invaluable resources for maintaining and repairing your Yamaha ATV. These schematics provide detailed information about the electrical systems, wiring diagrams, and component locations of your ATV, making it easier for you to diagnose and fix any issues that may arise.
By using Yamaha ATV schematics, you can save time and money by avoiding unnecessary trips to the mechanic and performing minor repairs yourself. The schematics allow you to accurately identify faulty components, troubleshoot wiring problems, and follow step-by-step instructions for disassembly and reassembly.
Whether you are a seasoned ATV enthusiast or a beginner, Yamaha ATV schematics are user-friendly and accessible tools that can greatly assist you in maintaining and repairing your ATV. With the help of these schematics, you can ensure that your ATV is in optimal condition, prolong its lifespan, and enhance your overall riding experience.
So, if you own a Yamaha ATV, don’t hesitate to explore the available schematics and make use of them for all your maintenance and repair needs.