
When it comes to setting up a car audio system with multiple subwoofers, understanding the wiring configuration is crucial. One common setup involves using three dual voice coil (DVC) 4 ohm subs. By properly wiring these subs, you can achieve the desired impedance load and maximize the power output of your amplifier.
Firstly, it’s important to understand the concept of impedance. In simple terms, impedance refers to the resistance that the subwoofers present to the amplifier. By wiring the subs in a specific way, you can change the total impedance of the system. In the case of wiring three DVC 4 ohm subs, the goal is to achieve a final impedance of 4 ohms, which is a common load for most car amplifiers.
The wiring configuration for this setup involves connecting the voice coils of each subwoofer in a series-parallel combination. To do this, you’ll need to connect the positive terminal of one voice coil on the first subwoofer to the negative terminal of the second voice coil on the same subwoofer. Then, connect the remaining positive terminal of the second voice coil to the negative terminal of the first voice coil on the second subwoofer. Finally, connect the positive terminal of the second voice coil on the second subwoofer to the negative terminal of the first voice coil on the third subwoofer. The remaining positive and negative terminals on the first and third subwoofers should be left unused.
By following this wiring diagram, you can effectively wire three DVC 4 ohm subs to achieve a final impedance of 4 ohms. This balanced impedance load will ensure that your amplifier operates within its safe power output range, allowing you to enjoy powerful and clear bass in your car audio system.
How to Wire 3 DVC 4 Ohm Subs: A Comprehensive Guide
Wiring multiple subwoofers can be a complex task, especially when dealing with different impedances and configurations. In this comprehensive guide, we will walk you through the process of wiring three DVC (Dual Voice Coil) 4 Ohm subs to ensure optimal performance and sound quality.
Before we begin, it is important to understand the basics of subwoofer wiring. Each subwoofer has its own impedance, which is measured in Ohms. The total load on the amplifier or stereo system depends on how the subs are wired together. In the case of three DVC 4 Ohm subs, there are several options to consider:
- Series Wiring: In series wiring, the positive terminal of one subwoofer is connected to the negative terminal of the next subwoofer. This is repeated until all the subs are connected in a chain. The final connection is made between the positive terminal of the last subwoofer and the positive terminal of the amplifier. This configuration increases the overall impedance and is suitable for amplifiers that can handle higher impedance loads.
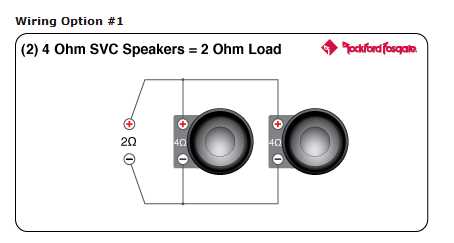
- Parallel Wiring: In parallel wiring, the positive terminals of all the subs are connected together, as are the negative terminals. This configuration reduces the overall impedance and is suitable for amplifiers that can handle lower impedance loads. However, it is important to ensure that the amplifier is capable of driving the load.
- Combination Wiring: Combination wiring involves a combination of series and parallel configurations. This allows for flexibility in matching the impedance to the capabilities of the amplifier or stereo system.
When wiring three DVC 4 Ohm subs, you have the option of wiring them in series, parallel, or a combination of both. It is crucial to consult the specifications of your amplifier or stereo system to determine the optimal wiring configuration. Additionally, it is recommended to use high-quality wiring materials and connectors to ensure a reliable and efficient connection.
To summarize, wiring three DVC 4 Ohm subs requires careful consideration of the desired impedance, the capabilities of the amplifier or stereo system, and the overall sound quality requirements. By following the guidelines provided in this comprehensive guide, you will be able to wire your subs effectively and enjoy enhanced bass performance in your audio system.
Understanding the Basics of DVC Subwoofers
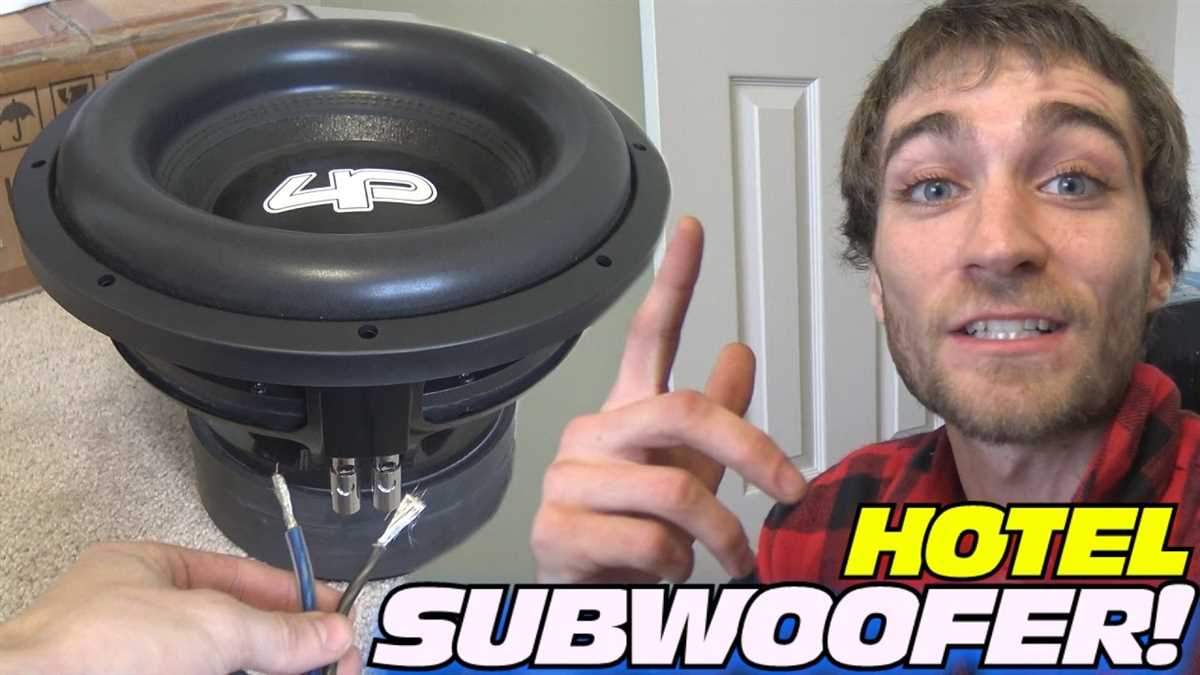
Dual voice coil (DVC) subwoofers are a popular choice among car audio enthusiasts due to their flexibility and ability to produce powerful bass. These subwoofers have two separate voice coils, each with its own set of terminals, which allows for multiple wiring configurations.
One of the key features of DVC subwoofers is their impedance. The impedance of a subwoofer refers to the amount of resistance it offers to an electrical signal. DVC subwoofers are typically available in 2-ohm, 4-ohm, or 8-ohm configurations. The impedance of each voice coil can be wired in series or parallel to achieve different total impedance options.
- Series wiring: When wiring the voice coils in series, the total impedance of the subwoofer increases. For example, if each voice coil has an impedance of 4 ohms, wiring them in series would result in a total impedance of 8 ohms. Series wiring is commonly used to create higher impedance loads.
- Parallel wiring: When wiring the voice coils in parallel, the total impedance of the subwoofer decreases. Using the previous example, wiring the 4-ohm voice coils in parallel would result in a total impedance of 2 ohms. Parallel wiring is often used for lower impedance loads.
It’s important to consider the capabilities of your amplifier when selecting the wiring configuration for DVC subwoofers. Amplifiers are typically rated to handle specific impedance loads, so it’s essential to match the subwoofer’s impedance to the amplifier’s capabilities.
Additionally, wiring multiple DVC subwoofers together can further increase or decrease the total impedance. By understanding the basics of wiring DVC subwoofers, car audio enthusiasts can maximize their system’s performance and achieve their desired bass response.
Choosing the Right Amplifier for Your Setup
When it comes to wiring 3 dual voice coil (DVC) 4-ohm subwoofers, it is important to choose the right amplifier for your setup. The amplifier is responsible for providing power to the subwoofers and driving the sound system. Selecting the appropriate amplifier is crucial to ensure optimal performance and prevent any damage to the subwoofers.
Power Handling: The power handling capabilities of the amplifier should match or exceed the power rating of the subwoofers. It is essential to consider both the RMS power and peak power ratings of the subwoofers. RMS power indicates the continuous power handling of the subwoofers, while peak power represents the maximum power that the subwoofers can handle for short intervals. It is advisable to choose an amplifier with a power output that matches the RMS power rating of the subwoofers to ensure efficient and safe operation.
Impedance Matching: The impedance of the amplifier should be compatible with the impedance of the subwoofers. In the case of wiring 3 DVC 4-ohm subwoofers, the total impedance can be configured in multiple ways, such as series or parallel connections. The amplifier should be capable of handling the specified impedance load, typically expressed in ohms. It is important to check the amplifier’s specifications and ensure compatibility with the chosen wiring configuration.
Features and Controls: Consider the features and controls offered by the amplifier. Certain amplifiers may have built-in filters, adjustable gain controls, and other options that allow you to customize the sound output. Additionally, some amplifiers offer bridgeable options, which can be useful when wiring multiple subwoofers. Assess your requirements and choose an amplifier that provides the necessary features and controls for your setup.
Brand and Reputation: Research and consider reputable amplifier brands known for their quality and reliability. Brands with a good reputation often provide better warranties, customer support, and overall performance. Reading reviews and seeking recommendations can help you make an informed decision.
In conclusion,
- Choose an amplifier that matches the power handling capabilities of the subwoofers.
- Ensure that the amplifier’s impedance is compatible with the chosen wiring configuration.
- Consider the features and controls offered by the amplifier.
- Research reputable amplifier brands and read reviews before making a decision.
Option 1: Wiring in Parallel for a 1.33 Ohm Load
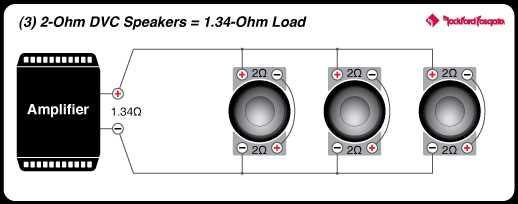
When it comes to wiring three Dual Voice Coil (DVC) 4-ohm subs, there are a few options to consider. One of the options is to wire them in parallel to achieve a 1.33 ohm load. This configuration allows for increased power handling and can be a good choice if you have an amplifier that is stable at such a low impedance.
To wire the subs in parallel for a 1.33 ohm load, you will need to connect the positive terminal of the first sub to the positive terminal of the second sub. Then, connect the positive terminal of the second sub to the positive terminal of the third sub. You will also need to connect the negative terminal of the first sub to the negative terminal of the second sub, and the negative terminal of the second sub to the negative terminal of the third sub.
This parallel wiring setup effectively combines the impedance of the subs. In this case, since each sub is 4 ohms, wiring them in parallel will reduce the overall impedance to approximately 1.33 ohms. This lower impedance can be beneficial for certain amplifier setups that are designed to handle lower loads.
It is important to note that when wiring in parallel, the power distribution among the subs may not be equal. The first sub in the wiring chain may receive slightly more power compared to the last sub. However, this difference is typically minimal and should not cause any significant issues.
Overall, wiring three DVC 4-ohm subs in parallel for a 1.33 ohm load can be a suitable option if you have an amplifier that can handle such a low impedance. This configuration allows for increased power handling and can provide a powerful and impactful audio experience.
Option 2: Wiring in Series for a 12 Ohm Load
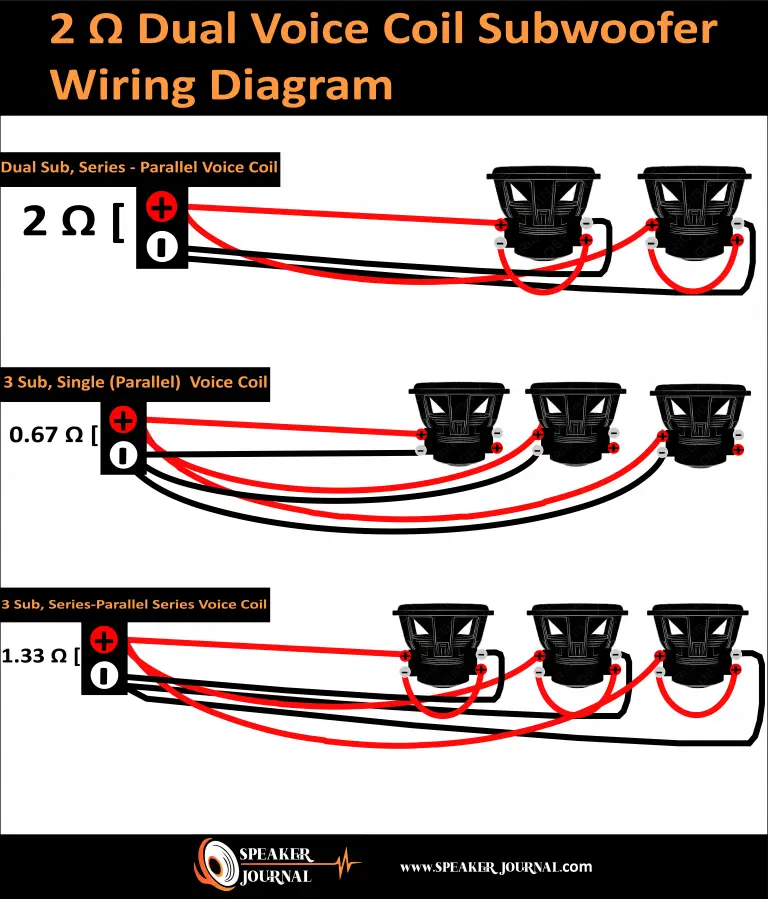
If you want to wire three DVC (Dual Voice Coil) 4 ohm subwoofers in series, you can achieve a 12 ohm load. This configuration is different from wiring in parallel, as it combines the positive terminal of one subwoofer to the negative terminal of the next subwoofer, creating a continuous loop of connections.
To wire in series, start by connecting the positive terminal of your amplifier to the positive terminal of the first subwoofer. Then, take a wire and connect the negative terminal of the first subwoofer to the positive terminal of the second subwoofer. Repeat this process, connecting the negative terminal of the second subwoofer to the positive terminal of the third subwoofer.
This series wiring configuration adds up the impedance of each subwoofer, resulting in a 12 ohm load. This can be beneficial if your amplifier is better suited to driving higher impedance loads. However, keep in mind that the power output of your amplifier will be reduced when operating at a higher impedance.
- Connect the positive terminal of the amplifier to the positive terminal of the first subwoofer.
- Connect the negative terminal of the first subwoofer to the positive terminal of the second subwoofer.
- Connect the negative terminal of the second subwoofer to the positive terminal of the third subwoofer.
By wiring three DVC 4 ohm subwoofers in series, you can achieve a 12 ohm load, which may be suitable for certain amplifier setups. Make sure to match the impedance requirements of your amplifier and subwoofers to avoid any potential issues.
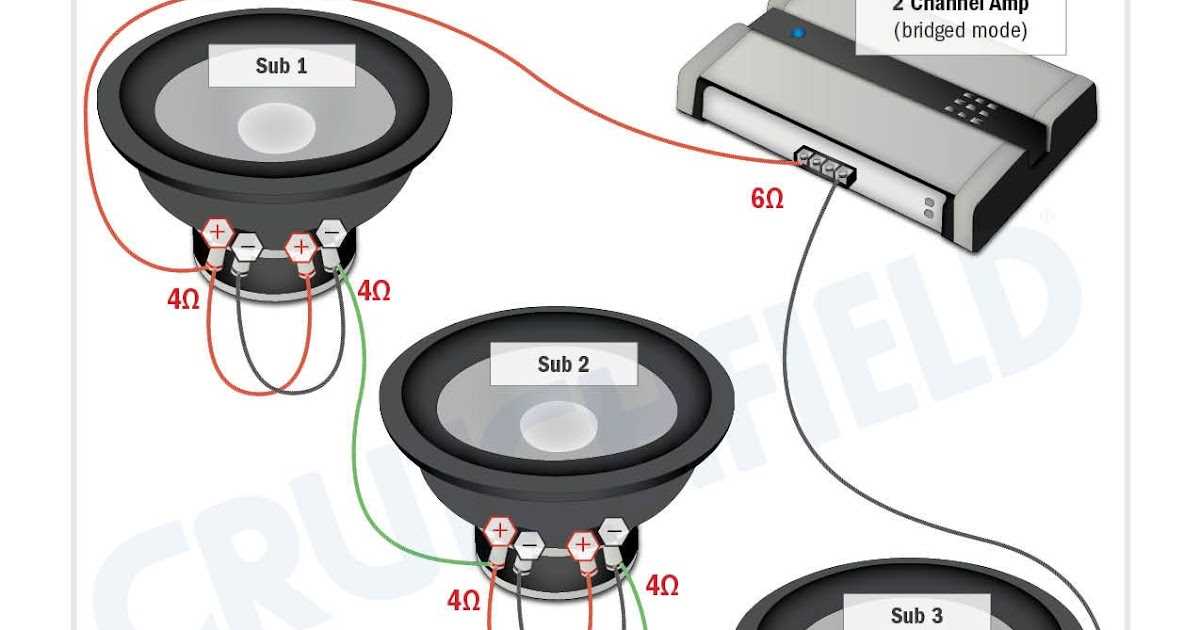
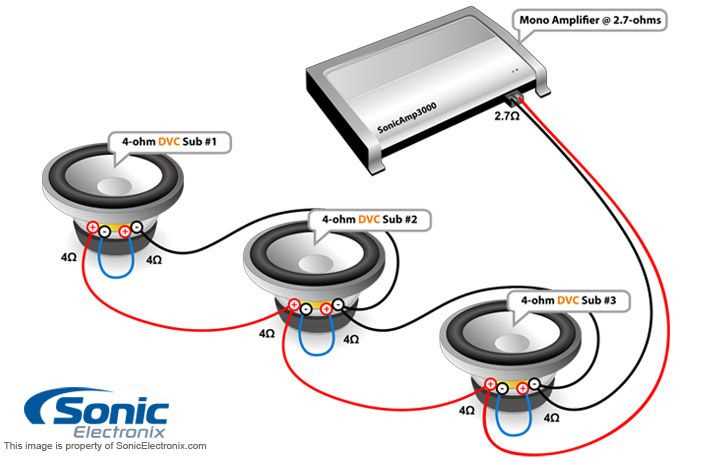
Option 3: Wiring in a Combination of Series and Parallel for a 4 Ohm Load
When wiring three DVC (Dual Voice Coil) 4 ohm subwoofers, there are various wiring configurations that can be used to achieve a 4 ohm load. One option is to use a combination of series and parallel wiring, which can provide the desired impedance. This method involves both series and parallel connections to create a balanced load for the amplifier.
To wire the subs in this configuration, you would first need to identify which terminals on each subwoofer are positive and negative. Each subwoofer will have two sets of terminals, one for each voice coil. Once you have identified the terminals, you can begin the wiring process.
- Start by wiring the two voice coils of each subwoofer in series. This means connecting the positive terminal of one voice coil to the negative terminal of the other voice coil on each subwoofer. This will create a 8 ohm load for each subwoofer.
- Next, wire the three subwoofers in parallel. This involves connecting the positive terminal of the first subwoofer to the positive terminal of the second subwoofer, and then connecting the positive terminals of the second and third subwoofers together. Repeat the same process for the negative terminals of the subwoofers. This parallel connection will result in a 2.67 ohm load.
- Finally, connect the positive and negative terminals of the parallel connection to the corresponding terminals on the amplifier. This will give you a combined 4 ohm load for the three DVC 4 ohm subwoofers.
It’s important to note that when wiring subwoofers in a combination of series and parallel, you should double-check all connections to ensure they are secure and properly insulated. This will prevent any potential damage to the subwoofers or amplifier. Additionally, it’s recommended to consult the owner’s manual or contact the manufacturer for specific wiring instructions or diagrams for your particular subwoofer model.
Testing and Troubleshooting Your Wiring Setup

Testing and troubleshooting your wiring setup is an essential step to ensure that everything is working correctly and avoid any potential problems. This process involves checking for connectivity, verifying impedance, and identifying any issues that may arise.
1. Checking for Connectivity
To test the connectivity of your wiring setup, start by disconnecting the subs from the amplifier. Use a multimeter set to the continuity or resistance mode to measure the resistance between the positive and negative terminals of each subwoofer. You should get a reading close to the nominal impedance of the subwoofers (in this case, 4 ohms).
If you get a reading significantly different from the expected impedance, there may be a problem with the wiring. Double-check the connections and ensure that all wires are securely connected. If necessary, redo the wiring to ensure proper connectivity.
2. Verifying Impedance
Once you have confirmed the connectivity, it is important to verify the impedance of your subwoofers. This can be done by using a multimeter or an impedance meter. Measure the impedance across each subwoofer individually and ensure that it matches the nominal impedance specified by the manufacturer (in this case, 4 ohms).
If you notice significant variations in the impedance readings or if they differ from the nominal impedance, there may be an issue with the subwoofers. Check for any loose connections or damaged coils and address them accordingly.
3. Identifying Issues
If you encounter any issues during the testing process, such as abnormal impedance readings or no sound output, it is crucial to identify and troubleshoot the problem. Start by rechecking all the connections and ensuring that they are secure and properly connected. Additionally, check for any damaged wires or faulty components.
If you are still unable to resolve the issue, it may be beneficial to consult a professional or refer to the user manual for further guidance. They can provide expert advice and help diagnose the problem.
Overall
Testing and troubleshooting your wiring setup is a crucial step in ensuring that your subs are properly connected and functioning correctly. By carefully checking for connectivity, verifying impedance, and identifying any issues that may arise, you can address problems early on and ensure optimal performance from your audio system.