
When it comes to troubleshooting electrical issues or performing repairs on your 2003 Chevy Trailblazer, having access to a wiring diagram is essential. A wiring diagram is a comprehensive schematic that shows you how the electrical components in your vehicle are connected and how they interact with each other. By understanding the wiring diagram, you can accurately diagnose problems and make the necessary repairs.
The wiring diagram for a 2003 Chevy Trailblazer includes information about the electrical system, such as the power distribution, ground locations, component locations, and wire colors. It outlines the connections between various components, such as the battery, alternator, starter, ignition switch, lights, sensors, and more. With this diagram, you can trace the flow of electric current throughout your vehicle and identify any issues.
Whether you are a professional mechanic or a DIY enthusiast, having a wiring diagram for your 2003 Chevy Trailblazer can save you time and frustration. It eliminates the need for guesswork and helps you tackle electrical problems with confidence. Additionally, a wiring diagram can be a valuable resource when installing aftermarket accessories or upgrading your vehicle’s electrical system.
There are several ways to obtain a wiring diagram for your 2003 Chevy Trailblazer. You can purchase a printed manual from a reputable automotive bookstore or order one online. Alternatively, you can access electronic versions of wiring diagrams through online resources or subscription-based websites that specialize in automotive repair information. Some websites offer free diagrams, while others require a fee for access.
Overall, having a wiring diagram for your 2003 Chevy Trailblazer is an invaluable tool for anyone working on the vehicle’s electrical system. It provides a visual representation of how the components are connected, allowing you to troubleshoot and repair electrical issues more efficiently. Whether you’re a professional mechanic or a novice DIYer, investing in a wiring diagram can save you time, money, and headaches in the long run.
General Information
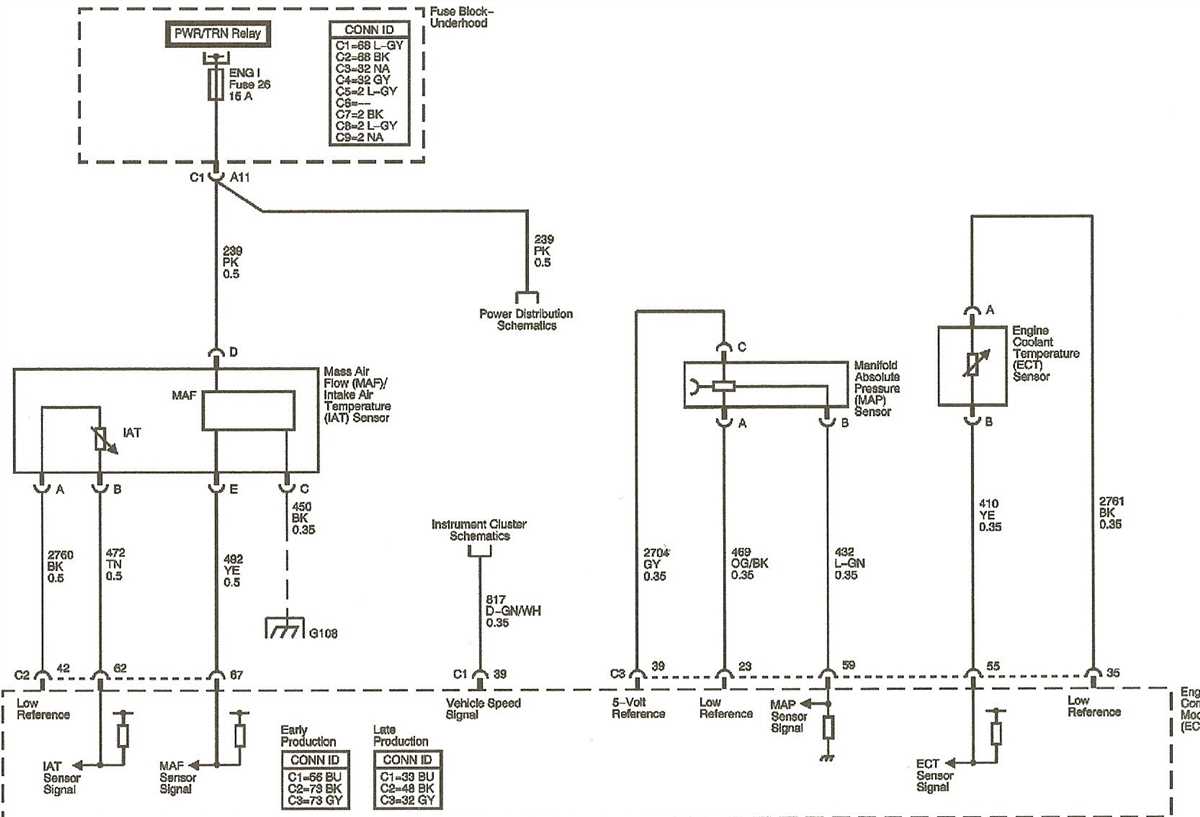
The wiring diagram for a 2003 Chevy Trailblazer provides a visual representation of the electrical system in the vehicle. It shows the various components and their connections, allowing technicians and DIY enthusiasts to troubleshoot electrical issues and make repairs.
In the diagram, different symbols are used to represent different electrical components such as batteries, fuses, relays, switches, and connectors. Each component is labeled with its respective part number or name, making it easier to identify and locate the component in the vehicle.
The wiring diagram also indicates the color coding of the wires, helping technicians to correctly identify and trace the path of each wire throughout the electrical system. This is important for understanding how different components are connected and for diagnosing any issues related to wire connectivity or shorts.
Additionally, the wiring diagram may include information about voltage and current specifications for specific components or circuits. This information is crucial for ensuring that the electrical system functions properly and that compatible replacement parts are used when necessary.
Overall, the wiring diagram for a 2003 Chevy Trailblazer serves as a valuable tool for understanding and troubleshooting the vehicle’s electrical system. It provides detailed information about the connections, colors, and specifications of various components, helping technicians and DIY enthusiasts maintain and repair the electrical system effectively.
Overview of the 2003 Chevy Trailblazer’s wiring system
The 2003 Chevy Trailblazer is equipped with a complex wiring system that is responsible for powering and controlling various components of the vehicle. This wiring system ensures that electrical signals are properly transmitted and received throughout the vehicle, allowing for seamless operation of the various systems.
One of the main components of the wiring system is the fuse box, which is located in the engine compartment. The fuse box houses a series of fuses that protect the electrical circuits from overloading. Each fuse is dedicated to a specific system or component, such as the headlights, power windows, or audio system.
Another important component of the wiring system is the wiring harness, which is a bundle of wires that connects all the electrical components of the vehicle. The wiring harness is responsible for transmitting electrical signals from the main control unit to the various sensors, switches, and actuators throughout the vehicle.
Additionally, the wiring system includes various connectors and terminals that allow for easy connection and disconnection of electrical components. These connectors and terminals ensure that the electrical connections are secure and reliable, preventing any potential electrical issues.
Overall, the 2003 Chevy Trailblazer’s wiring system is essential for the proper functioning of the vehicle’s electrical components. It ensures that electrical signals are transmitted and received accurately, allowing for seamless operation of the various systems.
Headlights and Exterior Lighting
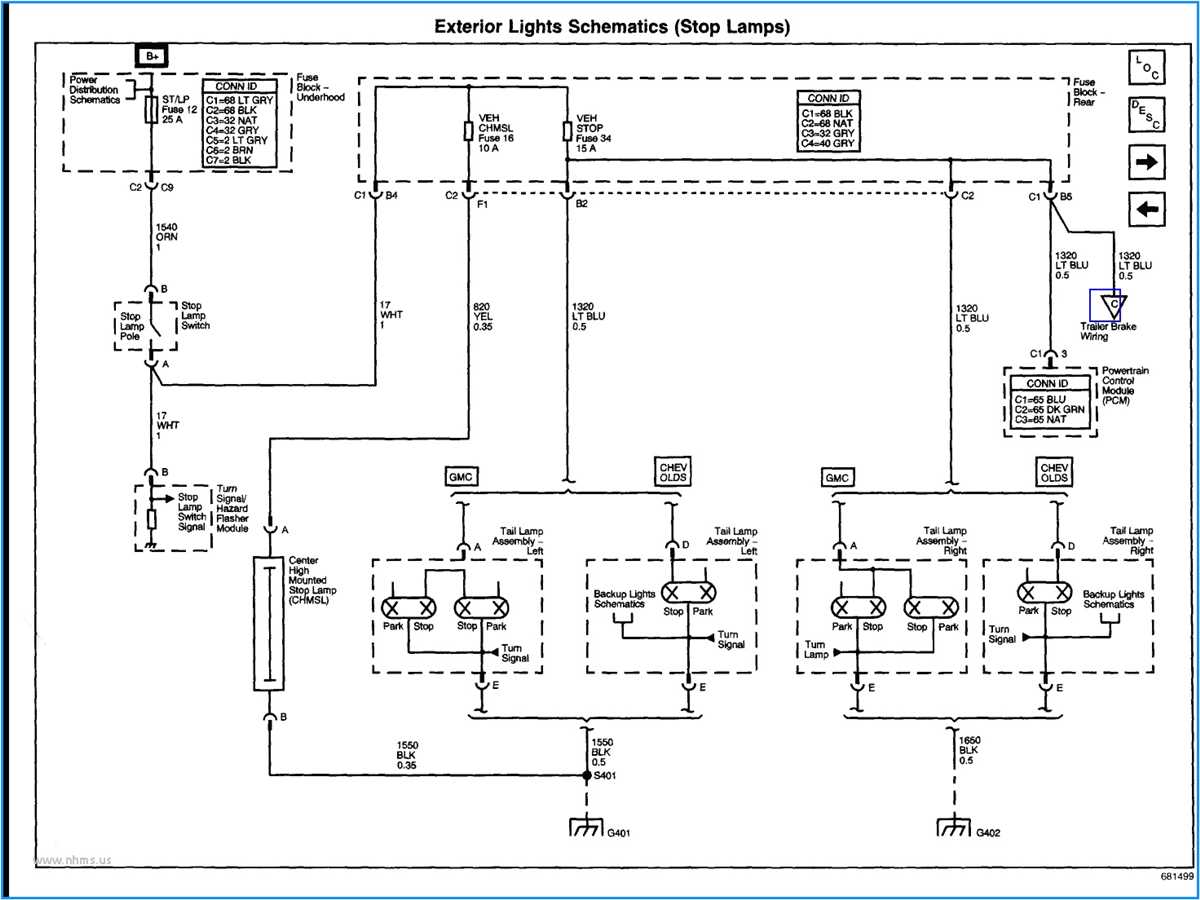
In the wiring diagram for the 2003 Chevy Trailblazer, the headlights and exterior lighting system is highlighted. This system includes the headlights, tail lights, brake lights, turn signals, and parking lights. It is important to have a properly functioning lighting system for both safety and legal reasons.
The wiring diagram showcases the different components and their connections. For example, it shows the power source for the headlights, which is typically the battery. It also shows the different switches and relays that control the lighting functions, such as the headlight switch and the turn signal switch.
Headlights
The headlights are essential for night time driving and providing visibility. They are controlled by the headlight switch, which can be turned to different positions to activate the low beam or high beam headlights. The wiring diagram shows the connections between the headlight switch, the headlights themselves, and any relays or fuses that are in the circuit.
Turn Signals
The turn signals are crucial for indicating a change in direction while driving. They are controlled by the turn signal switch, which is typically located on the steering column. The wiring diagram shows the connections between the turn signal switch, the turn signal lights, and any flasher relays that may be present. It also shows how the brake lights are connected to the turn signals, allowing them to function as brake lights as well.
Parking Lights
The parking lights are used to increase the visibility of the vehicle when parked or when driving with the headlights off. They are typically activated by a separate switch or by turning the headlight switch to a certain position. The wiring diagram illustrates the connections between the parking light switch and the parking lights themselves.
- In conclusion, the wiring diagram for the 2003 Chevy Trailblazer provides a detailed overview of the headlights and exterior lighting system.
- It shows the connections between the different components and how they are controlled.
- Having a properly functioning lighting system is essential for safety and legal compliance.
- The diagram can be used as a reference for troubleshooting and repairing any issues with the headlights or exterior lighting.
Understanding the Wiring Diagram for the Headlights and Exterior Lights
When it comes to understanding the wiring diagram for the headlights and exterior lights of a 2003 Chevy Trailblazer, it is important to have a clear understanding of the various components and their interconnections.
The wiring diagram for the headlights typically includes the following components: the headlight switch, the dimmer switch, the headlights themselves, the fog lights (if applicable), the daytime running lights (if applicable), and the related wiring harnesses and connectors. Each of these components plays a crucial role in the overall functioning of the headlights and exterior lights.
The headlight switch is responsible for controlling the on and off function of the headlights. It is usually connected to a power source and includes multiple wires that connect to different lighting components. The dimmer switch is connected to the headlight switch and allows the driver to adjust the brightness of the headlights between low beam and high beam settings.
The headlights themselves are connected to the headlight switch through a wiring harness and receive power when the switch is turned on. The fog lights, if present, are usually connected to a separate switch and wiring harness. Similarly, the daytime running lights, if installed, have their own wiring system and are often connected to the ignition switch.
Understanding the wiring diagram involves knowing which wires connect to which component, as well as the color coding of the wires. In the diagram, different colors represent different functions, such as power supply, ground, and signal wires. These color-coded wires help technicians troubleshoot and identify any issues with the wiring system.
By referring to the wiring diagram, technicians and DIY enthusiasts can identify the specific wires and connectors that need to be tested or replaced in case of a malfunctioning headlight or exterior light. This helps ensure a safe and reliable lighting system for the vehicle.
Interior Lighting
The interior lighting system in the 2003 Chevy Trailblazer is designed to provide illumination in the cabin area for various purposes such as reading, locating objects, and creating a pleasant ambiance. It comprises several components, including overhead lights, reading lights, and door lights.
The overhead lights, located on the ceiling of the vehicle, are the main source of interior illumination. These lights typically have a switch with different settings such as “Off,” “On,” and “Door.” When set to “On,” the lights will remain illuminated regardless of the vehicle’s status. The “Door” setting is tied to the vehicle’s doors and will turn the lights on when a door is opened and off when all the doors are closed.
Reading lights provide localized illumination for specific areas, usually positioned above the front seats. These lights can be individually operated through switches or buttons located on the light fixture or on the vehicle’s overhead console. They are typically designed to be adjustable and provide focused light for reading or other tasks.
The door lights in the 2003 Chevy Trailblazer are designed to assist with entry and exit from the vehicle. These lights are activated when a door is opened and can be set to turn off after a certain period of time or when the doors are closed. They are typically located in the vehicle’s door panels, and their purpose is to provide enough light to ensure safe entry or exit from the vehicle.
In summary, the interior lighting system in the 2003 Chevy Trailblazer includes overhead lights, reading lights, and door lights. These components can be controlled through specific switches or buttons to provide various levels of illumination for different purposes within the vehicle’s cabin.
Exploring the Wiring Diagram for the Interior Lights of the 2003 Chevy Trailblazer
The interior lights in a 2003 Chevy Trailblazer are an essential feature for providing visibility and convenience to the driver and passengers. Understanding the wiring diagram for these lights can help troubleshoot any issues and make necessary repairs.
The interior lights circuitry consists of several components, including the fuse, the door switch, the lamp control module, and the interior lamps themselves. The wiring diagram illustrates the connections and pathways through which electrical current flows to power the lights.
The fuse box is usually located under the driver’s side instrument panel and contains the fuse for the interior lights. This fuse protects the circuit from power surges and prevents damage to the wiring. If the interior lights are not working, checking and replacing the fuse should be the first step in troubleshooting.
The door switch is another crucial component in the interior lights circuit. It senses when a door is opened or closed and sends a signal to the lamp control module to turn the lights on or off accordingly. If the door switch is faulty or not making proper contact, it can cause the interior lights to malfunction.
The lamp control module acts as the central control unit for the interior lights. It receives input from various sources, such as the door switch or the headlight switch, and sends the appropriate commands to illuminate the lights. If the lamp control module is not functioning correctly, it can cause the interior lights to behave erratically or not work at all.
Finally, the interior lamps themselves are the endpoints of the circuit and provide the actual lighting. These lamps can be located on the roof, near the doors, or in the console area. If any of the interior lamps are not working, checking the wiring connections and the lamp bulbs should be the next steps in troubleshooting.
By referring to the wiring diagram for the interior lights of the 2003 Chevy Trailblazer, owners or technicians can identify the specific components involved in the circuit and pinpoint the potential causes of any issues. This knowledge can help in making accurate diagnoses and performing effective repairs, ensuring that the interior lights function properly and provide the desired illumination and convenience.
Power Windows and Door Locks
The power windows and door locks in a 2003 Chevy Trailblazer are essential components that provide convenience and security to the vehicle. These features allow the driver and passengers to control the windows and door locks with just the touch of a button.
The power windows in the Trailblazer are controlled by an electric motor attached to each window regulator. When the driver or passenger presses the window switch, an electrical signal is sent to the window motor, which activates and moves the window up or down. This mechanism provides ease of use and eliminates the need for manual window cranks.
The door locks in the Trailblazer are also electrically controlled, allowing the driver and passengers to lock or unlock all the doors simultaneously. The door lock switch sends a signal to the door lock actuator, which mechanically locks or unlocks the door depending on the desired action. This feature enhances safety by allowing the occupants to quickly secure the vehicle from within.
The power windows and door locks in the 2003 Chevy Trailblazer are connected to the vehicle’s electrical system. They rely on fuses and relays to regulate the flow of electricity and protect the components from damage. Checking the fuse box and relays is essential when troubleshooting any issues with the power windows or door locks. Additionally, wiring diagrams for the specific year, make, and model of the Trailblazer can be useful in diagnosing and repairing any electrical problems.
Overall, the power windows and door locks in the 2003 Chevy Trailblazer provide convenience, comfort, and safety to the driver and passengers. These features simplify the operation of the windows and door locks and contribute to a pleasant driving experience.
Analyzing the Wiring Diagram for the Power Windows and Door Locks
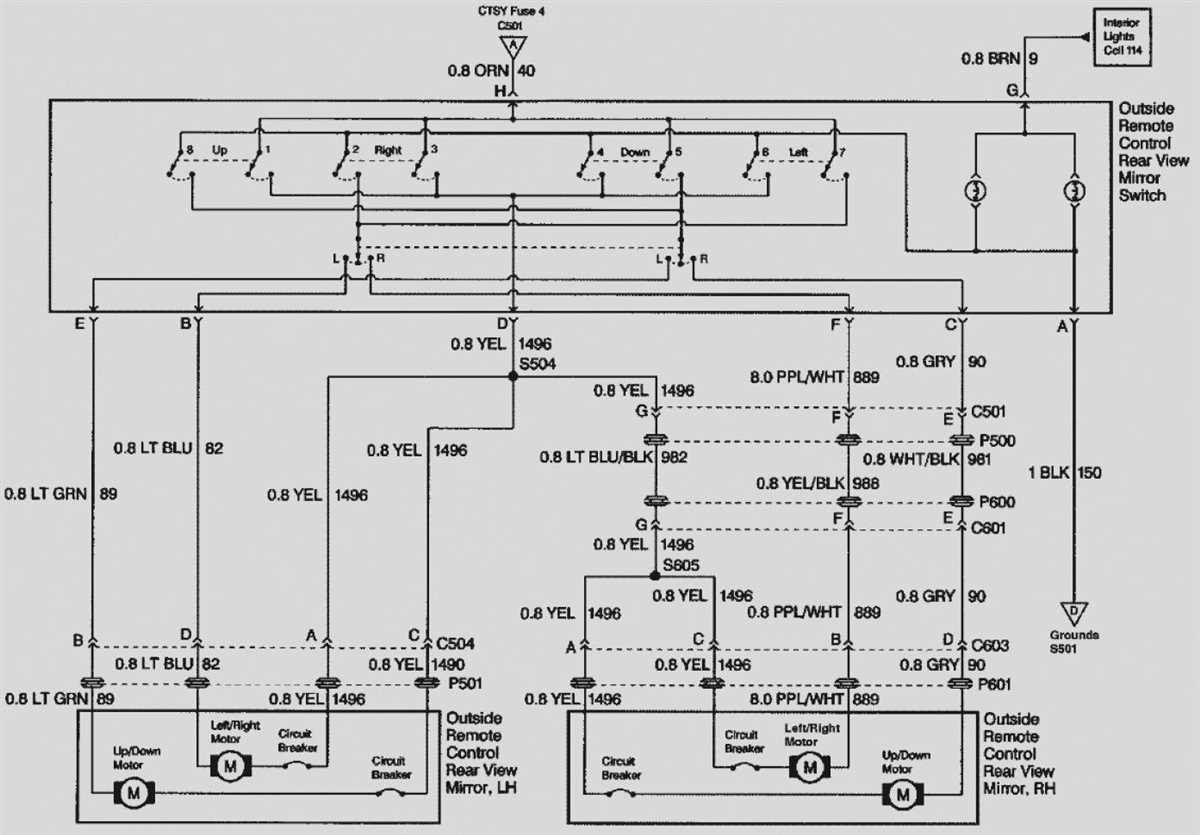
The wiring diagram for the power windows and door locks in a 2003 Chevy Trailblazer provides a visual representation of the electrical connections and components involved in controlling these features. By examining this diagram, we can gain a better understanding of how the power windows and door locks are wired and how they function.
Power Windows
The power windows in the Chevy Trailblazer are controlled by individual switches located on the driver’s side door panel, as well as on each respective door panel for the passenger windows. The wiring diagram shows that each window switch is connected to a central control module, which receives signals from the switches and sends commands to the power window motors. The diagram also illustrates the power source for the windows, typically connected to the vehicle’s battery, and the grounding points for the system.
Additionally, the wiring diagram shows the specific wiring connections for each power window motor. This includes the positive and negative leads that power the motor, as well as the wires for controlling the motor’s direction (up or down) and speed.
In summary, the wiring diagram for the power windows in a 2003 Chevy Trailblazer reveals the connections and components involved in controlling the individual window switches, central control module, power window motors, power source, and grounding points.
Door Locks
The wiring diagram for the door locks in a 2003 Chevy Trailblazer illustrates how the locking and unlocking functions are achieved. The diagram reveals that the door lock switches on the driver and passenger doors are connected to a central control module, similar to the power windows. This control module receives signals from the switches and sends commands to the door lock actuators, which physically move the locking mechanisms.
Furthermore, the diagram shows the power source for the door locks, typically connected to the vehicle’s battery, as well as the grounding points. It also depicts the specific wiring connections for each door lock actuator, including the wires for locking and unlocking the doors.
To summarize, the wiring diagram for the door locks in a 2003 Chevy Trailblazer displays the connections and components involved in controlling the door lock switches, central control module, door lock actuators, power source, and grounding points.