
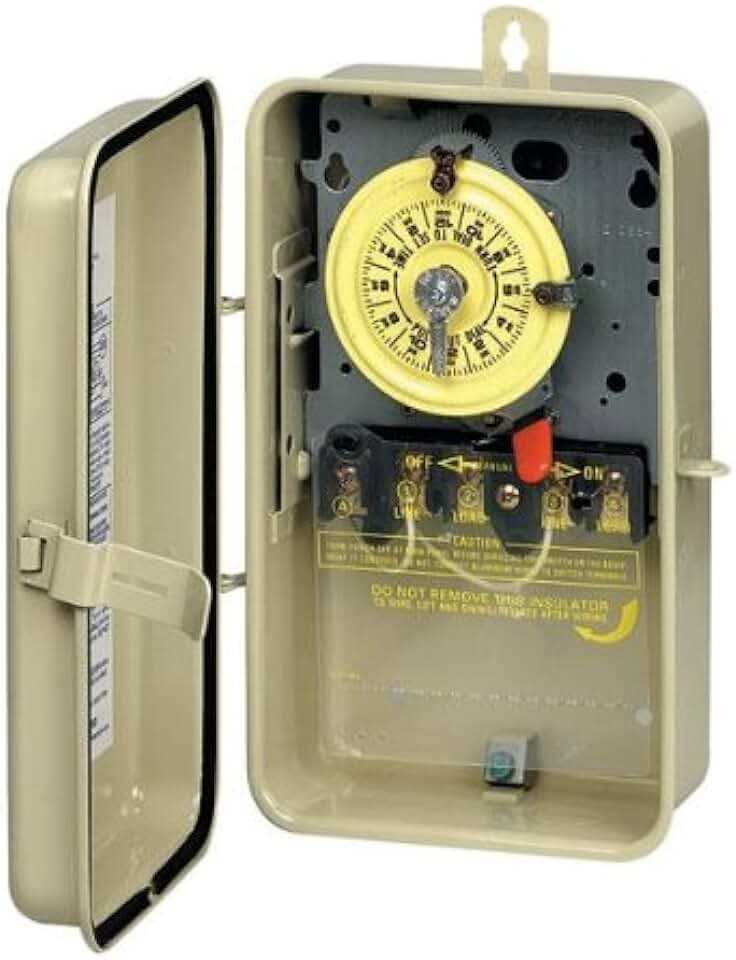
The Intermatic T101 is a versatile and reliable electromechanical timer, commonly used in residential and commercial applications. It is designed to control the timing of electrical devices such as pool pumps, outdoor lights, and sprinkler systems. Proper installation and wiring of the Intermatic T101 are crucial for the timer to function correctly.
Before starting the installation process, it is essential to gather all the necessary tools and materials. These may include a screwdriver, wire cutters, wire strippers, electrical tape, and a voltage tester. It is also important to comply with all local electrical codes and regulations when wiring the Intermatic T101.
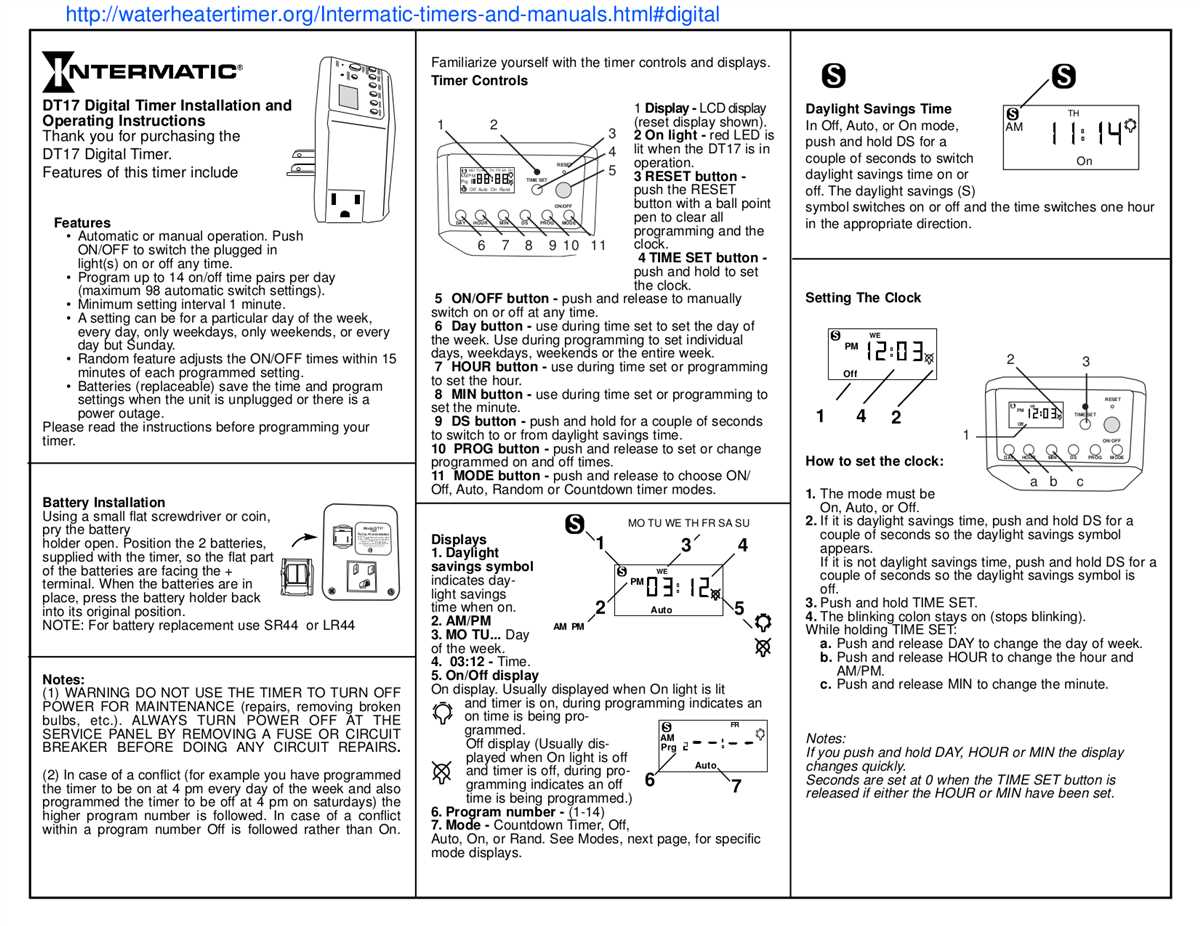
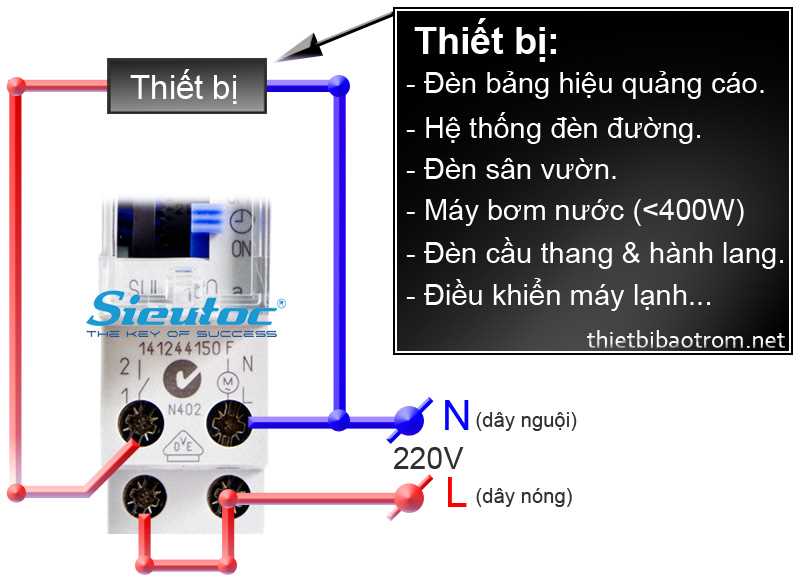
When wiring the Intermatic T101, it is important to pay attention to the different terminals on the timer. The T101 has three main terminals: Line, Load, and Neutral. The Line terminal is where the power supply is connected, the Load terminal is where the device being controlled is connected, and the Neutral terminal is where the neutral wire is connected.
Intermatic T101 Wiring Instructions
Intermatic T101 is a mechanical time switch used for controlling outdoor lighting, pool pumps, and other electrical devices. It is a reliable and durable device that requires proper wiring for correct functionality. Here are the step-by-step wiring instructions for Intermatic T101:
1. Turn off the power
Before starting the wiring process, make sure to turn off the power supply to the circuit you will be working on. This is essential for safety reasons and to prevent any electrical accidents.
2. Connect the power supply
Using a screwdriver, connect the power supply wires to the LINE terminals of the Intermatic T101. The LINE terminals are clearly marked and usually colored black. Make sure to securely tighten the screws to ensure a good electrical connection.
3. Connect the load
Connect the load wires, which are the wires that go to the electrical device you want to control, to the LOAD terminals of the Intermatic T101. The LOAD terminals are usually colored red. Again, tighten the screws securely to ensure a proper electrical connection.
4. Connect the ground wire
Connect the ground wire, which is usually green or bare, to the ground terminal of the Intermatic T101. The ground terminal is usually marked with a symbol or the word “GROUND”. This is an important step for safety, as it helps prevent electrical shocks.
5. Mount the Intermatic T101
Mount the Intermatic T101 onto a suitable surface using screws or mounting brackets. Make sure it is securely fastened and properly aligned.
By following these wiring instructions, you can successfully install and wire the Intermatic T101 for efficient control of your electrical devices. Remember to always consult the user manual or seek professional help if you are unsure about any step in the wiring process.
Prepare the Necessary Tools and Materials
Before you begin wiring your Intermatic T101 timer, it is important to gather all the necessary tools and materials to ensure a smooth and successful installation. Having the right tools at hand will make the process easier and more efficient. Here is a list of items you will need:
- Screwdriver set: You will need both a flathead and a Phillips screwdriver to remove and install screws in the timer and electrical box.
- Wire strippers: These tools will allow you to strip the insulation from the wires and prepare them for connection.
- Wire nuts: Wire nuts are used to securely connect wires together. Make sure you have a variety of sizes to accommodate the different wire gauges.
- Electrical tape: Electrical tape is essential for insulating connections and preventing electrical shocks or short circuits.
- Electrical box: The electrical box will house the timer and provide a safe enclosure for the electrical connections. Make sure you have a suitable box that meets electrical codes.
- Wire connectors: Wire connectors are used to join wires together. It is important to choose the right type and size for your specific application.
By having these tools and materials ready, you can proceed with the wiring process confidently and efficiently. It is always a good idea to double-check the instructions provided with your Intermatic T101 timer to ensure proper installation and wiring procedures.
Turn Off the Power Supply
When working with electrical wiring, it is extremely important to ensure your safety by turning off the power supply before beginning any work. Failure to do so can result in serious injury or even death.
Here are step-by-step instructions on how to turn off the power supply:
- Step 1: Locate the circuit breaker or fuse box that controls the power to the area where you will be working.
- Step 2: Carefully open the circuit breaker or fuse box cover using a screwdriver or your hands, depending on the type of enclosure.
- Step 3: Identify the breaker or fuse that corresponds to the area you will be working on. Check for any labels or markings that indicate the specific area or appliance.
- Step 4: To turn off the power, flip the switch of the corresponding breaker to the “off” position or remove the fuse from its socket.
- Step 5: Double-check that the power is indeed off by using a voltage tester or multimeter to ensure there is no voltage present.
- Step 6: Once you have completed your work, you can turn the power back on by reversing the steps above and flipping the breaker switch to the “on” position or reinserting the fuse.
Always exercise caution when working with electrical wiring and follow all safety guidelines. If you are unsure about any aspect of the process, it is best to consult a licensed electrician.
Remove the Old Timer
Before installing the new Intermatic T101 timer, it is necessary to remove the old timer from the electrical panel. This process requires turning off the power supply to the timer and disconnecting the wiring. Follow these step-by-step instructions to safely remove the old timer:
- Turn off the power supply: Locate the circuit breaker or fuse that controls the power to the timer and switch it off. Ensure that the power is completely turned off before proceeding with any work.
- Identify the wiring: Take note of the existing wiring configuration, diagram, or label on the old timer. This will help during the installation of the new timer.
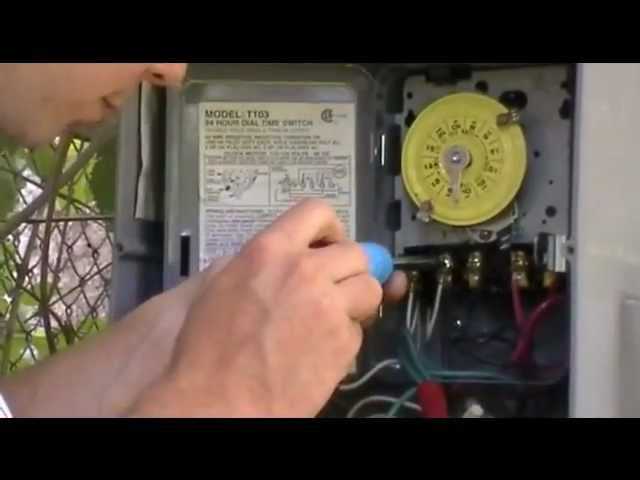
- Remove the timer cover: Use a screwdriver to loosen the screws or remove the bolts securing the timer cover. Carefully lift off the cover and set it aside.
- Disconnect the wiring: Locate the terminal screws or wire connectors that are securing the wiring to the old timer. Loosen the screws or remove the connectors to detach the wires. Keep track of each wire’s location and label them if necessary.
- Remove the old timer: Once the wiring is disconnected, remove any mounting screws or brackets that are holding the old timer in place. Carefully slide the timer out of the electrical panel.
- Test for power: Use a voltage tester to ensure that there is no residual power in the electrical panel before proceeding with the installation of the new timer.
Connect the Wires to the Intermatic T101 Timer
Installing the Intermatic T101 timer involves connecting the necessary wires to ensure proper functionality. Before proceeding with the wiring process, it is crucial to shut off the power to the circuit to avoid any electrical hazards.
Step 1: Identify the Wires
Start by identifying the three main wires that need to be connected to the Intermatic T101 timer. These wires include the line wire (coming from the electrical panel), the load wire (going to the device being controlled), and the neutral wire.
Note: It is essential to consult the wiring diagram provided with the Intermatic T101 timer to verify the correct wiring configuration for your specific application.
Step 2: Connect the Line and Load Wires
Connect the line wire to the terminal marked “Line,” typically located at the top of the T101 timer. It is essential to use a wire connector or wire nut to secure the connection properly.
Next, connect the load wire to the terminal marked “Load” on the Intermatic T101 timer. Again, ensure that the connection is secure using a wire connector or wire nut.
Step 3: Connect the Neutral Wire
Locate the terminal strip on the Intermatic T101 timer and connect the neutral wire to the terminal marked “Neutral” or “N.” It is crucial to use a wire connector or wire nut to secure the connection properly.
Step 4: Grounding
Ensure that the Intermatic T101 timer is properly grounded. Connect a grounding wire to the green grounding screw on the timer and secure it tightly.
Note: It is essential to follow local electrical codes and regulations when grounding the timer.
Step 5: Test the Connection
After completing the wiring process, turn on the power to the circuit and test the connection. Verify that the Intermatic T101 timer functions correctly by programming it according to the device’s needs.
Remember to always consult the Intermatic T101 timer’s user manual and wiring diagram for specific instructions and guidelines based on your unique installation requirements.
Install the Intermatic T101 Timer
Installing the Intermatic T101 timer is a straightforward process that can be done by following a few simple steps. The T101 timer is commonly used to control outdoor lights, pool pumps, and other electrical devices. Before starting the installation, ensure that you have the necessary tools and safety precautions in place.
Step 1: Turn off the power supply to the electrical circuit where the timer will be installed. This ensures your safety and prevents any accidental shocks or damage. Locate the main circuit breaker and flip it to the “off” position.
Step 2: Remove the cover of the electrical panel box. This will allow access to the wiring inside. Take caution not to touch any live wires or exposed electrical components.
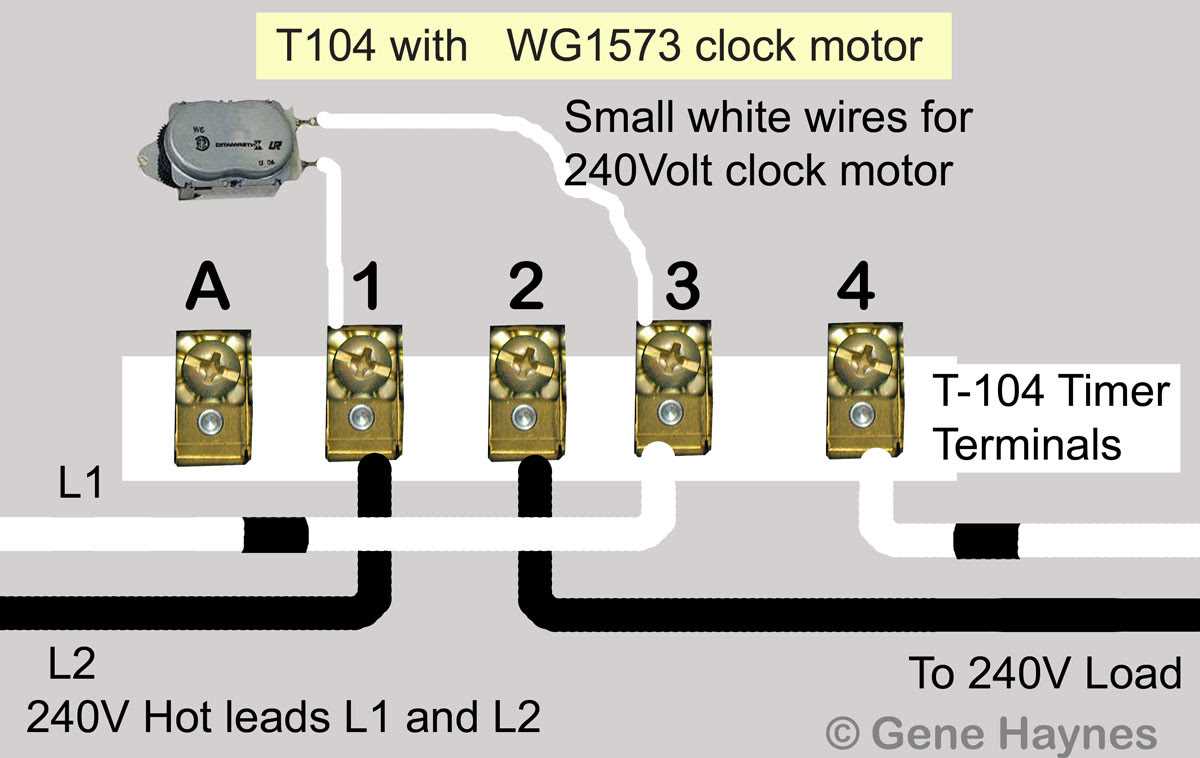
Step 3: Run electrical wires from the timer to the electrical circuit you want to control. The Intermatic T101 timer requires a 120-volt power supply and can control a 15-amp load. Refer to the wiring diagram provided with the timer for the correct connections.
Step 4: Connect the wires to the appropriate terminals on the Intermatic T101 timer. The timer has clearly labeled terminals for the power supply, load, and neutral connections. Follow the instructions and ensure that all connections are secure.
Step 5: Replace the cover of the electrical panel box and secure it in place. Double-check that all the wiring is properly connected and insulated. Close the circuit breaker and restore power to the electrical circuit.
Step 6: Set the time and programming on the Intermatic T101 timer according to your needs. The timer features easy-to-use dials and switches for setting the desired on and off times. Refer to the user manual for detailed instructions on programming the timer.
Step 7: Test the timer to ensure it is functioning correctly. Turn on the device or lighting that the timer controls and observe if it turns on and off according to the programmed schedule. Make any necessary adjustments to the timer settings if needed.
Installing the Intermatic T101 timer is a simple process that can be completed by following these steps. Remember to exercise caution when working with electricity and always refer to the manufacturer’s instructions for specific wiring diagrams and safety precautions.
Test and Activate the Timer
Once you have finished wiring the Intermatic T101 timer according to the instructions, it is important to test and activate the timer to ensure it is functioning properly. Follow the steps below to test and activate the timer:
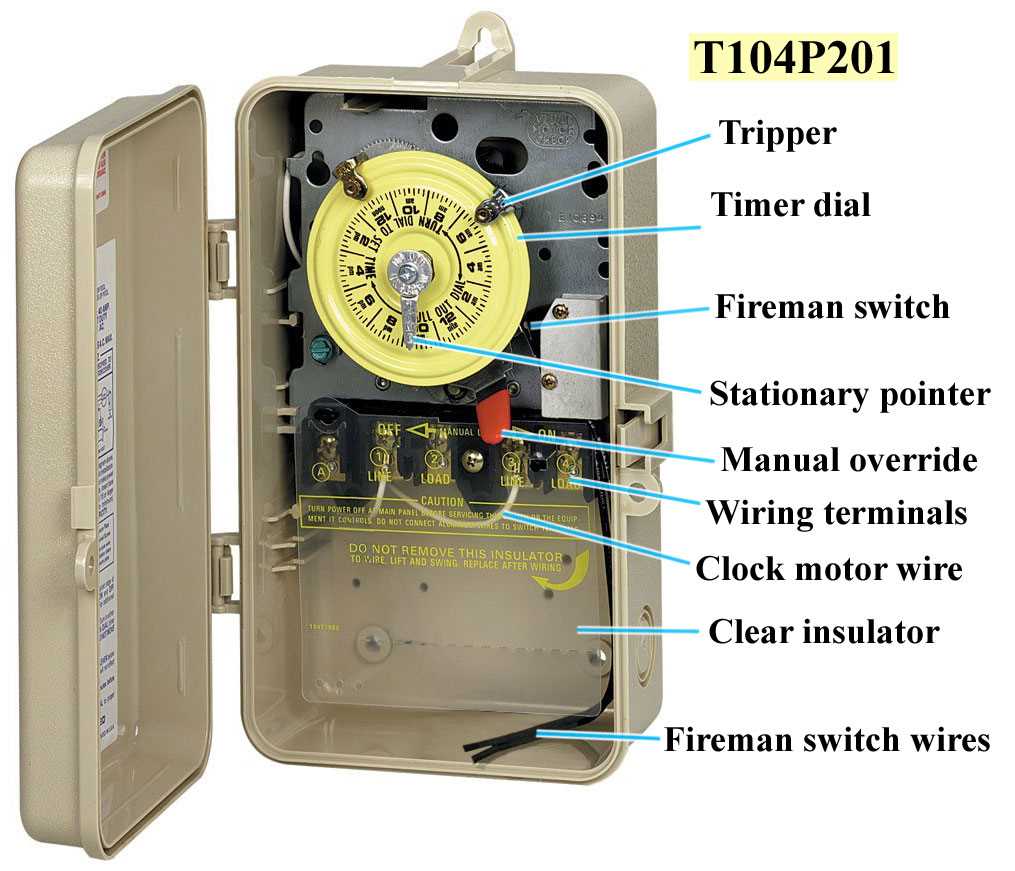
- Set the time: Turn the time dial of the timer clockwise until the current time aligns with the pointer. Make sure to set the time accurately.
- Verify operation: Double-check that the timer’s manual override switch is in the “Timer” position (pulled out). This ensures that the timer is in automatic mode.
- Plug in the power: Connect the power supply to the timer. Make sure that the power source is compatible with the timer’s voltage requirements.
- Test the load: Connect the load, such as a light or motor, to the timer. Ensure that the load is appropriate for the timer’s capacity.
- Activate the timer: To activate the timer, push the timer’s manual override switch to the “On” position (pushed in). The timer should now be supplying power to the connected load.
- Observe the operation: Inspect the load to ensure that it is functioning as expected. If the load is not turning on or off at the programmed times, double-check the wiring and retest.
- Adjust settings if needed: If the timer is not operating as desired, you may need to adjust the trippers or programming settings to ensure proper timing and operation.
By following these steps, you can test and activate the Intermatic T101 timer to ensure that it is functioning correctly. Remember to always refer to the manufacturer’s instructions and consult a professional if you are unsure or uncomfortable with any part of the installation or testing process.