
When it comes to towing a utility trailer, having a proper wiring system is crucial. Without it, you won’t be able to safely power your trailer’s lights and signals, making it dangerous for both you and other drivers on the road. That’s why understanding the wiring diagram for your utility trailer is essential.
A wiring diagram is a visual representation of the electrical connections and components of a system. In the case of a utility trailer, the wiring diagram will show you how to connect the trailer’s lights, brakes, and other electrical components to your vehicle’s electrical system.
One of the most common wiring systems for utility trailers is the 4-way flat connector. This type of connector has four pins that correspond to the basic lighting functions of a trailer: tail lights, brake lights, left turn signal, and right turn signal. By following the wiring diagram for a 4-way flat connector, you can easily connect your trailer’s lights to your vehicle’s electrical system.
What Is a Wiring Diagram for a Utility Trailer?
A wiring diagram for a utility trailer is a visual representation of the electrical wiring system of the trailer. It shows how the electrical components are connected and how the current flows through the system. This diagram is essential for troubleshooting any electrical issues and for understanding the trailer’s electrical system.
Components:
The wiring diagram includes several components that are crucial for the proper functioning of the utility trailer’s electrical system. These components include the battery, trailer lights, brake lights, turn signals, and the trailer’s electrical connector.
- Battery: The battery provides the power to the trailer’s electrical system. It is connected to the trailer’s electrical components through a series of wires.
- Trailer Lights: The trailer lights include the taillights, brake lights, and turn signals. These lights ensure the trailer is visible to other drivers on the road, especially during nighttime or in low visibility conditions.
- Brake Lights: The brake lights are activated when the driver applies the brakes. They warn other drivers behind the trailer that the trailer is slowing down or stopping.
- Turn Signals: The turn signals indicate the intended direction of the trailer when turning. They notify other drivers on the road about the trailer’s upcoming turns.
- Trailer’s Electrical Connector: The trailer’s electrical connector connects the trailer’s electrical system to the towing vehicle’s electrical system. It allows the trailer’s lights and other electrical components to function properly.
Importance:
The wiring diagram for a utility trailer is important as it helps in understanding the electrical system of the trailer and troubleshooting any issues. It ensures that all the electrical components are connected correctly and that the current flows smoothly through the system. By referring to the wiring diagram, one can identify any faulty connections or damaged wires and repair them accordingly. A properly functioning electrical system is essential for the safe and efficient operation of a utility trailer.
Understanding the Basics
When it comes to the wiring diagram for a utility trailer, it’s important to understand the basics of how the electrical system works. The wiring diagram provides a visual representation of the electrical connections and components within the trailer, allowing you to properly wire and connect everything.
One of the key components in the electrical system of a utility trailer is the trailer connector. This connector is typically located at the front of the trailer and is used to connect the trailer’s electrical system to the tow vehicle. It allows for the transfer of power and signals between the two, enabling the trailer’s lights and other electrical components to function properly.
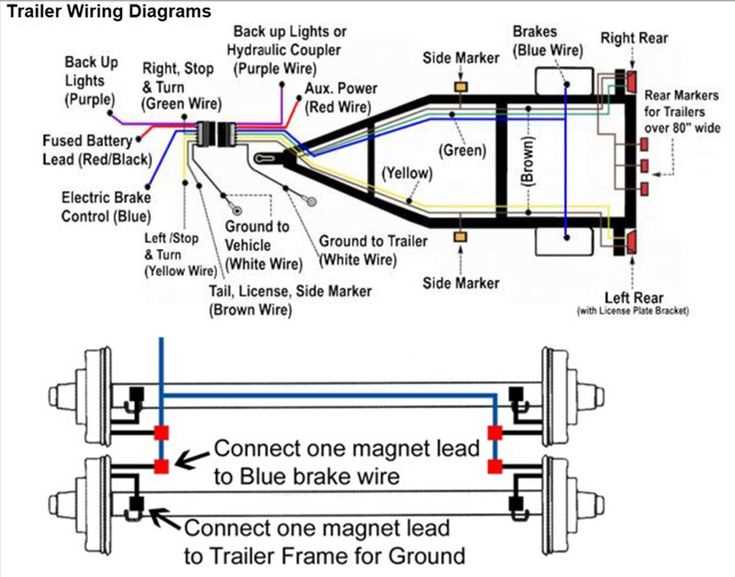
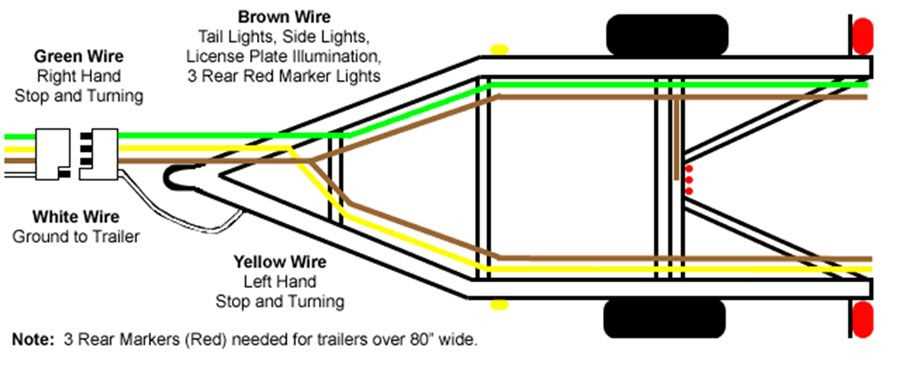
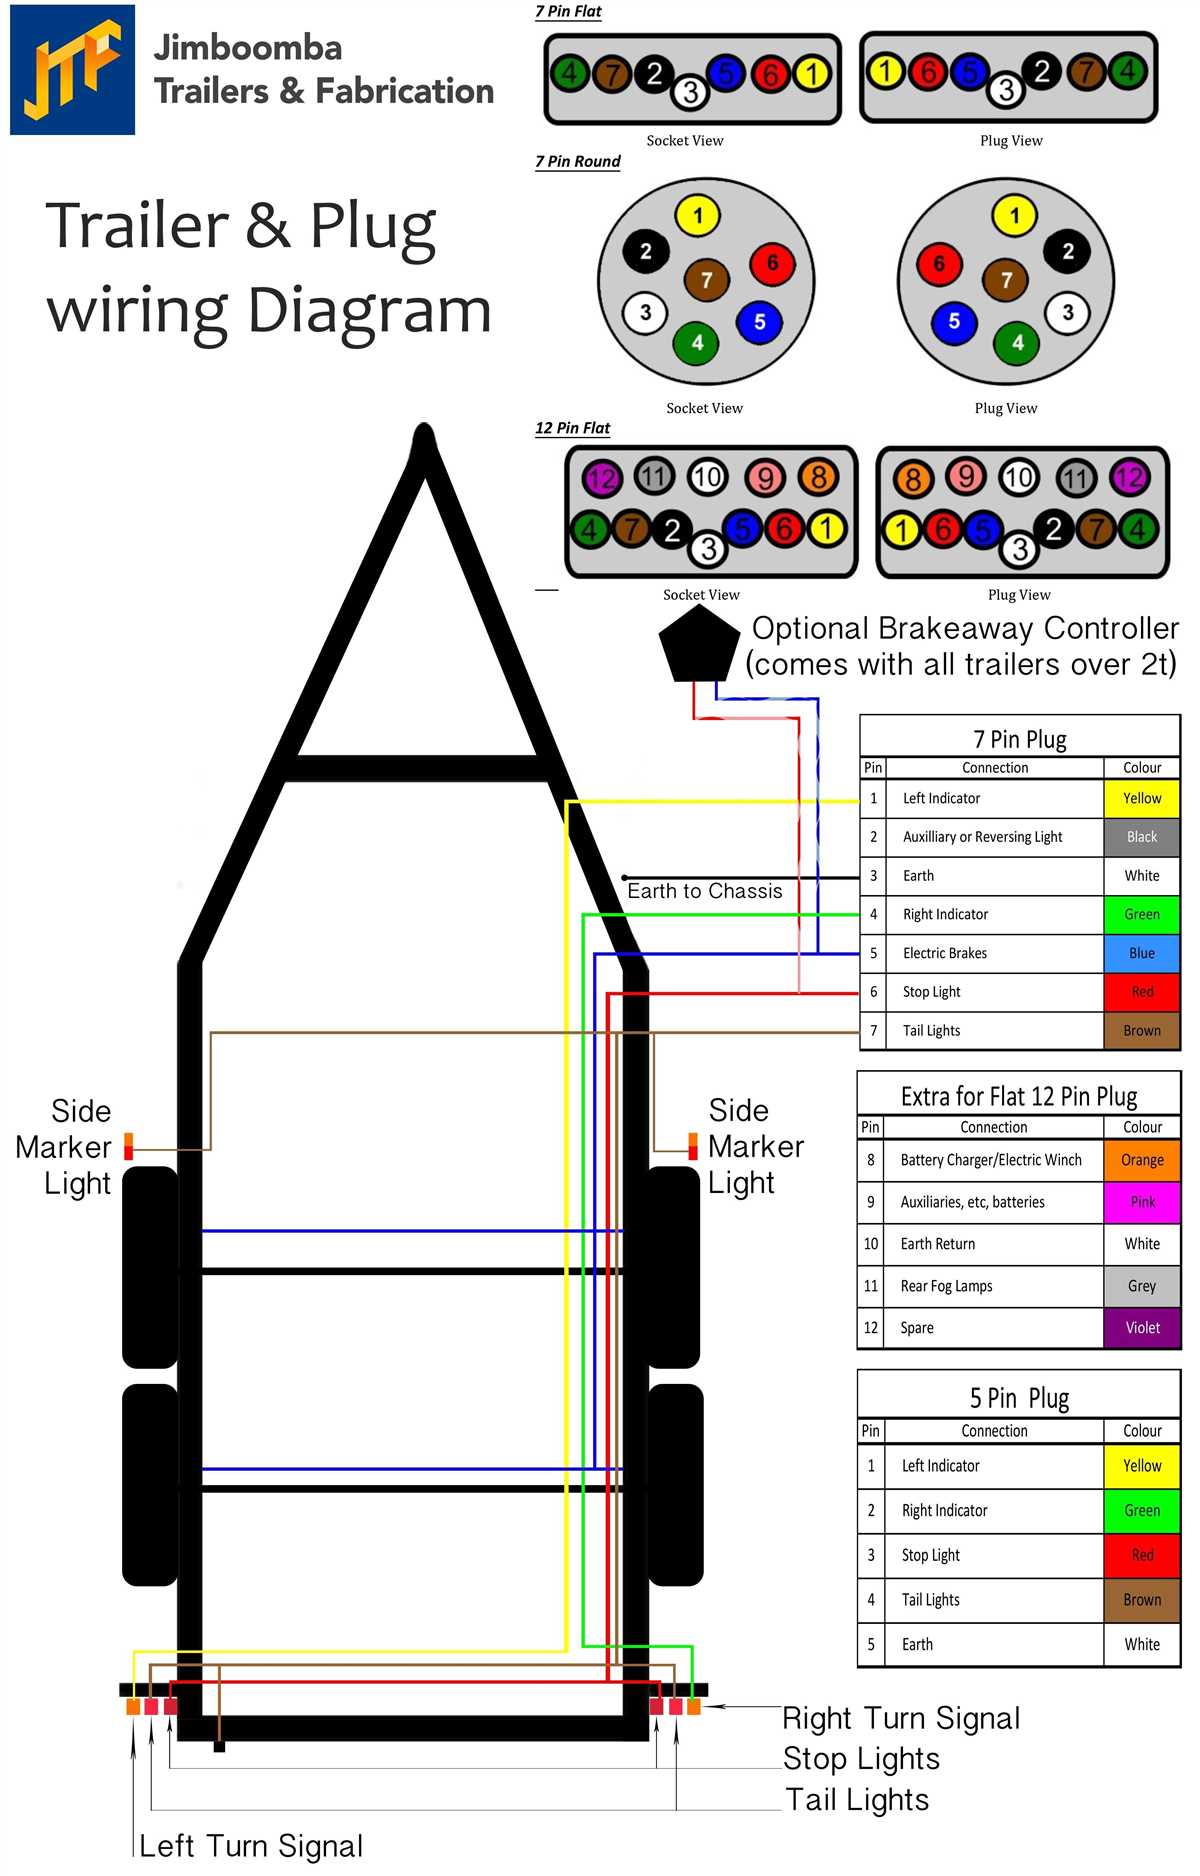
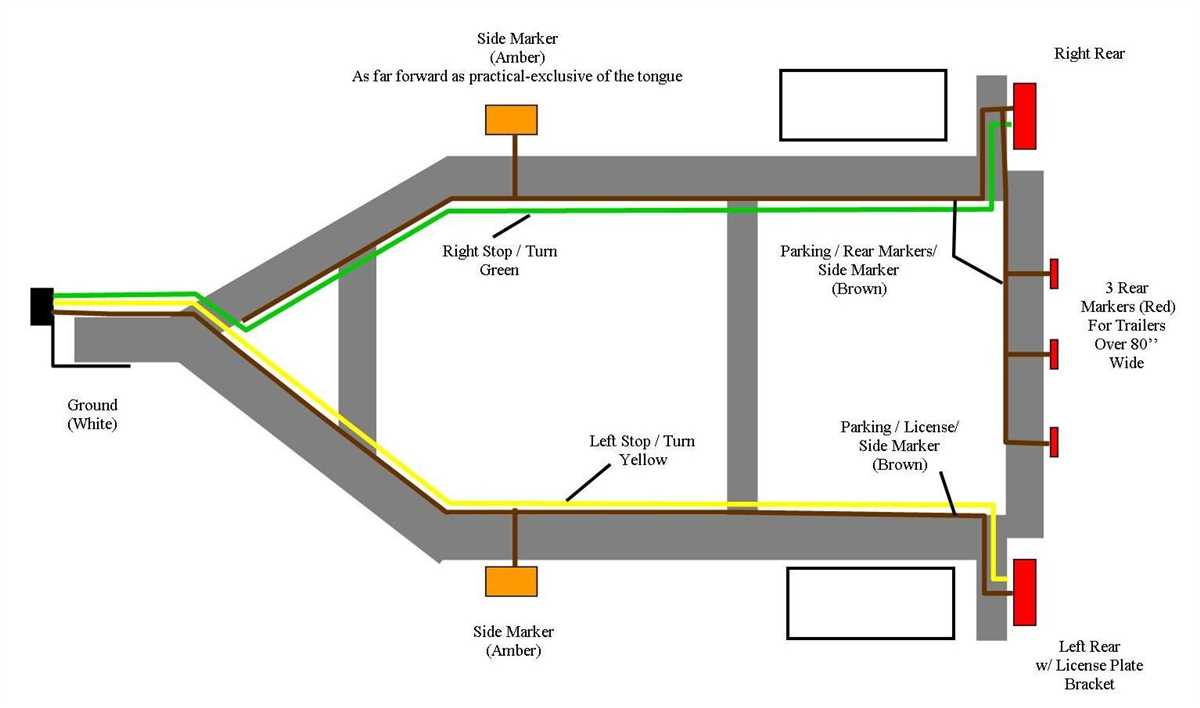
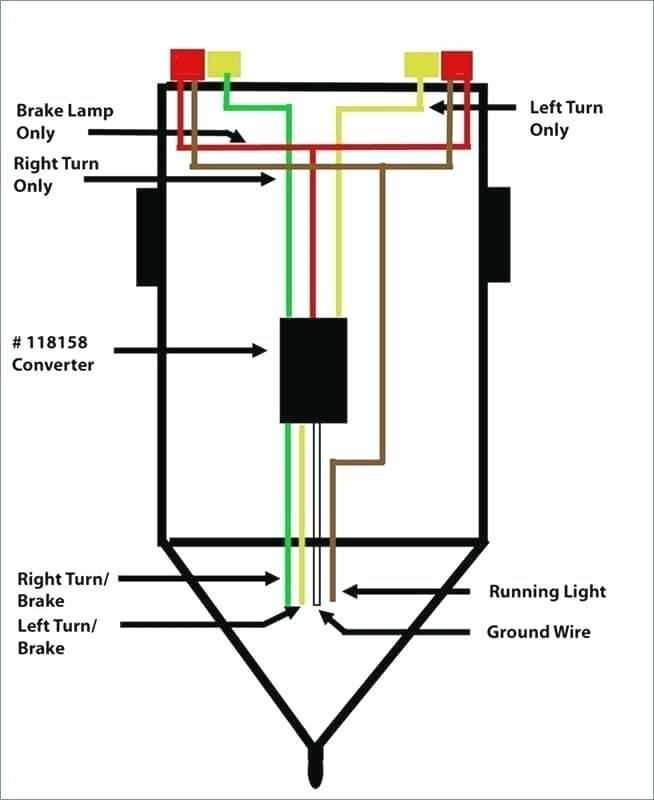
Within the wiring diagram, you will often see different colored wires. Each wire serves a specific purpose and should be connected accordingly. For example, the brown wire is typically used for the tail lights, while the green wire is used for the right turn signal and the yellow wire is used for the left turn signal. The white wire is usually the ground wire, providing a safe path for electrical current to flow.
It’s important to follow the wiring diagram carefully and ensure that all connections are made correctly. If any wires are crossed or connected improperly, it can lead to electrical issues and potentially pose a safety risk. Taking the time to understand the basics of the wiring diagram and double-checking your work can help ensure a properly functioning utility trailer.
To summarize, the wiring diagram for a utility trailer provides a visual representation of the electrical connections and components. Understanding the basics, such as the trailer connector and the different colored wires, is crucial for properly wiring the trailer and ensuring its electrical system functions correctly.
Types of Utility Trailer Wiring Diagrams
When it comes to wiring a utility trailer, there are several different diagrams and methods that can be used depending on the specific needs and requirements of the trailer. Different types of trailers may have different wiring setups, and it’s important to choose the right diagram to ensure proper functioning of the trailer.
Here are a few common types of utility trailer wiring diagrams:
- 4-Way Flat Connector: This is one of the most basic and commonly used wiring diagrams for utility trailers. It consists of four wires – ground, tail lights, left turn/brake lights, and right turn/brake lights. Each wire connects to the corresponding component on the trailer.
- 5-Way Flat Connector: This wiring diagram is similar to the 4-way flat connector, but it includes an additional wire for the auxiliary power supply. This wire can be used to power accessories such as interior lights or electric brakes.
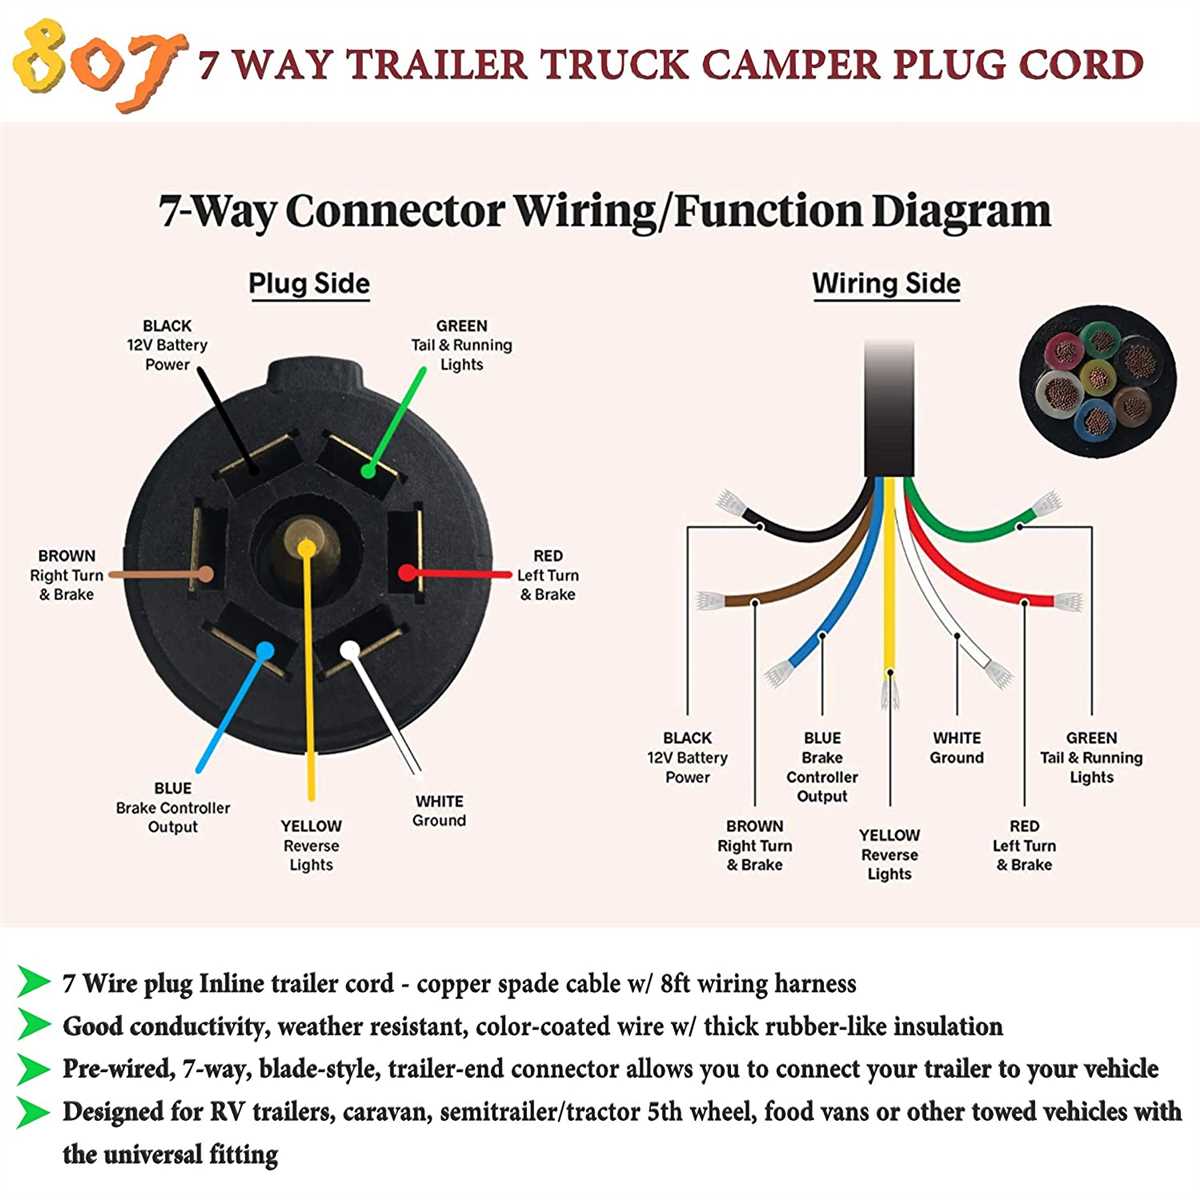
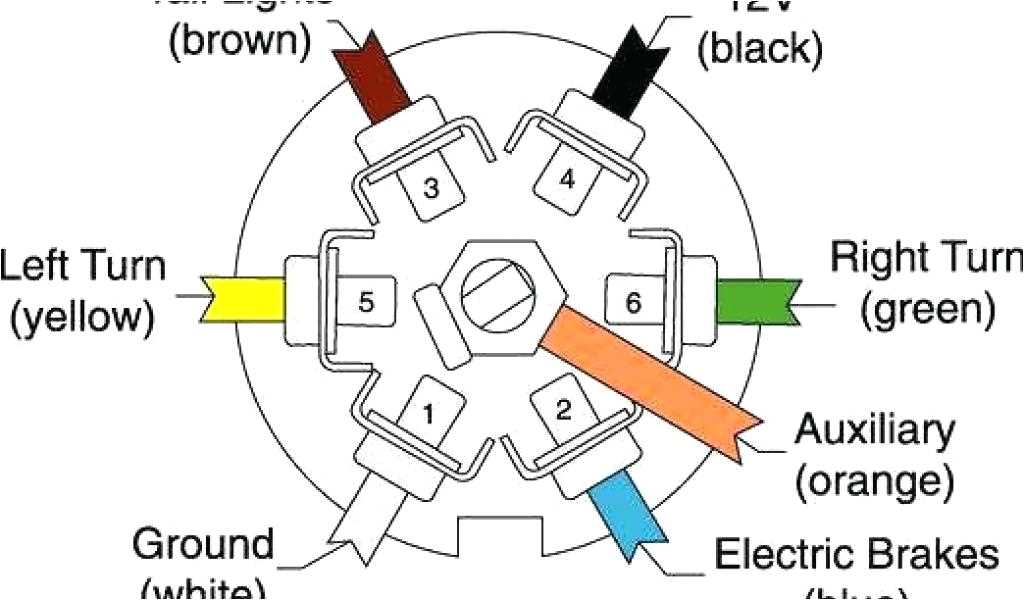
- 7-Way RV Connector: This wiring diagram is commonly used for larger utility trailers or RVs. It includes seven wires – ground, tail lights, brake lights, left turn signal, right turn signal, backup lights, and auxiliary power supply. The 7-way RV connector provides more power and allows for additional features such as electric brakes and a charging system for the trailer’s battery.
Choosing the right utility trailer wiring diagram is essential for proper and safe operation of the trailer. It’s important to follow the diagram closely and make sure all connections are secure and properly insulated. Additionally, it’s recommended to use a wiring harness or kit specifically designed for utility trailers to ensure compatibility and ease of installation.
Step-by-Step Installation Guide
Installing a wiring harness for a utility trailer may seem like a daunting task, but with the right tools and a step-by-step guide, it can be a straightforward process. Here is a detailed installation guide to help you through the process:
1. Gather the necessary tools and materials
Before you begin the installation, make sure you have all the necessary tools and materials handy. This includes a wiring harness kit, wire cutters/strippers, a voltage tester, electrical tape, and zip ties.
2. Locate the trailer’s existing wiring harness
Start by locating the existing wiring harness on your utility trailer. This is usually found near the tongue or at the rear of the trailer. Carefully inspect the wiring to ensure there are no frayed or damaged wires.
3. Disconnect the existing wiring
Using your wire cutters, carefully disconnect the existing wiring from the trailer. This may include removing any electrical connectors or cutting and stripping the wires.
4. Install the new wiring harness
Begin by connecting the new wiring harness to the trailer. Match the color-coded wires from the harness to the corresponding wires on the trailer. Use wire connectors or solder the connections for a secure and reliable connection.
5. Test the connections
Once all the wiring connections are made, use a voltage tester to check the connections for proper functionality. Test each lighting circuit (turn signals, brake lights, etc.) to ensure they are working correctly.
6. Secure the wiring
After confirming that all the connections are working correctly, use zip ties to secure the wiring harness to the trailer. This will help prevent any loose wires and protect them from damage during use.
7. Wrap the connection points
Finally, wrap the connection points with electrical tape to provide an extra layer of protection against moisture and corrosion. This will help extend the lifespan of your trailer’s wiring system.
By following these step-by-step instructions, you can easily install a wiring harness for your utility trailer. Remember to take your time and double-check each connection to ensure a safe and reliable electrical system for your trailer.
Troubleshooting Common Wiring Issues
When it comes to wiring issues with utility trailers, there are a few common problems that you may encounter. These issues can affect the lights, brakes, or other electrical components of the trailer. It’s important to address these problems promptly to ensure safe and reliable operation. Here are some troubleshooting tips for common wiring issues:
Flickering or Non-Functional Lights
If you notice that the lights on your utility trailer are flickering or not functioning at all, the first thing to check is the wiring connections. Make sure that all the connections are secure and free of any corrosion or damage. If the connections are loose, tighten them with a wrench. If you notice any corrosion, clean the terminals with a wire brush and apply dielectric grease to prevent further corrosion. If the lights still don’t work, check the bulbs and replace any that are burnt out.
Brake System Problems
If you’re experiencing issues with the trailer’s brakes, there are a few things to check. Start by inspecting the brake wiring for any loose or damaged connections. Make sure that the wires are properly connected to the brake controller and the brakes themselves. If the connections are loose, tighten them as necessary. If the wires are damaged, replace them with new ones. Additionally, check the brake controller settings to ensure that they are properly adjusted for your trailer.
Lack of Power
If you’re not getting power to your trailer’s electrical components, such as the lights or brakes, there may be an issue with the power source. Check the trailer’s battery to ensure that it is fully charged and the connections are secure. If the battery is dead or the connections are loose, charge the battery or tighten the connections as needed. If the battery is in good condition, check the fuse box to see if any fuses related to the trailer’s electrical system are blown. Replace any blown fuses with new ones of the correct amperage.
Remember, it’s always a good idea to consult the wiring diagram for your specific trailer model to ensure that you’re troubleshooting the correct components and connections. If you’re unsure or unable to resolve the wiring issues on your own, it’s recommended to seek assistance from a professional trailer technician.
Tips for Maintaining Your Utility Trailer Wiring
Proper maintenance of your utility trailer wiring is crucial to ensure safe and efficient towing. Here are some tips to help you keep your trailer wiring in good condition:
- Regularly inspect the wiring: Periodically check the condition of the wiring harness, connectors, and trailer lights. Look for any signs of damage, such as frayed wires or corrosion. If you notice any issues, address them promptly to prevent further damage.
- Keep the wiring clean: Dirt, mud, and road grime can accumulate on the wiring, leading to poor connections and reduced electrical conductivity. Clean the wiring and connectors regularly using a mild detergent and water. Be sure to dry them thoroughly to prevent moisture-related issues.
- Secure the wiring properly: Make sure the wiring harness is securely fastened to the trailer frame using clips or zip ties. This will prevent it from rubbing against other components or getting snagged during towing.
- Protect the wiring from elements: Use wire loom or conduit to shield the wiring from exposure to sunlight, moisture, and other environmental factors. This will help extend its lifespan and prevent damage caused by weathering.
- Test the lights regularly: Before each trip, test all the trailer lights, including brake lights, turn signals, and taillights, to ensure they are functioning properly. Replace any burnt-out bulbs or faulty components promptly.
- Consult a professional if needed: If you are not confident in your ability to troubleshoot or repair trailer wiring issues, consult a qualified mechanic or trailer technician. They will have the expertise and equipment to diagnose and fix any problems.
By following these maintenance tips, you can help prolong the life of your utility trailer wiring and ensure a safe and reliable towing experience.