
If you own a 2003 Toyota 4Runner and want to upgrade or replace the stereo system, having the correct wiring diagram is essential. The wiring diagram provides a blueprint of how the stereo components are connected and helps you properly install a new stereo or troubleshoot any issues with the existing one.
Installing a new stereo in your 2003 Toyota 4Runner can greatly enhance your driving experience and allow you to enjoy your favorite music while on the road. However, without the proper wiring diagram, the installation process can be challenging and time-consuming. Having the right information at hand will make the installation much easier and ensure that you connect the wires correctly.
The 2003 Toyota 4Runner stereo wiring diagram includes information about the wire color codes, which wires connect to which speakers, and the different power sources required for the stereo system. By following the wiring diagram, you can easily identify the wires and make the necessary connections without confusion or guesswork.
Whether you are an experienced car audio installer or a novice attempting to install a stereo for the first time, having the 2003 Toyota 4Runner stereo wiring diagram will be invaluable. It will save you time, prevent potential mistakes, and ensure that you achieve the desired sound quality and functionality from your new stereo system.
Are you looking for a stereo wiring diagram for your 2003 Toyota 4Runner? Look no further! This wiring diagram will help you connect your aftermarket stereo system to your vehicle’s electrical system with ease.
Here is a detailed breakdown of the wiring connections:
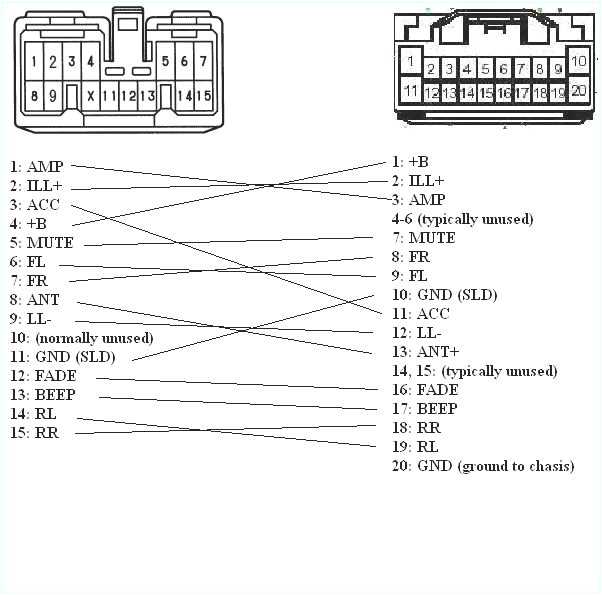
Wire Color Codes:
- Yellow: Constant 12V+
- Red: Accessory 12V+
- Black: Ground
- White: Left Front Speaker Positive
- White/Black: Left Front Speaker Negative
- Gray: Right Front Speaker Positive
- Gray/Black: Right Front Speaker Negative
- Green: Left Rear Speaker Positive
- Green/Black: Left Rear Speaker Negative
- Purple: Right Rear Speaker Positive
- Purple/Black: Right Rear Speaker Negative
It’s important to note that the wire colors may vary depending on your specific vehicle’s trim level and audio system. Always consult the wiring diagram for your vehicle or use a wire harness adapter for a hassle-free installation.
# and #
3 Toyota 4Runner Stereo Wiring Diagram
If you are in need of a stereo wiring diagram for your 2003 Toyota 4Runner, you have come to the right place. The following diagram will provide guidance on how to connect your aftermarket stereo system to the vehicle’s electrical system.
Below are the wire color codes for the various connections:
- Yellow: Constant 12V+
- Red: Accessory 12V+
- Black: Ground
- White: Left Front Speaker Positive
- White/Black: Left Front Speaker Negative
- Gray: Right Front Speaker Positive
- Gray/Black: Right Front Speaker Negative
- Green: Left Rear Speaker Positive
- Green/Black: Left Rear Speaker Negative
- Purple: Right Rear Speaker Positive
- Purple/Black: Right Rear Speaker Negative
Please note that the wire colors mentioned above may vary depending on the trim level and audio system of your specific vehicle. Always consult a wiring diagram for your vehicle or consider using a wire harness adapter for a smooth installation process.
Overview of the 2003 Toyota 4Runner
The 2003 Toyota 4Runner is a mid-size SUV that offers a combination of off-road capability, spaciousness, and reliability. It is known for its ruggedness and durability, making it a popular choice for those who enjoy outdoor activities and adventure.
The 2003 Toyota 4Runner comes with several engine options, including a 4.0-liter V6 and a 4.7-liter V8. These engines provide ample power and torque for both on-road and off-road driving. The 4Runner also offers a choice between rear-wheel drive and four-wheel drive, allowing drivers to tackle various terrains with ease.
Inside the 2003 Toyota 4Runner, you will find a comfortable and well-designed cabin that can accommodate up to five passengers. The seats are supportive and provide ample headroom and legroom for all occupants. The cargo space is also generous, with a rear cargo area that can be expanded by folding down the rear seats.
The 2003 Toyota 4Runner is equipped with a range of features to enhance convenience and safety. These include power windows and locks, keyless entry, cruise control, and a variety of airbags. The 4Runner also offers optional features like a navigation system, premium audio system, and leather upholstery.
On the road, the 2003 Toyota 4Runner delivers a smooth and comfortable ride. Its suspension system is designed to handle bumps and uneven surfaces, ensuring a stable and enjoyable driving experience. The 4Runner’s off-road capabilities are also impressive, with features like hill descent control and off-road traction control providing added confidence when venturing off the beaten path.
In conclusion, the 2003 Toyota 4Runner is a versatile and reliable SUV that offers a comfortable ride, spacious interior, and impressive off-road capabilities. Whether you are exploring rugged terrains or just cruising around town, the 4Runner is sure to deliver a satisfying driving experience.
Importance of a Stereo Wiring Diagram
When installing or upgrading the stereo system in your 2003 Toyota 4Runner, it is crucial to have access to a stereo wiring diagram. A stereo wiring diagram provides a detailed map of all the electrical connections and wires in your vehicle’s stereo system. This diagram is essential for ensuring the proper installation and functioning of your stereo system.
One of the main reasons why a stereo wiring diagram is important is because it allows you to identify the correct wires for each component of your stereo system. Without a diagram, it can be challenging to determine which wires are responsible for powering the speakers, connecting the amplifier, or enabling other features like Bluetooth or satellite radio. With a wiring diagram, you can easily locate the necessary wires and make the right connections.
A stereo wiring diagram also helps to prevent any potential damage to your vehicle’s electrical system. Connecting the wrong wires or components can lead to short circuits, blown fuses, or even damage to your stereo unit. By following the instructions provided in the wiring diagram, you can ensure that the connections are made correctly and avoid any unnecessary complications.
In addition, having a stereo wiring diagram can save you time and frustration during the installation process. Rather than guessing or trial-and-error, a wiring diagram provides precise instructions on how to connect each wire. This can greatly simplify the installation process, especially if you are not familiar with car electronics or wiring systems.
Overall, a stereo wiring diagram is an essential tool for anyone installing or upgrading their stereo system. It provides crucial information on the electrical connections and ensures a smooth and accurate installation. Without a wiring diagram, you may encounter difficulties, damage your vehicle’s electrical system, or spend unnecessary time and effort on the installation process. Therefore, it is highly recommended to obtain a stereo wiring diagram before starting any stereo system installation project.
Tools and Materials Needed
When installing a stereo system in a 2003 Toyota 4Runner, there are several tools and materials you will need to have on hand. These items will help ensure the installation process goes smoothly and efficiently. Here is a list of the tools and materials you should have:
1. Screwdriver Set
A screwdriver set with various sizes and types of screwdrivers is essential for removing panels and securing the stereo unit in place.
2. Wire Strippers
Wire strippers are necessary for cleanly and safely removing the insulation from the wires that will be connected to the new stereo system.
3. Electrical Tape
Electrical tape is used to secure and insulate the electrical connections made during the installation process.
4. Crimping Tool
A crimping tool is needed to securely attach the wire connectors to the wires, ensuring a reliable electrical connection.
5. Multimeter
A multimeter is handy for testing the electrical connections and ensuring everything is properly connected.
6. Stereo Wiring Harness

A stereo wiring harness specific to the 2003 Toyota 4Runner is necessary for connecting the new stereo system to the factory wiring.
7. Trim Panel Removal Tools

Trim panel removal tools are useful for safely removing the interior panels without causing damage.
8. Mounting Brackets
Mounting brackets are required for securely attaching the new stereo unit to the dashboard of the 2003 Toyota 4Runner.
9. Antenna Adapter
An antenna adapter is needed to connect the factory antenna to the new stereo system.
Having these tools and materials readily available will help make the installation process of a stereo system in a 2003 Toyota 4Runner easier and more efficient.
Step-by-Step Guide: Wiring the Stereo
When installing a new stereo in your 2003 Toyota 4Runner, it’s important to properly wire it to ensure optimal functionality. Follow this step-by-step guide to wire the stereo correctly:
1. Disconnect the negative battery terminal: Before starting any wiring work, it’s crucial to disconnect the negative terminal of the battery to avoid any electrical shorts or accidents.
2. Gather the necessary tools: Make sure you have all the tools you need for the wiring process, including wire strippers, electrical tape, crimp connectors, and a wiring harness adapter.
3. Remove the old stereo: Carefully remove the old stereo from the dashboard of your 2003 Toyota 4Runner. Use a trim panel removal tool or a flathead screwdriver to remove any panels or screws holding the stereo in place.
4. Disconnect the wiring harness: Locate the wiring harness connected to the old stereo and disconnect it. Depending on the model, you may need to press a tab or use a small flathead screwdriver to release the harness.
5. Connect the wiring harness adapter: Take the wiring harness adapter that matches the new stereo’s wiring harness and connect it to the vehicle’s wiring harness. Make sure the connections are secure and properly aligned.
6. Prepare the stereo wiring: Use the wire strippers to remove a small portion of insulation from the ends of the stereo’s wiring harness. Then, twist the matching colored wires together and secure them with crimp connectors.
7. Connect the stereo: Plug the wiring harness from the stereo into the wiring harness adapter, ensuring a secure connection. Double-check the connections to make sure they are properly aligned and secure.
8. Test the stereo: Before reassembling the dashboard and panels, turn on the stereo to ensure it is functioning correctly. Test all the features, including the radio, CD player, and any other auxiliary functions.
9. Reassemble the dashboard: Once you have confirmed that the stereo is working properly, reassemble the dashboard and any panels you removed during the installation process.
10. Reconnect the negative battery terminal: Finally, reconnect the negative terminal of the battery to restore power to the vehicle. Make sure all connections are secure and properly fitted.
Following these steps will help you wire your new stereo to your 2003 Toyota 4Runner correctly and ensure that it operates smoothly and efficiently.
Troubleshooting Tips and Common Issues
If you’re experiencing issues with the stereo wiring in your 2003 Toyota 4Runner, there are a few troubleshooting tips that can help you identify and resolve common problems. Here are some common issues you may encounter and ways to troubleshoot them:
No sound:
- Check the stereo’s volume settings and make sure it’s not set to Mute.
- Ensure that the speaker wires are properly connected to the stereo and speakers.
- Inspect the speaker wires for any signs of damage or loose connections.
- If you have an amplifier, check its power and connection to the stereo.
Poor sound quality:
- Check if the speakers are properly installed and securely mounted.
- Inspect the speaker wires for any signs of damage or loose connections.
- Make sure the stereo’s equalizer settings are adjusted appropriately for your preferences.
- If you have an amplifier, check its settings and adjust them as needed.
Intermittent sound:
- Inspect the speaker wires for any signs of damage or loose connections.
- Check if the stereo’s wiring harness connectors are securely plugged in.
- Consider the possibility of a faulty stereo or amplifier, and try connecting a different stereo or amplifier to troubleshoot.
No power:
- Check if the stereo’s fuse is blown and replace it if necessary.
- Inspect the stereo’s wiring harness connectors for any signs of damage or loose connections.
- Ensure that the stereo is properly grounded.
- If the issue persists, consider the possibility of a faulty stereo and consult a professional for further assistance.
Remember, always refer to your vehicle’s wiring diagram and follow proper safety precautions while troubleshooting and making any modifications to the stereo wiring.
Final Thoughts and Additional Resources
In conclusion, having a clear understanding of the stereo wiring diagram for a 2003 Toyota 4Runner is essential when it comes to installing or troubleshooting the audio system in your vehicle. This diagram provides valuable information on the color codes and wiring connections, allowing you to connect your aftermarket stereo or troubleshoot any issues with the existing system.
By referring to the wiring diagram, you can ensure that the correct wires are connected, minimizing the risk of damaging your stereo or causing electrical problems in your vehicle. It is important to follow the diagram carefully and double-check each connection to ensure everything is properly installed.
If you need further assistance or have specific questions about your 2003 Toyota 4Runner stereo wiring, there are additional resources available. These resources include:
- The vehicle’s owner’s manual: This manual may provide some information on the factory stereo wiring or include a wiring diagram.
- Toyota dealership or service center: They may be able to provide you with a copy of the wiring diagram or offer guidance on installing an aftermarket stereo.
- Online forums and communities: There are many online forums and communities dedicated to Toyota 4Runner owners, where you can ask questions and get advice from fellow enthusiasts.
- Aftermarket stereo installation guides: If you are installing an aftermarket stereo, the manufacturer may provide a specific installation guide that includes a wiring diagram for your vehicle model.
By utilizing these additional resources and ensuring that you have the correct wiring diagram, you can confidently install or troubleshoot the stereo system in your 2003 Toyota 4Runner.