
If you own a Yard Machines lawn mower, snow blower, or any other outdoor power equipment, it’s important to have a good understanding of its parts and how they work together. A Yard Machines parts diagram can be a valuable tool in helping you identify and locate the specific parts you need for maintenance or repairs.
Yard Machines is a well-known brand that offers a wide range of outdoor power equipment for residential and commercial use. Their products are known for their durability and performance, but like any machine, they may require occasional repairs or replacement parts. Having a parts diagram on hand can save you time and frustration, as it provides a visual representation of the various components and their relationships.
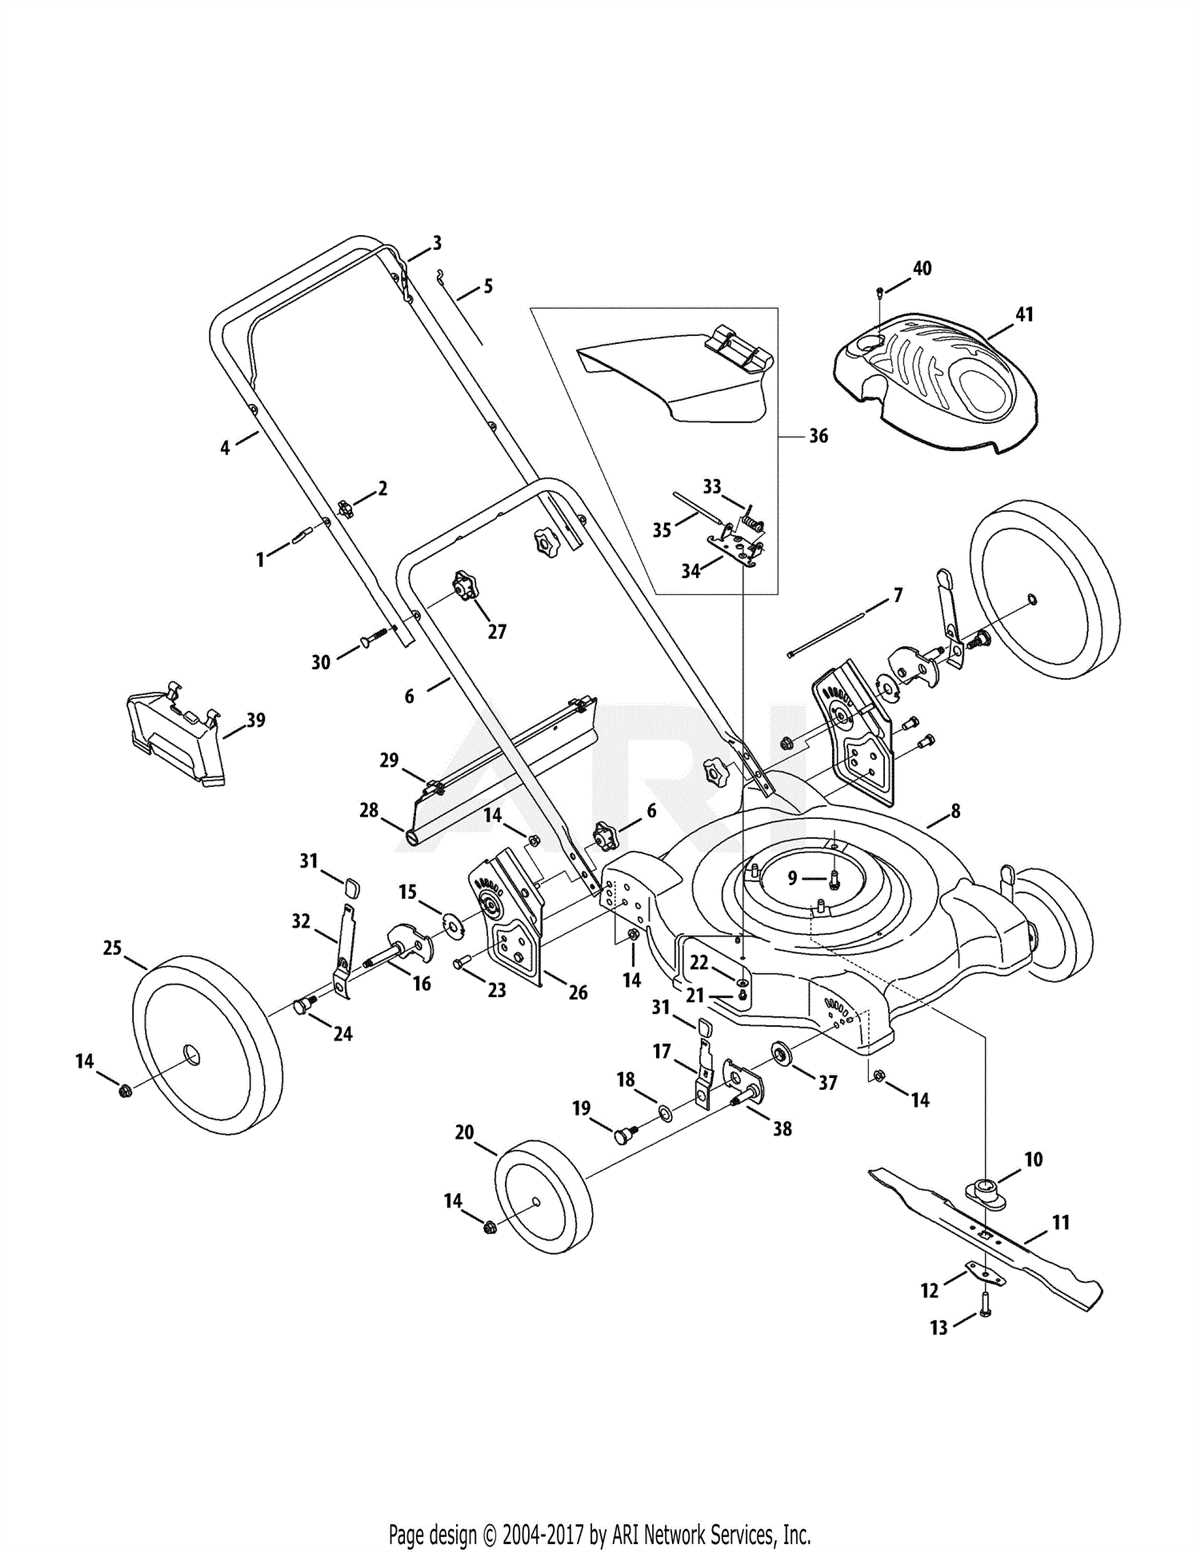
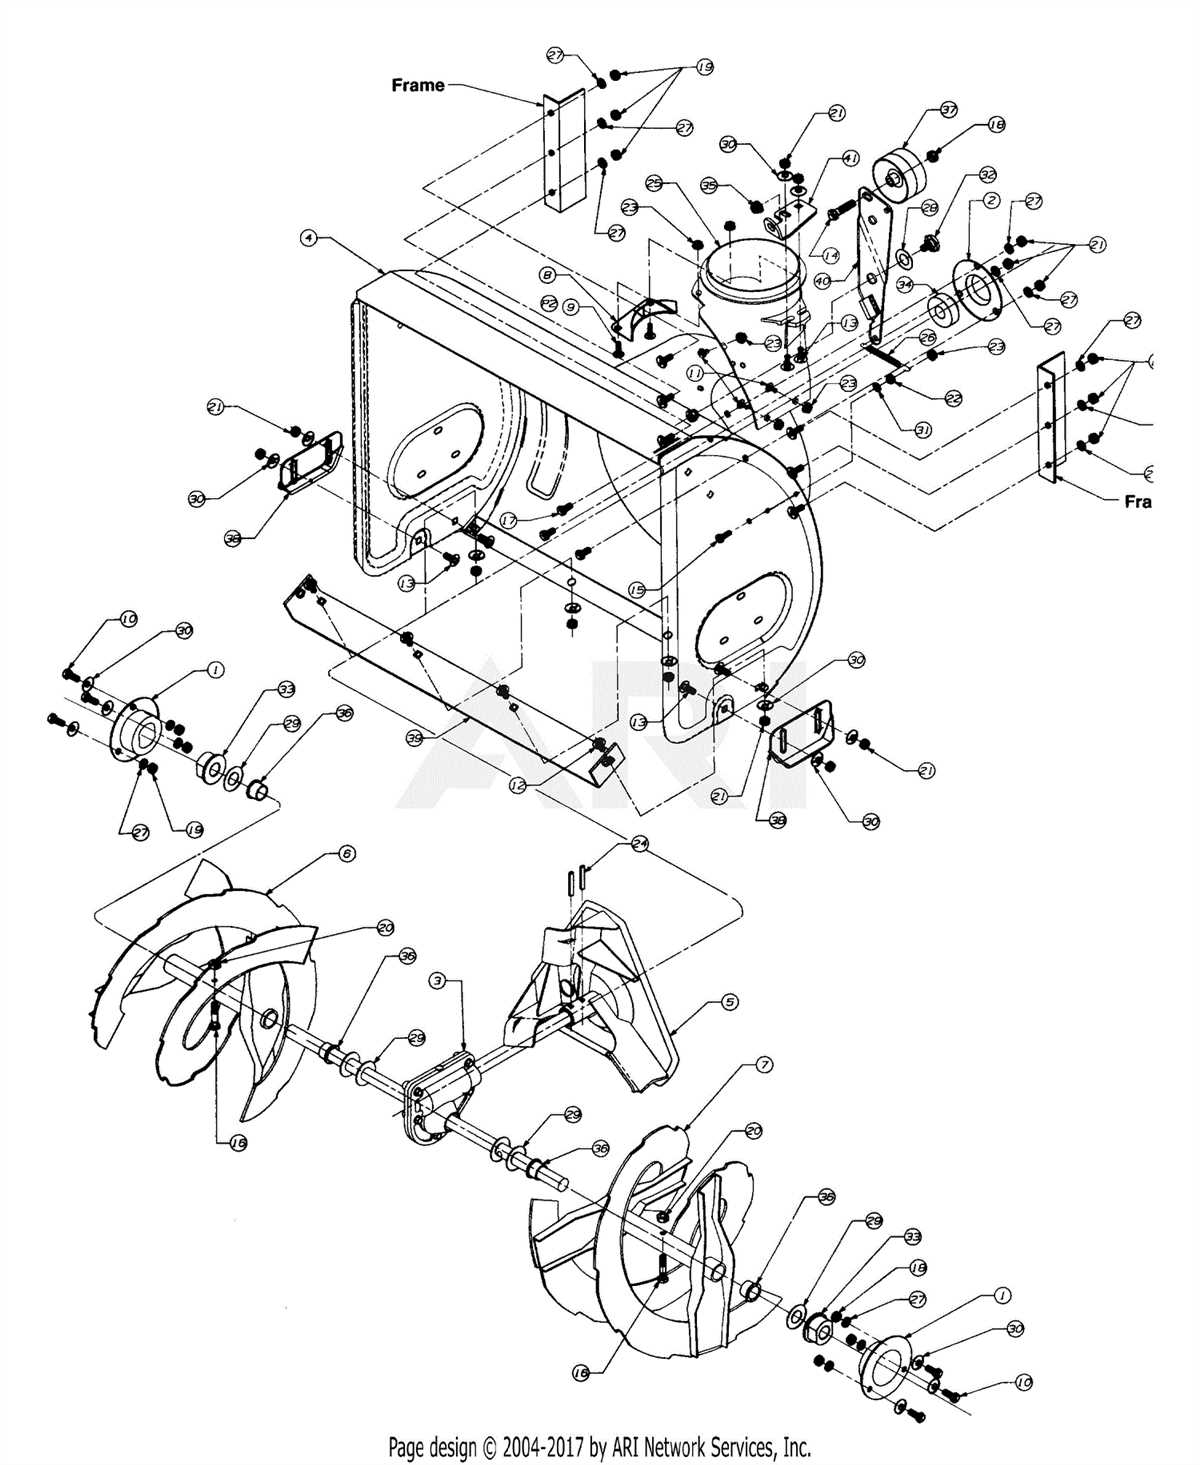
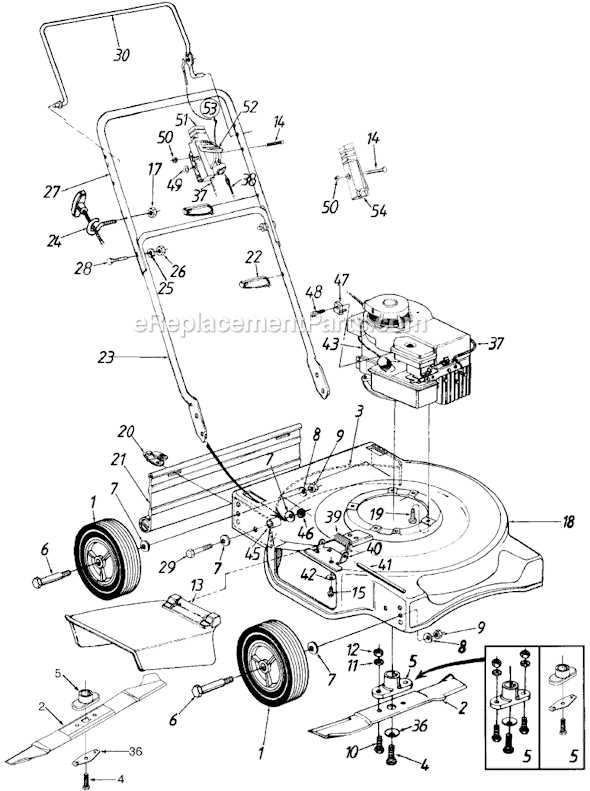
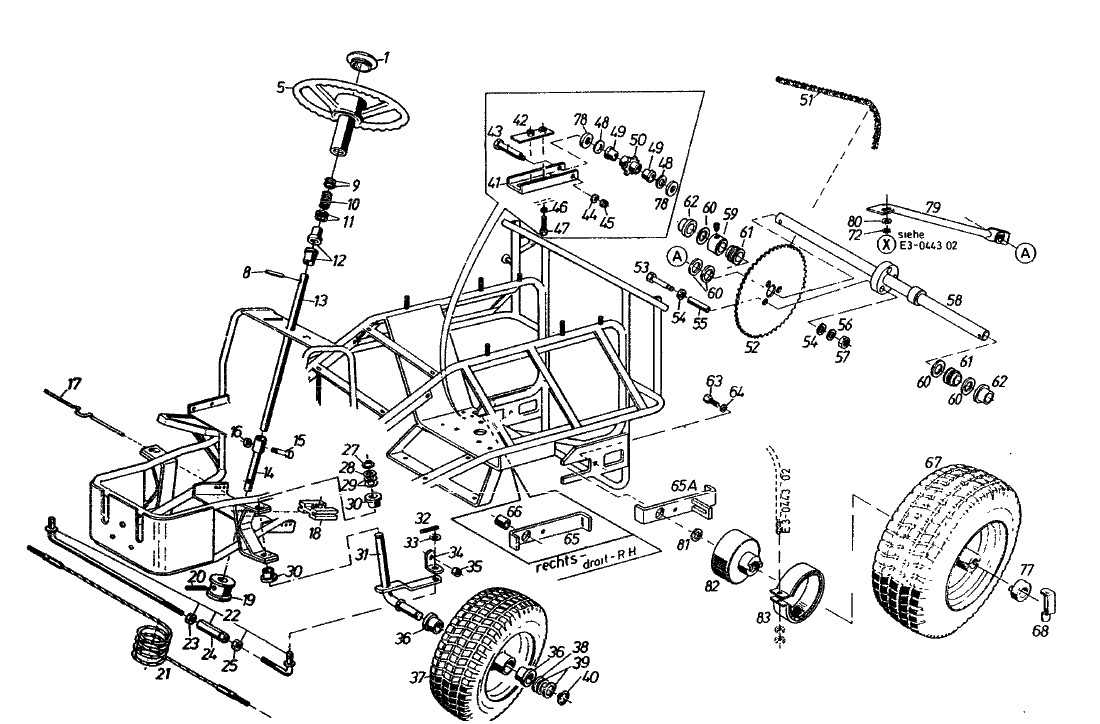
A Yard Machines parts diagram typically includes an exploded view of the equipment, with each part numbered and labeled for easy identification. It will also provide a list of the parts, along with their corresponding part numbers, so you can order the correct replacements. With this diagram, you can easily locate the part you need and understand how it fits into the overall system.
Whether you’re a seasoned DIYer or a first-time equipment owner, a Yard Machines parts diagram can be a valuable resource. It can help you troubleshoot issues, perform routine maintenance, or simply gain a better understanding of how your machine works. By familiarizing yourself with the various parts and their functions, you’ll be better equipped to keep your Yard Machines equipment running smoothly for years to come.
What is a Yard Machines parts diagram and why is it important?
A Yard Machines parts diagram is a visual representation or schematic of the various components that make up a Yard Machines product, such as a lawnmower, snow blower, or leaf blower. It provides a detailed illustration of the parts and their placement within the machine, making it easier for users to identify and locate specific parts they may need to replace or repair.
These diagrams are typically provided by the manufacturer and can be found in the product’s user manual or on the manufacturer’s website. They are often labeled with numbers or descriptions that correspond to specific parts, allowing users to easily reference the diagram when ordering replacement parts.
Why is a Yard Machines parts diagram important?
- Identification: Having a parts diagram can help users accurately identify the specific part they need to replace. Instead of trying to describe the part over the phone or search through a long list of part descriptions, users can simply refer to the diagram and provide the corresponding number or description.
- Ordering: When ordering replacement parts, having a parts diagram can ensure that users receive the correct part for their machine. By referencing the diagram, users can easily confirm that they are ordering the exact part they need, reducing the likelihood of receiving an incompatible or incorrect replacement.
- Repair: For users who prefer to repair their machines themselves, a parts diagram can be invaluable. It provides a visual guide to help users understand how all the components fit together and how they may need to disassemble and reassemble certain parts to complete the repair.
- Maintenance: A parts diagram can also be useful for routine maintenance tasks, such as oil changes or belt replacements. Users can refer to the diagram to ensure that all necessary parts are properly installed and functioning, maximizing the lifespan and performance of their Yard Machines product.
In conclusion, a Yard Machines parts diagram is an essential tool for users of Yard Machines products. It provides a visual reference for identifying and ordering replacement parts, as well as assisting with repairs and maintenance tasks. By using a parts diagram, users can confidently maintain and repair their Yard Machines products, ensuring optimal performance and longevity.
Understanding the different types of yard machines parts diagrams
When it comes to repairing or maintaining your yard machines, having a parts diagram can be extremely helpful. Parts diagrams provide a visual representation of the different components of your machine, allowing you to easily identify the parts you need and how they fit together. However, it’s important to understand that there are different types of yard machines parts diagrams, each serving a specific purpose.
One common type of parts diagram is the exploded view diagram. This type of diagram shows all the individual parts of a machine and how they fit together. It provides a detailed and comprehensive representation of the machine’s components and can be particularly useful when you need to disassemble and reassemble your machine. Exploded view diagrams often include numbered labels for each part, making it easier to identify and order the correct replacement parts.
Another type of parts diagram is the assembly diagram. Unlike the exploded view diagram, the assembly diagram focuses on showing how the parts fit together to form the complete machine. It provides a more simplified and concise representation of the machine’s components and is often used as a reference during assembly or reassembly. Assembly diagrams typically include arrows or lines to indicate the connection points between the parts, making it easier to understand how they should be assembled.
In addition to the exploded view and assembly diagrams, there are also parts lists or catalogs that provide detailed information about each individual part. These lists often include part numbers, descriptions, and sometimes even photos or illustrations of the parts. Parts lists are useful when you know the specific part you need and want to quickly find and order it.
Overall, understanding the different types of yard machines parts diagrams can make it easier for you to navigate and utilize these resources when working on your machines. Whether you’re disassembling, assembling, or simply identifying a specific part, having access to the right diagram can save you time and frustration.
How to Read and Interpret a Yard Machines Parts Diagram
When it comes to repairing or maintaining your Yard Machines equipment, having a parts diagram can be extremely useful. Parts diagrams provide a visual representation of the various components and parts of your machine, making it easier to understand how they fit together and identify the specific part you need to replace or repair.
Here are some steps to help you read and interpret a Yard Machines parts diagram:
1. Identify the Model Number
The first step is to locate the model number of your Yard Machines equipment. This number is usually located on a sticker or tag on the machine itself. Once you have the model number, you can use it to find the appropriate parts diagram for your specific machine.
2. Understand the Parts Categories
Yard Machines parts diagrams typically categorize the various components and parts into different sections. These sections may include engine parts, drive system parts, cutting deck parts, and more. Understanding these categories will help you navigate the diagram more efficiently.
3. Study the Diagram Key
The diagram key is an important part of the parts diagram. It provides a legend that helps you understand the symbols, numbers, and labels used in the diagram. Take your time to study and familiarize yourself with the key before interpreting the diagram.
4. Locate the Part
Using the model number and the diagram key, locate the specific part you need within the diagram. Parts are usually labeled with numbers or letters that correspond to the key. Pay attention to the location of the part within the diagram, as it will help you understand its placement within the machine.
5. Understand Assembly and Disassembly
A parts diagram not only helps you identify the part you need, but it also provides information on how to assemble and disassemble your machine. The diagram may include arrows or other symbols indicating how the parts fit together or where they should be removed.
By following these steps and carefully studying the Yard Machines parts diagram, you’ll be able to navigate through the various components of your machine, identify the parts you need, and understand how they fit together. This knowledge will greatly assist you in repairing and maintaining your Yard Machines equipment.
Common parts found in a yard machines parts diagram
When looking at a yard machines parts diagram, you will often come across several common parts that are essential for the functionality of the machine. These parts include:
1. Engine Components:
- Piston and Cylinder: These components work together to create the necessary combustion needed to power the machine.
- Ignition System: This system includes spark plugs, ignition coils, and the flywheel, which help to ignite the fuel mixture.
- Carburetor: Responsible for mixing air and fuel to create the optimal fuel-air mixture needed for combustion.
- Exhaust System: This system includes the muffler and exhaust pipe, which help to expel the exhaust gases produced during combustion.
2. Drive System Parts:
- Drive Belt: This belt connects the engine to the transmission or the mower deck, allowing power to be transferred.
- Transmission: The transmission is responsible for transferring power from the engine to the wheels or mower blades.
- Gears and Pulleys: These components help to control the speed and direction of the machine.
3. Cutting Components:
- Mower Blades: These blades are responsible for cutting the grass and are typically found on lawn mowers.
- Mower Deck: The mower deck houses the blades and helps to direct the cut grass into a collection bag or discharge chute.
4. Electrical System:
- Battery: The battery provides the necessary power to start the engine and operate electrical components.
- Wiring Harness: This harness consists of various wires that connect the different electrical components of the machine.
- Safety Switches: These switches are designed to ensure the machine operates safely and can include features such as seat and blade engagement switches.
These are just a few examples of the common parts that can be found in a yard machines parts diagram. It’s important to consult the diagram specific to your machine to identify all the necessary parts for repairs or maintenance.
Where to find and purchase yard machines parts
If you own a yard machine and need to find the right parts to repair or enhance its performance, there are several options available to you. Whether you prefer shopping online or in-person, there are reliable sources that carry a wide range of yard machine parts to meet your specific needs.
1. Online retailers and marketplaces
One of the most convenient ways to find and purchase yard machine parts is through online retailers and marketplaces. Websites like Amazon, eBay, and Walmart offer a vast selection of parts for various models of yard machines. Simply search for the specific part you need, and you’ll likely find multiple options to choose from. Make sure to read reviews and compare prices before making a purchase to ensure you’re getting the best deal.
2. Manufacturer’s website
If you prefer to buy directly from the manufacturer, many yard machine brands have their own official websites where you can find and purchase genuine parts. These websites often have detailed parts diagrams that allow you to locate the exact part you need based on your machine’s model number. Ordering from the manufacturer ensures that you’re getting high-quality, compatible parts for your yard machine.
3. Local hardware stores and home improvement centers
For those who prefer a more hands-on shopping experience, local hardware stores and home improvement centers can be a great option. These stores typically have dedicated sections for outdoor power equipment, including yard machines, and carry a selection of replacement parts. It’s a good idea to call ahead and check if they have the specific part you need in stock, as their inventory may vary.
Ultimately, the best place to find and purchase yard machine parts depends on your personal preferences and convenience. Whether you choose to shop online or in-person, there are plenty of options available to help you keep your yard machine running smoothly.
Tips for using a yard machines parts diagram effectively
When it comes to maintaining and repairing your yard machines, having access to a parts diagram can be incredibly helpful. A parts diagram provides a visual representation of the different components and their placement in the machine, making it easier to identify and order the correct parts. Here are some tips for using a yard machines parts diagram effectively:
- Familiarize yourself with the diagram: Before you start using the parts diagram, take some time to familiarize yourself with it. Look for the key or legend that explains the different symbols and labels used in the diagram. Understanding how to interpret the diagram will make it much easier to navigate and locate the specific parts you need.
- Take accurate measurements: While the parts diagram provides a visual representation of the components, it may not give you the exact measurements of each part. It’s important to take accurate measurements of the parts you need to replace to ensure you order the correct size and fit. Use a measuring tape or ruler to determine the dimensions and compare them to the measurements provided in the diagram.
- Pay attention to part numbers: Each part in the diagram is typically assigned a specific part number. These part numbers are essential for ordering the correct replacement parts. Make sure to take note of the part numbers associated with the components you need, and cross-reference them with the manufacturer’s catalog or website to ensure you order the exact part you require.
- Use a digital or printable version: Many manufacturers provide digital versions of their parts diagrams, which can be viewed on a computer or mobile device. These digital diagrams often allow you to zoom in and out, making it easier to see the details. If a digital version is not available, you can print out the diagram to have a physical copy on hand while working on your machine.
- Seek assistance if needed: While using a yard machines parts diagram can be straightforward, it’s possible to encounter confusion or difficulty in identifying certain parts. If you’re unsure about any aspect of the diagram or need clarification, don’t hesitate to reach out to the manufacturer’s customer support or consult with a professional who has experience working with yard machines.
By following these tips, you can effectively utilize a yard machines parts diagram to ensure you order and install the correct components for your machine’s maintenance and repair needs. The diagram serves as a valuable visual aid, helping you save time and money by avoiding mistakes in part selection and installation.