
The 2002 Mercury Grand Marquis is a popular full-size sedan known for its comfort and reliability. One of the essential components of the vehicle is the fuse box, which houses the electrical fuses that control various systems and functions within the car. Understanding the fuse box diagram is crucial for troubleshooting electrical issues and replacing blown fuses.
The fuse box diagram for a 2002 Mercury Grand Marquis provides a detailed layout of each fuse and its corresponding function. It is typically located under the dashboard on the driver’s side or inside the glove compartment. The diagram is divided into different sections, each representing a different system or electrical component. This makes it easier to identify the fuse associated with a specific issue.
The fuse box diagram includes information such as the fuse number, amp rating, and description of its function. It helps car owners identify the correct fuse to replace when a particular electrical component malfunctions. For example, if the power windows stop working, checking the fuse box diagram can help determine which fuse controls the windows and if it needs to be replaced.
What is a Fuse Box Diagram for a 2002 Mercury Grand Marquis?
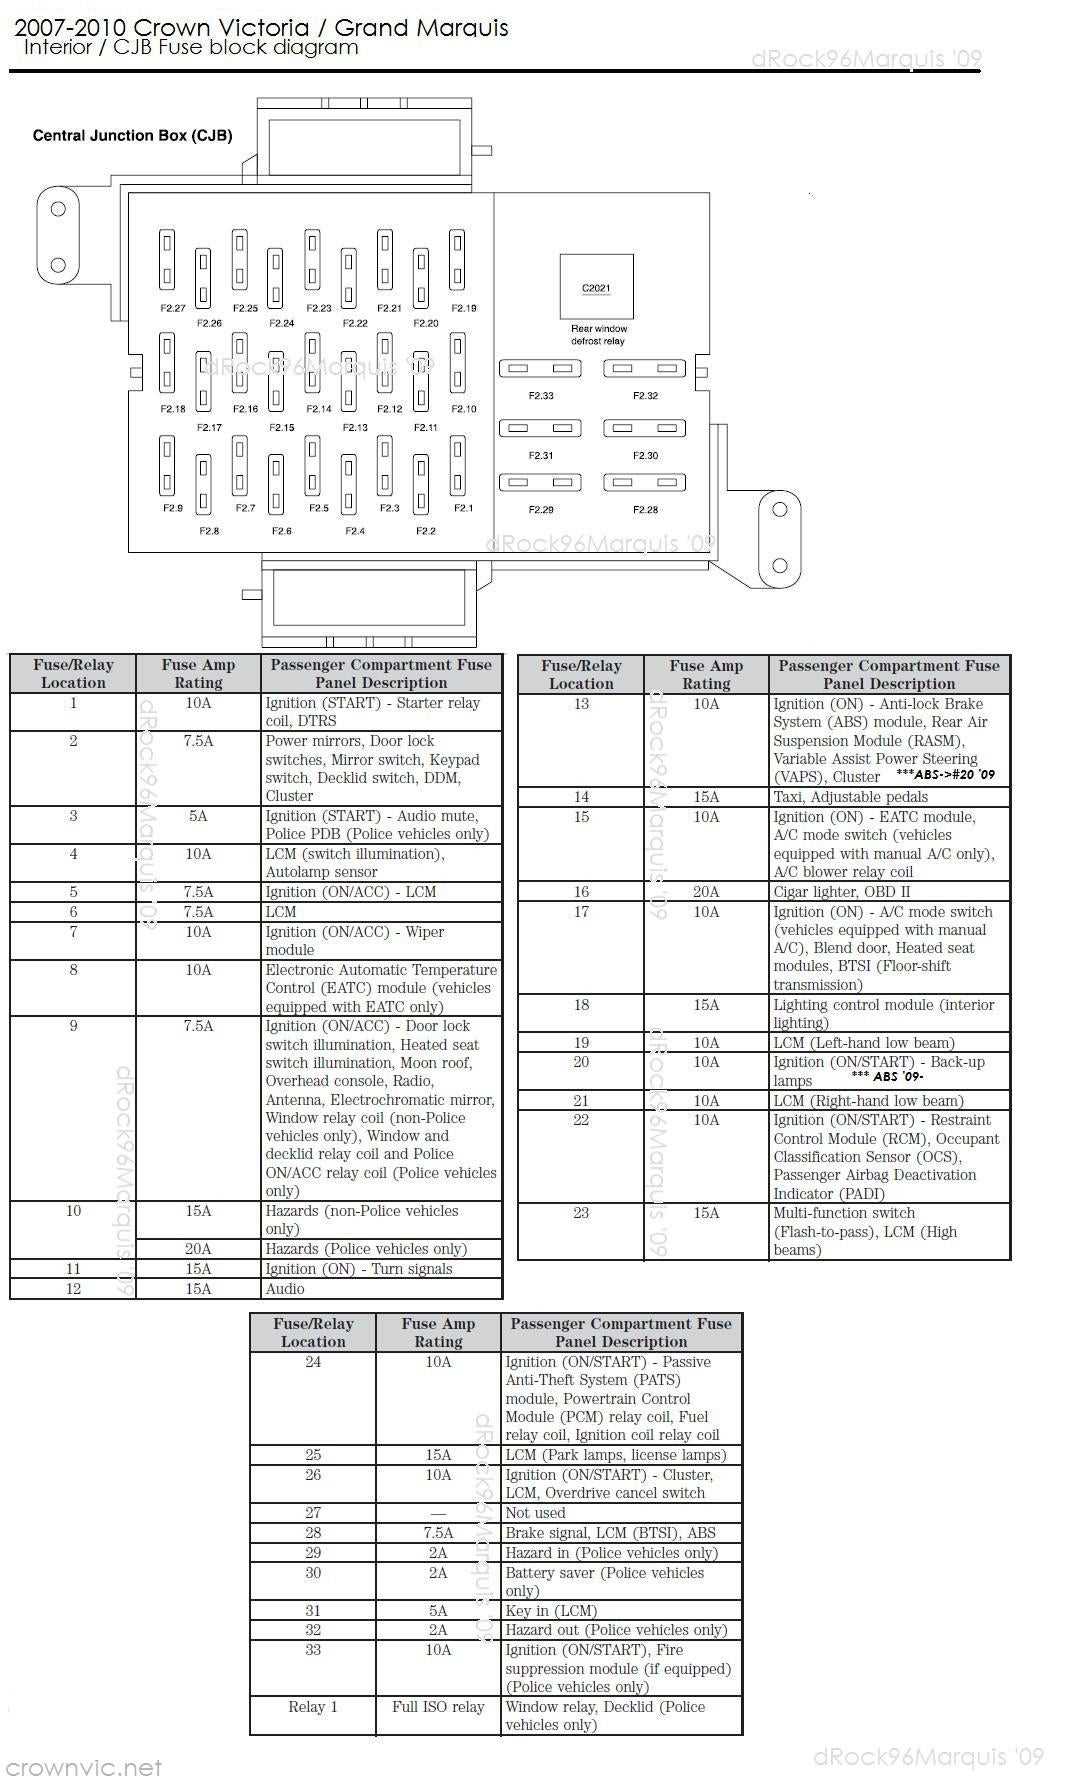
In a 2002 Mercury Grand Marquis, the fuse box diagram is a visual representation of the electrical components and their corresponding fuses in the vehicle. It shows the location and function of each fuse, allowing the driver or mechanic to quickly identify and replace a blown fuse.
The fuse box diagram for a 2002 Mercury Grand Marquis typically includes a detailed map of the fuse panel located underneath the dashboard on the driver’s side. It may also be found in the owner’s manual or on the inside cover of the fuse box itself.
The diagram will indicate the specific fuse number and its corresponding function, such as headlights, turn signals, or power windows. This information is vital when troubleshooting electrical issues or replacing a blown fuse.
It is important to consult the fuse box diagram to ensure the correct fuse is replaced, as using the wrong fuse can cause electrical problems or even damage to the vehicle’s systems. If in doubt, it is recommended to consult a professional mechanic or refer to the vehicle’s manual for accurate information.
Understanding the Fuse Box Layout

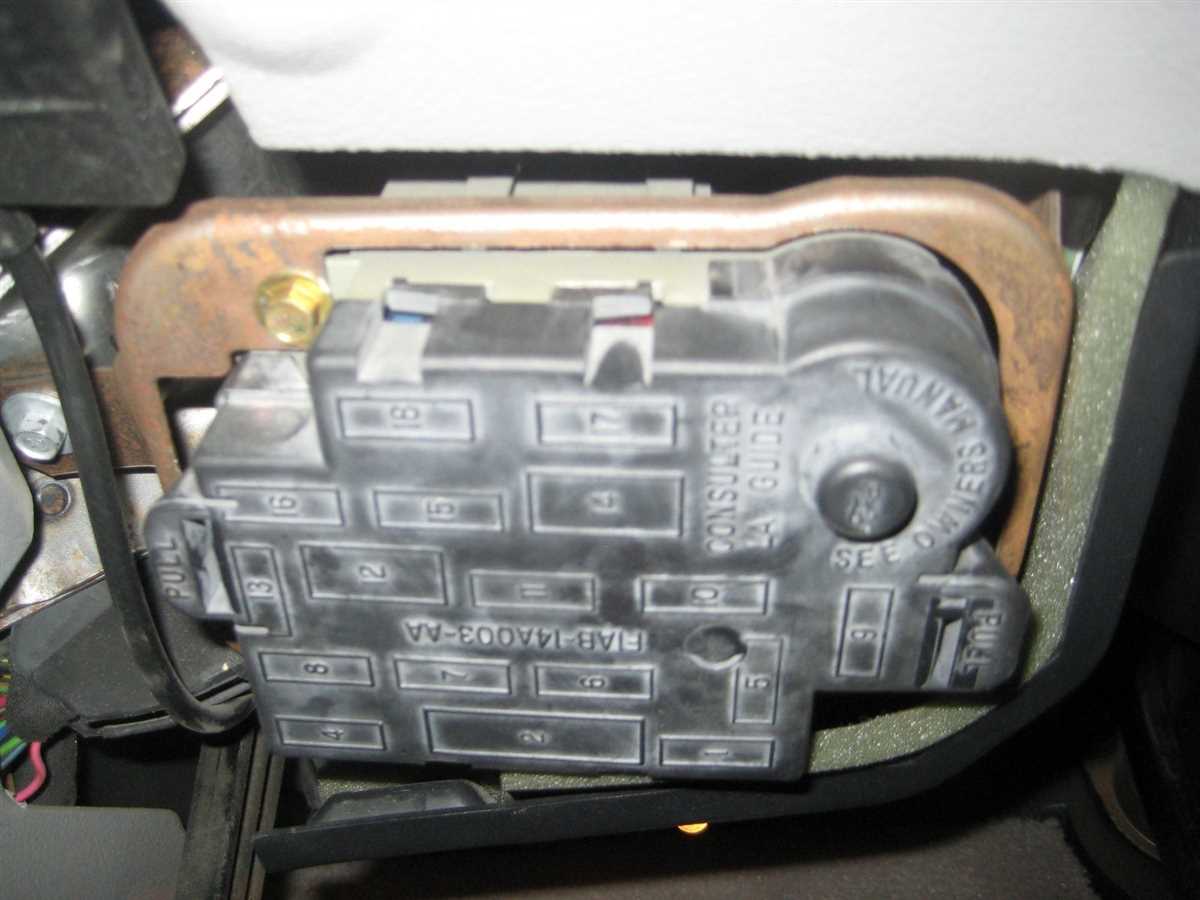
The fuse box layout in a 2002 Mercury Grand Marquis is an important reference for troubleshooting electrical issues in the vehicle. The fuse box is located under the dashboard on the driver’s side and contains a variety of fuses that control different electrical components.
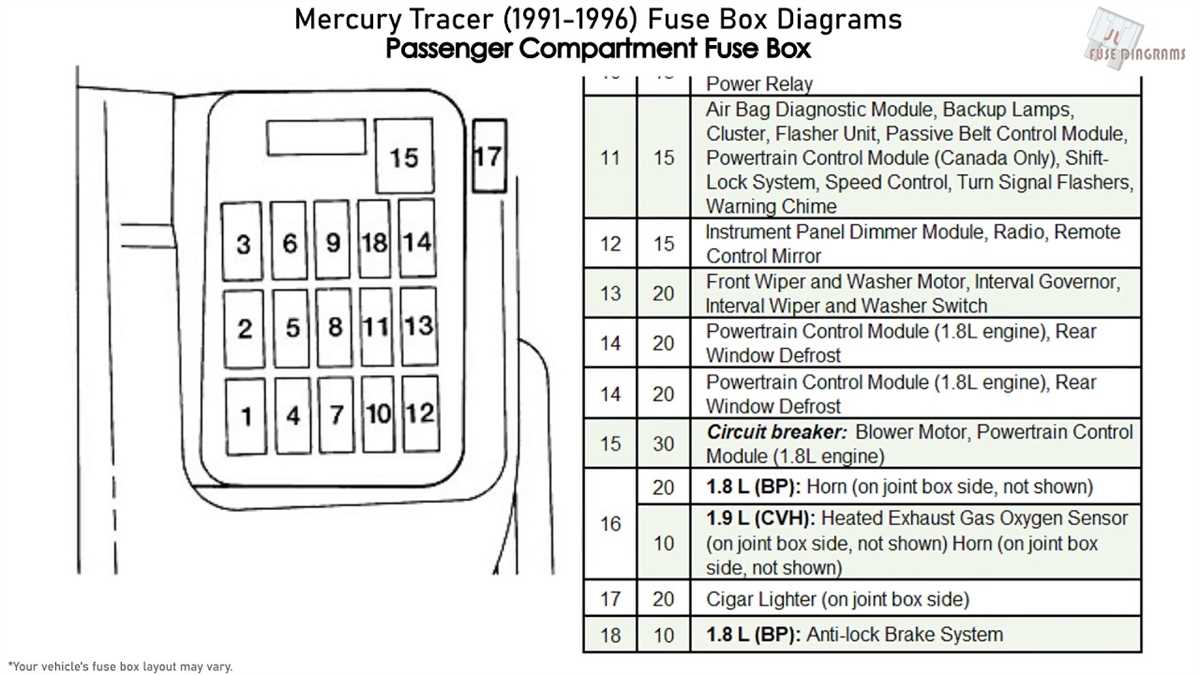
Fuse Box Diagram: The fuse box diagram provides a visual representation of the layout and location of each fuse. It identifies each fuse by number and corresponds to the fuse panel lid or owner’s manual for reference. When an electrical issue arises, referring to the fuse box diagram can help identify which fuse is responsible for the problem.
Fuse Functions: Understanding the functions of each fuse is essential for diagnosing electrical problems. The fuse box diagram will indicate what each fuse controls, such as the headlights, brake lights, interior lights, or power windows. This information can help isolate the issue to a specific circuit or component.
Checking and Replacing Fuses: To check a fuse, use a fuse puller tool or a pair of needle-nose pliers to remove the fuse from its slot. Inspect the fuse for any signs of damage, such as a blown filament or melted plastic. If the fuse is faulty, replace it with a new one of the same amperage rating.
Additional Troubleshooting: If replacing a fuse does not solve the electrical problem, further troubleshooting may be required. This could involve checking the related wiring, connectors, switches, or relays for any faults. It may also be necessary to consult a professional mechanic or refer to a repair manual for specific troubleshooting steps.
In conclusion, understanding the fuse box layout in a 2002 Mercury Grand Marquis is crucial for troubleshooting electrical issues. The fuse box diagram provides a visual reference for identifying the location and function of each fuse, and knowing how to check and replace fuses can help resolve common electrical problems.
Locating the Fuse Box
When dealing with electrical issues in your 2002 Mercury Grand Marquis, it’s crucial to know the location of the fuse box. The fuse box contains fuses and relays that control various electrical components in your vehicle. If a particular system or component is not working, such as the headlights, power windows, or radio, there may be a blown fuse that needs to be replaced.
The fuse box in the 2002 Mercury Grand Marquis is typically located under the dashboard on the driver’s side. To access the fuse box, you will need to open the driver’s side door and kneel down to inspect the lower part of the dashboard. There should be a panel that can be easily removed by hand.
Once you have located the fuse box, you can refer to the fuse box diagram that is usually printed on the inside of the panel or on the back of the fuse box cover. The diagram will show the location and function of each fuse and relay. It is important to use the correct fuse rating when replacing a blown fuse to prevent electrical damage to your vehicle.
If you are unable to find the fuse box or the fuse box diagram, you can also refer to the owner’s manual of your 2002 Mercury Grand Marquis. The manual will provide you with detailed information on the location and function of the fuse box, as well as instructions on how to replace a fuse.
In summary, knowing the location of the fuse box in your 2002 Mercury Grand Marquis is essential for troubleshooting electrical issues in your vehicle. By referring to the fuse box diagram and using the correct fuse rating, you can easily replace a blown fuse and restore the functionality of the affected electrical component.
Identifying Fuse Box Diagram Symbols
In order to effectively troubleshoot and repair electrical issues in a vehicle, it is important to understand the symbols used in the fuse box diagram. These symbols represent different electrical components and systems that are protected by fuses. Familiarizing yourself with these symbols will make it easier to locate and diagnose any problems.
1. Fuse: The fuse symbol is typically represented by a rectangle with a line dividing it into two sections. This symbol indicates the presence of a fuse that protects a specific electrical component or system.
2. Circuit Breaker: The circuit breaker symbol is similar to the fuse symbol, but it typically has a more angular shape. Circuit breakers serve the same function as fuses, but they can be reset after they trip, whereas fuses need to be replaced.
3. Power Distribution Box: The power distribution box symbol looks like a larger rectangle with multiple smaller rectangles inside. This symbol represents the main fuse panel or box where the fuses for various systems are located.
4. Relay: The relay symbol usually looks like a coil or a box with a coil inside. Relays are electrical switches that allow a low-power circuit to control a high-power circuit. They are used to control various systems in the vehicle.
5. Diode: The diode symbol is represented by a triangle with a line across one of the corners. Diodes are electrical components that allow current to flow in only one direction. They are commonly used to rectify alternating current and protect sensitive electrical components.
6. Earth Ground: The earth ground symbol is a horizontal line with three downward-pointing arrows. It represents a connection to the vehicle’s chassis, which serves as a common ground for electrical systems.
7. Battery: The battery symbol is typically represented by a rectangle with two parallel lines inside. This symbol indicates the presence of the vehicle’s battery, which provides power to the electrical system.
8. Electrical Connector: The electrical connector symbol looks like a rectangle with a line extending from one side. It represents a connection point for electrical wires or cables.
By understanding and interpreting these symbols, you can effectively navigate the fuse box diagram and troubleshoot electrical issues in your vehicle. Remember to always refer to the vehicle’s manual for specific information about fuse box locations and functions.
Interpreting the Fuse Box Diagram
The fuse box diagram for the 2002 Mercury Grand Marquis is a visual representation that shows the location and function of each fuse in the vehicle’s electrical system. It is important to understand how to interpret this diagram in order to correctly identify and replace blown fuses.
The diagram is typically found on the inside cover of the fuse box or in the owner’s manual. Each fuse is labeled with a number and a corresponding description of its function. The numbers on the diagram correspond to the numbers on the fuse box itself, allowing you to easily locate a specific fuse.
For example:
- Fuse 1 may be labeled “Power Window” and is responsible for controlling the power windows in the vehicle.
- Fuse 2 may be labeled “Headlights” and is responsible for controlling the headlights.
- Fuse 3 may be labeled “Radio” and is responsible for controlling the radio.
In addition to the descriptions, the fuse box diagram may also include additional information such as the amp rating of each fuse. This is important to know when replacing a blown fuse, as using a fuse with the wrong amp rating can cause further damage to the electrical system.
When interpreting the fuse box diagram, it is important to remember that each fuse is designed to protect a specific electrical component or system in the vehicle. Therefore, if a certain component or system is not functioning properly, checking the corresponding fuse is a logical first step in troubleshooting the issue.
Common Issues and Solutions
When it comes to the fuse box in a 2002 Mercury Grand Marquis, there are a few common issues that owners may encounter. Fortunately, most of these issues have straightforward solutions that can be easily addressed.
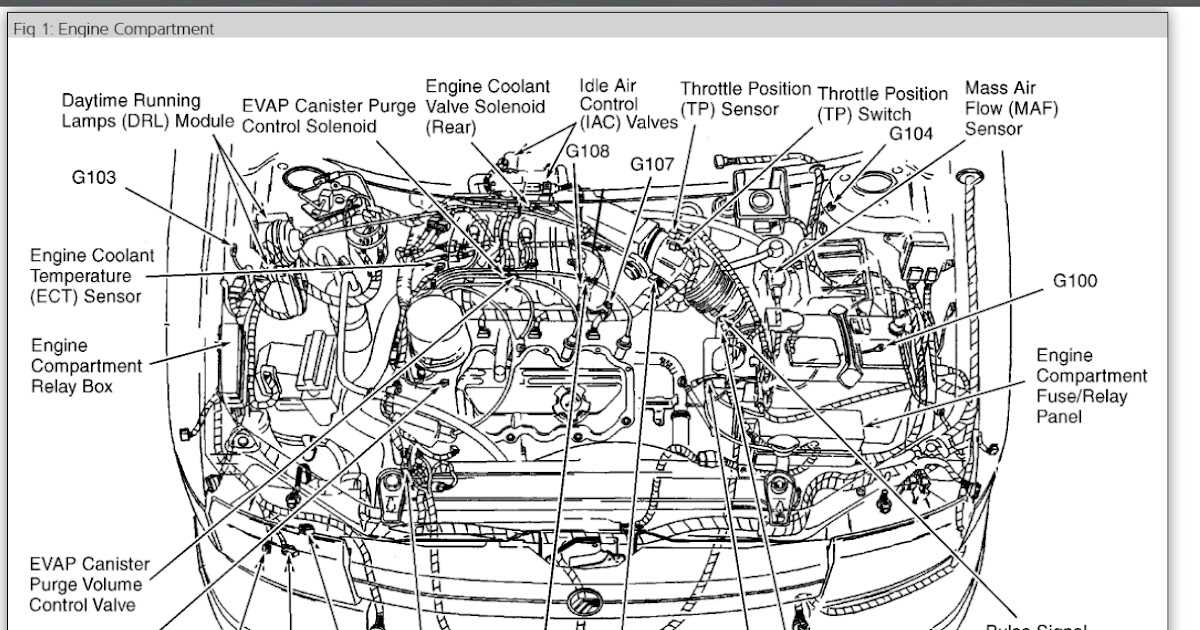
1. Blown Fuses: One of the most common issues with the fuse box is blown fuses. This can cause various electrical components to stop working, such as the interior lights, power windows, or radio. To fix this problem, locate the fuse box (typically located under the dashboard on the driver’s side or in the engine compartment) and check for any blown fuses. Replace any blown fuses with ones of the same amperage rating.
2. Loose Connections: Another common issue is loose or corroded connections within the fuse box. Over time, the connections may become loose or develop corrosion, resulting in poor electrical contact. This can lead to intermittent power issues or electrical failures. To fix this problem, inspect the connections within the fuse box and clean any corrosion using a wire brush. Ensure that all connections are tight and secure.
3. Faulty Relays: The fuse box in the Grand Marquis also contains relays that control various electrical systems, such as the headlights or fuel pump. A faulty relay can cause the corresponding system to malfunction or stop working entirely. To fix this issue, identify the faulty relay by referencing the fuse box diagram and replace it with a new one.
4. Overloading the Fuse Box: Sometimes, owners may inadvertently overload the fuse box by adding too many electrical accessories or using high-powered devices. This can lead to blown fuses or other electrical issues. To avoid this problem, be mindful of the electrical load on the vehicle and avoid exceeding the recommended fuse ratings. If necessary, consult the owner’s manual or a professional to determine the proper fuse ratings for additional accessories.
In conclusion, while the fuse box in a 2002 Mercury Grand Marquis may experience common issues such as blown fuses, loose connections, faulty relays, or overloading. These problems can be easily addressed by replacing blown fuses, tightening connections, replacing faulty relays, or being mindful of the electrical load on the vehicle. Regular maintenance and inspection of the fuse box can help prevent these issues from occurring in the first place.
Replacing Fuses in a 2002 Mercury Grand Marquis

When a fuse in your 2002 Mercury Grand Marquis blows, it can cause electrical components to stop working. Replacing a blown fuse is a simple and cost-effective way to restore functionality to your vehicle’s electrical system. Here is a step-by-step guide on how to replace fuses in a 2002 Mercury Grand Marquis:
Materials Needed:
- New fuse(s) of the appropriate amperage
- Fuse puller or needle-nose pliers
Before replacing any fuses, it is important to locate the fuse box in your Mercury Grand Marquis. The fuse box is usually located under the dashboard on the driver’s side or in the engine compartment. Refer to your vehicle’s owner’s manual for the exact location.
Once you have located the fuse box:
- Turn off the ignition and any electrical components that may be affected by the blown fuse.
- Open the fuse box cover by pulling it towards you or using a flat-head screwdriver to pry it open.
- Use the diagram on the inside of the fuse box cover or the owner’s manual to identify the fuse that needs to be replaced.
- Using the fuse puller or needle-nose pliers, gently grasp the blown fuse and pull it straight out. Be careful not to twist or break the fuse.
- Insert a new fuse of the same amperage rating into the empty slot, pushing it firmly until it is seated securely.
- Close the fuse box cover, making sure it snaps into place.
- Turn on the ignition and check if the electrical component is now working. If not, there may be an underlying issue that requires further inspection.
It is important to use the correct amperage fuse when replacing a blown fuse. Using a fuse with a higher amperage rating can cause electrical damage or a fire, while using a fuse with a lower amperage rating may not provide enough power to the component.
If you are unsure about which fuse to replace or encounter any difficulties during the process, it is recommended to consult a professional mechanic or refer to the vehicle’s owner’s manual for guidance.
By following these steps, you can easily replace blown fuses in a 2002 Mercury Grand Marquis and restore functionality to your vehicle’s electrical system.
Q&A:
How do I know if a fuse needs to be replaced in a 2002 Mercury Grand Marquis?
If a specific component or system in your car stops working, such as the headlights or radio, there is a chance that a fuse related to that component has blown and needs to be replaced.
Where can I find the fuse box in a 2002 Mercury Grand Marquis?
The fuse box in a 2002 Mercury Grand Marquis is located under the dashboard on the driver’s side, near the brake pedal.
What size and type of fuse does a 2002 Mercury Grand Marquis use?
A 2002 Mercury Grand Marquis typically uses mini fuses, which are smaller and have a blade-shaped design. The correct amp rating for each fuse can be found in the owner’s manual or on the fuse box cover.
How do I remove a blown fuse in a 2002 Mercury Grand Marquis?
To remove a blown fuse, use a fuse puller tool or a pair of needle-nose pliers to grip the fuse and gently pull it out of the fuse box. Be careful not to exert too much force or damage the fuse box.
How do I install a new fuse in a 2002 Mercury Grand Marquis?
To install a new fuse, simply push it into the corresponding slot in the fuse box until it is firmly seated. Make sure to use a fuse with the correct amp rating to avoid any electrical issues.
How do I replace a fuse in a 2002 Mercury Grand Marquis?
To replace a fuse in a 2002 Mercury Grand Marquis, locate the fuse panel under the dashboard on the driver’s side. Open the panel by pulling down on the cover. Look for the fuse that corresponds to the component that is not working. Use the fuse diagram on the panel or in the owner’s manual to identify the correct fuse. Once you have located the fuse, use a fuse puller or a pair of needle-nose pliers to remove the old fuse. Inspect the fuse to see if it is blown. If it is, replace it with a new fuse of the same rating. Push the new fuse into the slot until it is fully seated. Close the fuse panel cover and test the component to see if it is working.