
When it comes to troubleshooting electrical issues in your 1997 Dodge Ram 1500, having access to a detailed wiring diagram is crucial. The alternator, an essential component of the vehicle’s charging system, plays a critical role in powering various electrical components and ensuring the battery stays charged. This comprehensive guide will provide you with all the necessary information about the alternator wiring diagram for your 1997 Dodge Ram 1500.
Understanding the alternator wiring diagram is essential for diagnosing any issues related to the charging system. It helps you identify the different components, their connections, and the path the electrical current takes. With this information at hand, you can easily trace any faults and make the necessary repairs or replacements.
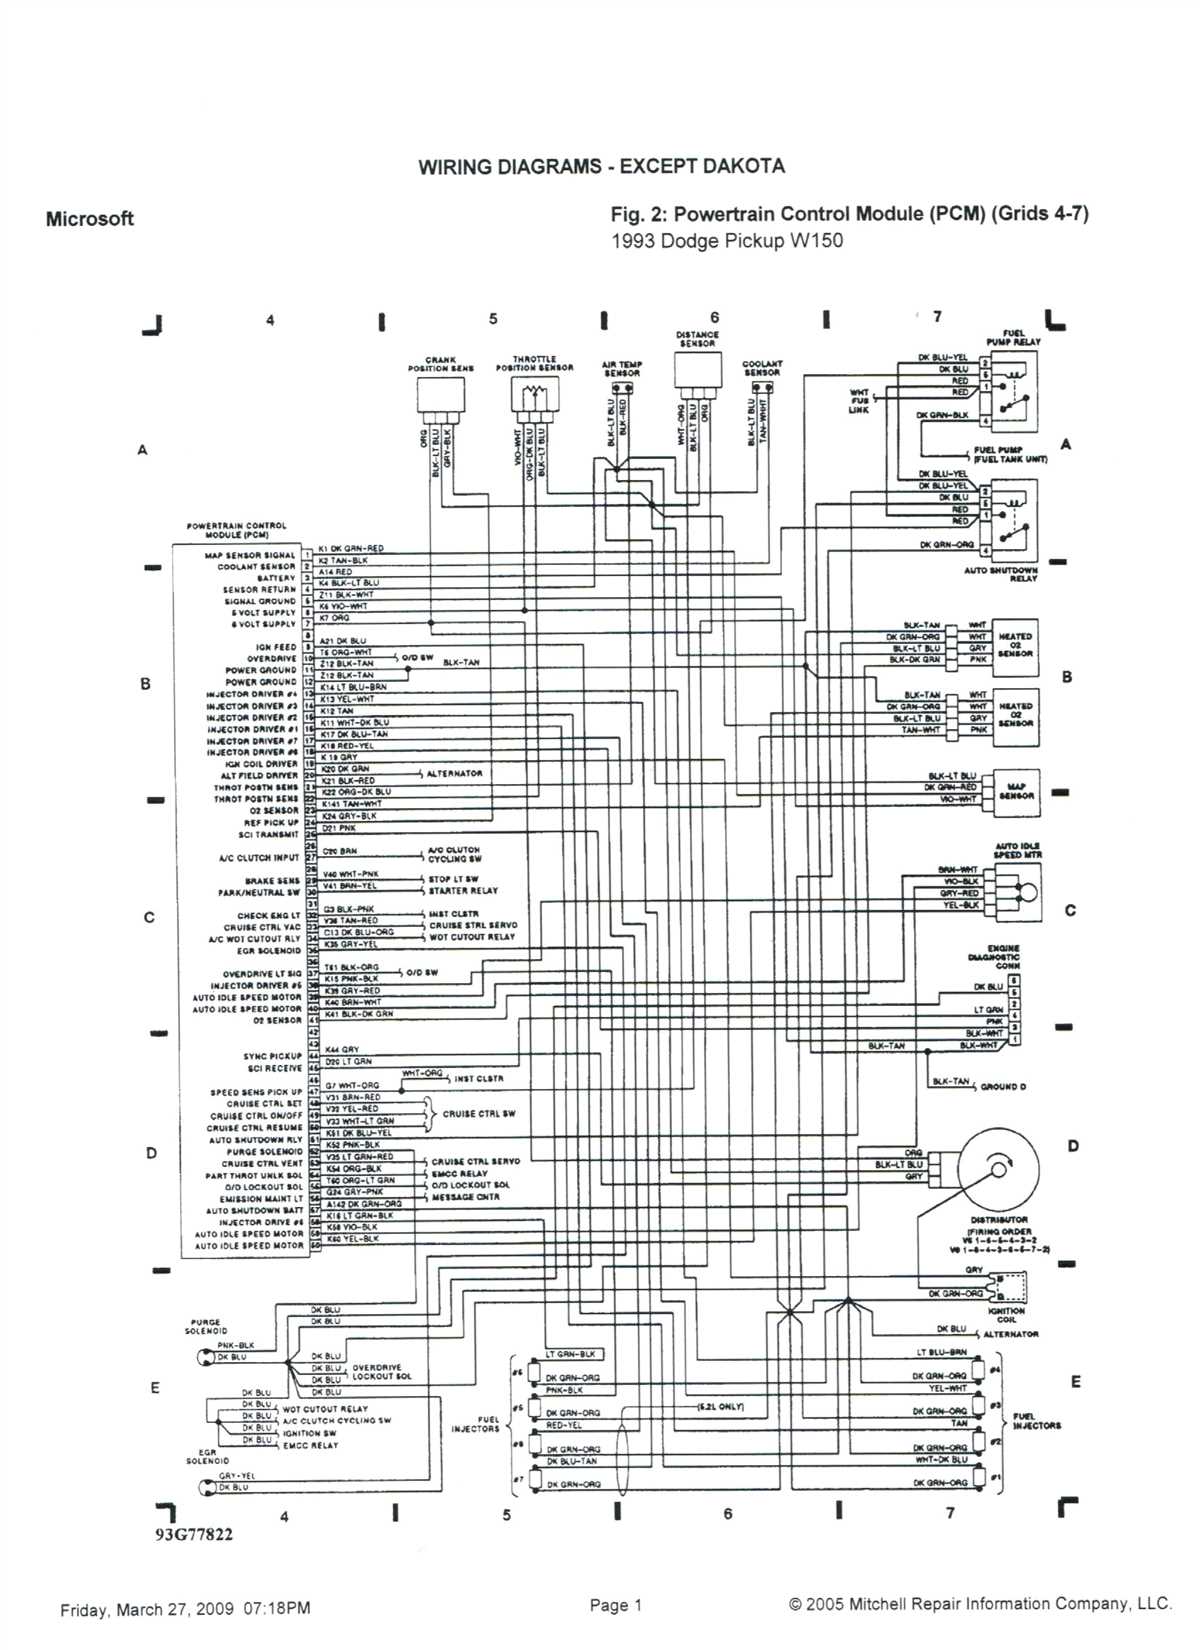
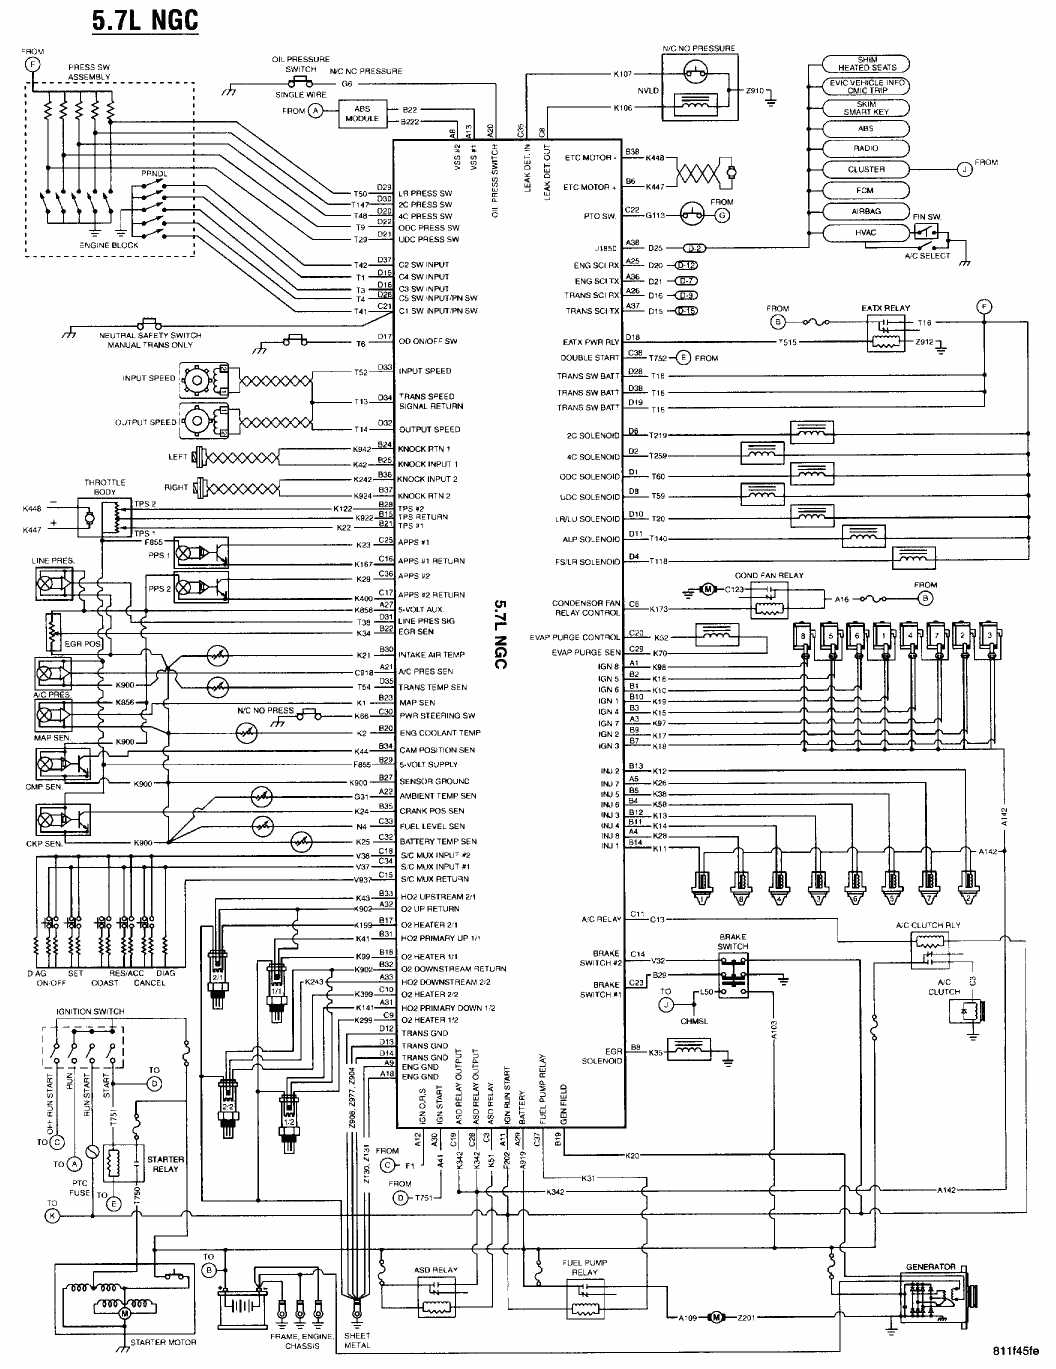
The 1997 Dodge Ram 1500 alternator wiring diagram includes information about the various wires and their functions. It typically includes details such as wire color, terminal location, and the connections to other components. Additionally, it provides valuable information on the voltage and current ratings, which are vital for ensuring proper operation of the charging system.
Whether you’re a seasoned mechanic or a DIY enthusiast, having access to the 1997 Dodge Ram 1500 alternator wiring diagram will greatly simplify the troubleshooting process. It allows you to identify the root cause of any charging system issues and take appropriate measures to rectify them. So, if you’re facing any electrical problems or simply looking to gain a deeper understanding of your vehicle’s charging system, this guide is a must-have.
Why You Need a 1997 Dodge Ram 1500 Alternator Wiring Diagram
When it comes to maintaining and troubleshooting your 1997 Dodge Ram 1500, having access to a wiring diagram for the alternator can be extremely helpful. The alternator plays a crucial role in charging the battery and powering the electrical components of your vehicle. Understanding the wiring connections and how they should be properly installed is essential for ensuring optimal performance and avoiding potential electrical issues.
One of the main reasons why a wiring diagram is necessary is because it provides a visual representation of the electrical connections for the alternator. It shows you how the various wires are connected, the paths they take, and where they should be properly routed. This can be invaluable when troubleshooting electrical problems or making modifications to your vehicle’s electrical system. Without a wiring diagram, you may be left guessing or relying on trial and error, which can be time-consuming and potentially lead to further issues.
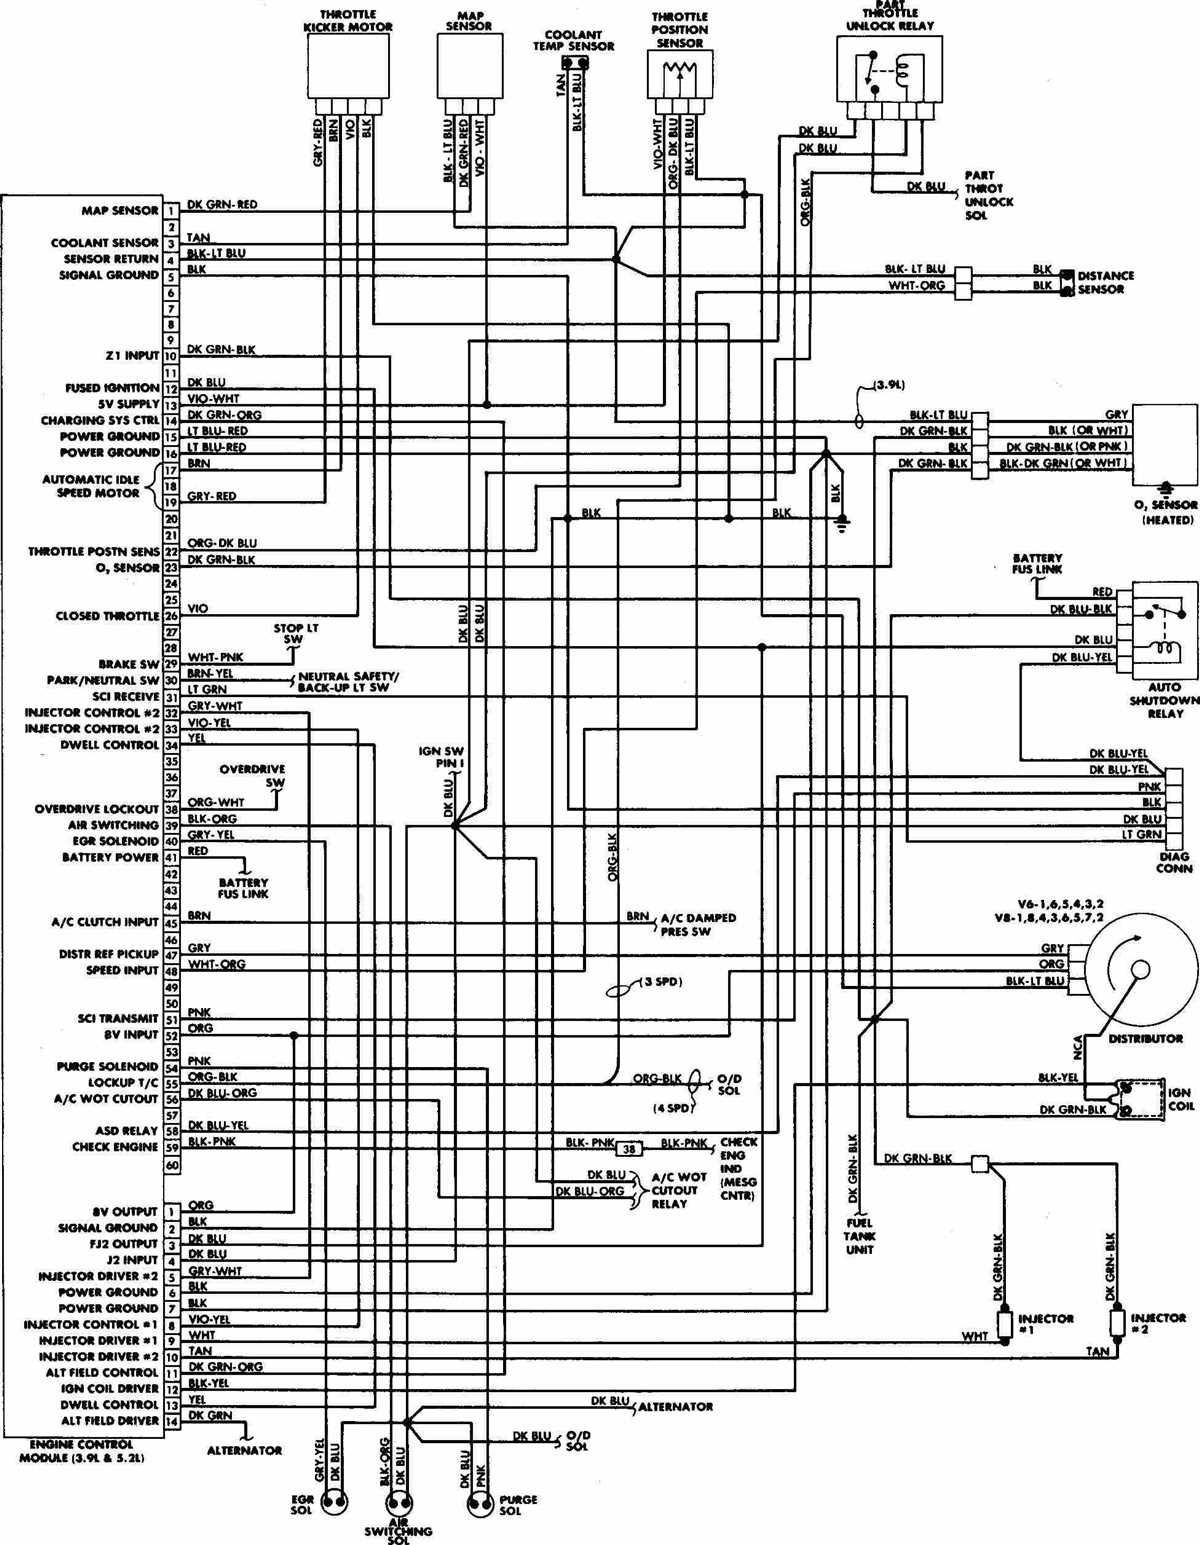
A wiring diagram also allows you to understand the specific functions of each wire in the alternator system. For example, you can distinguish between the output wire that supplies power to the battery, the ground wire that completes the circuit, and any other wires that may be connected to sensors or other components. Knowing which wire is responsible for each function can help you diagnose problems more accurately and make necessary repairs or replacements.
Benefits of having a 1997 Dodge Ram 1500 alternator wiring diagram:
- Accurate and detailed representation of the alternator wiring connections
- Helps with troubleshooting electrical problems
- Avoids guesswork and trial and error
- Ensures proper installation and routing of wires
- Provides understanding of the specific functions of each wire
- Facilitates modifications or upgrades to the electrical system
In conclusion, having a 1997 Dodge Ram 1500 alternator wiring diagram is essential for maintaining and troubleshooting your vehicle’s electrical system. It provides a visual representation of the wiring connections, helps with troubleshooting and repairs, and ensures proper installation and routing of wires. By understanding the functions of each wire, you can accurately diagnose and fix any electrical issues that may arise. Don’t overlook the importance of having a wiring diagram for your alternator.
Understanding the Basics of the Alternator Wiring System
The alternator is an essential component of a vehicle’s electrical system. Its primary function is to convert mechanical energy into electrical energy, which powers the various electrical components of the vehicle. Understanding the basics of the alternator wiring system is crucial for troubleshooting and repairing any issues related to the electrical system.
Alternator Wiring Diagram
The alternator wiring diagram provides a visual representation of the connections and circuits involved in the alternator system. It shows how the alternator is connected to the battery, the various electrical components, and the vehicle’s grounding system. This diagram is essential for understanding the flow of electrical current and identifying any potential issues or faults.
Key Components
- Alternator: The alternator is the main component of the electrical system. It consists of a rotor, stator, and diode bridge, which work together to generate electrical energy.
- Battery: The battery stores the electrical energy produced by the alternator and provides power to start the engine and operate the vehicle’s electrical systems when the engine is off.
- Wiring Harness: The wiring harness connects the alternator to the battery and distributes electrical power to the various components of the vehicle.
- Regulator: The regulator controls the voltage output of the alternator to ensure a steady supply of electrical power.
Common Issues
Some common issues with the alternator wiring system include loose or corroded connections, damaged wiring harness, faulty regulator, or a defective alternator. These issues can result in various problems, such as dim headlights, a drained battery, or electrical component failure.
Troubleshooting and Repair
When troubleshooting the alternator wiring system, it is essential to start by checking the connections and ensuring they are tight and free of corrosion. Inspecting the wiring harness for any visible damage is also crucial. If the wiring and connections appear to be in good condition, further testing with a multimeter may be required to determine if the alternator, regulator, or battery is at fault.
Overall, understanding the basics of the alternator wiring system is essential for maintaining and repairing a vehicle’s electrical system. Regular inspection and proper maintenance can help prevent issues and ensure the reliable operation of the vehicle’s electrical components.
Common Issues with the Alternator Wiring in a 1997 Dodge Ram 1500
When it comes to the electrical system in a vehicle, the alternator plays a vital role in supplying power to the various electrical components. In the case of a 1997 Dodge Ram 1500, the alternator wiring can sometimes be a source of issues that can cause problems with the charging system and overall performance of the vehicle.
One common issue with the alternator wiring in a 1997 Dodge Ram 1500 is the presence of loose or corroded connections. Over time, the electrical connections can become loose or corroded, leading to a poor electrical connection. This can result in a weak charging system, causing the battery to not receive enough power and potentially leading to a dead battery or difficulties starting the vehicle.
Another issue that can arise with the alternator wiring is damage to the wiring harness itself. The wiring harness is responsible for carrying the electrical current from the alternator to the battery and other electrical components. If the wiring harness becomes damaged, it can cause a disruption in the electrical flow, resulting in a malfunctioning charging system. Common causes of wiring harness damage include wear and tear, corrosion, and physical damage from accidents or improper installation.
To address these issues with the alternator wiring in a 1997 Dodge Ram 1500, it is important to regularly inspect the connections and wiring harness for any signs of damage, corrosion, or looseness. If any issues are identified, they should be addressed and repaired promptly to ensure the proper functioning of the charging system.
- Check the electrical connections for tightness and clean any corrosion.
- Inspect the wiring harness for any signs of damage and repair or replace as necessary.
- Consider upgrading to a higher-quality wiring harness to reduce the risk of future issues.
- Regularly test the charging system to ensure it is operating at the correct voltage levels.
By addressing these common issues with the alternator wiring in a 1997 Dodge Ram 1500, owners can ensure that their vehicle’s electrical system is functioning correctly and avoid potential problems with the charging system and battery performance.
How to Interpret and Use a 1997 Dodge Ram 1500 Alternator Wiring Diagram
When working with the electrical system of a 1997 Dodge Ram 1500, it is important to have a clear understanding of the alternator wiring diagram. This diagram provides a visual representation of the electrical connections and components involved in the alternator system of the vehicle. By interpreting and understanding this diagram, you can effectively diagnose and troubleshoot any issues that may arise with the alternator.
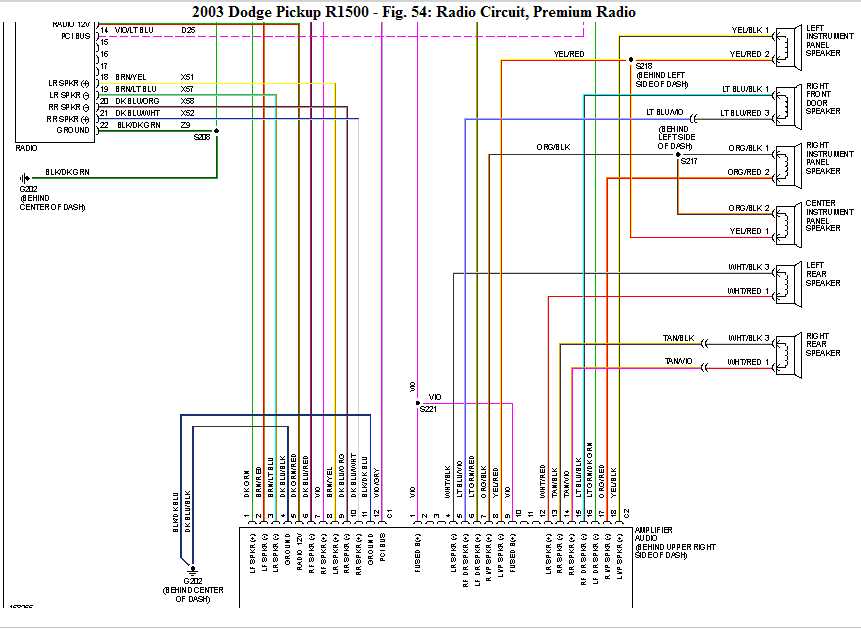
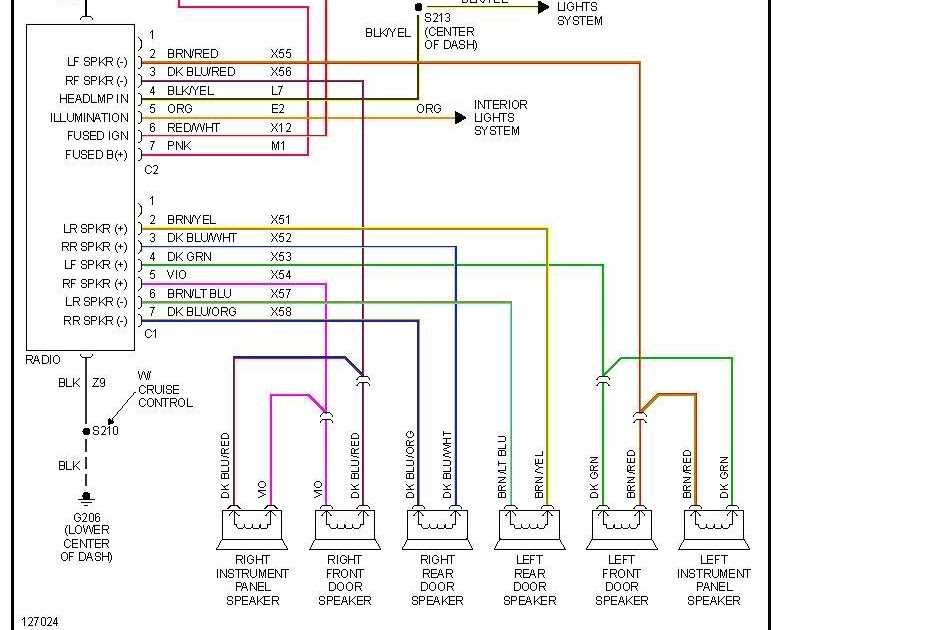
The alternator wiring diagram typically includes information such as wire colors, wire sizes, and the locations and connections of various electrical components. It may also indicate the voltage and amperage ratings of the alternator and other related components. This diagram serves as a guide for technicians and DIY enthusiasts alike, allowing them to identify the correct wires and connections, and ensuring a proper installation or repair.
One key aspect of interpreting an alternator wiring diagram is understanding the different symbols and markings used. Typically, solid lines represent direct electrical connections, while dashed lines indicate optional or variable connections. Arrows may be used to indicate the flow of electrical current or signal. Additionally, labels and numbering may be present to identify specific wires or components, making it easier to follow the diagram and make the necessary connections.
Using a 1997 Dodge Ram 1500 alternator wiring diagram can greatly simplify the process of troubleshooting electrical issues. By referring to the diagram, you can quickly identify potential problem areas, such as loose connections, damaged wires, or faulty components. It can also provide guidance on the proper sequence of connections when installing a new alternator or making repairs to the existing system.
In summary, a 1997 Dodge Ram 1500 alternator wiring diagram is a valuable tool for understanding and working with the electrical system of the vehicle. By studying the diagram and familiarizing yourself with its symbols and markings, you can effectively diagnose and resolve any issues that may arise with the alternator. This can save time and effort, ensuring that the electrical system operates smoothly and reliably.
Step-by-Step Guide to Troubleshooting and Repairing Alternator Wiring Problems

When it comes to your vehicle’s electrical system, the alternator plays a crucial role in keeping the battery charged and providing power to various electrical components. However, alternator wiring problems can arise, causing issues with the charging system and leading to a dead battery or unreliable electrical performance. Follow these steps to troubleshoot and repair alternator wiring problems in your 1997 Dodge Ram 1500.
Step 1: Check the Battery
Before diving into the alternator wiring, start by checking the battery’s condition. Use a voltmeter to measure the battery’s voltage. A fully charged battery should read around 12.6 volts. If the voltage is significantly lower, recharge or replace the battery. A weak battery can put additional strain on the alternator and impact its performance.
Step 2: Inspect the Alternator Wiring
Next, visually inspect the alternator wiring for any signs of damage or loose connections. Look for frayed wires, melted insulation, or corroded terminals. Pay close attention to the wires connected to the alternator, voltage regulator, and the main power distribution center. Any visible issues should be repaired or replaced to ensure proper electrical flow.
Step 3: Test the Alternator Output
Using a multimeter, test the alternator’s output voltage. Start the vehicle and let it idle, then connect the multimeter’s positive lead to the alternator’s positive output terminal and the negative lead to a good ground. Ideally, the alternator should produce a voltage around 13.5 to 14.5 volts. If the output falls outside this range, the alternator may need to be repaired or replaced.
Step 4: Check the Alternator Belt
A loose or worn alternator belt can cause insufficient charging and electrical issues. Inspect the belt for any signs of wear or looseness. Check the tension by applying pressure to the belt midway between the alternator and crankshaft pulleys. If the belt deflects more than 1/2 inch, it needs to be tightened or replaced. A properly tensioned belt ensures the alternator rotates at the correct speed to generate sufficient power.
Step 5: Test the Voltage Regulator
The voltage regulator is responsible for controlling the alternator’s output voltage. To test the voltage regulator, turn off the vehicle and disconnect the alternator’s wiring harness. Start the engine and measure the voltage on the harness side of the disconnected plug. It should read around 12 volts. If the voltage is significantly higher or lower, the voltage regulator may need to be replaced.
By following these steps, you can effectively troubleshoot and repair alternator wiring problems in your 1997 Dodge Ram 1500. Remember to exercise caution when working with electrical components and consult a professional if you are unsure about any steps or procedures.
Important Tips for Maintaining the Alternator Wiring System in Your 1997 Dodge Ram 1500
Maintaining the alternator wiring system in your 1997 Dodge Ram 1500 is essential for the overall performance and reliability of your vehicle. Proper care and maintenance of the wiring system can prevent potential electrical issues and ensure a smooth and trouble-free driving experience. Here are some important tips to help you maintain the alternator wiring system in your Dodge Ram 1500.
1. Regular Inspection
Regularly inspect the wiring connections and harnesses associated with the alternator. Look for any signs of damage, such as frayed wires, loose connections, or corrosion. If any issues are found, make sure to address them immediately. Tighten loose connections and replace any damaged or corroded wires to prevent further problems.
2. Cleanliness
Keep the alternator wiring system clean and free from dirt, debris, and grime. Accumulation of dirt and contaminants can affect the electrical conductivity and cause issues with the alternator and battery. Use a soft brush or cloth to remove any dirt or debris from the wiring system regularly.
3. Proper Grounding
Ensure that the alternator is properly grounded to the vehicle’s chassis. A poor or loose ground connection can lead to electrical problems and reduce the performance of the alternator. Check the grounding wire and connection for any signs of damage or looseness. If necessary, clean and tighten the ground connection to ensure a solid connection.
4. Avoid Overloading
Avoid overloading the alternator by adding excessive electrical accessories or upgrading the vehicle’s electrical system without considering the alternator’s capacity. Excessive load on the alternator can lead to overheating and premature failure. If you plan to add additional electrical components, consider upgrading the alternator to a higher capacity model to handle the increased load.
5. Regular Battery Maintenance

Proper maintenance of the vehicle’s battery is crucial for the overall health of the alternator wiring system. Ensure that the battery terminals are clean and tightly connected. Regularly check the battery’s electrolyte level, and if necessary, top-up with distilled water. A well-maintained battery can reduce the strain on the alternator and prolong its lifespan.
By following these important tips, you can ensure the proper functioning and longevity of the alternator wiring system in your 1997 Dodge Ram 1500. Regular inspection, cleanliness, proper grounding, avoiding overloading, and maintaining the battery will help prevent potential electrical issues and keep your vehicle running smoothly for years to come.
Where to Find and Download a 1997 Dodge Ram 1500 Alternator Wiring Diagram
If you own a 1997 Dodge Ram 1500 and need access to the alternator wiring diagram, this article will guide you on where to find and download it. Having a wiring diagram can be extremely helpful when diagnosing and troubleshooting electrical issues in your vehicle.
1. Online Forums and Communities: One of the best places to find wiring diagrams for older vehicles like the 1997 Dodge Ram 1500 is online forums and communities dedicated to Dodge trucks. These forums are filled with knowledgeable enthusiasts who can help you find the exact wiring diagram you need. You can search through the threads or post a question requesting the diagram.
2. Dodge Ram Repair Manuals: Another reliable source for wiring diagrams is a Dodge Ram repair manual. These manuals are available for purchase online or at auto parts stores. They contain step-by-step instructions, diagrams, and other valuable information for repairing and maintaining your specific vehicle model. Look for a manual that covers the 1997 Dodge Ram 1500 and includes wiring diagrams.
3. Online Vehicle Repair Websites: There are several online vehicle repair websites that offer access to wiring diagrams for various vehicles, including the 1997 Dodge Ram 1500. Some websites require a subscription or payment for access, while others may offer free diagrams. Search for reputable websites that specialize in Dodge Ram repairs and offer wiring diagrams for your specific model year.
4. Manufacturer Websites: Check the official websites of Dodge or their authorized service providers. Sometimes, they provide free access to certain repair information, including wiring diagrams. Navigate through their online resources or contact their customer support for assistance.
In conclusion, to find and download a 1997 Dodge Ram 1500 alternator wiring diagram, consider exploring online forums, Dodge Ram repair manuals, online vehicle repair websites, and manufacturer websites. Having a wiring diagram at your disposal can simplify the process of troubleshooting electrical issues in your vehicle and can save you time and money on repairs.