
If you are experiencing issues with your 2001 Toyota Echo’s alternator belt, it is important to understand how it is supposed to be properly installed. The alternator belt is responsible for transferring power from the engine to the alternator, which charges the vehicle’s battery and powers the electrical system. Without a properly functioning alternator belt, your car may experience a decrease in electrical power or even a complete loss of power. In this article, we will provide a detailed diagram of the 2001 Toyota Echo’s alternator belt, as well as step-by-step instructions on how to install it correctly.
Step 1: Locate the alternator and the belt tensioner. The alternator is typically located near the bottom of the engine, on the passenger side. The belt tensioner is a pulley that applies pressure to the belt, keeping it tight and properly aligned.
Step 2: Using a wrench or socket, rotate the belt tensioner counterclockwise to relieve tension on the belt. This will allow you to remove the old belt from the alternator pulley.
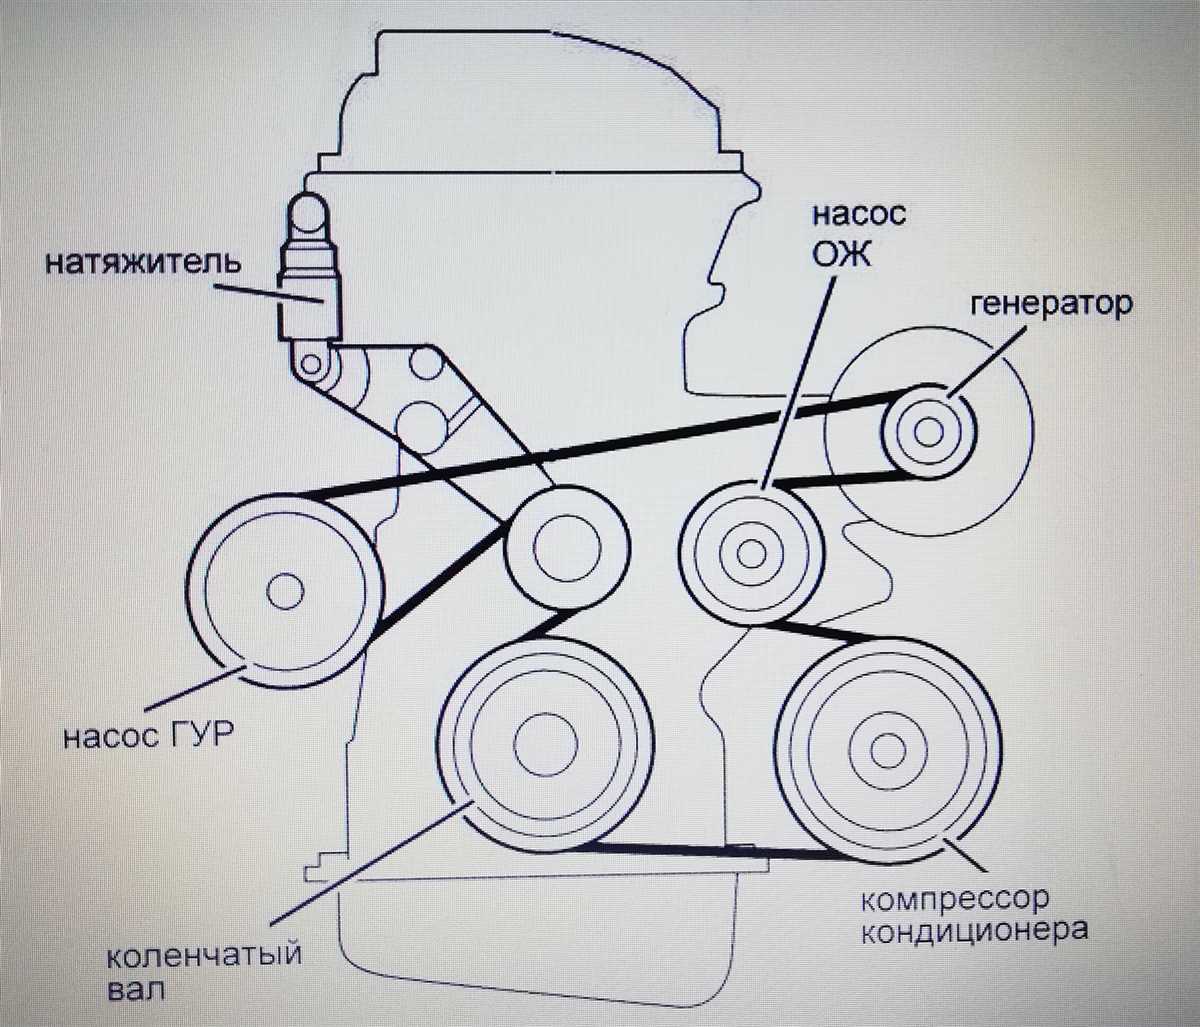
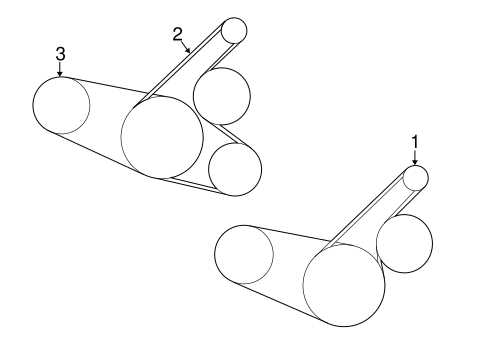
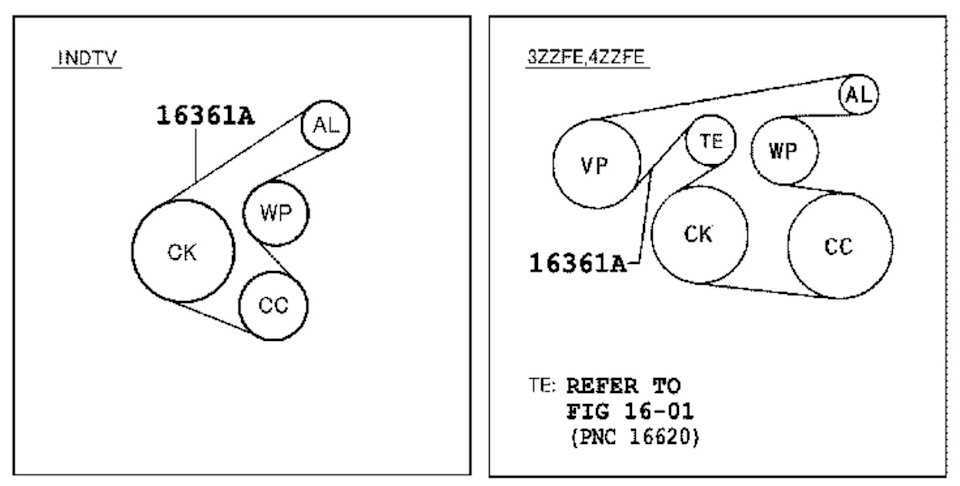
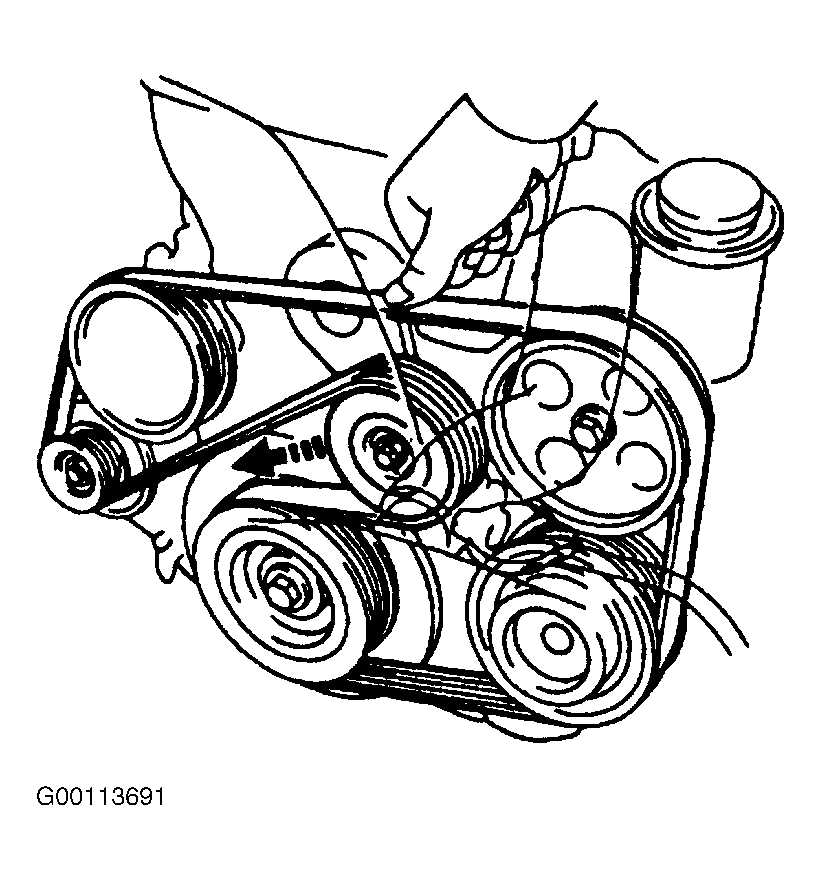
Step 3: Refer to the diagram provided for the correct routing of the new alternator belt. Make sure the belt is properly threaded around each pulley, following the diagram closely.
Step 4: Once the belt is properly routed, use the wrench or socket to rotate the belt tensioner clockwise. This will apply tension to the belt, ensuring a tight fit.
Step 5: Double-check the alignment of the belt and make any necessary adjustments. The belt should be centered on each pulley and should not have any visible signs of wear or damage.
By following these steps and referring to the provided diagram, you can easily install a new alternator belt on your 2001 Toyota Echo. If you are unsure or uncomfortable performing this task yourself, it is always recommended to consult a professional mechanic.
How to Replace the Alternator Belt on a 2001 Toyota Echo
If you’re experiencing issues with your 2001 Toyota Echo’s alternator belt, such as squeaks, slipping, or visible signs of wear, it’s important to replace it promptly to ensure the proper functioning of your vehicle’s electrical system. Here’s a step-by-step guide on how to replace the alternator belt on a 2001 Toyota Echo.
1. Gather the necessary tools and materials:
- New alternator belt
- Socket wrench set
- Tensioner pulley tool
2. Locate the alternator and tensioner pulley:
The alternator is typically located towards the front of the engine, and the tensioner pulley will be nearby. Refer to your vehicle’s owner’s manual or a diagram for the exact location.
3. Loosen the tension on the old belt:
- Insert the tensioner pulley tool into the square hole on the tensioner pulley.
- Rotate the tool counterclockwise to relieve tension on the belt.
- Slide the old belt off the pulleys.
4. Install the new alternator belt:
- Route the new belt around the various pulleys, following the diagram or the markings on the engine.
- Ensure the belt is properly seated on each pulley.
5. Apply tension to the new belt:
- Insert the tensioner pulley tool into the square hole on the tensioner pulley.
- Rotate the tool clockwise to apply tension to the belt.
- Check the belt’s tension by pressing down on it with your thumb. It should have about ½ inch of deflection.
6. Double-check the belt’s alignment:
Make sure the belt is aligned properly on each pulley and that it is sitting in the grooves correctly. Misalignment can cause premature wear and failure of the belt.
7. Start the engine and check for proper belt operation:
With the engine running, visually inspect the belt to make sure it is traveling smoothly and not slipping or squeaking. If any issues are present, you may need to readjust the belt tension.
By following these steps, you should be able to successfully replace the alternator belt on your 2001 Toyota Echo. However, if you’re unsure or uncomfortable performing this task yourself, it’s always recommended to seek the assistance of a professional mechanic.
Step 1: Prepare the Tools and Materials
Before starting the process of replacing the alternator belt on a 2001 Toyota Echo, it is important to gather all the necessary tools and materials. Having everything ready and easily accessible will make the task go smoother and more efficiently.
Here is a list of the tools and materials that you will need:
- Ratchet and Socket Set: A ratchet and socket set will be required to loosen and remove the bolts holding the old alternator belt.
- New Alternator Belt: It is essential to have a new alternator belt that is compatible with your Toyota Echo model and year.
- Belt Tensioner Tool: A belt tensioner tool is necessary to release the tension on the old belt and install the new one.
- Serpentine Belt Diagram: It is helpful to have a serpentine belt diagram specific to your Toyota Echo model. This diagram will illustrate the correct path and placement of the new alternator belt.
- Gloves and Safety Glasses: Wearing gloves and safety glasses is recommended to protect your hands and eyes during the replacement process.
By making sure you have all the necessary tools and materials beforehand, you can avoid any unnecessary delays or interruptions during the alternator belt replacement process.
Step 2: Locate the Alternator Belt
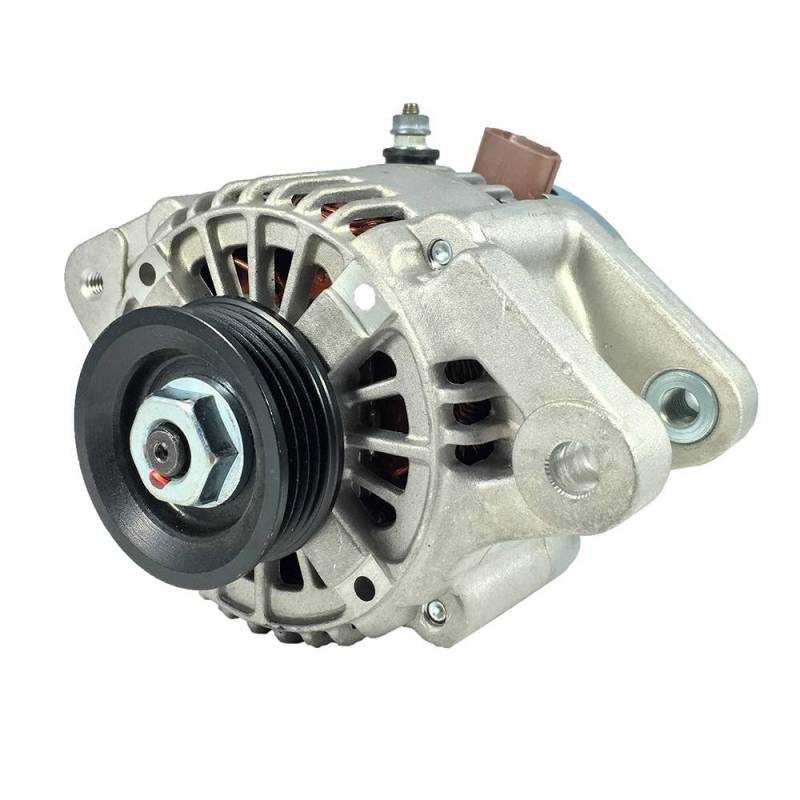
Next, you will need to locate the alternator belt on your 2001 Toyota Echo. The alternator belt is a key component in the charging system of your vehicle, as it transfers power from the engine to the alternator, which then generates electricity to power the electrical components of your car.
To locate the alternator belt, you will need to open the hood of your car and prop it open securely. The alternator is typically located on the side of the engine and is connected to various other components, such as the power steering pump or air conditioning compressor. Look for a pulley that is connected to the alternator; this is where the belt will be installed.
Note: It is recommended to refer to your vehicle’s owner’s manual or a repair manual specific to your make and model for detailed instructions and diagrams, as the exact location of the alternator and belt may vary depending on your car’s configuration.
Once you have located the alternator and the pulley, inspect the belt for any signs of wear or damage. Common signs of a worn or damaged alternator belt include cracks, fraying, or glazing on the belt’s surface. If you notice any of these signs, it is recommended to replace the belt to ensure proper functioning of the charging system.
Pro Tip: It is a good idea to check the condition of the alternator belt periodically as part of your regular vehicle maintenance routine. This will help you catch any issues early on and prevent potential breakdowns.
Step 3: Loosen and Remove the Old Alternator Belt
Now that you have located the alternator and identified the tensioner pulley, it’s time to loosen and remove the old alternator belt. Here are the steps to follow:
1. Disconnect the negative battery cable: Before working on the alternator, it’s important to disconnect the negative battery cable to prevent any electrical accidents or damage.
2. Locate the tensioner pulley: Use the belt diagram or the marking on the engine to locate the tensioner pulley. The tensioner pulley is responsible for keeping the alternator belt tight. It usually has a square hole in the middle for a ratchet or breaker bar to fit into.
3. Loosen the tensioner pulley: Insert the ratchet or breaker bar into the square hole of the tensioner pulley and turn it counterclockwise. This will release the tension on the alternator belt, making it easier to remove.
4. Slide the old belt off the pulleys: With the tension released, slide the old alternator belt off the pulleys, making sure to remember the exact routing of the belt. It may help to take a picture or draw a diagram to reference during reinstallation.
5. Inspect the old belt for wear: Take a moment to inspect the old alternator belt for any signs of wear, cracking, or damage. If the belt shows any signs of deterioration, replace it with a new one to ensure optimal performance.
6. Clean the pulleys: Before installing the new alternator belt, clean the pulleys with a rag or brush to remove any dirt or debris. This will help ensure proper belt traction and prevent slippage.
7. Install the new alternator belt: Referencing the belt diagram or your previous notes, route the new alternator belt around the pulleys, making sure it follows the correct path. Use the tensioner pulley to apply tension to the belt, then tighten it by turning the ratchet or breaker bar clockwise.
By following these steps, you will be able to loosen and remove the old alternator belt on your 2001 Toyota Echo and prepare to install a new one. Remember to refer to a belt diagram or create a visual reference to ensure proper belt routing during the installation process.
Step 4: Install the New Alternator Belt
Now that you have removed the old alternator belt, it’s time to install the new one. Make sure to use a belt that is compatible with your 2001 Toyota Echo model.
- Begin by threading the new belt through the various pulleys, following the diagram provided in your vehicle’s manual or the label under the hood. The belt should fit snugly around each pulley.
- To adjust the tension of the belt, locate the belt tensioner. This is usually a small pulley that can be pressed or turned to create tension. Use a wrench or socket to apply pressure or turn the tensioner in the appropriate direction, making sure the belt is tight.
- Once the belt is properly tensioned, give it a visual inspection to ensure it is properly aligned and seated on each pulley. Double-check the diagram or label to make sure you have routed the belt correctly.
- Start the engine and let it run for a few minutes to make sure the belt is functioning properly. Listen for any unusual noises or vibrations that may indicate a problem. If everything sounds and feels normal, you have successfully installed the new alternator belt.
Remember to always refer to your vehicle’s manual or consult a professional if you have any doubts or concerns during the installation process to avoid any potential damage to your vehicle.
Step 5: Tighten the Alternator Belt
After aligning the alternator belt and adjusting its tension, the final step is to tighten the belt. This ensures that it is securely in place and will function properly when the engine is running. Follow these steps to tighten the alternator belt:
- Using a wrench or socket, locate the bolt that adjusts the tension of the alternator belt.
- Rotate the bolt clockwise to tighten the belt. Be careful not to overtighten the belt, as this can cause damage to the belt or the pulleys.
- Check the belt tension by pushing down on the belt with your finger. The belt should have a slight give, but not be overly loose.
- If the belt is too loose, continue to tighten the bolt until the proper tension is achieved.
- Once the belt is tightened to the correct tension, double check the alignment and tension of the belt to ensure it is properly installed.
Tightening the alternator belt is an important step in the installation process. A properly tensioned belt will prevent slipping and ensure that the alternator is functioning optimally. This will help to avoid potential electrical issues and ensure the longevity of the alternator system.
Q&A:
What is step 5 of tightening the alternator belt?
Step 5 is about tightening the alternator belt.
How do you tighten the alternator belt in step 5?
In step 5, you tighten the alternator belt using a wrench or socket to adjust the tensioner pulley.
Why is it necessary to tighten the alternator belt in step 5?
It is necessary to tighten the alternator belt in step 5 to ensure proper operation and prevent slipping or squeaking.
What tools are needed to tighten the alternator belt in step 5?
The tools needed to tighten the alternator belt in step 5 include a wrench or socket for adjusting the tensioner pulley.
What should be the correct tension of the alternator belt in step 5?
The correct tension of the alternator belt in step 5 should be specified by the manufacturer’s guidelines of the vehicle.
What is the purpose of tightening the alternator belt?
The alternator belt needs to be tightened in order to ensure that it is properly engaged with the pulleys and can effectively drive the alternator. If the belt is loose, it may slip or squeal, resulting in decreased charging performance or even total failure of the alternator.
How do I tighten the alternator belt?
To tighten the alternator belt, you will need to locate the adjusting bolt or tensioner pulley that is connected to the alternator. Using a wrench or socket, you can turn the bolt or adjust the tensioner to increase or decrease the tension on the belt. Once the desired tension is achieved, you can tighten any lock nuts or bolts on the adjusting mechanism to secure the belt in place.