
When it comes to upgrading the sound system in your 2010 Dodge Avenger, a crucial component to consider is the stereo wiring harness. The wiring harness is what allows you to connect your new stereo to the existing electrical system in your vehicle, ensuring that all the necessary connections are made and that your new stereo functions properly.
The 2010 Dodge Avenger stereo wiring harness is specifically designed to fit your vehicle and make the installation process as seamless as possible. It provides a plug-and-play solution, allowing you to simply connect the harness to the factory wiring and then connect it to your new stereo. This eliminates the need for any cutting or splicing of wires, which can be time-consuming and potentially damage your vehicle’s electrical system.
In addition to making the installation process easier, the stereo wiring harness also ensures that your new stereo receives the correct power and audio signals. It is designed to match the electrical specifications of your vehicle, providing a reliable and high-quality connection. This means that you can enjoy the full functionality of your new stereo, including features like Bluetooth connectivity, USB ports, and enhanced sound quality.
Overall, investing in a 2010 Dodge Avenger stereo wiring harness is a smart choice when upgrading your vehicle’s sound system. It not only simplifies the installation process but also ensures that your new stereo performs optimally. With the right harness, you can enjoy an enhanced audio experience while driving your 2010 Dodge Avenger.
How to Install a Stereo Wiring Harness on a 2010 Dodge Avenger
Installing a stereo wiring harness on a 2010 Dodge Avenger is a relatively straightforward process that allows you to upgrade the audio system in your vehicle. A stereo wiring harness is necessary to connect a new aftermarket stereo to the existing wiring in your car.
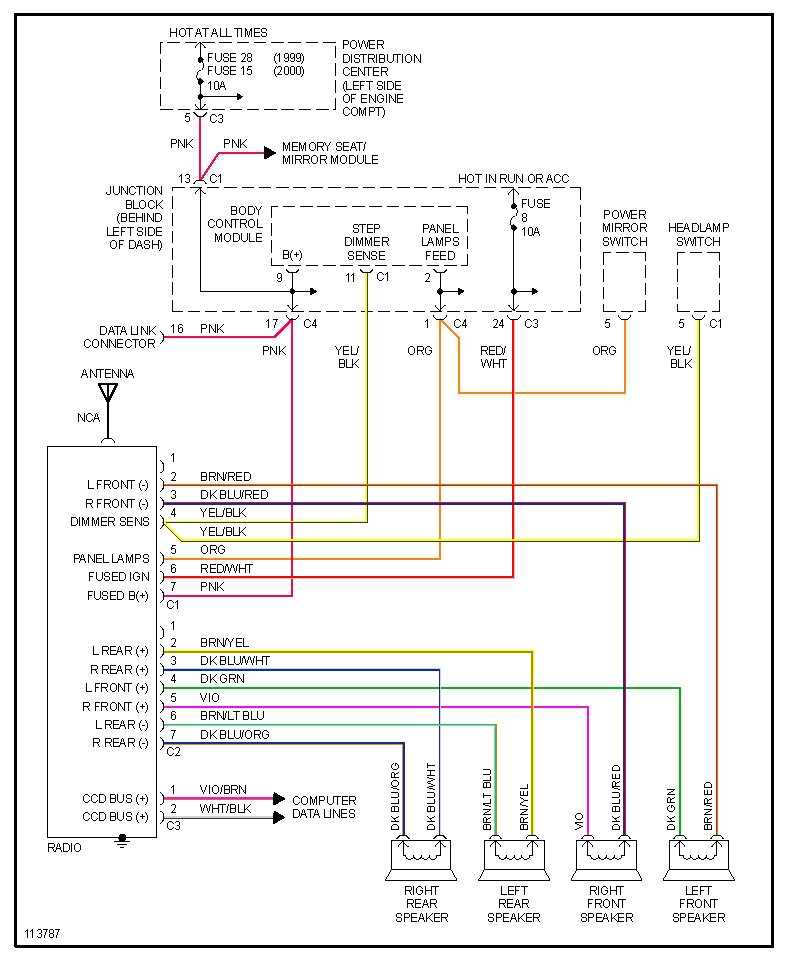
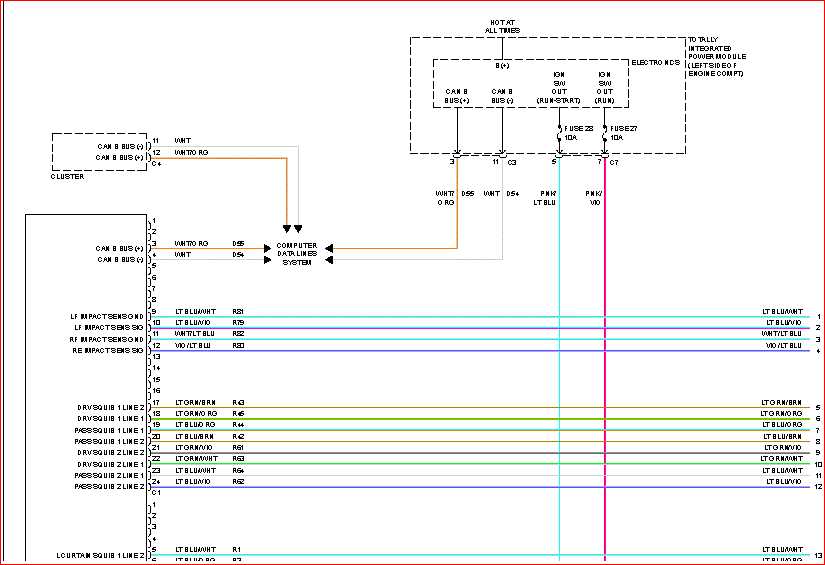
To begin the installation process, gather all the necessary tools and materials. You will need a stereo wiring harness specific to your make and model, wire connectors, and a basic set of hand tools. It is also useful to have a wiring diagram for your specific vehicle’s stereo system.
Step 1: Disconnect the negative terminal of the car battery to prevent any electrical mishaps during the installation process. This will ensure that you can work on the wiring without any risk of short circuits or damage to the electronics.
Step 2: Remove the existing stereo from the dashboard using the appropriate tools. This may involve removing trim pieces, unscrewing mounting brackets, or using a specially designed stereo removal tool. Refer to your vehicle’s manual or a car audio installation guide for specific instructions.
Step 3: Identify the factory wiring harness in your Dodge Avenger. This is the group of wires that are currently connected to the back of the stock stereo. Carefully disconnect the wires from the factory harness and set them aside.
Step 4: Connect the ends of the stereo wiring harness to the corresponding wires in your Dodge Avenger. Match the wire colors and use wire connectors to join them securely. Refer to the wiring diagram or the instructions provided with the harness to ensure proper connections.
Step 5: Once all the connections are made, test the stereo system by turning on the ignition and checking for proper functionality. Ensure that all speakers are producing sound and that all controls are working as expected.
Step 6: If everything is working correctly, secure the new stereo and wiring harness in the dashboard using the appropriate mounting brackets and hardware. Make sure the stereo is properly aligned and that all connections are secure.
By following these steps, you can install a stereo wiring harness on your 2010 Dodge Avenger and enjoy an upgraded audio system in your vehicle. Remember to double-check all connections and follow the wiring diagram or instructions provided with the harness for best results.
Overview
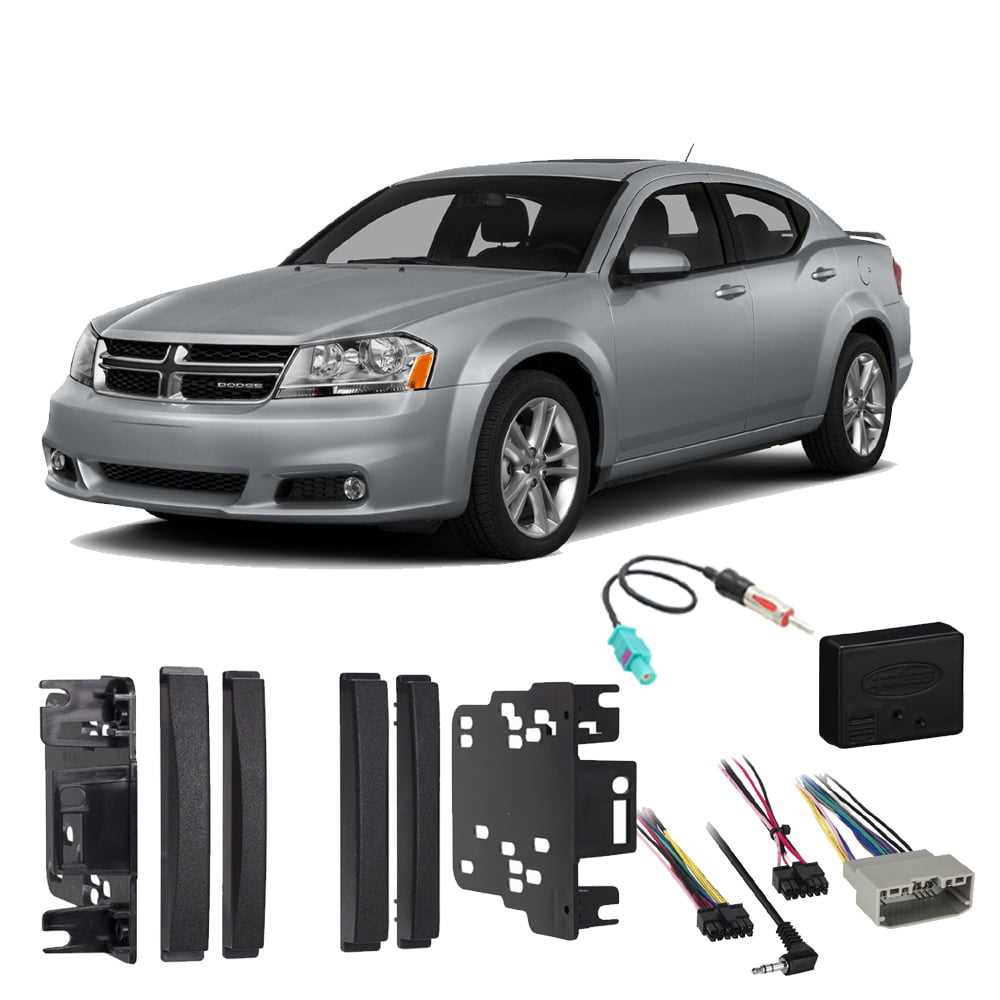
The 2010 Dodge Avenger comes with a factory stereo system, but many car owners may want to upgrade their audio experience by installing an aftermarket stereo. In order to properly install an aftermarket stereo, a wiring harness is needed to connect the new stereo to the car’s existing wiring system. The wiring harness essentially serves as an adapter, allowing for a seamless integration between the new stereo and the car’s electrical system.
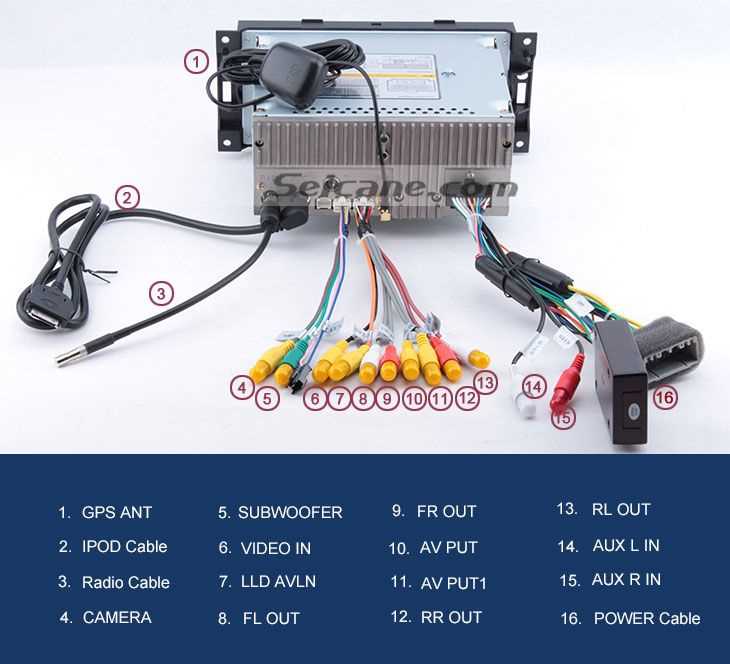
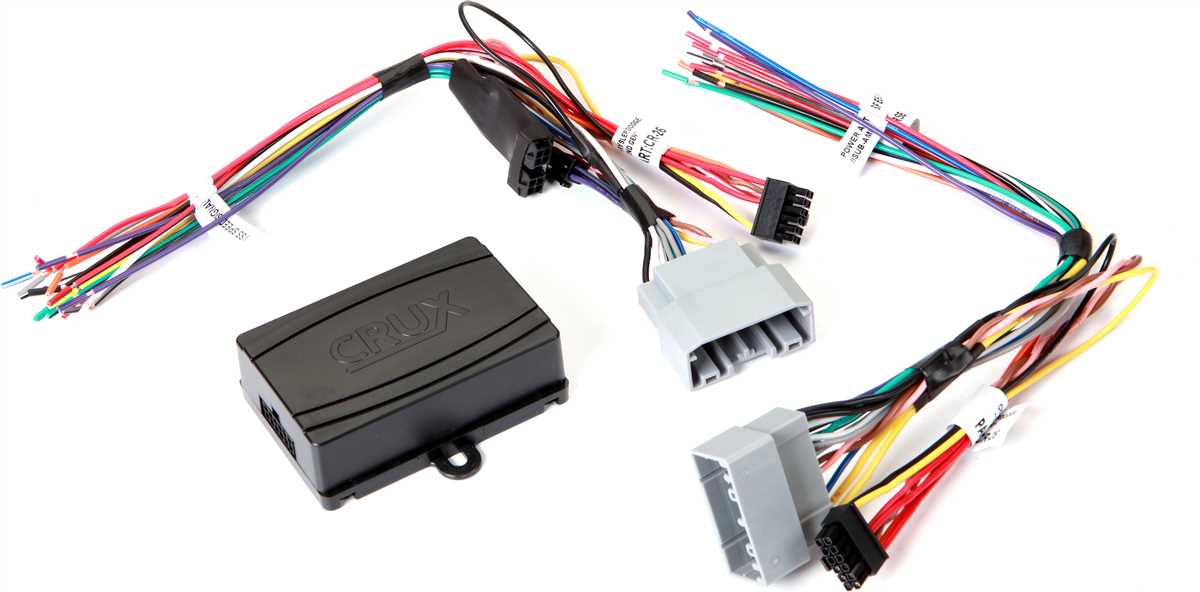
The 2010 Dodge Avenger stereo wiring harness consists of a set of connectors and wires that are specifically designed to fit the car’s wiring system. The harness is made up of various color-coded wires, each serving a specific purpose, such as powering the speakers or providing a signal for the radio. By using a wiring harness, car owners can easily connect their aftermarket stereo to their car without the need for any cutting or splicing of wires.
Installing a stereo wiring harness is a relatively simple process that can be done by most car owners, even those with limited knowledge of car electronics. The harness typically comes with detailed instructions that guide users through the installation process. It is important to ensure that the wiring harness is compatible with the specific make and model of the car, as different cars may require different types of harnesses.
Overall, a 2010 Dodge Avenger stereo wiring harness is an essential component for upgrading the car’s audio system. It allows car owners to easily and seamlessly install an aftermarket stereo, enhancing their audio experience while maintaining the integrity of the car’s electrical system.
Step 1: Gather the Necessary Tools and Materials
Before you begin installing a new stereo wiring harness in your 2010 Dodge Avenger, it is crucial to gather all the necessary tools and materials. Having everything prepared beforehand will make the installation process much smoother and efficient.
Here is a list of tools and materials that you will need:
- Wire harness adapter: This is a must-have item as it allows you to connect the new stereo to the existing wiring in your car without cutting or splicing any wires.
- Wire strippers: These are essential for removing the insulation from the wires and ensuring a clean connection.
- Electrical tape: This will be used to secure the connections and insulate any exposed wires.
- Butt connectors: These connectors are used to join two wires together securely.
- Phillips screwdriver: This tool is needed to remove any screws that are holding the old stereo in place.
- Panel removal tool: This tool will help you safely remove the trim panels without causing damage to the interior of your car.
- Socket wrench set: You may need this tool to remove any additional brackets or screws that are holding the stereo or bezel in place.
By having all of these tools and materials ready, you will be well-prepared to tackle the installation process and ensure a successful outcome. Remember to follow the specific instructions provided with your stereo wiring harness for the best results.
Step 2: Disconnect the Negative Battery Terminal

Before starting any electrical work on your 2010 Dodge Avenger stereo, it is crucial to disconnect the negative battery terminal to prevent any potential damage. Follow these steps to safely disconnect the negative battery terminal:
- Locate the negative terminal on your car battery. It is typically marked with a “-” symbol.
- Using a wrench or a socket, loosen the bolt that holds the negative terminal clamp in place.
- Slide the terminal clamp off the battery post and set it aside.
- Make sure the disconnected terminal does not make contact with the battery post to avoid accidental reconnection.
By disconnecting the negative battery terminal, you are cutting off the power source to your car’s electrical system. This step is essential to prevent any electrical mishaps or short circuits while working on the stereo wiring harness.
Remember to exercise caution and ensure your tools do not make contact with both the positive and negative terminals simultaneously to avoid any electrical shock.
Step 3: Remove the Factory Stereo
Removing the factory stereo from your 2010 Dodge Avenger is an essential step in installing a new stereo system. Here are the necessary steps to follow:
- Start by disconnecting the negative terminal of the car’s battery to prevent any electrical issues.
- Using a panel removal tool, carefully pry off the trim bezel around the stereo. Start from the edges and work your way around, being cautious not to damage any surrounding panels.
- Once the trim bezel is removed, you will see screws or bolts securing the stereo in place. Use a screwdriver or socket wrench to remove these fasteners.
- Gently pull the stereo towards you to expose the wiring harness at the back. You may need to use a wiring harness adapter to connect the new stereo to the factory wiring.
- Disconnect the wiring harness and antenna cable from the back of the factory stereo. Be careful not to yank on the wires, as this can cause damage.
- With the wiring disconnected, you can now fully remove the factory stereo from the dash. Store it safely in case you need it in the future.
Once the factory stereo is removed, you can proceed to the next step of the installation process, which involves connecting the wiring harness and installing the new stereo.
Step 4: Connect the Wiring Harness
Once you have removed the old stereo unit from your 2010 Dodge Avenger, the next step is to connect the wiring harness. The wiring harness allows you to easily connect your new stereo unit to the existing electrical system in your vehicle.
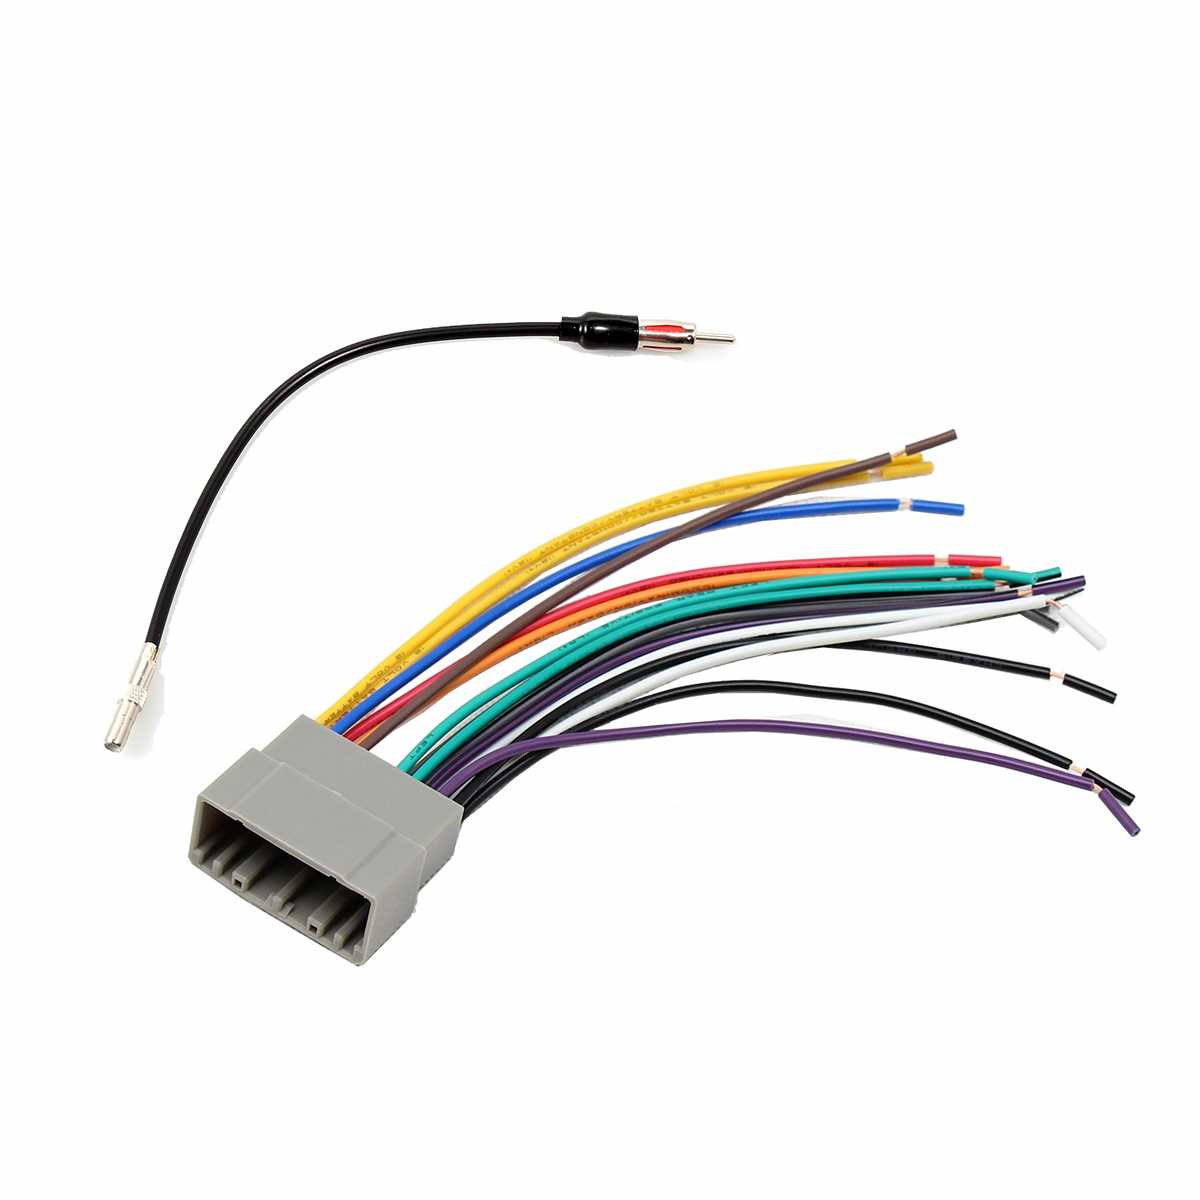
To begin, locate the wiring harness that came with your new stereo unit. This harness should have a series of color-coded wires that match up with the wires in your vehicle. Make sure to double-check the compatibility of the harness with your specific vehicle model.
Take the wiring harness and connect each wire to its corresponding wire in your vehicle’s wiring system. To do this, match the color-coded wires together, ensuring a secure and tight connection. You may need to use wire connectors or electrical tape to secure the connections and prevent any loose or exposed wires.
Once all the connections have been made, carefully tuck the wiring harness and its connected wires back into the dashboard. Make sure that there are no wires interfering with any moving parts or blocking the unit from fitting properly.
Before reinstalling the stereo unit, it’s important to double-check all the connections to ensure they are secure. Test the electrical functions of the stereo, such as power, sound, and controls, to ensure everything is working properly.
Once you are satisfied with the wiring harness connections and the functionality of the stereo unit, you can proceed to the next step of reinstalling the stereo unit back into the dashboard of your 2010 Dodge Avenger.
Step 5: Install the New Stereo
Once the wiring harness is connected correctly, you can proceed to install the new stereo in your 2010 Dodge Avenger. Follow these steps:
- Slide the new stereo into the dashboard slot, aligning it with the mounting brackets.
- Secure the stereo by tightening the screws or bolts provided in the installation kit.
- Reconnect the negative battery terminal to restore power to your vehicle.
After the new stereo is installed, turn on your vehicle and test the sound to ensure everything is working properly. If the sound is not coming out or you notice any issues, double-check the wiring connections and consult the stereo’s manual for troubleshooting steps.
Congratulations, you have successfully installed a new stereo in your 2010 Dodge Avenger! Enjoy your upgraded audio experience.