
If you own a 2015 Toyota Tacoma and are in need of a serpentine belt diagram, you’ve come to the right place. The serpentine belt plays an important role in the operation of your vehicle’s engine, helping to power various components such as the alternator, air conditioning compressor, and power steering pump. It is crucial to have the correct serpentine belt diagram in order to properly install or replace the belt to ensure proper functionality and performance.
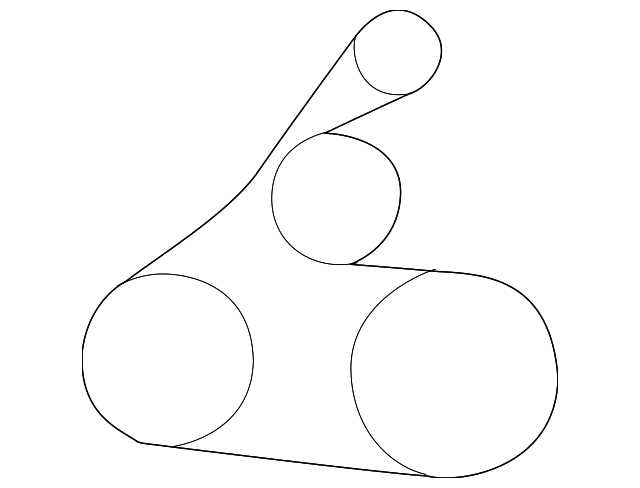
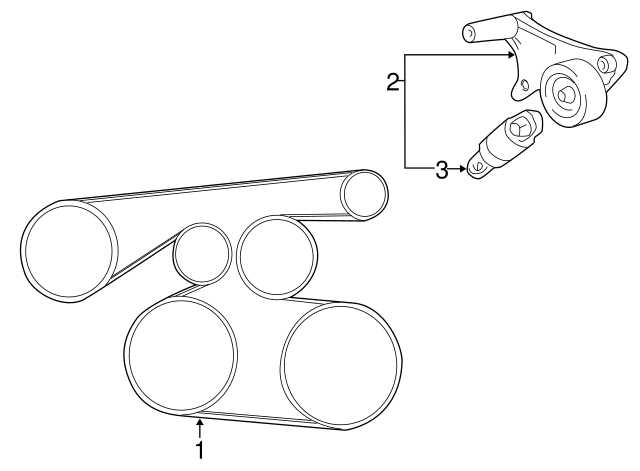
The 2015 Toyota Tacoma is equipped with a 4.0L V6 engine. The serpentine belt routing diagram for this engine is relatively simple and easy to follow. The diagram typically shows the path that the belt takes around various pulleys and accessories, helping to guide you during installation or replacement. By following the diagram correctly, you can avoid any potential issues that may arise from improper belt installation.
It’s important to note that the serpentine belt on the 2015 Toyota Tacoma should be inspected regularly for signs of wear or damage. Over time, the belt can become worn, cracked, or stretched, leading to decreased performance and potential belt failure. If you notice any issues with your serpentine belt, it is recommended to replace it as soon as possible to prevent further damage to your vehicle.
In conclusion, the serpentine belt diagram for the 2015 Toyota Tacoma is an important tool for proper installation or replacement of the belt. By following the diagram correctly, you can ensure the optimal performance of your vehicle’s engine. Regular inspection and maintenance of the serpentine belt is crucial to avoid any potential issues or failures. If you’re in need of a serpentine belt diagram for your 2015 Toyota Tacoma, be sure to consult the appropriate resources or seek assistance from a professional mechanic.
Toyota Tacoma Serpentine Belt Diagram: A Step-by-Step Guide for 2015 Model
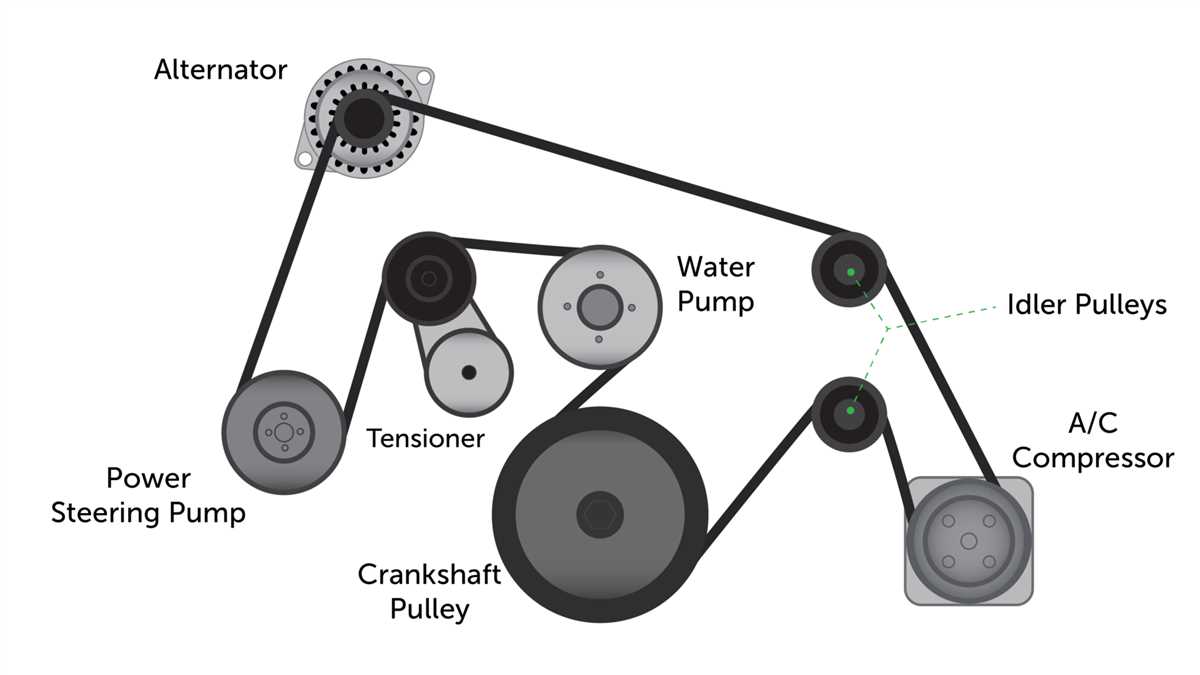
The serpentine belt in a 2015 Toyota Tacoma is an important component of the vehicle’s engine system. It is responsible for driving multiple engine accessories, such as the alternator, water pump, and power steering pump, by transmitting power from the engine’s crankshaft to these components. Over time, the serpentine belt may become worn or damaged, necessitating its replacement. To ensure proper installation and alignment of the new belt, it is crucial to consult a serpentine belt diagram.
The 2015 Toyota Tacoma serpentine belt diagram provides a visual representation of the belt’s routing and how it wraps around the various engine accessories. This diagram is often found on a sticker located near the engine bay or in the owner’s manual. It is important to reference the specific diagram for the 2015 model, as belt configurations can vary between different years and engine options.
Here is a step-by-step guide to using the serpentine belt diagram for a 2015 Toyota Tacoma:
- Locate the serpentine belt diagram sticker or consult the owner’s manual.
- Note the specific routing of the belt and the position of each engine accessory.
- If necessary, use a wrench or socket set to loosen the tension on the belt tensioner and remove the old serpentine belt.
- Using the diagram as a reference, route the new serpentine belt around each engine accessory according to the proper configuration.
- If needed, use the belt tensioner to apply tension to the belt and ensure it is properly aligned.
- Inspect the belt for proper alignment and tension, making any necessary adjustments.
- Double-check the routing of the belt against the diagram to ensure accuracy.
- If everything is aligned correctly, tighten the belt tensioner to secure the new serpentine belt in place.
Following the serpentine belt diagram is essential to ensure the proper installation and functionality of the belt in a 2015 Toyota Tacoma. Failure to properly route the belt or adjust the tension can result in engine performance issues or premature belt failure. If unsure or uncomfortable with the process, it is recommended to consult a professional mechanic for assistance.
Step 1: Gather the Necessary Tools

Before you can begin replacing the serpentine belt on your 2015 Toyota Tacoma, you will need to gather a few essential tools. These tools will help make the process easier and ensure that you have everything you need to successfully complete the task.
Here is a list of the tools you will need:
- Ratchet and socket set: This will be used to remove the bolts holding the old serpentine belt in place.
- Breaker bar: This longer handle bar will provide extra leverage when loosening or tightening bolts.
- Belt tensioner tool: This specialized tool is designed to release tension from the belt tensioner, allowing you to remove and replace the belt.
- New serpentine belt: Make sure to purchase the correct belt for your specific make and model of Toyota Tacoma.
- Pen and paper: Use these to draw a diagram or take notes on the routing of the old belt before removing it, ensuring that you install the new belt correctly.
- Safety goggles and gloves: These will protect your eyes and hands from any potential debris or injury during the process.
Once you have gathered all of these tools, you will be ready to move on to the next step of the process, which involves releasing the tension on the old serpentine belt.
Step 2: Locate the Serpentine Belt Routing Diagram
Once you have identified the serpentine belt on your 2015 Toyota Tacoma, the next step is to locate the serpentine belt routing diagram. This diagram shows the exact path that the belt must follow in order to properly operate the various components of the engine.
To find the routing diagram, you can refer to your owner’s manual or look for a decal located somewhere in the engine compartment. This decal is typically located on the underside of the hood or on the front of the engine cover. It may also be found on the radiator support or in other visible locations.
When locating the serpentine belt routing diagram, it is important to note the direction of rotation for the belt. This information is usually specified on the diagram and must be followed in order to ensure proper operation of the engine components.
Once you have located the routing diagram, take a moment to familiarize yourself with the layout and the path that the belt must follow. This will help you during the installation process and ensure that you install the belt correctly.
In some cases, the routing diagram may be difficult to find or may not be present. If this is the case, you can try searching online or contacting a local Toyota dealership for assistance. They should be able to provide you with the correct routing diagram for your specific model and year of Tacoma.
Step 3: Release the Tension on the Serpentine Belt
Releasing the tension on the serpentine belt is an important step in the process of replacing it. It allows you to easily remove the belt from the pulleys without causing any damage. Here are the instructions to release the tension:
- Locate the belt tensioner, which is usually located near the top of the engine and is a pulley with a spring-loaded arm.
- Using a wrench or socket, rotate the tensioner in the opposite direction of its normal movement. This will relieve the tension on the belt.
- While holding the tensioner in the released position, carefully slide the belt off one of the pulleys.
- Slowly release the tensioner, allowing it to move back to its original position.
- Continue this process for each pulley until the belt is completely free from all of the pulleys.
It is important to note that some vehicles may require the use of a belt tensioner tool to release the tension. Refer to your vehicle’s manual or consult a professional if you are unsure of the proper method for your specific vehicle.
Step 4: Remove the Old Serpentine Belt
Once you have located the tensioner pulley and loosened the tension, you can begin the process of removing the old serpentine belt. Start by carefully sliding the belt off of one of the pulleys, making sure to keep your hands clear of any moving parts. It can be helpful to have a diagram or reference photo of the original belt route to ensure you install the new belt correctly.
Next, continue sliding the old belt off of each pulley one by one until it is completely free. Be sure to take note of how the old belt was routed so you can replicate the same path when installing the new belt. Inspect the old belt for any signs of damage or excessive wear, as this may indicate an underlying issue that needs to be addressed.
Once the old belt is removed, take a moment to clean any debris or dirt from the pulleys before installing the new belt. This will help ensure proper traction and reduce the risk of premature wear on the new belt.
Now that you have successfully removed the old serpentine belt, you can proceed to the next step of installing the new belt and adjusting the tension properly.
Step 5: Install the New Serpentine Belt
Now that you have removed the old serpentine belt, it’s time to install the new one. Follow these steps to ensure a proper installation:
- Refer to the diagram: Before installing the new serpentine belt, refer to the diagram or routing schematic provided by the manufacturer. This diagram will show you the correct routing of the belt around the various pulleys.
- Position the belt: Place the new serpentine belt around the pulleys according to the diagram. Make sure the belt is properly aligned and positioned over each pulley.
- Snap into place: Use a belt tensioner tool or a wrench to rotate the tensioner pulley and create slack in the belt. Once there is enough slack, carefully guide the belt over the tensioner pulley and release the tensioner. The tensioner will automatically adjust the tension of the belt.
- Verify the belt is properly seated: Double-check that the belt is properly seated on each pulley and aligned according to the diagram. Make sure there are no twists or misalignments.
- Test the belt: Start the engine and let it run for a few minutes to ensure that the new serpentine belt is functioning properly. Check for any abnormal noises, vibrations, or slipping.
With the new serpentine belt properly installed and functioning, you can be confident in the reliable performance of your 2015 Toyota Tacoma’s engine.