
When it comes to towing a trailer with your 2011 Chevy Silverado, having a proper wiring system is essential. The trailer wiring diagram provides a clear illustration of the electrical connections needed in order to safely tow a trailer. Whether you’re hauling a boat, camper, or cargo trailer, understanding the wiring diagram will ensure that your lights, brakes, and other electrical components function properly.
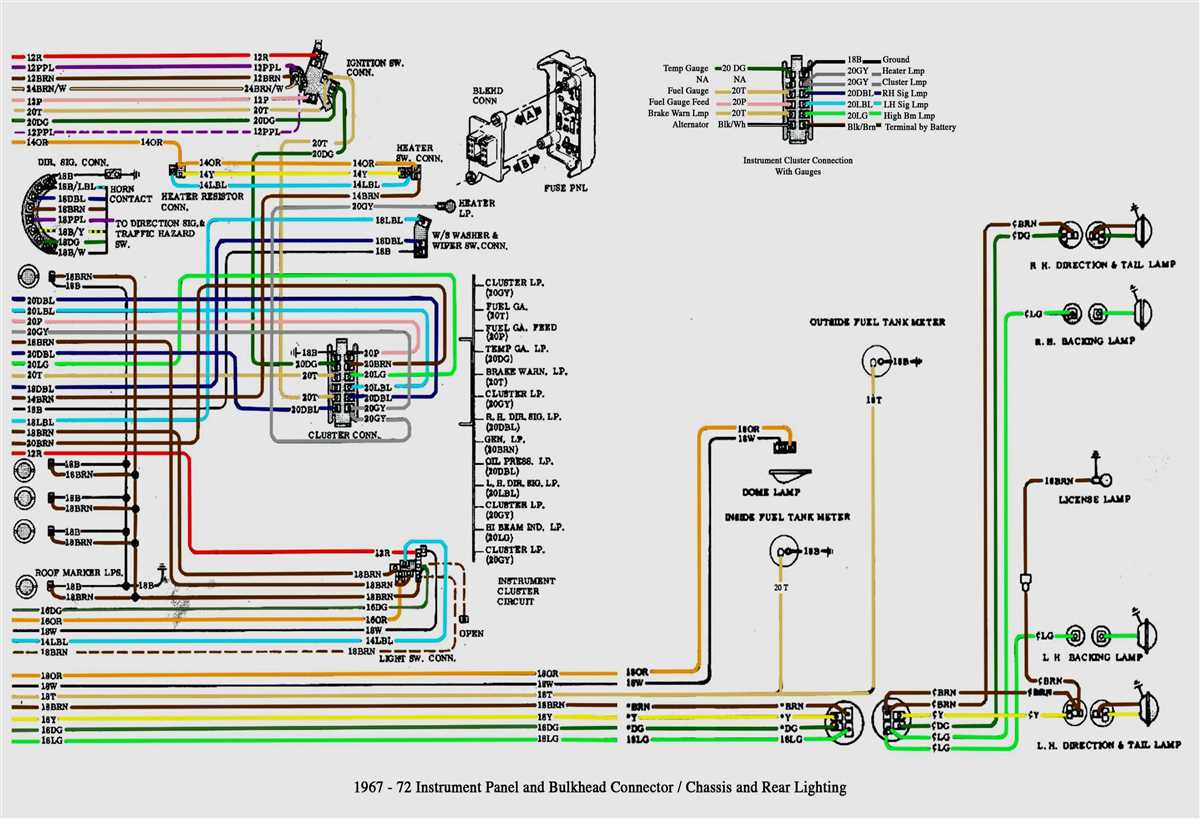
The 2011 Chevy Silverado trailer wiring diagram is divided into several sections, each representing a specific system or component. These sections include the trailer brake system, trailer lighting system, and trailer connector. The diagram provides color-coded illustrations, indicating the proper wire connections for each component.
One of the most important aspects of the trailer wiring diagram is the brake system. This diagram shows how the brake controller, brake switch, and trailer brakes are connected. It also highlights the necessary wire connections for the brake lights and turn signals, ensuring that other drivers can see your intentions on the road.
Another crucial aspect of the wiring diagram is the trailer lighting system. This section shows how the trailer’s lights, including the tail lights, brake lights, and turn signals, are connected to the Chevy Silverado’s electrical system. This ensures that the trailer’s lights function properly and are synchronized with the truck’s lights, providing optimal visibility and safety.
Finally, the trailer connector section of the wiring diagram details the necessary wire connections between the Chevy Silverado and the trailer. This includes the 7-pin connector, which is commonly used for many types of trailers. The diagram indicates the color coding of the wires, making it easier to match them up correctly during installation.
Overall, the 2011 Chevy Silverado trailer wiring diagram is an essential resource for anyone looking to tow a trailer safely. By understanding the wiring connections and following the diagram’s instructions, you can ensure that your trailer’s electrical system functions properly and allows for a smooth and safe towing experience.
How to Install a 2011 Chevy Silverado Trailer Wiring Harness
If you own a 2011 Chevy Silverado and you’re looking to install a trailer wiring harness, you’re in luck. Installing a trailer wiring harness on your Silverado is a relatively simple process that will allow you to connect your trailer’s lights and electrical system to your truck’s electrical system. This will ensure that your trailer’s lights function properly and that you can safely tow your trailer.
Before you begin, make sure you have the following tools and materials:
- Trailer wiring harness kit
- Wire strippers
- Electrical tape
- Wire connectors
- Scissors
- Socket wrench
Here are the steps to install a trailer wiring harness on your 2011 Chevy Silverado:
- Locate the truck’s tail lights wiring harness. This is usually located underneath the truck bed, near the rear bumper. You may need to remove the bottom of the truck bed to access the wiring harness.
- Disconnect the tail lights wiring harness by gently pulling the connectors apart.
- Connect the trailer wiring harness to the truck’s tail lights wiring harness. Match the corresponding wires and secure them together using wire connectors.
- Use wire strippers to strip about 1/2 inch of insulation from the ends of the trailer wiring harness wires.
- Connect the stripped ends of the trailer wiring harness wires to the corresponding wires on the trailer lights. Use wire connectors to secure the connections.
- Use electrical tape to wrap each wire connector, ensuring that the connections are protected and secure.
- Test the trailer’s lights by connecting the trailer to your truck and activating the lights. Make sure all the lights, including brake lights, turn signals, and taillights, are functioning properly.
- Reassemble any parts of the truck that were removed to access the wiring harness, such as the truck bed.
- Secure any loose wires or harnesses using zip ties or clips.
By following these steps, you will be able to successfully install a trailer wiring harness on your 2011 Chevy Silverado. Always refer to the wiring diagram specific to your truck model and trailer, and consult the owner’s manual for any additional instructions or safety precautions. Happy towing!
Step-by-Step Guide for Wiring the Trailer
Wiring the trailer for your 2011 Chevy Silverado can be a straightforward process if you follow these step-by-step instructions. Properly wiring your trailer is essential for ensuring the safety of both your vehicle and any cargo you may be towing. Here is a guide to help you with the process:
Gather the necessary tools and materials
Before you start wiring your trailer, make sure you have all the necessary tools and materials. These may include wire cutters, wire strippers, electrical tape, connectors, and a trailer wiring kit suitable for your Chevy Silverado.
Identify the wiring connections
Begin by identifying the wiring connections on your Chevy Silverado and the trailer. This usually includes connections for the trailer’s brake lights, turn signals, and taillights. Refer to your Chevy Silverado’s manual or the trailer wiring diagram for the exact specifications.
Prepare the wires
Next, cut the wires to the appropriate lengths and strip the insulation from the ends. Make sure to trim any excess or damaged wires. It is also recommended to label the wires to avoid confusion during the installation process.
Connect the wires
Once the wires are prepared, connect each wire to its corresponding connection point using connectors. You may need to crimp or solder the wires together for a secure connection. Ensure that each wire is connected properly and securely to avoid any loose connections that could cause electrical issues.
Test the connections
After the wires are connected, it is important to test the connections to ensure everything is functioning correctly. Use a trailer light tester or have a helper stand behind the trailer to check if all the lights and signals are working as intended.
Secure the wires
Once you have confirmed that the wiring connections are functioning properly, secure the wires using zip ties or cable clamps. This will help prevent any loose or hanging wires that could get damaged while towing.
Following these step-by-step instructions will help you efficiently and effectively wire your trailer for your 2011 Chevy Silverado. Always double-check your connections and consult the wiring diagram or manual for any specific instructions or guidelines for your vehicle.
Gather the Necessary Tools and Materials
Before you begin wiring your 2011 Chevy Silverado trailer, it’s important to gather all the necessary tools and materials. Having everything ready beforehand will ensure a smooth and efficient installation process.
Tools:
- Wire cutters
- Wire strippers
- Wire crimpers
- Electrical tape
- Screwdriver
- Drill (if needed)
Materials:
- Trailer wiring kit (specifically designed for your 2011 Chevy Silverado)
- Trailer connector
- Wire connectors
- Mounting brackets (if needed)
- Zip ties
- Screws or bolts (if needed)
Having these tools and materials on hand will ensure that you have everything you need to properly wire your trailer. It’s important to use a wiring kit that is specifically designed for your Chevy Silverado, as the wiring configurations may vary between different truck models.
Additionally, make sure to have wire connectors and electrical tape to securely connect and insulate the wires. Depending on your trailer setup, you may also need mounting brackets, zip ties, screws, or bolts to properly secure the wiring and connector to your vehicle.
Locate the Vehicle’s Trailer Wiring Connectors
When it comes to towing with your 2011 Chevy Silverado, it’s important to have a properly functioning trailer wiring system. This allows your vehicle to communicate with the trailer, powering the trailer’s lights and brakes. To ensure that everything is working correctly, you need to locate the vehicle’s trailer wiring connectors. Here’s how:
Step 1: Determine the Type of Connector:
Start by determining the type of trailer wiring connector your vehicle has. Common connector types include 4-pin, 5-pin, 6-pin, and 7-pin connectors. The type of connector will depend on your vehicle’s configuration and the type of trailer you will be towing.
Step 2: Check the Rear of the Vehicle:
Next, you’ll need to check the rear of your 2011 Chevy Silverado to locate the trailer wiring connectors. These connectors are typically located near the rear bumper or inside the bed of the truck. Look for a small rectangular plug with multiple wires coming out of it.
Step 3: Inspect the Connectors:
Once you’ve located the trailer wiring connectors, inspect them for any damage or corrosion. Over time, these connectors can become worn or corroded, leading to poor electrical connections. If you notice any issues, such as bent pins or rust, it’s best to replace the connectors to ensure a reliable connection.
Step 4: Test the Wiring:
After you’ve located and inspected the trailer wiring connectors, it’s time to test the wiring. Connect your trailer to the vehicle and test the lights, turn signals, and brakes to ensure they are functioning correctly. If any issues arise, you may need to troubleshoot the wiring or consult a professional for assistance.
Identify and Connect the Wiring System
When it comes to connecting the wiring system of your 2011 Chevy Silverado for trailer usage, it is important to correctly identify and connect the various wires to ensure proper functionality and safety. The wiring system includes several components, such as the trailer connector, taillights, brake lights, turn signals, and battery power.
To begin, you’ll need to locate the trailer connector on your 2011 Chevy Silverado. This connector is typically found on the rear bumper or hitch area of the vehicle. It is crucial to ensure that the connector is in good working condition and free from any damage or corrosion.
The trailer connector will have several pins or terminals, each with a specific function. The most common type of trailer connector is a seven-pin connector, which provides connections for the taillights, brake lights, turn signals, electric brakes, backup lights, and battery power. However, some trailers may only require a four-pin connector, which excludes the electric brakes and backup lights connections.
When connecting the wiring system, refer to a wiring diagram specific to your 2011 Chevy Silverado model. This diagram will illustrate the proper color codes and corresponding functions for each wire. It is crucial to match the wires on the trailer to the correct pins on the trailer connector, ensuring a secure and reliable connection.
Note: It is also important to check the trailer’s wiring system for any damages or loose connections. Any faulty wiring or improper connections can cause issues with the trailer’s lights and brakes, compromising the safety of both the trailer and the vehicle.
Summary:

- Identify the trailer connector on your 2011 Chevy Silverado.
- Ensure the connector is in good working condition.
- Refer to a wiring diagram specific to your Silverado model.
- Match the wires on the trailer to the correct pins on the connector.
- Check the trailer’s wiring system for damages or loose connections.
Testing and Troubleshooting the Wiring Connections
When it comes to trailer wiring, ensuring that all the connections are properly working is essential for safe and efficient towing. If you are experiencing issues with the wiring on your 2011 Chevy Silverado, here are some tips for testing and troubleshooting the wiring connections.
First, it’s crucial to check the connection points between the truck and the trailer. Inspect the plug on the trailer and the corresponding socket on the truck. Look for any loose, damaged, or corroded pins or connections. If you find any issues, these should be addressed and repaired before attempting to test the wiring.
Next, you can use a circuit tester to check the continuity of the wiring. Start by testing the truck’s wiring by connecting the tester to the truck’s socket pins and grounding the tester to a metal surface on the vehicle. Check each pin and verify that the corresponding light on the tester illuminates. If a light doesn’t come on, it indicates a problem in the wiring.
Once the truck’s wiring has been tested, you can move on to testing the trailer’s wiring. Connect the tester to the trailer’s plug and ground it to the trailer’s frame. Again, check each pin and verify that the tester’s lights illuminate accordingly. If a light doesn’t come on, there may be an issue with the trailer’s wiring.
If you encounter any problems during the testing process, it’s important to inspect the wiring harnesses for any damage or loose connections. In some cases, you may need to replace damaged wiring or connectors. Make sure to consult the appropriate wiring diagram for your 2011 Chevy Silverado to ensure proper connections.
In conclusion, testing and troubleshooting the wiring connections is essential for ensuring safe and reliable trailer towing. By inspecting the connections, using a circuit tester, and addressing any issues, you can identify and resolve any problems with the wiring on your 2011 Chevy Silverado.
Properly Securing and Protecting the Wiring Harness
When installing a trailer wiring harness on your 2011 Chevy Silverado, it is important to properly secure and protect the wiring to ensure a safe and reliable connection. Here are some tips to keep in mind:
- Route the wiring harness away from moving parts: Make sure to route the wiring harness away from any moving parts or potential sources of damage. Keep it clear of any sharp edges, hot surfaces, or areas where it could get pinched or snagged.
- Secure the wiring harness with clips or zip ties: Use clips or zip ties to securely fasten the wiring harness along the frame of the vehicle. This will help prevent it from dangling or dragging on the ground, reducing the risk of damage.
- Protect the wiring with conduit or loom: Consider using conduit or loom to protect the wiring harness from the elements and physical damage. This flexible tubing can be easily installed over the wiring to provide an extra layer of protection.
- Test the wiring harness for proper functionality: Before towing a trailer, it is important to test the wiring harness to ensure all connections are secure and functioning correctly. This can be done using a trailer tester or by connecting the harness to a trailer with working lights and brakes.
- Maintain regular inspections: Periodically inspect the wiring harness for any signs of wear or damage. If you notice any issues, such as exposed wires or loose connections, make the necessary repairs or replacements promptly to avoid further problems.
By properly securing and protecting the wiring harness on your 2011 Chevy Silverado, you can ensure a safe and reliable connection for your trailer. Following these tips will help prevent damage to the wiring and potential electrical issues while towing.