
The 2010 Maxima Fuse Box Diagram is an essential tool for any owner or mechanic working on a Nissan Maxima. The fuse box diagram provides a detailed layout of the electrical components and their corresponding fuses. This information is crucial for troubleshooting electrical issues and identifying blown fuses.
Located in the engine compartment, the fuse box houses a variety of fuses that control different systems in the vehicle. The diagram not only indicates the location of each fuse, but also provides information on the amp rating and the components it protects. It allows users to quickly identify and replace blown fuses, ensuring the proper functioning of the electrical systems.
With the 2010 Maxima Fuse Box Diagram, owners and mechanics can easily identify and resolve electrical problems. Whether it’s a malfunctioning brake lights, a non-working power window, or a faulty radio, the fuse box diagram is an invaluable resource. It saves time and effort by providing a clear visual representation of the fuse layout, eliminating the need to individually check each fuse.
In addition to its practicality, the 2010 Maxima Fuse Box Diagram promotes safety by preventing improper handling of electrical components. By clearly labeling and organizing the fuses, it reduces the risk of accidentally removing or replacing the wrong fuse. This helps to avoid further damage to the electrical system and potential injuries.
What is a Fuse Box Diagram?
A fuse box diagram is a visual representation of the electrical layout and fusing system of a vehicle or a building. It shows the location and function of each fuse, which protects different electrical circuits from overloading or short circuits.
Function and Importance:
A fuse box diagram is important for troubleshooting electrical issues or replacing blown fuses. It helps to identify the specific fuse that may be causing a problem in a particular circuit. Without a fuse box diagram, it would be difficult to pinpoint the exact fuse responsible for a malfunctioning electrical component.
Components of a Fuse Box Diagram:
- Fuse/Relay Identification: The diagram provides a list of fuses and relays present in the fuse box, along with their assigned amperage ratings. This information helps in accurately identifying and replacing the correct fuse.
- Fuse/Relay Location: The diagram shows the physical location of each fuse and relay within the fuse box. This makes it easier to access and replace the fuse or relay when needed.
- Circuit Descriptions: The fuse box diagram may include brief descriptions or labels for each circuit that is protected by a fuse. This helps in understanding the purpose of each circuit and its connection to specific electrical components.
- Fuse Color Coding: In some cases, the diagram may illustrate the color coding of fuses, indicating their amperage rating. This allows for quick identification of the correct fuse based on its color.
Overall, a fuse box diagram is a useful tool for anyone working with electrical systems in a vehicle or building. It provides a clear overview and helps in troubleshooting, maintenance, and repairs related to the fusing system.
Overview of the 2010 Maxima Fuse Box Diagram
When it comes to automotive electrical systems, the fuse box plays a crucial role in protecting the vehicle’s electrical components from damage due to overload or short circuits. The 2010 Maxima is no exception, and its fuse box diagram provides a useful guide for troubleshooting electrical issues.
The 2010 Maxima fuse box diagram is divided into several components, each representing a different circuit or system in the vehicle. These components include the engine compartment fuse panel, the instrument panel fuse panel, and the passenger compartment fuse panel.
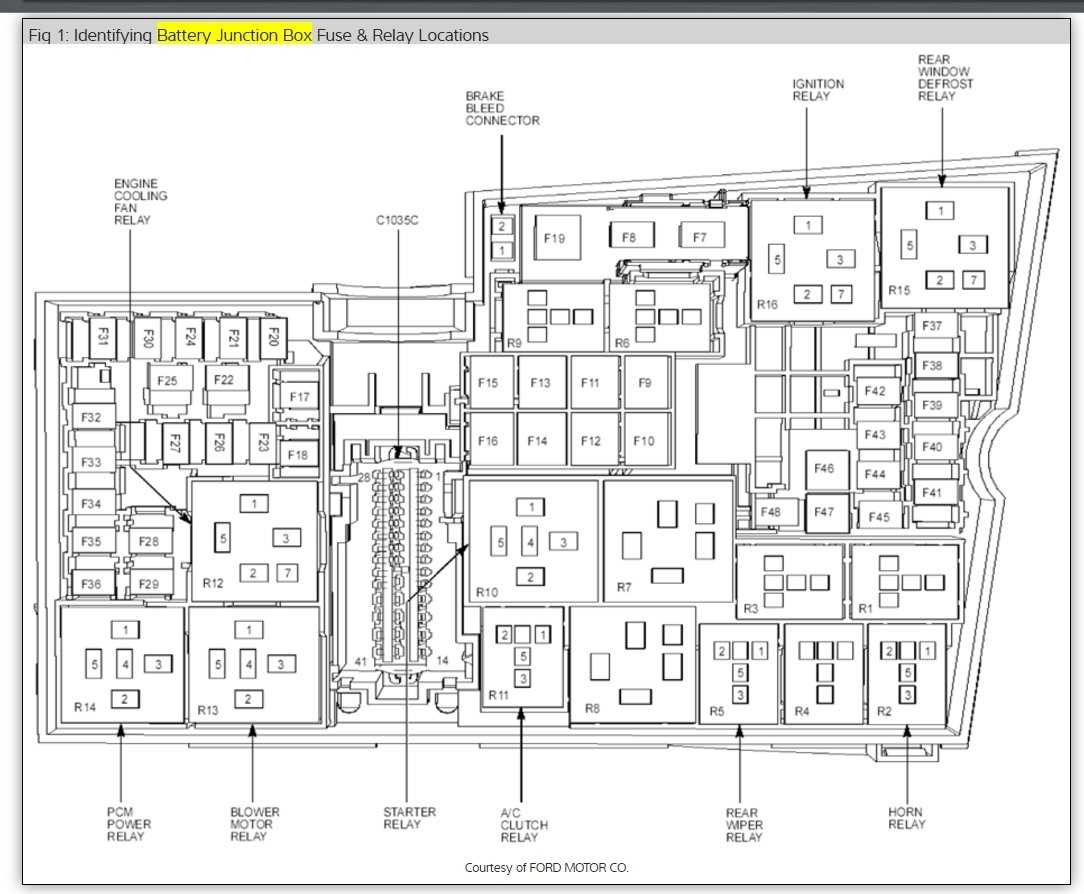
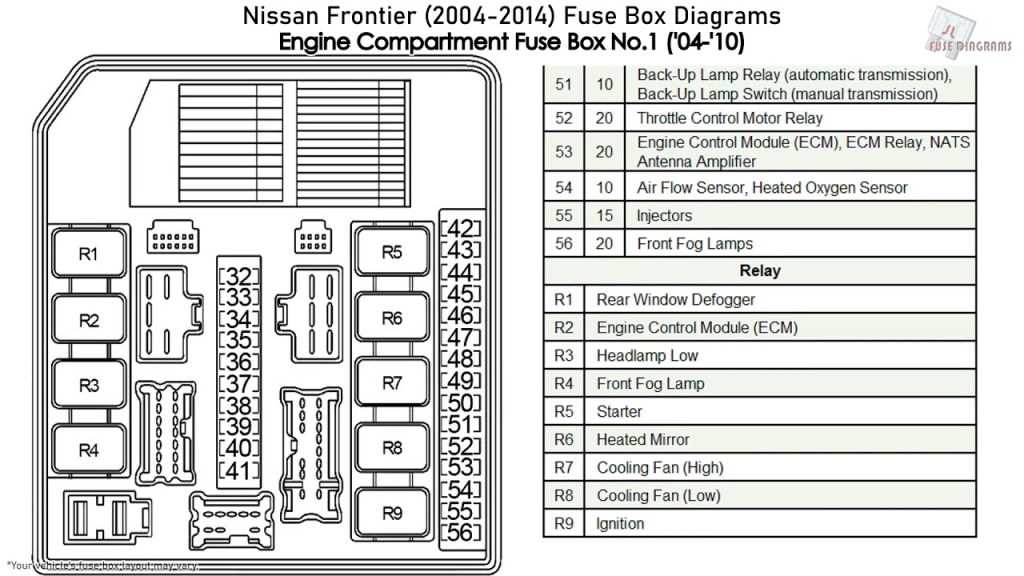
Engine Compartment Fuse Panel
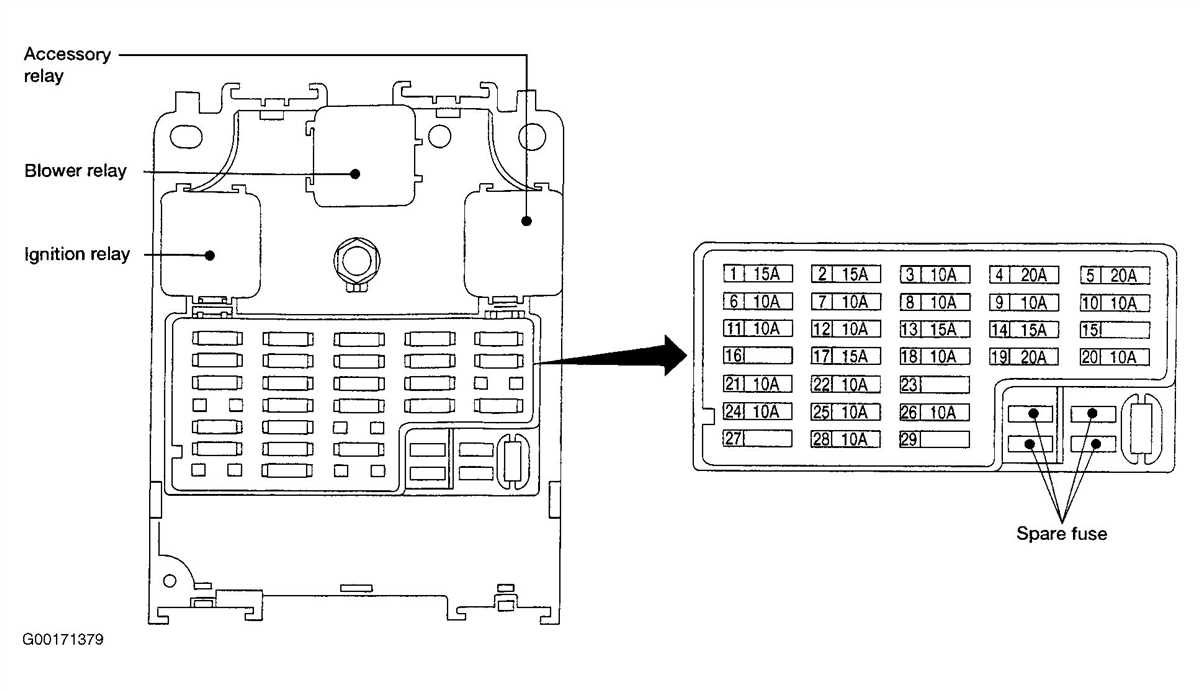
The engine compartment fuse panel in the 2010 Maxima is located on the driver’s side near the battery. It houses fuses for various systems, including the engine control module, fuel pump, ignition coil, and headlights. The fuse box diagram clearly displays the ampere rating and the corresponding electrical component for each fuse.
Instrument Panel Fuse Panel
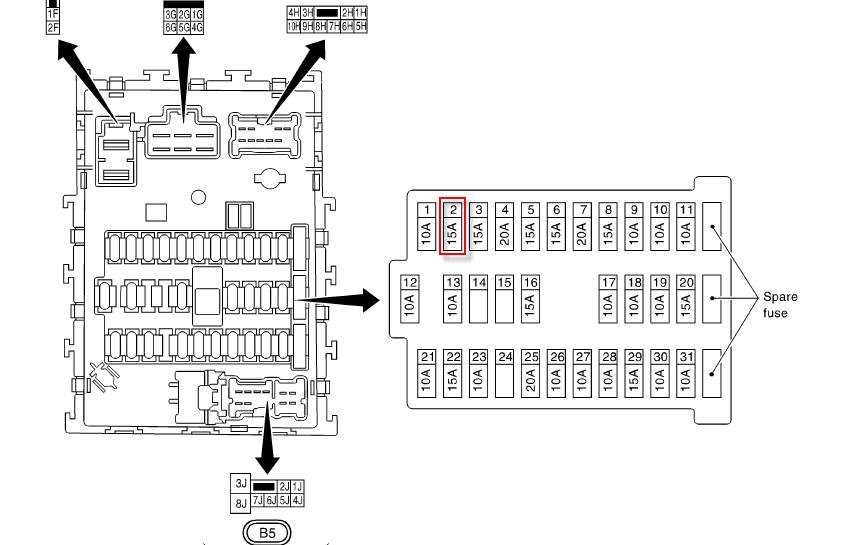
The instrument panel fuse panel is located on the driver’s side of the dashboard. It contains fuses for the interior lights, audio system, power windows, and other accessories. The fuse box diagram provides a detailed layout of the fuses and their associated components, making it easy to identify and replace a blown fuse.
Passenger Compartment Fuse Panel
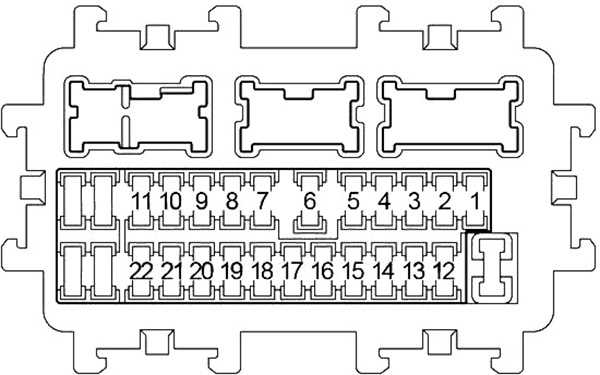
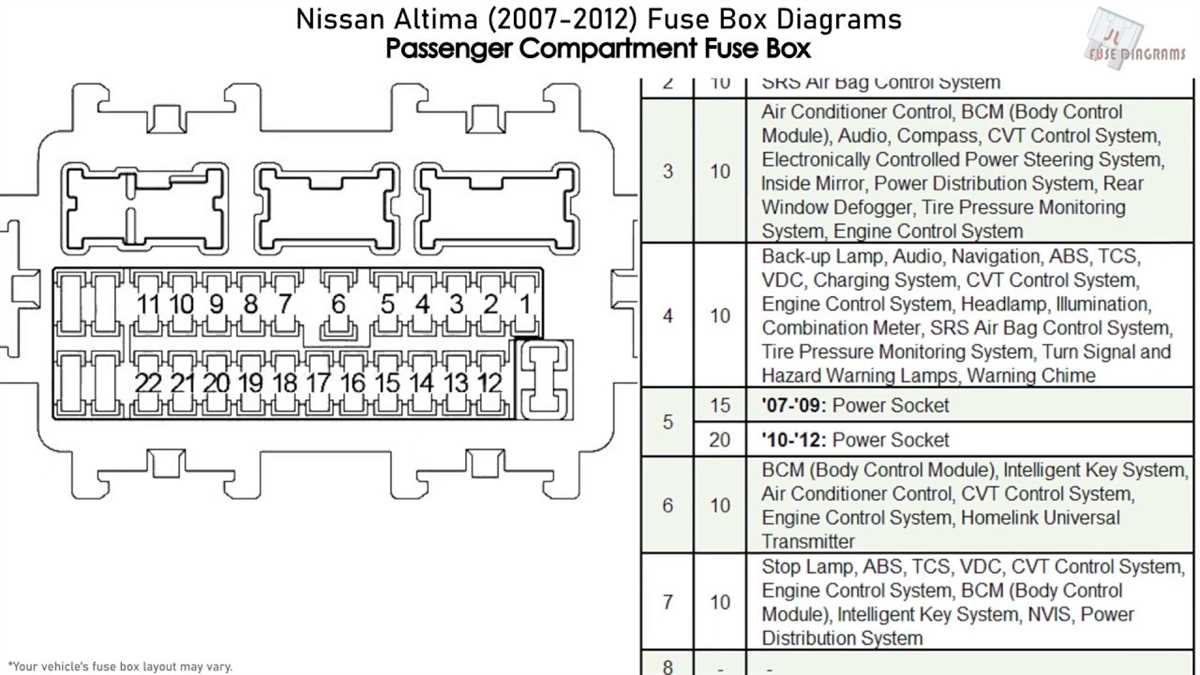
The passenger compartment fuse panel is located on the driver’s side kick panel. It houses fuses for systems like the air conditioning, power seats, and power locks. The fuse box diagram provides a clear representation of the fuses and their functions, allowing for quick troubleshooting of electrical issues in the passenger compartment.
In conclusion, the 2010 Maxima fuse box diagram is a valuable resource for owners and technicians alike. It provides a comprehensive overview of the fuse panels in the vehicle and assists in identifying and resolving electrical problems. By referring to the fuse box diagram, users can effectively troubleshoot and maintain the electrical system in their 2010 Maxima.
Locating the Fuse Box
The fuse box diagram is a helpful tool when it comes to troubleshooting electrical issues in your 2010 Maxima. By referring to the diagram, you can easily identify which fuses control specific components or systems in your vehicle.
To locate the fuse box in your 2010 Maxima, start by removing the cover panel. The fuse box is typically located in the engine compartment or inside the passenger compartment. Refer to your vehicle’s owner’s manual or the fuse box diagram sticker on the cover panel for the exact location of the fuse box in your specific model.
Once you have located the fuse box, you can use the diagram to find the fuse that corresponds to the component or system you are troubleshooting. The diagram will usually label each fuse and its corresponding function, making it easy to identify the appropriate fuse. In some cases, the diagram may also indicate the amperage rating of each fuse.
Remember to always disconnect the battery or turn off the ignition before replacing a fuse. Use a fuse puller or a pair of needle-nose pliers to remove the blown fuse, and replace it with a new one of the same amperage rating. If you are unsure about which fuse to replace or if the issue persists after replacing the fuse, it is recommended to consult a professional mechanic or refer to the vehicle’s service manual for further assistance.
Understanding the Fuse Box Diagram
If you own a 2010 Nissan Maxima, it is essential to understand the fuse box diagram to ensure that the electrical components of your vehicle are functioning properly. The fuse box diagram provides a visual representation of the different fuse locations and their corresponding functions within the car.
Fuse Box Diagram Components
The fuse box diagram typically includes information about the fuse number, location, and amp rating. It also indicates which electrical component or system each fuse is associated with. This information is crucial for troubleshooting and identifying issues with specific parts of the vehicle.
Locating the Fuse Box
To access the fuse box in a 2010 Nissan Maxima, you need to open the driver’s side door and look for a small rectangular panel located on the side of the dashboard. This panel can be easily removed by pulling it towards you.
Using the Fuse Box Diagram
Once you have located the fuse box, refer to the fuse box diagram to identify the specific fuse related to the electrical component or system that is malfunctioning. The diagram is typically printed on the inside of the fuse box cover or in the vehicle’s owner’s manual. Each fuse is numbered, making it easy to cross-reference with the diagram.
Replacing a Fuse
To replace a blown fuse, use a pair of needle-nose pliers or a fuse puller tool, both of which are often included in the fuse box. Simply grasp the fuse and pull it straight out. Inspect the fuse to see if it is blown, indicated by a broken wire inside the casing. If the fuse is blown, replace it with a new fuse of the same amp rating.
In conclusion, understanding the fuse box diagram is vital for maintaining the electrical functionality of your 2010 Nissan Maxima. It allows you to identify and replace blown fuses, ensuring that your vehicle’s electrical systems are operating smoothly.
Commonly Replaced Fuses in the 2010 Maxima
The 2010 Maxima, like any other vehicle, has a fuse box that contains various fuses to protect electrical components from damage caused by electrical surges or faults. While most fuses in the fuse box are not frequently replaced, there are a few that tend to be more prone to blowing or malfunctioning. In this article, we will discuss some of the commonly replaced fuses in the 2010 Maxima.
1. Blown Fuse for the Headlights
One of the most common fuses that may need to be replaced in the 2010 Maxima is the fuse for the headlights. A blown fuse for the headlights can result in a complete loss of lighting, making it unsafe to drive at night or in low visibility conditions. It is important to regularly check the fuse for the headlights and replace it if necessary.
2. Malfunctioning Fuse for the Power Windows
Another commonly replaced fuse in the 2010 Maxima is the fuse for the power windows. If the power windows are not functioning properly or not working at all, it could be due to a blown fuse. Checking and replacing the fuse for the power windows can help restore their functionality.
3. Failed Fuse for the Radio and Audio System
The fuse for the radio and audio system is also frequently replaced in the 2010 Maxima. If there is no sound coming from the speakers or the radio is not turning on, it is likely that the fuse for the radio and audio system needs to be replaced. This can be a simple fix to get the entertainment system up and running again.
4. Burnt Out Fuse for the Interior Lights

The interior lights in the 2010 Maxima, such as the dome lights or the lights in the dashboard, are controlled by a fuse. If these lights are not working, it could be due to a burnt-out fuse. Replacing the fuse for the interior lights can help restore proper illumination inside the vehicle.
5. Faulty Fuse for the Climate Control System
The climate control system in the 2010 Maxima relies on a fuse to function properly. If the air conditioning or heating system is not working as expected, it could be because of a faulty fuse. Checking and replacing the fuse for the climate control system can help restore comfortable temperatures inside the vehicle.
In conclusion, while most fuses in the 2010 Maxima fuse box do not require frequent replacement, there are a few that may need to be replaced more often. These include the fuses for the headlights, power windows, radio and audio system, interior lights, and climate control system. Regularly checking and replacing these fuses when necessary can help ensure the proper functioning of the vehicle’s electrical components.
Replacing a Fuse in the 2010 Maxima
In the 2010 Maxima, the fuse box is located under the hood on the driver’s side. It contains various fuses that control different electrical components in the vehicle. If a fuse has blown, it will need to be replaced in order for the corresponding electrical system to function properly again.
To replace a fuse in the 2010 Maxima, follow these steps:
- Identify the fuse: Consult the fuse box diagram, which is usually located on the inside of the fuse box cover or in the owner’s manual. Look for the fuse that corresponds to the electrical system that is not working.
- Turn off the ignition: Before replacing a fuse, make sure the ignition is turned off to prevent any electrical accidents.
- Remove the fuse: Use a fuse puller or a pair of needle-nose pliers to carefully remove the blown fuse from the fuse box. Be gentle to avoid damaging the fuse box or other components.
- Replace with a new fuse: Insert a new fuse of the same amperage rating into the appropriate slot in the fuse box. Make sure it is securely in place.
- Test the electrical system: Once the fuse has been replaced, turn on the ignition and test the electrical system to ensure that it is working properly. If the system still does not work, there may be another issue that needs to be addressed.
It is important to note that if a fuse blows repeatedly, there may be an underlying electrical problem that needs to be diagnosed and repaired by a professional mechanic. Replacing fuses should only be a temporary solution until the root cause of the problem is identified and fixed.
Overall, replacing a fuse in the 2010 Maxima is a straightforward process that can be easily done at home. However, if you are unsure or uncomfortable with handling electrical components, it is recommended to seek assistance from a qualified technician.