
If you’re a proud owner of a 2008 Yamaha R6 motorcycle, you’re probably familiar with the saying “riding is freedom.” Taking your bike out on the open road and feeling the wind rush past you is an exhilarating experience. But to keep your ride running smoothly, it’s important to have a solid understanding of its electrical system. That’s where a wiring diagram comes in.
A wiring diagram is a visual representation of the electrical components and their interconnections in a vehicle. For a 2008 R6, it shows how the various wires are routed, where they connect to the different parts of the bike, and what their functions are. This diagram can be invaluable when troubleshooting electrical issues or when installing aftermarket accessories.
Whether you’re a seasoned mechanic or a DIY enthusiast, having a wiring diagram for your 2008 R6 can save you time and frustration. It allows you to trace wires, identify components, and understand how the electrical system works as a whole. With this knowledge, you can confidently tackle any electrical project on your bike, from installing additional lighting to troubleshooting a faulty ignition system.
So, if you’re looking for a comprehensive wiring diagram for your 2008 R6, you’ve come to the right place. In this article, we’ll provide you with essential information about the electrical system of the 2008 R6 and where to find a detailed wiring diagram.
Understanding the 2008 R6 Wiring Diagram: A Comprehensive Guide
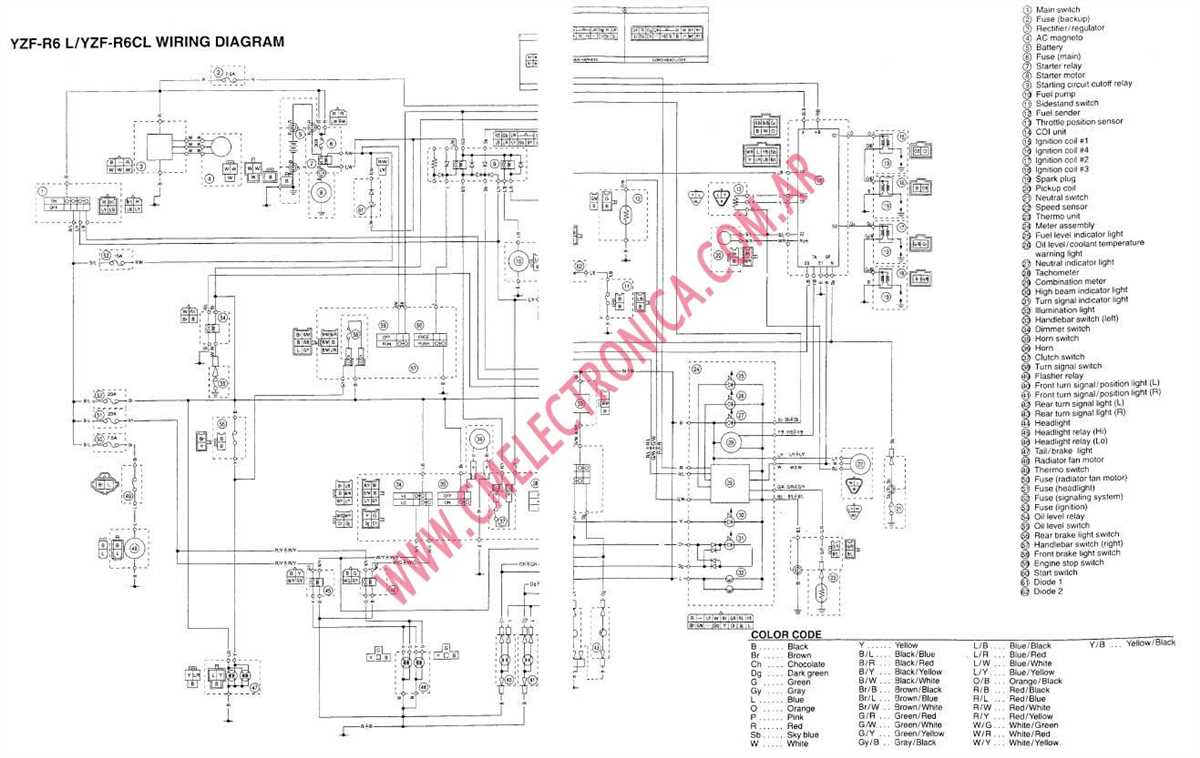
If you own a 2008 R6 motorcycle and are looking to understand its wiring diagram in detail, this comprehensive guide is here to help. The wiring diagram is a visual representation of the electrical system of your motorcycle, showing how different components are interconnected and how the current flows through the system. By understanding the wiring diagram, you can troubleshoot and diagnose electrical issues more effectively and even make modifications or additions to the system.
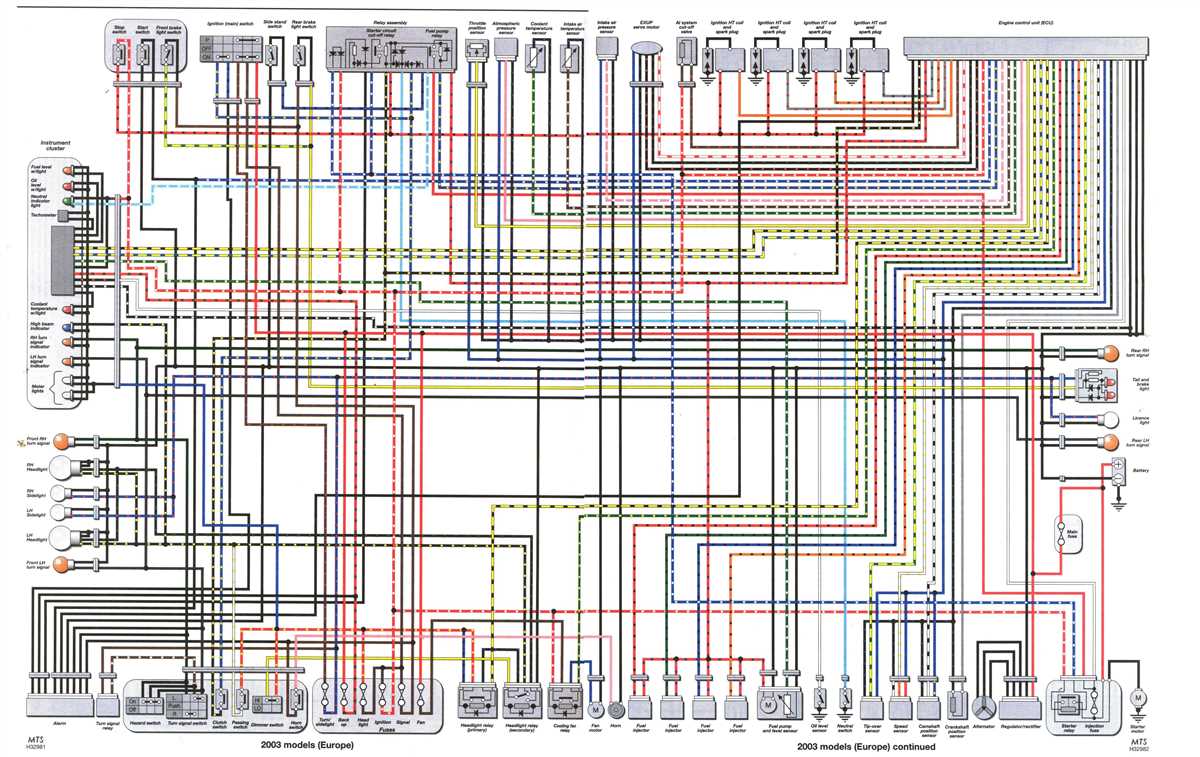
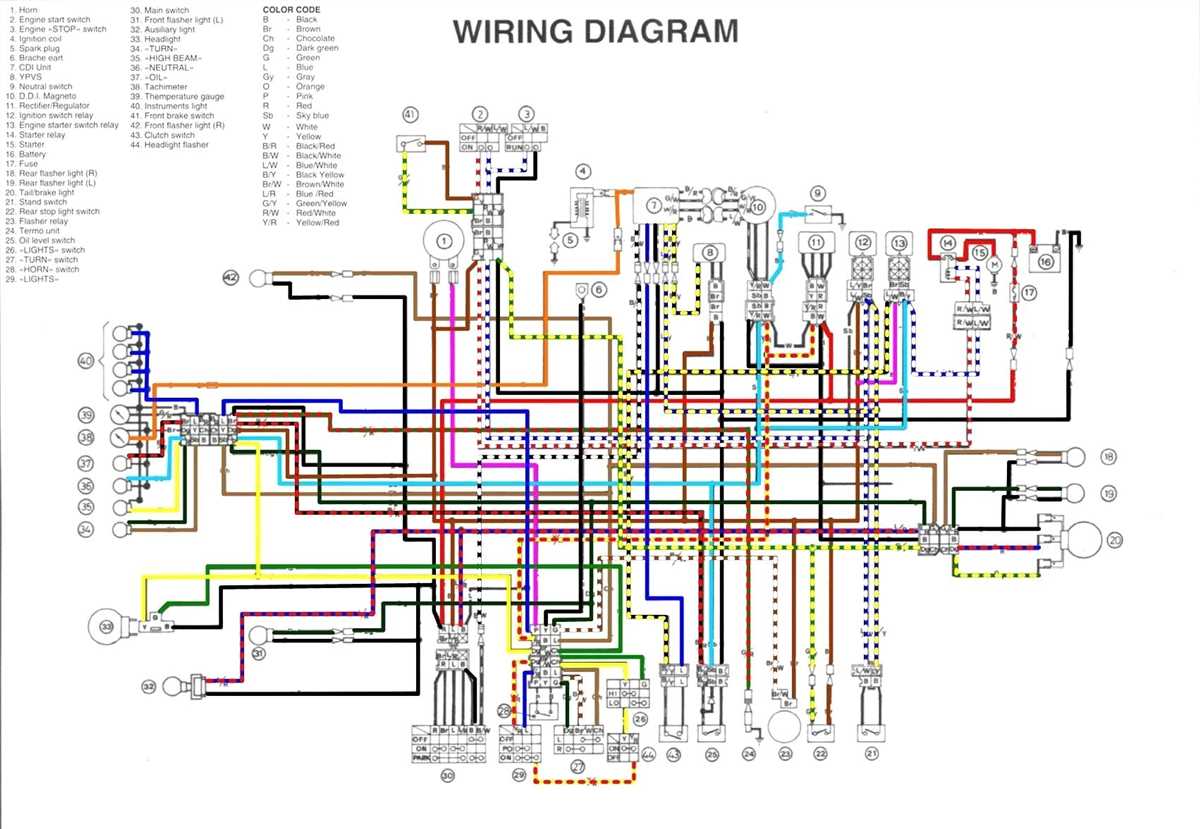
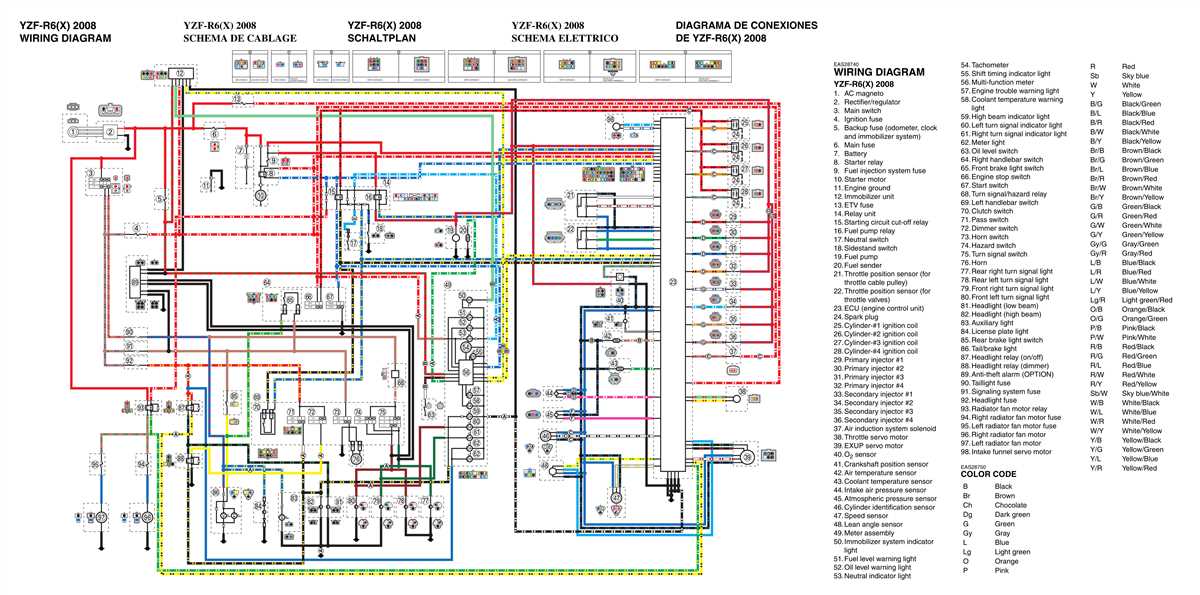
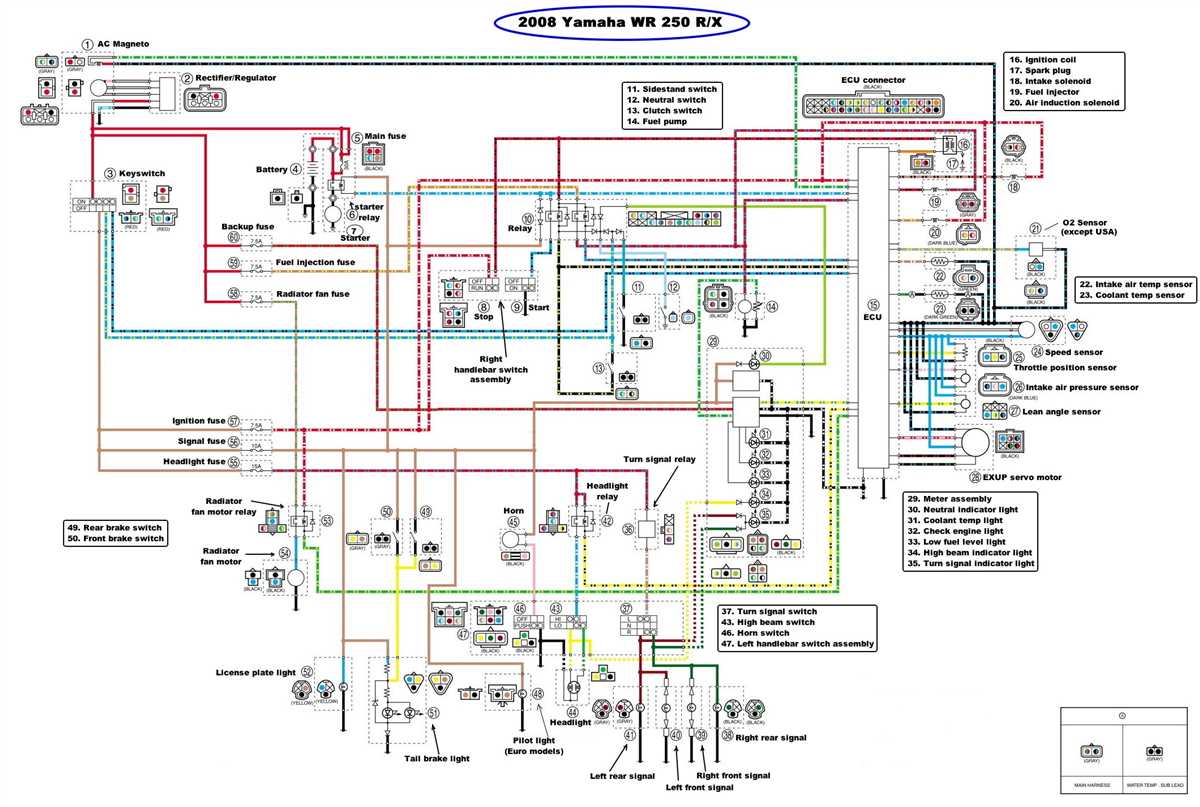
Key Components and Connections: The wiring diagram of the 2008 R6 includes various key components and their connections. These components may include the ignition switch, starter relay, battery, lights, indicators, sensors, and more. Each component is represented by a symbol, and the diagram shows how these components are connected with wires and cables. It’s crucial to understand the meaning of these symbols and the connection points to effectively interpret the diagram.
Color Coding: The 2008 R6 wiring diagram also uses color coding to represent different wires and their functions. Each wire is assigned a specific color, allowing you to identify its purpose. For example, the red wire may indicate a power supply, while the green wire may represent a ground connection. Understanding these color codes can make it easier to trace and identify specific wires in the electrical system.
Understanding Circuits: The wiring diagram is divided into several circuits, each representing a specific electrical system or component. These circuits may include the lighting circuit, ignition circuit, charging circuit, and more. By understanding the circuits and how they are connected, you can isolate issues and troubleshoot problems more effectively. This can save you time and effort in diagnosing electrical problems in your R6.
Additional Resources: To further enhance your understanding of the 2008 R6 wiring diagram, it’s recommended to refer to the motorcycle’s service manual, which provides detailed information and explanations. The service manual will also include additional diagrams, tables, and troubleshooting guides specific to your motorcycle model.
In conclusion, understanding the 2008 R6 wiring diagram is crucial for any motorcycle owner who wants to effectively troubleshoot electrical issues, make modifications, or simply gain a deeper understanding of their motorcycle’s electrical system. By familiarizing yourself with the key components, color coding, circuits, and referring to additional resources such as the service manual, you can tackle electrical problems with confidence and ensure the smooth operation of your 2008 R6 motorcycle.
Primary Components: Exploring the Key Elements of the 2008 R6 Wiring Diagram
The 2008 R6 motorcycle features a complex wiring system that allows for efficient electrical operations throughout the bike. Understanding the key components of the wiring diagram is essential for troubleshooting and maintaining the bike’s electrical system.
The wiring diagram for the 2008 R6 includes various primary components that work together to ensure the proper functioning of the motorcycle’s electrical system. These components include the ignition switch, starter relay, main fuse, battery, and various connectors.
Ignition Switch
The ignition switch is a crucial component of the wiring system as it controls the power flow to various electrical components. It allows the rider to turn the motorcycle’s electrical system on and off. The wiring diagram indicates the different wires connected to the ignition switch and their corresponding functions.
Starter Relay
The starter relay is responsible for activating the starter motor when the rider turns the ignition key. It acts as a switch and allows the flow of electrical current from the battery to the starter motor. The wiring diagram illustrates the connections between the starter relay, battery, and starter motor.
Main Fuse
The main fuse protects the entire electrical system of the motorcycle from overload and short circuits. It is an essential safety component that prevents damage to the wiring and electrical components. The wiring diagram indicates the location and rating of the main fuse.
Battery
The battery provides the necessary electrical power to start the motorcycle and operate various electrical components such as lights, indicators, and the ignition system. The wiring diagram shows the connections between the battery and other electrical components.
Connectors
The wiring diagram also includes various connectors that allow for the connection of different electrical components. These connectors ensure proper electrical connections and facilitate troubleshooting and maintenance. The wiring diagram provides information on the types and locations of the connectors.
Overall, understanding the primary components of the 2008 R6 wiring diagram is essential for properly maintaining and troubleshooting the motorcycle’s electrical system. Familiarizing yourself with these key elements will help ensure the bike’s electrical system operates efficiently and safely.
Electrical Connections: Understanding the Wiring Connections in the 2008 R6
The 2008 Yamaha R6 is a high-performance motorcycle known for its sleek design and powerful engine. Behind its impressive performance lies a complex electrical system that requires a proper understanding of the wiring connections.
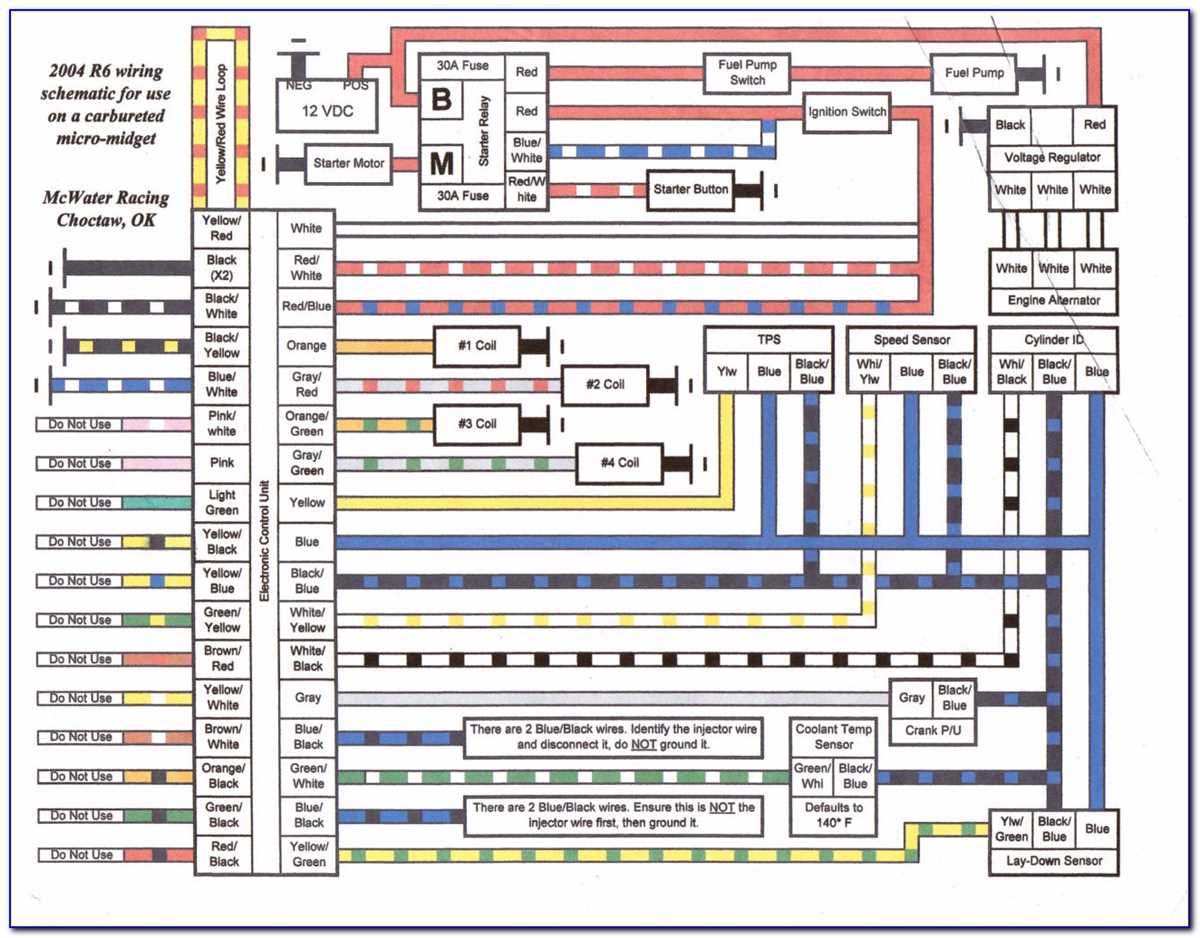
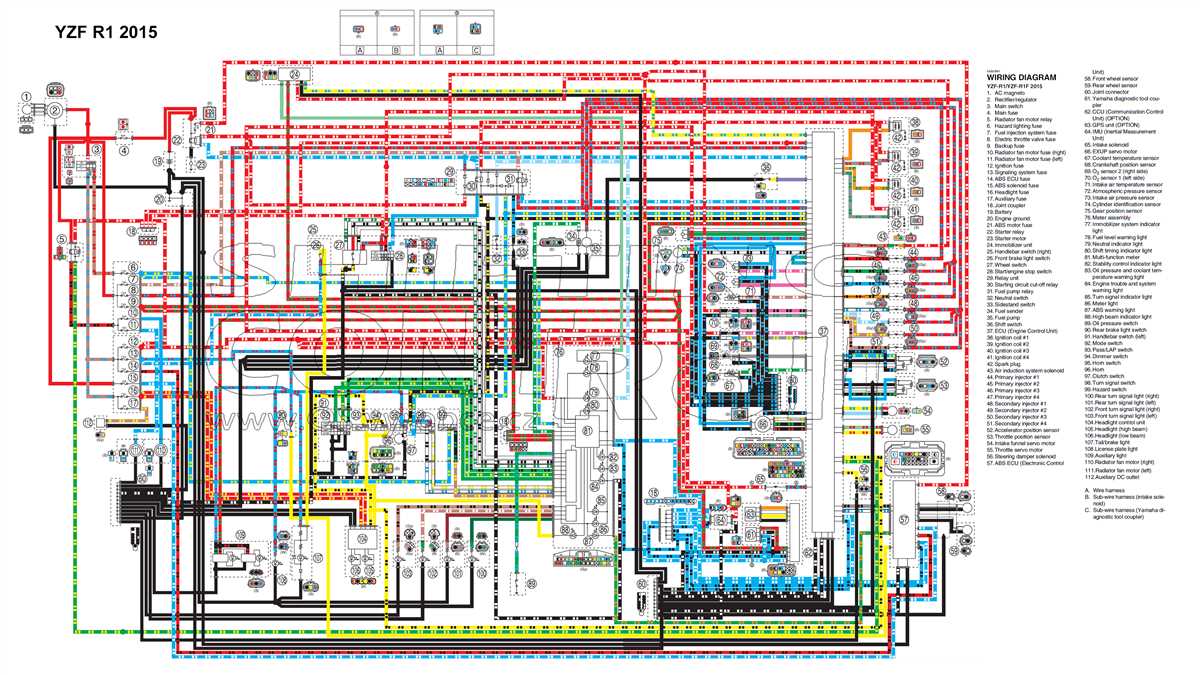
One of the key components of the 2008 R6 electrical system is the wiring harness. It acts as a central hub, connecting various electrical components such as the ignition system, lights, and sensors. The wiring harness is made up of multiple wires, each color-coded to indicate its purpose. For example, red wires are typically used for power supply, while black wires are used for grounding.
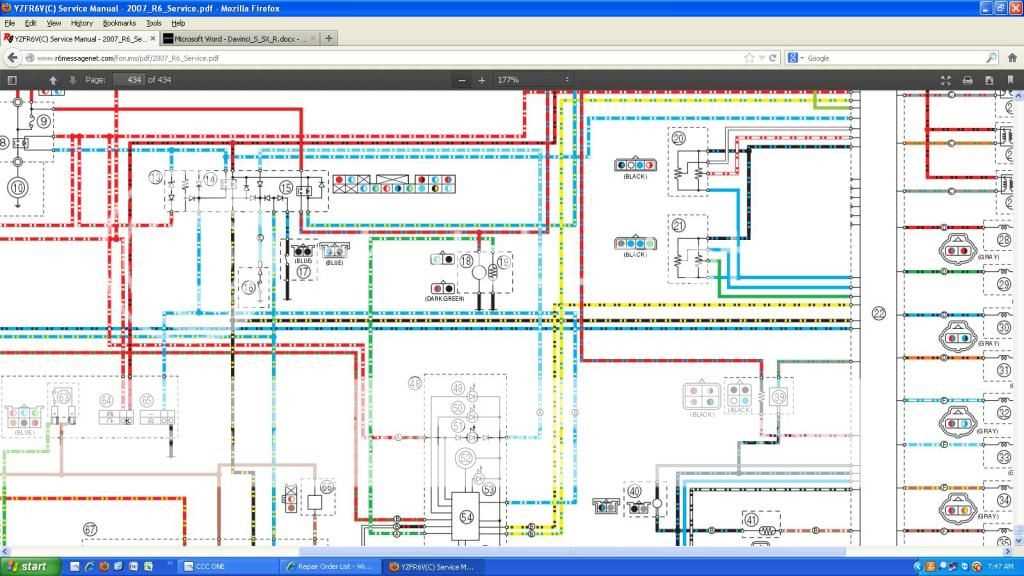
To avoid confusion and ensure the correct connection, it is crucial to refer to the wiring diagram specific to the 2008 R6 model. The wiring diagram provides a visual representation of the electrical connections, including the pin placements and wire colors. It serves as a guide to help identify which wire connects to which component, preventing any mishaps during installation or troubleshooting.
The wiring connections in the 2008 R6 are not only vital for the proper functioning of the motorcycle but also play a crucial role in safety. Incorrect connections or loose wiring can lead to electrical failures, which may result in malfunctions or even fires. Therefore, it is essential to handle the wiring connections with care and ensure they are securely fastened.
In conclusion, understanding the wiring connections in the 2008 R6 is crucial for proper installation, troubleshooting, and safety. The wiring harness acts as the central hub, connecting various electrical components, and should be referred to the wiring diagram specific to the model to ensure correct connections. Proper handling and secure fastening of the wiring connections are essential to prevent electrical failures and maintain the motorcycle’s optimal performance.
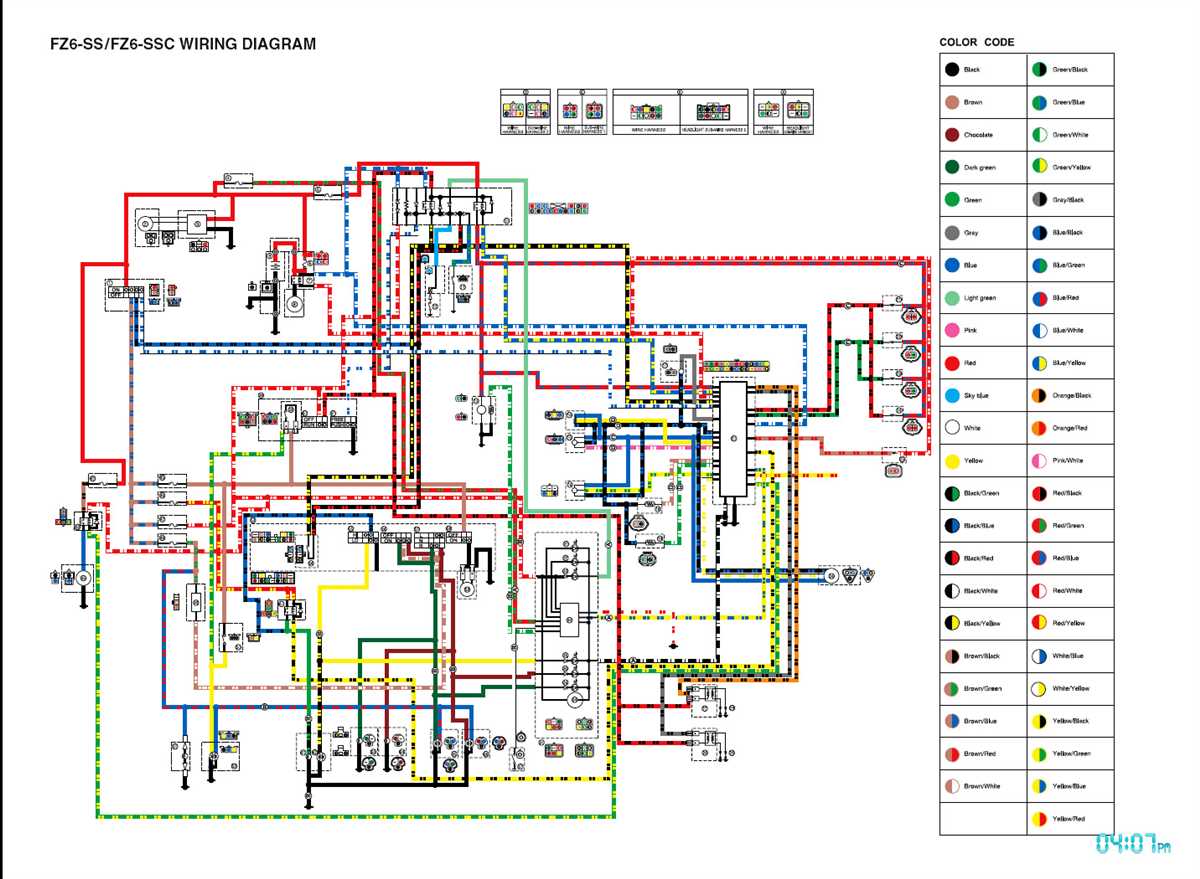
Color Coding: Deciphering the Meaning Behind the Colors in the 2008 R6 Wiring Diagram

When looking at the wiring diagram for a 2008 R6 motorcycle, one of the first things you may notice is the variety of colors used to represent different electrical components and connections. Each color has a specific meaning, and understanding this color coding can be crucial when it comes to troubleshooting or making modifications to your bike’s electrical system.
One of the most common colors you will see in the wiring diagram is black. Black wires typically represent ground connections, which provide a path for electrical current to return to the battery. Ground connections are crucial for ensuring proper functionality and preventing electrical shorts. It is important to ensure that all black wires are securely connected to their respective ground points.
Another common color you will encounter is red. Red wires often indicate power connections, which carry electrical current from the battery to various components and systems on the motorcycle. If you are working with red wires, it is important to exercise caution and ensure proper insulation and connection, as any faults in these wires can result in electrical malfunctions or even fire hazards.
Green wires are typically used for signaling purposes in the 2008 R6 wiring diagram. These wires may be connected to switches, lights, or other devices that indicate specific actions or states. Understanding the function of the component connected to the green wire can help determine its purpose and how it should be connected in the overall electrical system.
White wires are often used for neutral connections or for connecting to lighting systems in the wiring diagram. These wires may be responsible for providing a return path for electrical current, as well as supplying power to various lights on the motorcycle. It is important to ensure that white wires are properly connected and insulated to prevent any electrical issues.
In addition to these colors, there may be other colors used in the wiring diagram for specific components or connections. It is important to consult the specific wiring diagram for your 2008 R6 model to understand the meaning behind these colors and how they relate to the electrical system of your motorcycle. Taking the time to familiarize yourself with the color coding can save you time and frustration when working with the electrical system of your bike.
Troubleshooting Tips: Common Issues and Solutions Regarding the 2008 R6 Wiring System
The 2008 R6 is a popular motorcycle model known for its powerful performance and sleek design. However, like any other vehicle, it may encounter wiring issues that can affect its overall functionality. Here are some common problems and solutions related to the wiring system of the 2008 R6:
1. Blown fuses
One common issue with the 2008 R6 wiring system is blown fuses. Blown fuses can cause various electrical components to malfunction or stop working altogether. To troubleshoot this issue, start by checking the fuse box located under the seat. Look for any blown fuses and replace them with new ones of the same rating if necessary. Additionally, inspect the wiring harness for any signs of damage or shorts that may have caused the fuse to blow. Repair or replace any damaged wiring as needed.
2. Electrical shorts
Another common problem with the 2008 R6 wiring system is electrical shorts. Electrical shorts occur when two or more wires come into contact with each other, creating a path of low resistance that can cause fuses to blow or electrical components to malfunction. To identify and fix electrical shorts, start by visually inspecting the wiring harness for any exposed or damaged wires. Use a multimeter to test for continuity between wires and repair any shorts by insulating or rerouting the affected wires. It may be necessary to consult the wiring diagram for the 2008 R6 to ensure proper routing and connection of the wires.
3. Faulty connectors
Faulty connectors can also cause wiring problems in the 2008 R6. Loose or corroded connectors can disrupt the flow of electricity and result in various electrical issues. Inspect all connectors in the wiring system and clean or tighten them as necessary. If a connector is damaged or corroded beyond repair, consider replacing it with a new one. It is important to use the correct connectors and terminals specified for the 2008 R6 to ensure proper electrical connections.
By addressing these common wiring issues and following the appropriate troubleshooting steps, you can maintain the electrical integrity of your 2008 R6 and ensure smooth operation on the road.
Summary
The 2008 R6 wiring system is a crucial component of the motorcycle’s electrical system. Properly maintaining and customizing this system is essential for optimal performance and safety. This article has provided several tips and recommendations for maintaining and upgrading the 2008 R6 wiring system.
Proper Maintenance
- Regularly inspect the wiring harness for any signs of wear, damage, or loose connections.
- Check the wiring diagram for the specific model year to identify the various components and their connections.
- Ensure all connections are secure and properly routed to avoid any interference or short circuits.
- Keep the wiring system clean and free from dirt, debris, and moisture to prevent corrosion or electrical issues.
- Test the electrical components regularly to ensure they are functioning correctly.
Upgrades and Customizations
- When making upgrades or customizations to the wiring system, consult the wiring diagram and follow the instructions provided by the manufacturer.
- Consider using high-quality aftermarket wiring components for improved performance and durability.
- If adding new electrical accessories, ensure the wiring system can handle the additional load and consider installing a separate relay or fuse box.
- Properly route and secure any new wiring to avoid interference or damage.
- When modifying the wiring system, take safety precautions, such as disconnecting the battery and ensuring all connections are properly insulated.
By following these maintenance and upgrade tips, owners of the 2008 R6 can ensure a reliable and efficient wiring system that enhances the overall performance and customization of their motorcycle.