
Are you looking to install a new radio in your 2003 Nissan Frontier? If so, it’s important to have a wiring diagram to ensure a seamless installation process. The radio wiring diagram is a useful tool that provides a visual representation of the connections and wires involved in the installation.
With a wiring diagram, you can easily identify the different color codes for the wires, making it easier to connect the new radio to the existing wiring system. This will ensure that you have the correct connections and that your new radio functions properly.
The 2003 Nissan Frontier radio wiring diagram will also help you identify any additional components that may be necessary for the installation, such as adapters or harnesses. These components are often required to integrate the new radio with the existing electrical system and ensure compatibility.
Whether you are a car audio enthusiast or just looking to upgrade your radio system, having a wiring diagram at your disposal can save you time, money, and frustration. So, before you begin your installation, make sure to obtain a wiring diagram specifically for your 2003 Nissan Frontier.
2003 Nissan Frontier Radio Wiring Diagram
If you are looking to install a new radio in your 2003 Nissan Frontier, it’s important to have a wiring diagram. The radio wiring diagram will show you how to connect the wires from your new radio to the existing wiring harness in your truck. This ensures that the new radio functions properly and is compatible with the truck’s electrical system.
A 2003 Nissan Frontier radio wiring diagram typically includes information about the wire colors and what they represent. For example, the diagram may indicate that the blue wire is for the power antenna, the red wire is for the accessory power, and the yellow wire is for the constant power. It may also show which wires are for the speakers, ground, and other important connections.
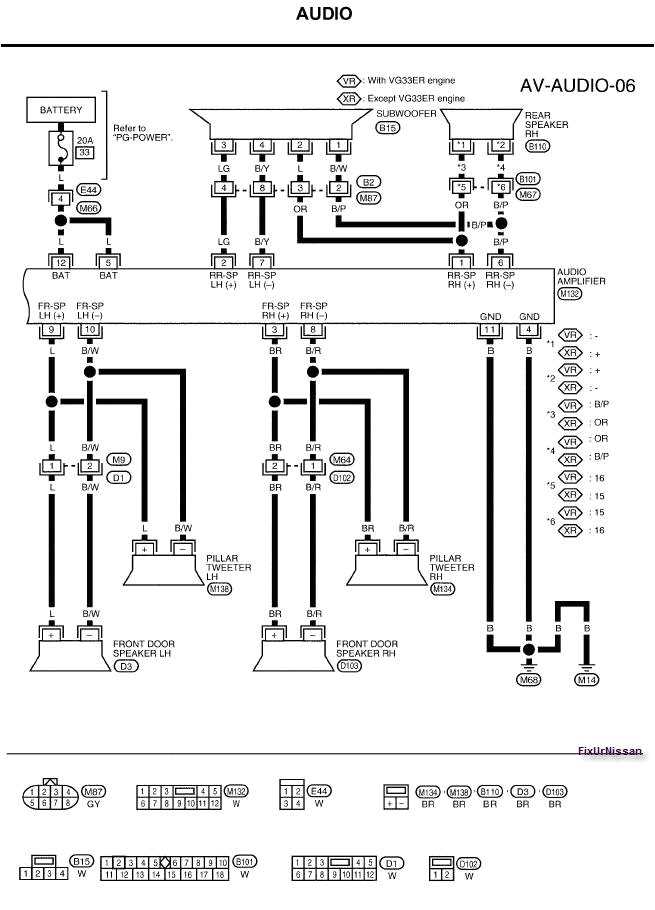
Here is an example of a 2003 Nissan Frontier radio wiring diagram:
- Yellow wire – constant power
- Red wire – switch power
- Black wire – ground
- Blue wire – power antenna
- White wire – front left speaker positive
- White/black wire – front left speaker negative
- Gray wire – front right speaker positive
- Gray/black wire – front right speaker negative
- Green wire – rear left speaker positive
- Green/black wire – rear left speaker negative
- Violet wire – rear right speaker positive
- Violet/black wire – rear right speaker negative
It’s important to note that the wire colors may vary depending on the specific model and trim level of your 2003 Nissan Frontier. Therefore, it’s always recommended to refer to the wiring diagram provided with your new radio or consult a professional installer to ensure proper installation.
Understanding the Wiring System in a 2003 Nissan Frontier
The wiring system in a 2003 Nissan Frontier plays a crucial role in powering and connecting various electrical components, such as the radio. Understanding the wiring diagram can help you with troubleshooting issues and making modifications to the radio system.
Radio Wiring Harness: The radio wiring harness is a set of wires that connect the radio to the vehicle’s electrical system. It typically includes wires for power, ground, speaker connections, and antenna. The harness ensures that the radio receives the necessary power and sends audio signals to the speakers.
Power Connections: The power connections in the radio wiring system consist of two main components: the constant power wire and the switched power wire. The constant power wire provides continuous power to the radio, even when the ignition is turned off, while the switched power wire only provides power when the ignition is on. These connections are essential to ensure that the radio functions properly and retains memory settings.
Speaker Connections: The speaker connections in the wiring system determine how the audio signals are sent from the radio to the speakers. Each speaker has its designated positive and negative wires, which are connected to the corresponding terminals on the radio. The proper connection of these wires is crucial for accurate sound reproduction and avoiding phase cancellation issues.
Antenna Connection: The antenna connection in the wiring system allows the radio to receive AM/FM radio signals. Typically, the antenna wire is connected to the back of the radio unit, ensuring a strong and clear radio reception. A proper antenna connection is necessary to achieve optimal radio performance.
Modifications: Understanding the wiring diagram can also help with making modifications to the radio system. For example, if you want to install a new aftermarket radio, you will need to identify the appropriate wires for power, ground, and speaker connections. You may also need to connect additional wires for features like steering wheel controls or Bluetooth connectivity.
In conclusion, understanding the wiring system in a 2003 Nissan Frontier is essential for troubleshooting radio issues, making modifications, or installing an aftermarket radio. By familiarizing yourself with the wiring diagram and the various connections, you can ensure a properly functioning and customized radio system in your vehicle.
Identifying the Radio Wiring Harness
When installing a new radio in your 2003 Nissan Frontier, it’s essential to correctly identify the wiring harness to ensure a successful installation. The radio wiring harness is a collection of wires that connect the radio to the electrical system of the vehicle. Each wire has a specific purpose, such as powering the radio, controlling the volume, or connecting to the speakers.
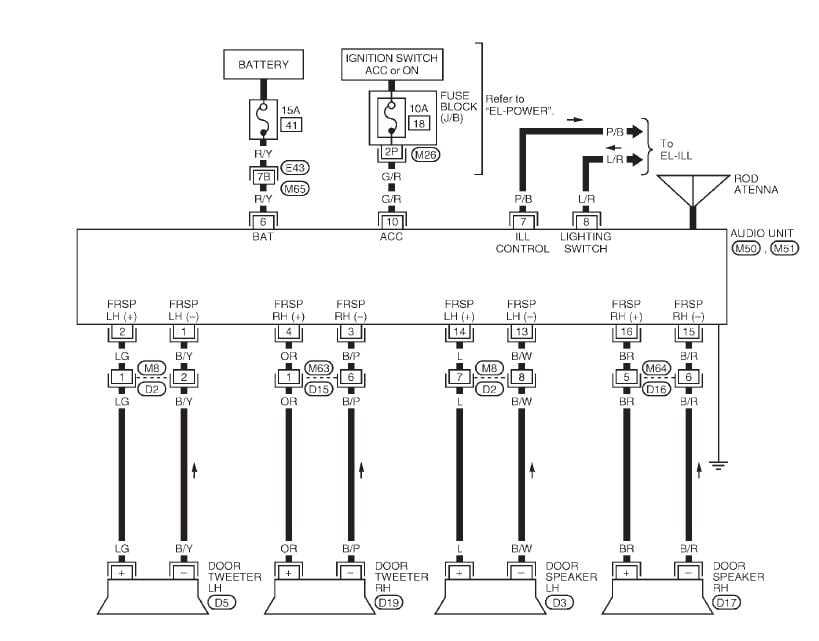
The first step in identifying the radio wiring harness is to consult the wiring diagram specific to your 2003 Nissan Frontier. This diagram provides a visual representation of the wire colors and connections for the radio harness. It is essential to refer to this diagram to identify the correct wires and avoid any mistakes during the installation process.
Typically, the radio wiring harness will include wires for power, ground, illumination, antenna, and speaker connections. The power wire is responsible for providing the radio with the necessary electrical power from the vehicle’s battery. The ground wire ensures a stable electrical connection for the radio. The illumination wire connects to the vehicle’s dashboard lighting system, allowing the radio display to dim when the headlights are turned on. The antenna wire connects the radio to the vehicle’s antenna for proper reception. Finally, the speaker wires connect the radio to the vehicle’s speakers.
It’s essential to use a wiring harness adapter when installing a new radio in your 2003 Nissan Frontier. The adapter allows for a seamless connection between the radio wiring harness and the vehicle’s electrical system. It eliminates the need for splicing wires, ensuring a clean and professional installation. Additionally, the adapter simplifies the installation process by matching the wire colors of the radio harness to the wire colors of the adapter.
In summary, correctly identifying the radio wiring harness is crucial for a successful installation of a new radio in your 2003 Nissan Frontier. Consulting the wiring diagram specific to your vehicle is essential, as it provides a visual representation of the wire colors and connections. Using a wiring harness adapter simplifies the installation process and ensures a clean and professional connection between the radio and the vehicle’s electrical system.
Wiring Diagram for the Radio in a 2003 Nissan Frontier
If you are looking for the wiring diagram for the radio in a 2003 Nissan Frontier, you’ve come to the right place. The radio wiring diagram helps you understand the connections and colors of the wires that connect the radio to the rest of the vehicle’s electrical system. This knowledge is essential if you are planning to install an aftermarket radio or troubleshoot any issues with the existing radio system.
In a 2003 Nissan Frontier, the radio wiring diagram typically consists of several color-coded wires. The most common wire colors include red, yellow, black, blue, green, and white. Each wire serves a specific purpose, such as power, ground, speaker, antenna, etc. It’s important to refer to the wiring diagram and understand the function of each wire before making any connections.
The wiring diagram for the 2003 Nissan Frontier radio can be found in the vehicle’s owner’s manual or can be obtained from a reputable automotive repair manual. These manuals are available both in print and online and provide detailed information about the vehicle’s wiring system, including the radio wiring diagram. It’s important to ensure that the wiring diagram you are using matches the specific year and model of your Nissan Frontier.
The radio wiring diagram typically includes information about the wire colors, wire functions, and sometimes even the wire gauge or size. This information is crucial to ensure proper connections and prevent any damage to the radio or other electrical components. It’s recommended to use a wiring harness adapter, which can simplify the installation process by matching the vehicle’s wiring colors to those of the aftermarket radio.
In conclusion, if you are looking for the wiring diagram for the radio in a 2003 Nissan Frontier, it’s crucial to refer to the vehicle’s owner’s manual or a reputable automotive repair manual. The wiring diagram provides essential information about the wire colors and functions, helping you install or troubleshoot the radio system effectively.
Connecting the Radio Wiring Harness to the Vehicle’s Electrical System
When installing a new radio in your 2003 Nissan Frontier, it is important to properly connect the radio wiring harness to the vehicle’s electrical system. This ensures that the radio functions correctly and is compatible with the existing wiring in the car. Here are some steps to help you connect the radio wiring harness:
1. Gather the necessary tools and materials:
- Radio wiring harness adapter
- Wire strippers
- Electrical tape
- Wire connectors
2. Start by disconnecting the negative terminal of the car battery to prevent any electrical short circuits while working on the wiring.
3. Locate the radio wiring harness in your vehicle. It is usually located near the dashboard or behind the stereo unit.
4. Identify the wires on the radio wiring harness and match them with the corresponding wires on the wiring harness adapter. Refer to the wiring diagram specific to your vehicle make and model for accurate wire identification.
5. Use wire strippers to remove about half an inch of insulation from the ends of the wires on both the radio wiring harness and the wiring harness adapter.
6. Connect each wire from the radio wiring harness to the corresponding wire on the wiring harness adapter using wire connectors. Make sure the connections are secure and properly insulated.
7. Once all the wires are connected, wrap the exposed connections with electrical tape to provide additional insulation and prevent any potential short circuits.
8. Before mounting the new radio into the dashboard, reconnect the negative terminal of the car battery to restore power to the electrical system.
9. Test the functionality of the new radio by turning it on and checking if all the features and functions are working properly.
10. Securely mount the new radio into the dashboard using the appropriate installation kit and brackets according to the manufacturer’s instructions.
By following these steps and properly connecting the radio wiring harness to the vehicle’s electrical system, you can ensure a successful installation and enjoy your new radio in your 2003 Nissan Frontier.
Troubleshooting Common Radio Wiring Issues in a 2003 Nissan Frontier
Having trouble with the radio in your 2003 Nissan Frontier? Don’t worry, you’re not alone. Many owners of this vehicle have experienced issues with their radio wiring, resulting in a loss of sound, static, or even complete radio failure. In this troubleshooting guide, we will explore some common radio wiring issues and provide potential solutions to help you get your radio back in working order.
1. Check the Fuse
One of the first things you should do when experiencing radio issues is to check the fuse. The radio in the 2003 Nissan Frontier is connected to a fuse in the fuse box. If the fuse is blown, it can cause the radio to lose power or not function at all. Locate the fuse box, typically located under the dashboard or in the engine compartment, and find the fuse for the radio. Check if the fuse is blown and replace it if necessary.
2. Inspect the Wiring Connections
Another common issue with radio wiring is loose or faulty connections. Check the wiring connections at the back of the radio and ensure they are secure. If any wires appear damaged or disconnected, repair or reconnect them as needed. Additionally, check the wiring harnesses and connectors behind the dashboard to ensure they are properly connected.
3. Check for Antenna Issues

If your radio is experiencing poor reception or static, the issue may lie with the antenna. Inspect the antenna connection at the back of the radio to ensure it is secure and not damaged. If necessary, replace the antenna or have it professionally repaired. Additionally, check for any obstructions that may be blocking the antenna’s signal.
4. Seek Professional Assistance
If you have followed the above troubleshooting steps and are still experiencing issues with your radio, it may be best to seek professional assistance. An automotive technician with experience in radio wiring can diagnose the problem and provide the necessary repairs to get your radio functioning properly again.
- Remember to turn off your vehicle before inspecting or working on any wiring components to prevent electrical shock.
- If you are unsure or uncomfortable with any part of the troubleshooting or repair process, consult a professional.
By following these troubleshooting steps, you can often resolve common radio wiring issues in a 2003 Nissan Frontier without the need for costly repairs or replacements. Good luck!
Upgrading the Radio in a 2003 Nissan Frontier: Tips and Recommendations
Upgrading the radio in a 2003 Nissan Frontier can greatly enhance your driving experience and allow for a wider range of audio options. Whether you’re looking to upgrade to a Bluetooth-enabled system, add navigation capabilities, or simply improve sound quality, there are several tips and recommendations to keep in mind.
1. Research Compatible Radios
Before purchasing a new radio, it’s important to research compatible options for your specific 2003 Nissan Frontier model. Look for radios that are specifically designed for your vehicle make and model, as they will ensure a proper fit and function. Consider what features are important to you, such as Bluetooth connectivity, USB ports, or CD players, and find a radio that meets your desired specifications.
2. Check Wiring Diagrams
Obtaining a wiring diagram for your Frontier’s radio system is crucial for a successful upgrade. It will help you understand the existing wiring configuration and the necessary steps to install a new radio. Refer to the 2003 Nissan Frontier radio wiring diagram to identify the color codes for each wire, making it easier to match them with the corresponding wires on your new radio.
3. Gather the Required Tools
Make sure you have all the necessary tools before starting the installation process. Common tools needed include a socket wrench set, wire strippers, crimping tools, electrical tape, and a panel removal tool. Having these tools on hand will facilitate a smooth installation and prevent any potential delays.
4. Disconnect the Battery
Before starting any electrical work on your vehicle, it’s important to disconnect the negative terminal of the battery. This will help prevent any accidental short circuits or electrical damage during the installation process.
5. Follow Installation Instructions
When installing the new radio, follow the manufacturer’s instructions carefully. Ensure all connections are secure and properly insulated to prevent any electrical issues. Take your time and double-check each step to avoid any mistakes or complications.
6. Test the New Radio
Once the installation is complete, test the new radio to ensure everything is functioning correctly. Check for sound quality, radio reception, and any additional features you’ve added. If any issues arise, refer to the installation instructions or consult a professional for assistance.
Conclusion

Upgrading the radio in your 2003 Nissan Frontier can bring a new level of enjoyment to your driving experience. By researching compatible options, referencing wiring diagrams, gathering the necessary tools, following instructions, and testing the new radio, you can successfully upgrade your vehicle’s audio system to fit your preferences. Enjoy your upgraded radio and the improved audio experience it provides.