
A ceiling fan is a popular household appliance that helps to circulate air and provide cooling in a room. It is not only functional, but can also be a stylish addition to any space. When installing a ceiling fan, it’s important to understand the wiring and connection diagram to ensure proper installation and safe operation.
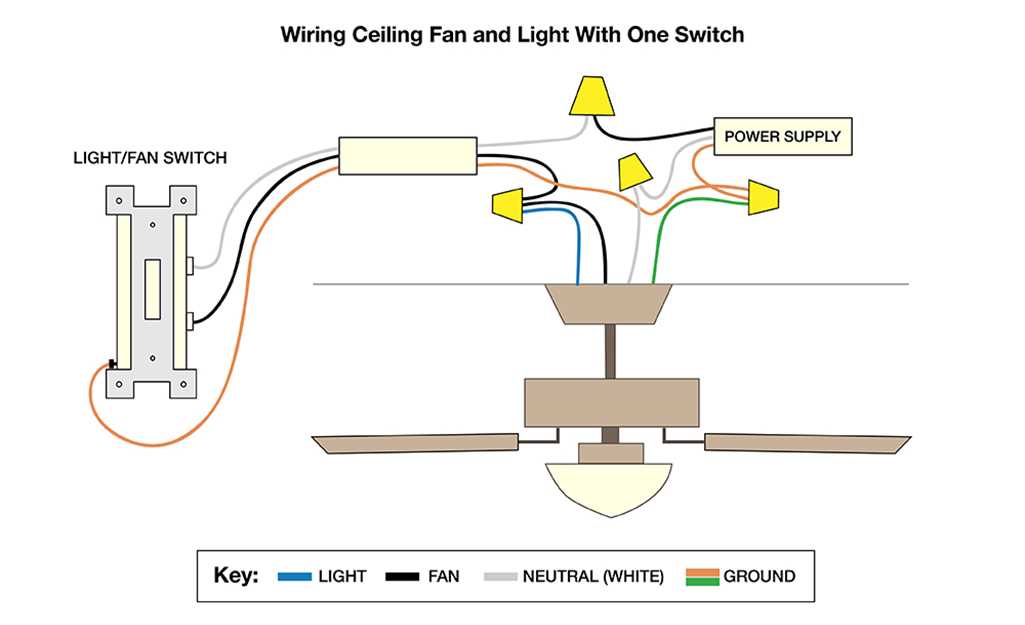
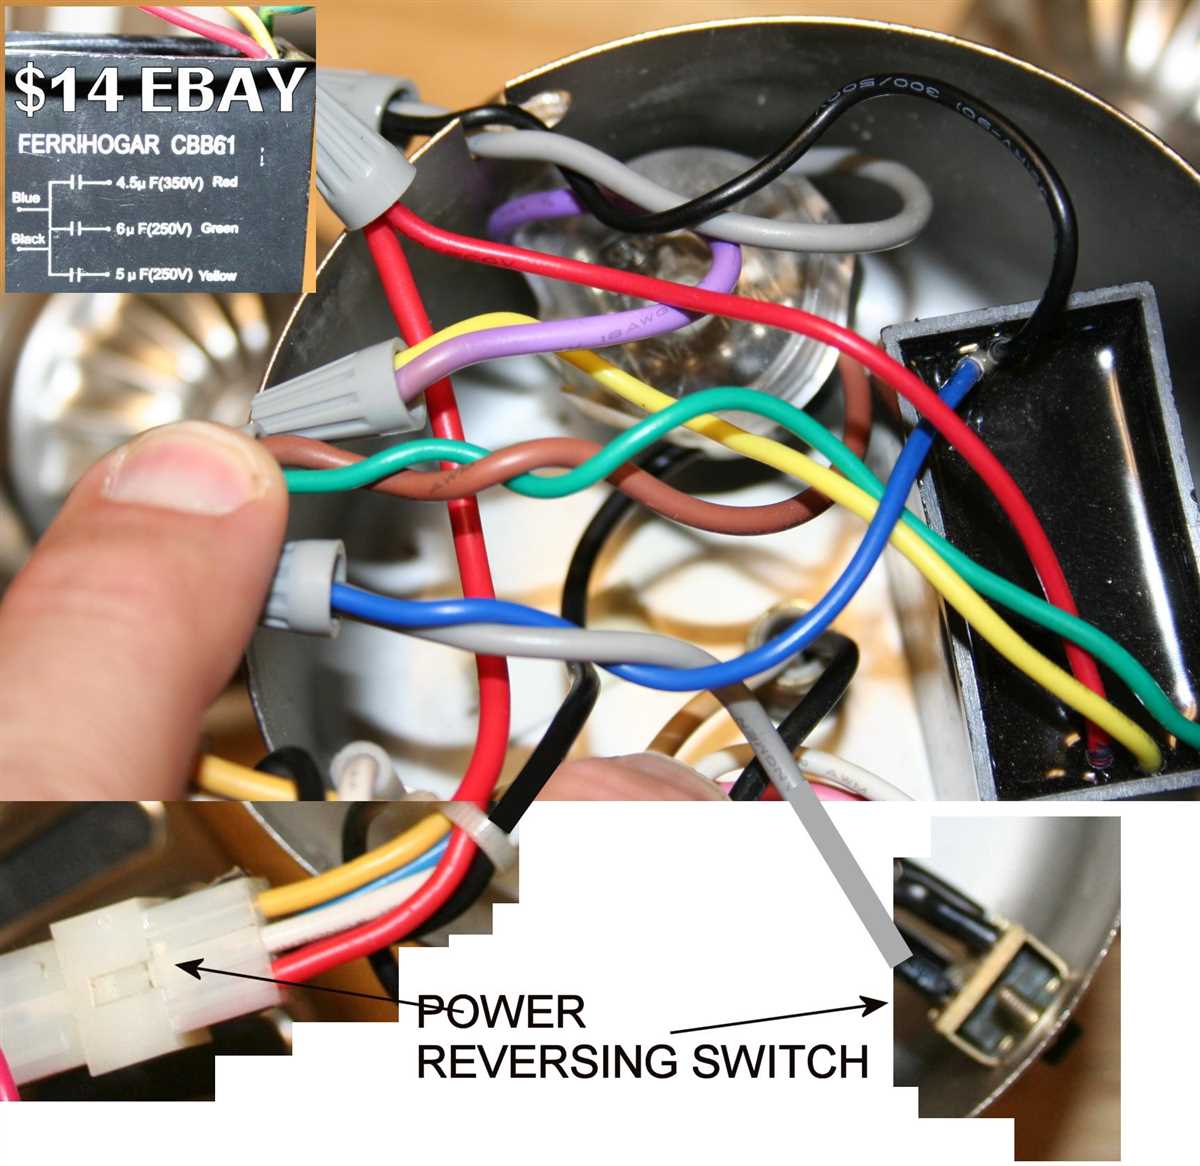
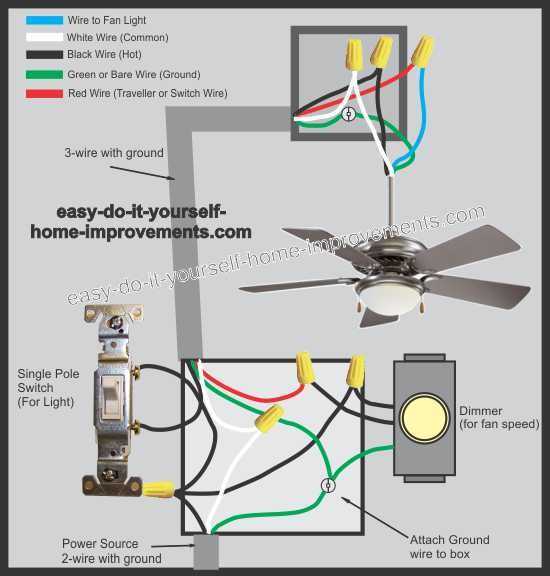
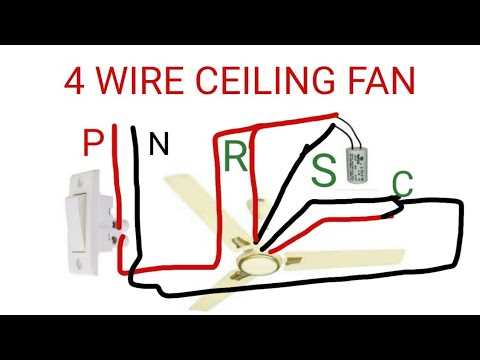
A four wire connection diagram is commonly used for ceiling fans, as it allows for separate control of the fan and light functions. The diagram consists of four wires: a neutral wire, a ground wire, and two power wires. The neutral wire is typically white, while the ground wire is green or bare copper. The two power wires can be different colors, such as black and red.
To make the four wire connection, the fan and light functions are typically controlled by separate switches. The neutral wire and ground wire are connected to their respective terminals in the ceiling fan, while the two power wires are connected to separate switches. This allows for independent control of the fan and light, so you can adjust them according to your preference and needs.
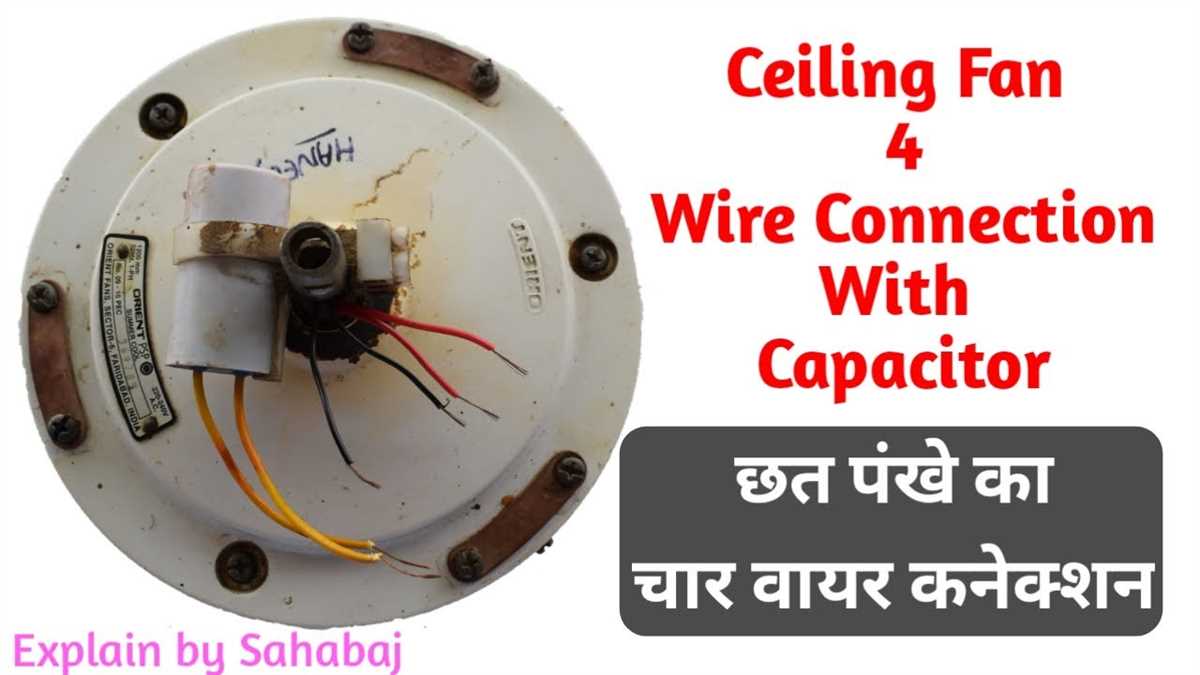
Ceiling Fan Four Wire Connection Diagram
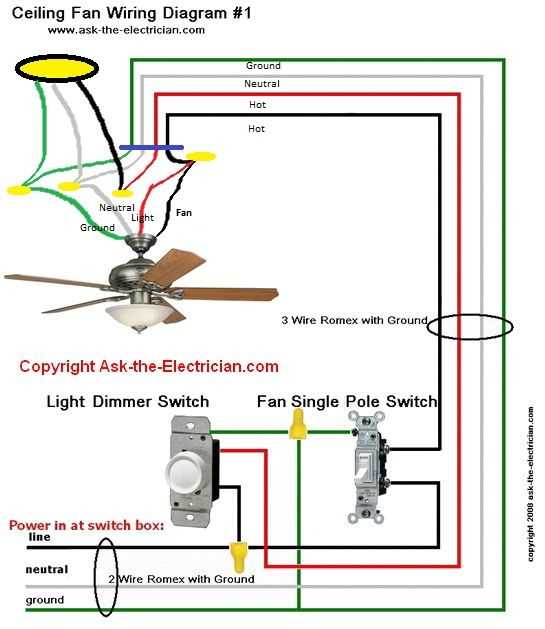
If you’re installing a ceiling fan and need to understand the four wire connection diagram, this guide will provide you with the necessary information. A ceiling fan typically has four wires: a black (hot), a white (neutral), a green (ground), and a blue (light). Understanding how to properly connect these wires is essential for the fan to function correctly.
Black (Hot) Wire: The black wire is the hot wire, which carries the electrical current from the power source to the fan and light. It is typically connected to the black wire from the ceiling using a wire nut or a similar connector. The hot wire is responsible for powering the fan’s motor and light.
White (Neutral) Wire: The white wire is the neutral wire, which completes the electrical circuit and allows the current to return to the power source. It is typically connected to the white wire from the ceiling using a wire nut or similar connector. The neutral wire does not carry any electrical current and is essential for the safe operation of the fan and light.
Green (Ground) Wire: The green wire is the ground wire, which provides a path for electrical current to flow safely to the ground in the event of a fault or malfunction. It is connected to the green or bare copper wire from the ceiling using a wire nut or similar connector. The ground wire helps protect against electrical shock and is an important safety feature.
Blue (Light) Wire: The blue wire is the light wire and is responsible for controlling the fan’s light function. It is typically connected to the blue wire from the ceiling using a wire nut or similar connector. This wire allows you to turn the fan’s light on and off independently of the fan itself, providing added convenience and functionality.
When connecting the four wires of a ceiling fan, be sure to follow the manufacturer’s instructions and consult a professional electrician if you’re unsure about any step of the process. Safety should always be the top priority when working with electrical connections. By understanding the purpose of each wire and properly connecting them, you can enjoy the comfort and convenience of your ceiling fan with confidence.
Understanding the Four Wires
When it comes to connecting a ceiling fan, it’s important to understand the four wires that are typically present. These wires are usually color-coded for easy identification and must be properly connected to ensure the fan functions correctly. Let’s take a closer look at each of the four wires and their respective purposes:
1. Black Wire
The black wire is commonly known as the hot wire and is responsible for carrying the electrical current from the power source to the fan. This wire is usually connected to the black wire from the ceiling using a wire nut or other appropriate electrical connector.
2. White Wire
The white wire, also known as the neutral wire, completes the electrical circuit and helps to balance the electrical load. This wire is typically connected to the white wire from the ceiling, again using a wire nut or similar connector.
3. Blue Wire
The blue wire is often used for connecting the light kit of the ceiling fan. If your fan does not have a light kit, you may not have a blue wire present. In this case, it can be capped off with a wire nut or electrical tape to prevent it from making contact with other wires.
4. Green or Bare Copper Wire
The green or bare copper wire is known as the ground wire and is crucial for safety. This wire helps to prevent electrical shocks and provides a path for electrical current to be safely discharged in the event of a fault or short circuit. The green or bare copper wire should be connected to the green or bare copper wire from the ceiling using a wire nut or appropriate grounding connector.
Properly understanding and connecting the four wires of a ceiling fan is essential for safe and reliable operation. If you are unsure about any aspect of the wiring process, it is recommended to consult a qualified electrician to ensure everything is installed correctly.
Tools and Materials Needed
When connecting the wires of a ceiling fan with four wires, you will need a few tools and materials to ensure a proper and safe installation. Here is a list of the tools and materials that are typically needed:
- Screwdriver: A screwdriver is essential for loosening and tightening the screws that hold the fan and its components in place.
- Wire strippers: Wire strippers are used to remove the protective coating from the ends of the wires, allowing for proper connections.
- Wire nuts: Wire nuts are small plastic caps that are used to securely connect the wires together, ensuring a strong electrical connection.
- Electrical tape: Electrical tape is used to securely wrap around the wire connections, protecting them from exposure and potential damage.
- Wire connectors: Wire connectors are used to join multiple wires together, creating a secure and reliable electrical connection.
- Ladder: Depending on the height of your ceiling, you may need a ladder to access the fan and its wiring.
These tools and materials are essential for safely and effectively connecting the four wires of your ceiling fan. It is important to have them on hand to ensure a smooth installation process and to avoid any electrical hazards.
Step-by-step Guide to Connecting the Wires
Connecting the wires of a ceiling fan with four wires can be intimidating, but with a step-by-step guide, it becomes a straightforward process. Here is a simplified guide to help you connect the wires:
1. Gather the necessary tools and materials
Before you start, make sure you have all the tools and materials you need. You will typically need wire cutters, wire strippers, electrical tape, wire connectors, and a ladder to reach the fan installation location. Make sure to turn off the power supply to the room before you begin.
2. Identify the wires
Start by identifying the different wires. Typically, a ceiling fan with four wires will have a green or bare copper wire (ground wire), a white wire (neutral wire), a black wire (fan motor wire), and a blue wire (light fixture wire). Use a voltage tester to ensure that the power is turned off before touching any wires.
3. Connect the wires
Begin by connecting the ground wires. Twist the green or bare copper wire from the ceiling fan to the green or bare copper wire from the ceiling. Secure them together using a wire connector or electrical tape.
Next, connect the white wires together, followed by the black wires, and then the blue wires. Use wire connectors to twist the wires together and secure them. Make sure to match the colors correctly, as improper connections can result in a malfunctioning fan or light.
4. Test the connections
After connecting all the wires, it’s important to test the connections before fully installing the fan. Turn on the power and use the fan and light switches to check if both the fan and light work properly. If the fan doesn’t work or there are any issues, you may need to revisit the connections and make sure they are secure.
Following these steps will help you successfully connect the wires of a ceiling fan with four wires. However, if you are unsure or uncomfortable working with electrical connections, it’s always a good idea to consult a professional electrician to ensure safety and proper installation.
Troubleshooting Common Issues
If you encounter any problems with your ceiling fan’s four-wire connection, here are some common issues and troubleshooting steps you can take:
1. Fan not turning on:
- Verify that the power switch is turned on and that the power supply to the fan is functioning.
- Check if the wall switch or remote control is properly connected and functioning.
- Inspect the wiring connections to ensure they are secure and properly connected.
2. Fan running at a slow speed:
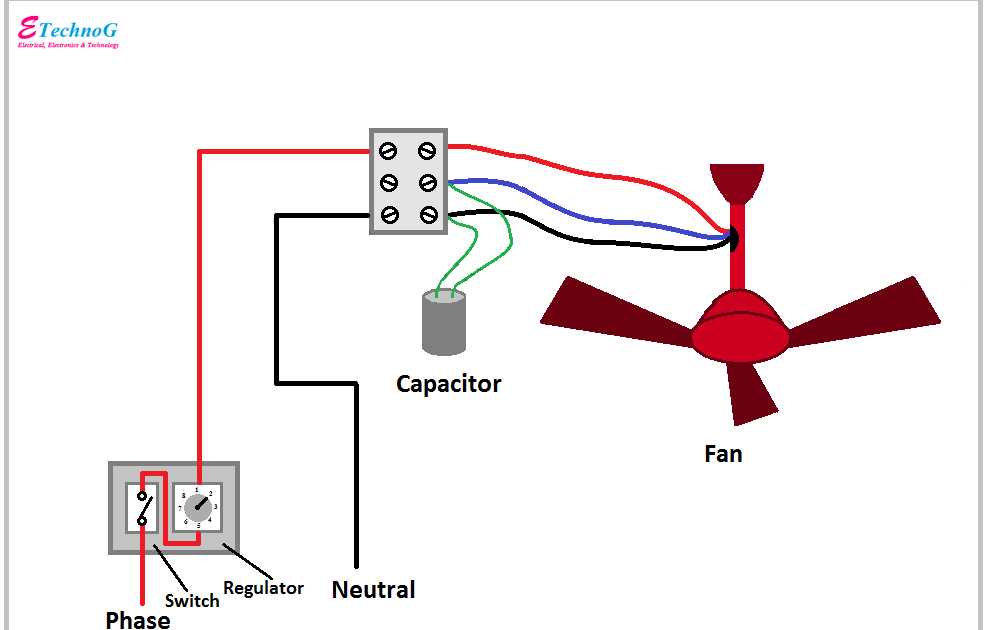
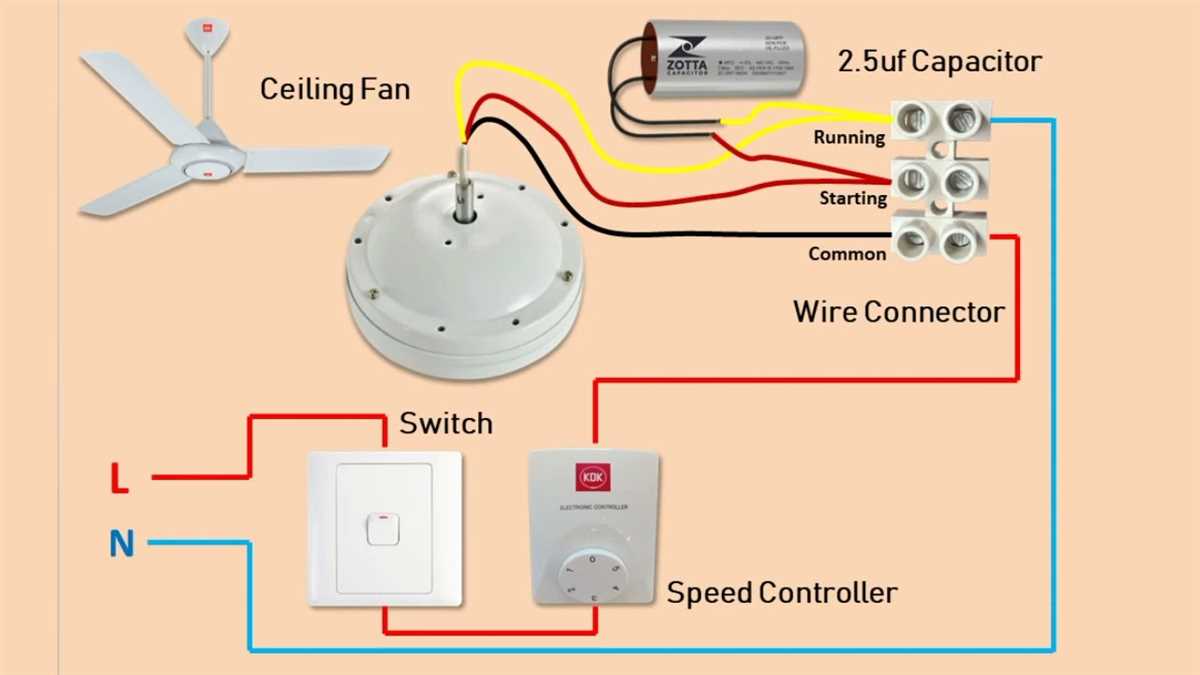
- Check if the fan speed setting is set to a low speed. Adjust it to a higher speed if necessary.
- Inspect the capacitor for any signs of damage or malfunction. Replace it if needed.
- Ensure that the blades are clean and not obstructed, as this can affect the fan’s performance.
3. Fan making noise or wobbling:
- Tighten any loose screws or bolts on the fan blades, motor housing, and mounting brackets.
- Check if the blades are securely attached to the motor and not warped or damaged.
- Balance the fan blades using a balancing kit or by adding weights to the blades.
In conclusion, troubleshooting common issues with a ceiling fan’s four-wire connection involves checking the power supply, ensuring proper wiring connections, adjusting fan speed settings, inspecting and replacing faulty components, and addressing any issues with noise or wobbling. By following these troubleshooting steps, you can resolve most problems and ensure optimal performance of your ceiling fan.