
When it comes to your generator’s performance, one crucial component that plays a vital role is the carburetor. Whether you are a seasoned generator enthusiast or simply a homeowner looking to troubleshoot a carburetor issue, understanding its inner workings is essential. In this article, we will delve into the ins and outs of the Champion generator carburetor diagram, providing you with a comprehensive guide to help you navigate this critical part with ease.
A carburetor is responsible for mixing air and fuel in the combustion chamber, creating the necessary vaporized mixture for the generator’s engine to run smoothly. Champion generators are known for their durability and reliability, and their carburetors are no exception. Understanding the carburetor’s diagram will enable you to identify its various components, such as the choke, float bowl, jets, and throttle plate, empowering you to perform routine maintenance and troubleshooting.
By studying the Champion generator carburetor diagram, you will be able to identify each component’s location and understand how they work together to ensure optimal generator performance. This knowledge can be invaluable when it comes to cleaning or replacing specific parts, adjusting the fuel mixture, or troubleshooting engine-related issues. With this article, we aim to provide you with the knowledge and confidence necessary to tackle any carburetor-related task with ease.
Champion Generator Carburetor Diagram: Comprehensive Guide
The carburetor is an essential component of any generator, including the Champion generator. It is responsible for mixing air and fuel in the right proportions to create a combustible mixture that powers the engine. Understanding the carburetor and its components is crucial for troubleshooting and maintaining your generator. In this comprehensive guide, we will explore the Champion generator carburetor diagram to help you gain a better understanding of its parts and functionality.
Main Components of the Carburetor
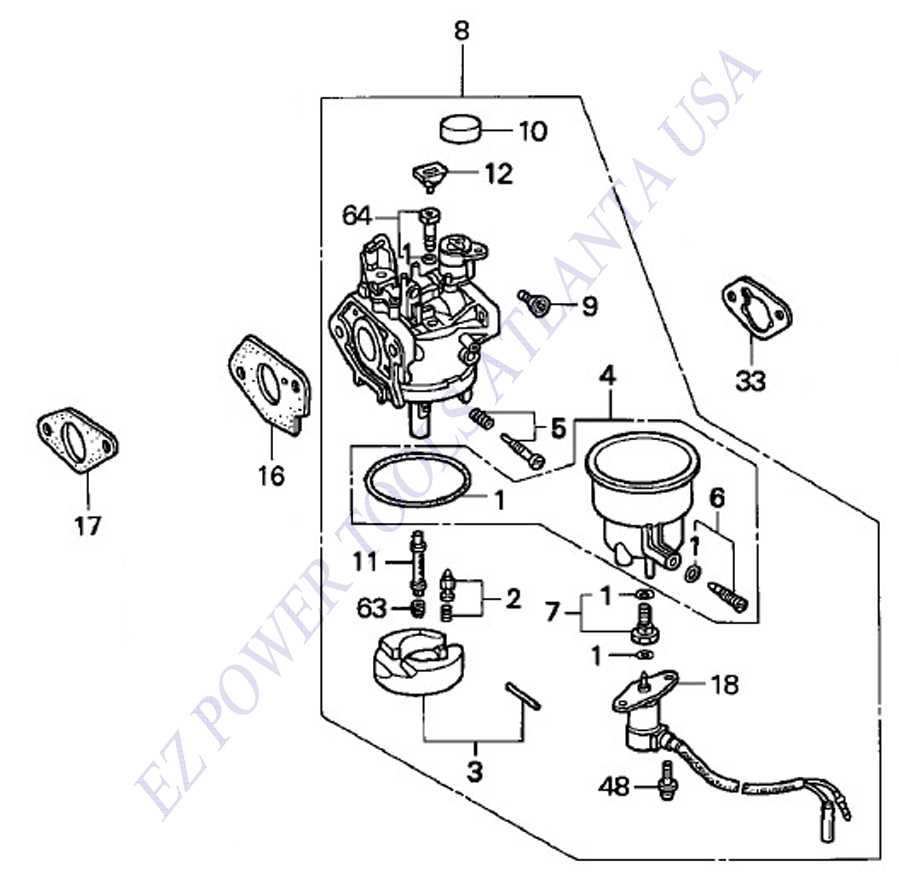
The Champion generator carburetor diagram typically includes several key components, each with its specific role in the carburetion process. These components include:
- Fuel Bowl: The fuel bowl is a reservoir that holds the fuel before it is drawn into the intake manifold.
- Main Jet: The main jet controls the flow of fuel into the carburetor. Turning the adjustment screw can regulate the amount of fuel entering the combustion chamber.
- Venturi Tube: The venturi tube creates a vacuum-like effect to draw fuel from the fuel bowl into the carburetor throat.
- Idle Speed Screw: The idle speed screw regulates the engine’s idle speed by controlling the amount of air bypassing the throttle valve.
- Float and Needle Valve: The float and needle valve work together to control the fuel level in the fuel bowl. The float rises with the fuel level, closing the needle valve when the bowl is full.
- Throttle Valve: The throttle valve determines the amount of air entering the engine. Its position is controlled by the governor to adjust the engine’s speed.
Using the Carburetor Diagram for Maintenance
The Champion generator carburetor diagram is a valuable resource for maintenance and troubleshooting. It allows you to identify, locate, and understand the various components of the carburetor. This knowledge is crucial for cleaning, adjusting, and replacing parts when necessary.
To use the carburetor diagram effectively, start by identifying the component you want to work on. Then, refer to the diagram to locate the part and understand its function within the carburetor system. This step-by-step visual guide can help you dismantle and reassemble the carburetor correctly, ensuring optimal performance of your Champion generator.
Additionally, the carburetor diagram can assist in troubleshooting common generator problems. By understanding the carburetor’s components and their functions, you can pinpoint potential issues related to fuel delivery, air intake, and mixture control. This knowledge can guide you in diagnosing and resolving problems efficiently, saving time and money on repairs.
In conclusion, the Champion generator carburetor diagram is an invaluable tool for generator owners. It provides a comprehensive visual guide to understanding the carburetor’s components and their functions. By familiarizing yourself with the diagram, you can perform effective maintenance, troubleshoot common issues, and ensure optimal performance of your Champion generator.
What is a carburetor and why is it important for a generator?
A carburetor is a mechanical device that mixes air and fuel in the correct proportions for combustion in an internal combustion engine. It is an integral component of a generator’s engine system, playing a crucial role in ensuring the efficient and reliable operation of the generator.
The main function of a carburetor in a generator is to provide the engine with the optimal air-fuel ratio for combustion. It achieves this by regulating the flow of air and fuel into the engine. The carburetor controls the fuel flow based on factors such as engine speed, load, and temperature, ensuring that the engine receives the right amount of fuel at any given operating condition.
A properly functioning carburetor is important for a generator because it directly affects the engine’s performance and fuel efficiency. If the carburetor is not properly calibrated or becomes clogged or damaged, it can cause issues such as poor fuel economy, rough idling, weak acceleration, and overall engine performance problems.
In the context of a Champion generator, a carburetor diagram can be a useful resource for troubleshooting and maintenance. It provides a visual representation of the various components and their connections within the carburetor, making it easier to identify and address any issues that may arise. By understanding the layout and function of the carburetor, users can perform basic maintenance tasks such as cleaning or adjusting the carburetor to ensure optimal performance of their generator.
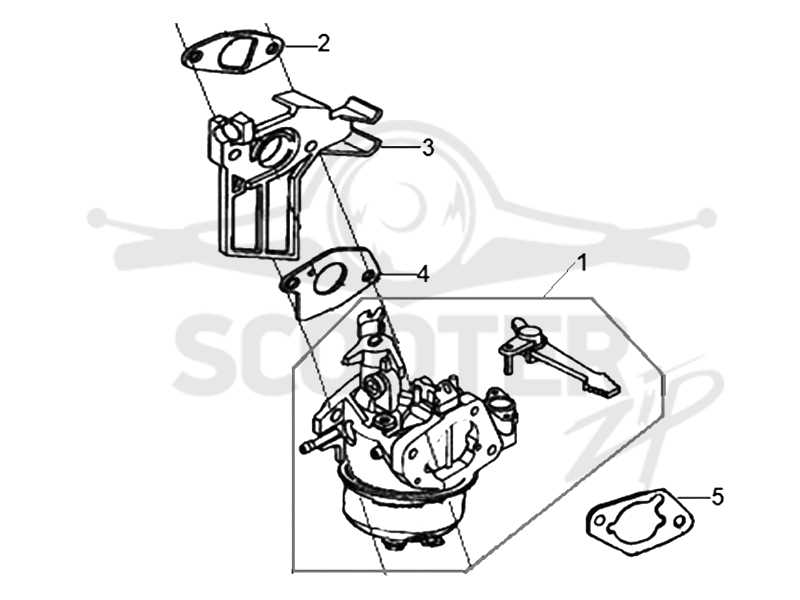
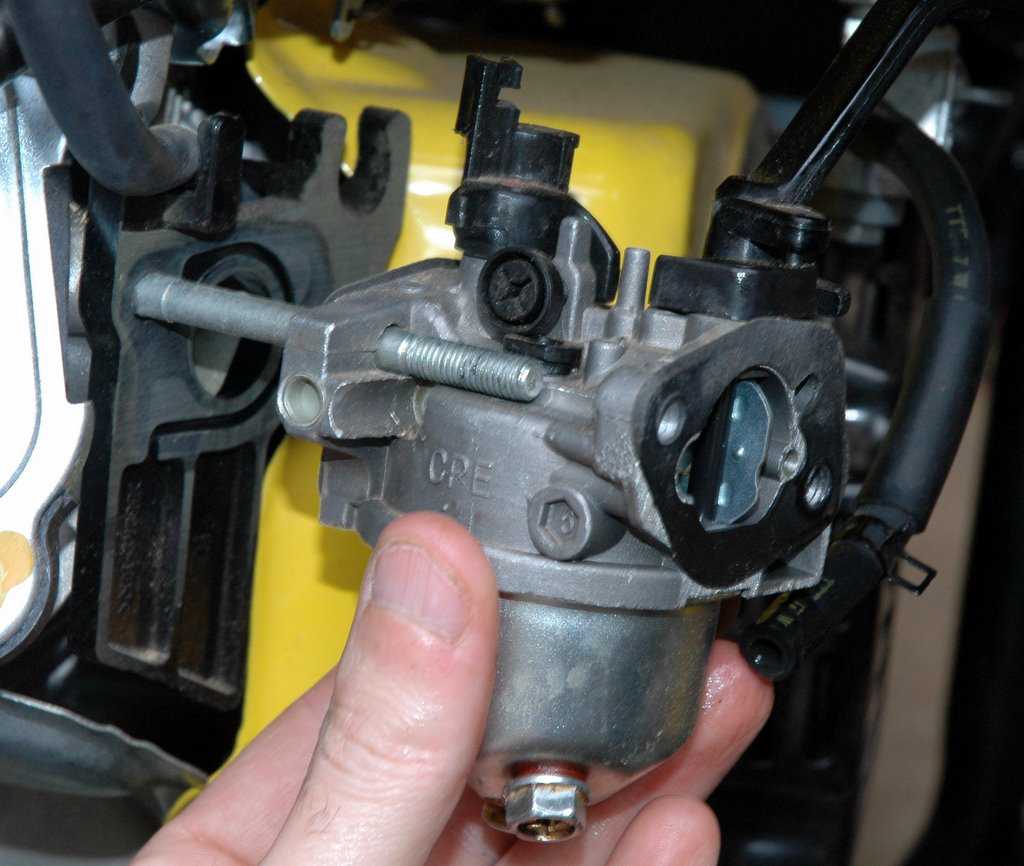
The components of a Champion generator carburetor
A Champion generator carburetor is composed of several essential components that work together to ensure the proper fuel and air mixture for the engine’s combustion process. These components play a crucial role in the overall performance of the generator.
1. Main body: The main body of the carburetor houses many of the critical components, including the fuel reservoir, float, and needle valve. It acts as the central hub, connecting the other parts together and providing support for their operation.
2. Float: The float is a crucial component that regulates the fuel level in the carburetor. It is typically made of a buoyant material such as plastic or metal and is designed to rise and fall according to the fuel level in the reservoir. When the fuel level is low, the float lowers and opens the needle valve to allow fuel to enter the carburetor.
3. Needle valve: The needle valve works in tandem with the float to control the flow of fuel into the carburetor. As the float lowers, it opens the needle valve, allowing fuel to enter the carburetor. When the float rises and reaches a certain level, it closes the needle valve, preventing further fuel from entering.
4. Throttle plates: The throttle plates are responsible for controlling the airflow into the engine. They are located in the carburetor’s throat and can be adjusted to regulate the engine’s speed. By opening or closing the throttle plates, the amount of air entering the engine can be varied, affecting its performance.
5. Jets: Jets are small openings or nozzles in the carburetor that control the amount of fuel entering the airflow. There are typically two types of jets: the main jet and the idle jet. The main jet controls fuel flow at higher engine speeds, while the idle jet controls fuel flow at lower engine speeds or when the engine is idling.
These are just a few of the essential components found within a Champion generator carburetor. Understanding their functions and how they work together is crucial for maintaining the proper fuel-air mixture and ensuring the generator operates smoothly and efficiently.
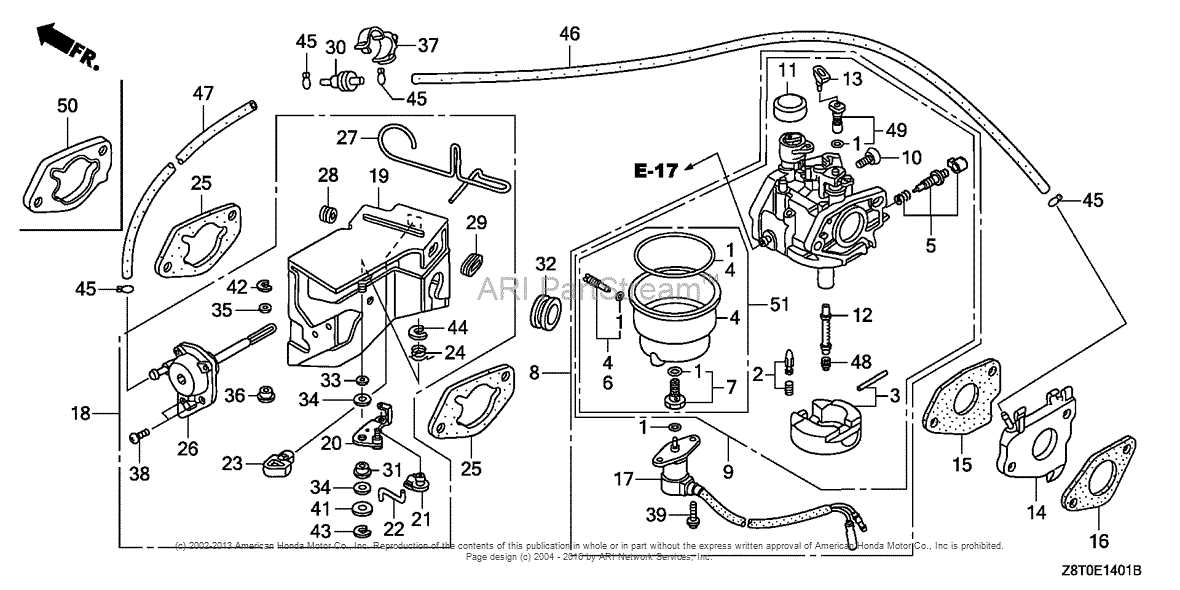
Understanding the diagram of a Champion generator carburetor
A carburetor is a critical component of a Champion generator, responsible for mixing air and fuel to create the combustible mixture that powers the engine. Understanding the diagram of a Champion generator carburetor is essential for troubleshooting and maintaining your generator.
The diagram typically includes various components such as the throttle plate, choke plate, fuel bowl, float, needle valve, main jet, and idle circuit. Each component plays a specific role in fuel delivery and engine performance. By familiarizing yourself with the diagram, you can better understand how these components interact and ensure the carburetor functions optimally.
The throttle plate is a butterfly-shaped valve that regulates the amount of air entering the carburetor. The choke plate, on the other hand, restricts airflow during cold starts to enrich the fuel-air mixture. The fuel bowl is a reservoir that holds fuel, while the float and needle valve work together to control the fuel level in the bowl. The main jet controls the flow of fuel into the carburetor, while the idle circuit allows for smooth operation at low engine speeds.
When troubleshooting carburetor issues, it is crucial to refer to the diagram to identify potential problem areas. Common problems include clogged jets, worn-out gaskets, and malfunctioning floats. By understanding the diagram, you can locate these components and perform appropriate maintenance or repairs. Furthermore, the diagram can serve as a guide when disassembling and reassembling the carburetor during cleaning or rebuilding.
In conclusion, understanding the diagram of a Champion generator carburetor is essential for proper maintenance and troubleshooting. By familiarizing yourself with the various components and their functions, you can effectively diagnose and rectify any issues that may arise. Regular inspection and maintenance of the carburetor can ensure optimal engine performance and extend the lifespan of your Champion generator.
Common issues and troubleshooting tips for a Champion generator carburetor
When it comes to a Champion generator carburetor, there are a few common issues that can arise. Understanding these issues and troubleshooting them can save you time and frustration. Here are some of the most common issues and tips to resolve them:
Clogged carburetor:
A clogged carburetor is a common problem that can prevent the generator from starting or running smoothly. If you suspect a clogged carburetor, start by removing the air filter and inspecting it for dirt or debris. Clean or replace the air filter if necessary. Next, remove the carburetor and clean it thoroughly using carburetor cleaner. Pay special attention to the jets and passages, ensuring they are clear of any obstructions. Reinstall the carburetor and try starting the generator again.
Fuel flow issues:
If your Champion generator is experiencing fuel flow issues, it may not be receiving enough fuel to run properly. Start by checking the fuel tank for any blockages or debris. Clean the fuel tank if necessary. Next, inspect the fuel line for any kinks or damage. Replace the fuel line if needed. If the fuel tank and fuel line are clear, the issue may lie with the fuel filter or fuel cap. Remove and inspect these components, replacing them if necessary. Finally, check that the fuel valve is fully open to ensure proper fuel flow.
Incorrect fuel mixture:
A Champion generator carburetor requires the correct fuel mixture to function properly. If you are experiencing issues with your generator, check that the fuel mixture is correct. Consult the generator’s manual or manufacturer’s guidelines for the proper fuel-to-oil ratio. Mixing incorrect fuel can cause the carburetor to become clogged or the engine to run poorly. Drain the fuel tank if needed and refill it with the correct fuel mixture.
Worn or damaged carburetor components:
If your carburetor has been in use for an extended period of time, it may have worn or damaged components. Inspect the carburetor for any signs of wear, such as worn gaskets or seals. Replace any worn or damaged components to ensure proper functioning of the carburetor. It’s also worth checking the throttle and choke mechanisms for any sticking or binding. Lubricate or adjust these components as needed. Proper maintenance and regular inspection can help prevent excessive wear and damage to the carburetor.
By understanding these common issues and following the troubleshooting tips, you can keep your Champion generator carburetor in optimal condition. Regular maintenance, including cleaning and inspection, can help prevent many of these issues from occurring in the first place. If you are unsure about any aspect of carburetor maintenance or repair, consult a professional for assistance.
How to Clean and Maintain Your Champion Generator Carburetor
Properly maintaining and cleaning your Champion generator carburetor is essential for its optimal performance and longevity. The carburetor plays a crucial role in supplying the engine with the correct mixture of fuel and air. Over time, the carburetor can get clogged with dirt, debris, and stale fuel, resulting in poor engine performance or starting issues. Regular cleaning and maintenance can help ensure that your generator runs smoothly when you need it most.
1. Gather the necessary tools: Before you begin, gather the tools you’ll need for the job. These may include a wrench or socket set, a carburetor cleaner, a small brush, compressed air, and a clean cloth or rag.
2. Turn off the generator: Before you start working on the carburetor, make sure the generator is turned off and the fuel valve is closed. Disconnect the spark plug wire to prevent accidental starts.
3. Remove the carburetor: Locate the carburetor on your Champion generator and carefully remove it from the engine. This may require removing a few screws or bolts that hold it in place. Take note of the carburetor’s orientation and any hoses or wires that are connected to it.
4. Clean the exterior: Use a clean cloth or rag to wipe away any dirt or grime on the exterior of the carburetor. Pay attention to the various components, including the throttle linkage and choke plate.
5. Disassemble the carburetor: Carefully disassemble the carburetor, taking note of the order in which the parts are removed. Use a carburetor cleaner to spray and clean each component thoroughly. A small brush can be used to scrub away any stubborn deposits.
6. Clear the fuel passages: Use compressed air to blow out any debris or blockages in the fuel passages of the carburetor. Pay attention to the jets and small orifices that may become clogged over time.
7. Reassemble and reinstall: Once the carburetor is clean and dry, reassemble it using the correct order of parts. Carefully reinstall the carburetor onto the engine, ensuring that all hoses and wires are properly connected. Tighten the screws or bolts to secure it in place.
8. Test and adjust: After cleaning and reinstalling the carburetor, test the generator to ensure it runs smoothly. If necessary, adjust the carburetor settings according to the manufacturer’s specifications for optimal performance.
By regularly cleaning and maintaining your Champion generator carburetor, you can keep it running smoothly and extend its lifespan. Remember to follow the manufacturer’s guidelines and recommendations for specific maintenance intervals to ensure the best results.
Replacing or upgrading your Champion generator carburetor
If you are experiencing issues with your Champion generator’s carburetor, such as poor performance, difficulty starting, or rough idling, it may be necessary to replace or upgrade the carburetor.
First, you should consult your generator’s manual or contact the manufacturer to determine the specific carburetor model required for your generator. Once you have this information, you can either purchase a replacement carburetor that matches the original specifications, or you can opt for an upgraded carburetor that may offer improved performance or fuel efficiency.
When replacing the carburetor, it is important to follow the manufacturer’s instructions and guidelines. This usually involves shutting off the fuel supply, disconnecting any necessary components, removing the old carburetor, and then installing the new one in its place. It is also recommended to clean the air filter and fuel lines during this process to ensure optimal performance.
If you decide to upgrade your carburetor, you may need to make additional modifications to your generator. This could include adjusting the fuel mixture or installing a higher capacity fuel pump. It is crucial to carefully follow the instructions provided with the upgraded carburetor and consult with a professional if needed.
Overall, replacing or upgrading your Champion generator carburetor can improve its performance and extend its lifespan. By following the appropriate steps and guidelines, you can ensure that your generator runs smoothly and reliably when you need it most.
Q&A:
How do I know if I need to replace my Champion generator carburetor?
If your Champion generator is having trouble starting or running smoothly, it could be a sign that the carburetor needs to be replaced. Other signs include a leaking carburetor, inconsistent RPMs, or black smoke coming from the exhaust.
Can I upgrade my Champion generator carburetor?
Yes, you can upgrade your Champion generator carburetor. Upgrading the carburetor can improve the overall performance and efficiency of your generator. It can also help to reduce fuel consumption and emissions.
How can I replace the carburetor on my Champion generator?
To replace the carburetor on your Champion generator, you will need to disconnect the fuel line, remove the air filter and housing, disconnect the throttle linkage, and unbolt the carburetor from the engine. Then, simply reverse the steps to install the new carburetor.
Where can I purchase a replacement carburetor for my Champion generator?
You can purchase a replacement carburetor for your Champion generator from various online retailers, such as Amazon or eBay. You can also check with local generator repair shops or contact Champion directly to inquire about purchasing a replacement carburetor.