
As drones become increasingly popular for recreational and professional use, understanding their inner workings becomes vital for enthusiasts and professionals alike. One crucial aspect of drone technology is the wiring diagram, which serves as a roadmap for connecting various components and ensuring the drone’s proper functioning. In this article, we will delve into the basics of drone wiring diagrams, their importance, and how to read and create one.
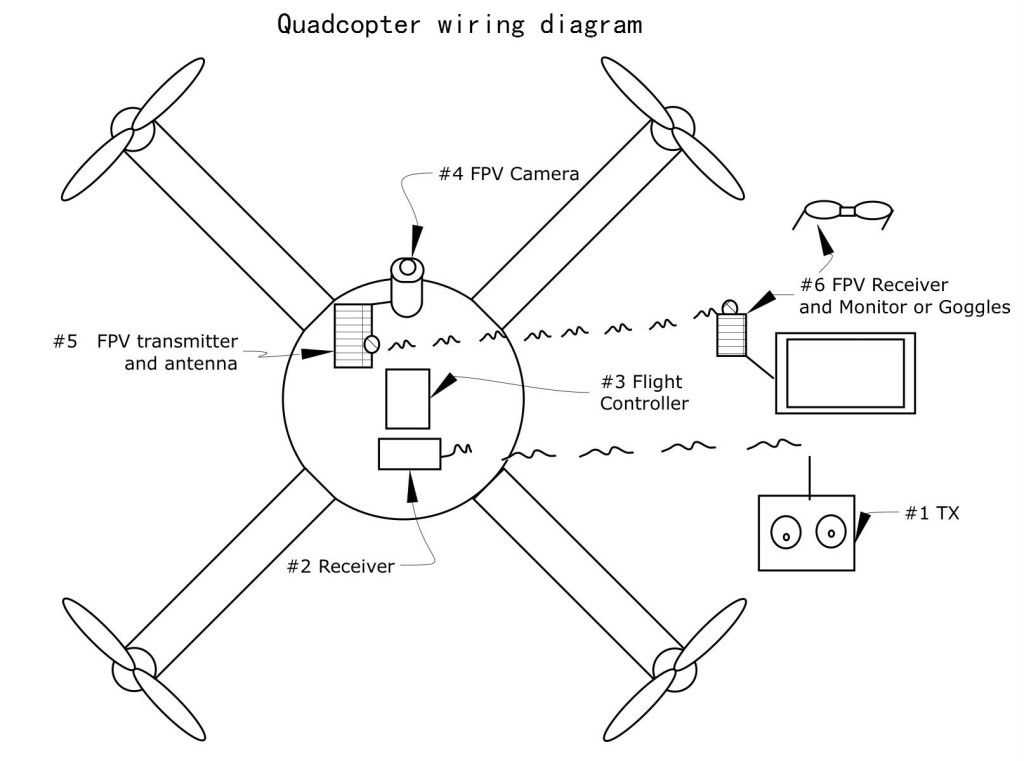
Drone wiring diagrams are essentially blueprints that demonstrate the connections between different electrical components of a drone. These components include the flight controller, motors, batteries, electronic speed controllers (ESCs), receivers, and other peripherals. By providing a clear visual representation of these connections, wiring diagrams help enthusiasts and professionals troubleshoot issues, make modifications, or assemble their own custom drones.
Understanding how to read a drone wiring diagram is essential for drone enthusiasts who want to repair or build their drones. Each component in a diagram is represented by a symbol and labeled with specific information, such as pin assignments and wire colors. By following these symbols and labels, users can determine where each wire needs to be connected, ensuring the correct flow of electricity throughout the drone’s system.
Drone Wiring Diagram: A Comprehensive Guide
When it comes to building or modifying a drone, understanding its wiring diagram is crucial. The diagram acts as a blueprint, guiding drone enthusiasts through the complex process of connecting various components effectively. It provides a visual representation of how different parts, such as the flight controller, ESCs, motors, and other peripherals, are interconnected.
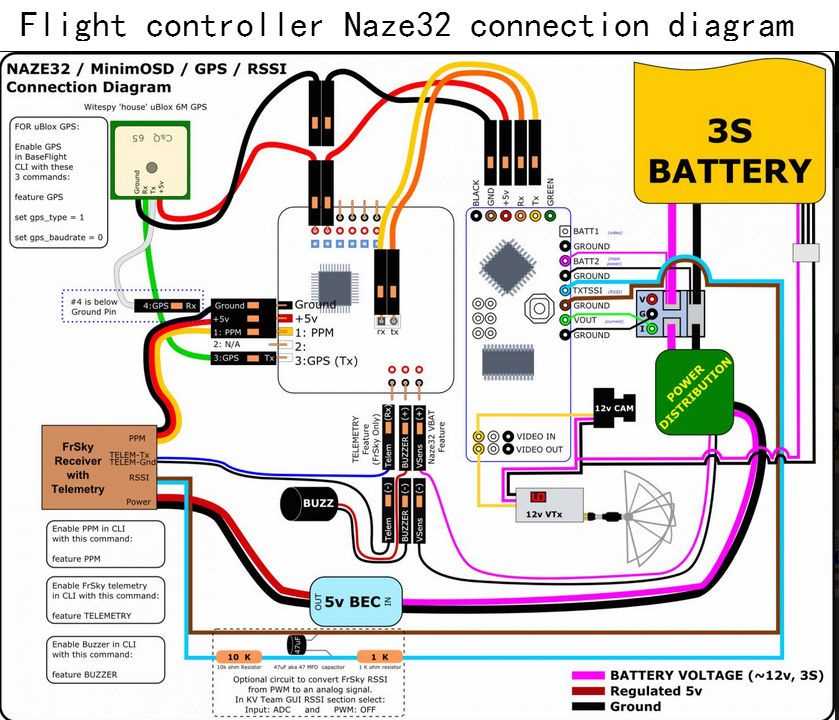
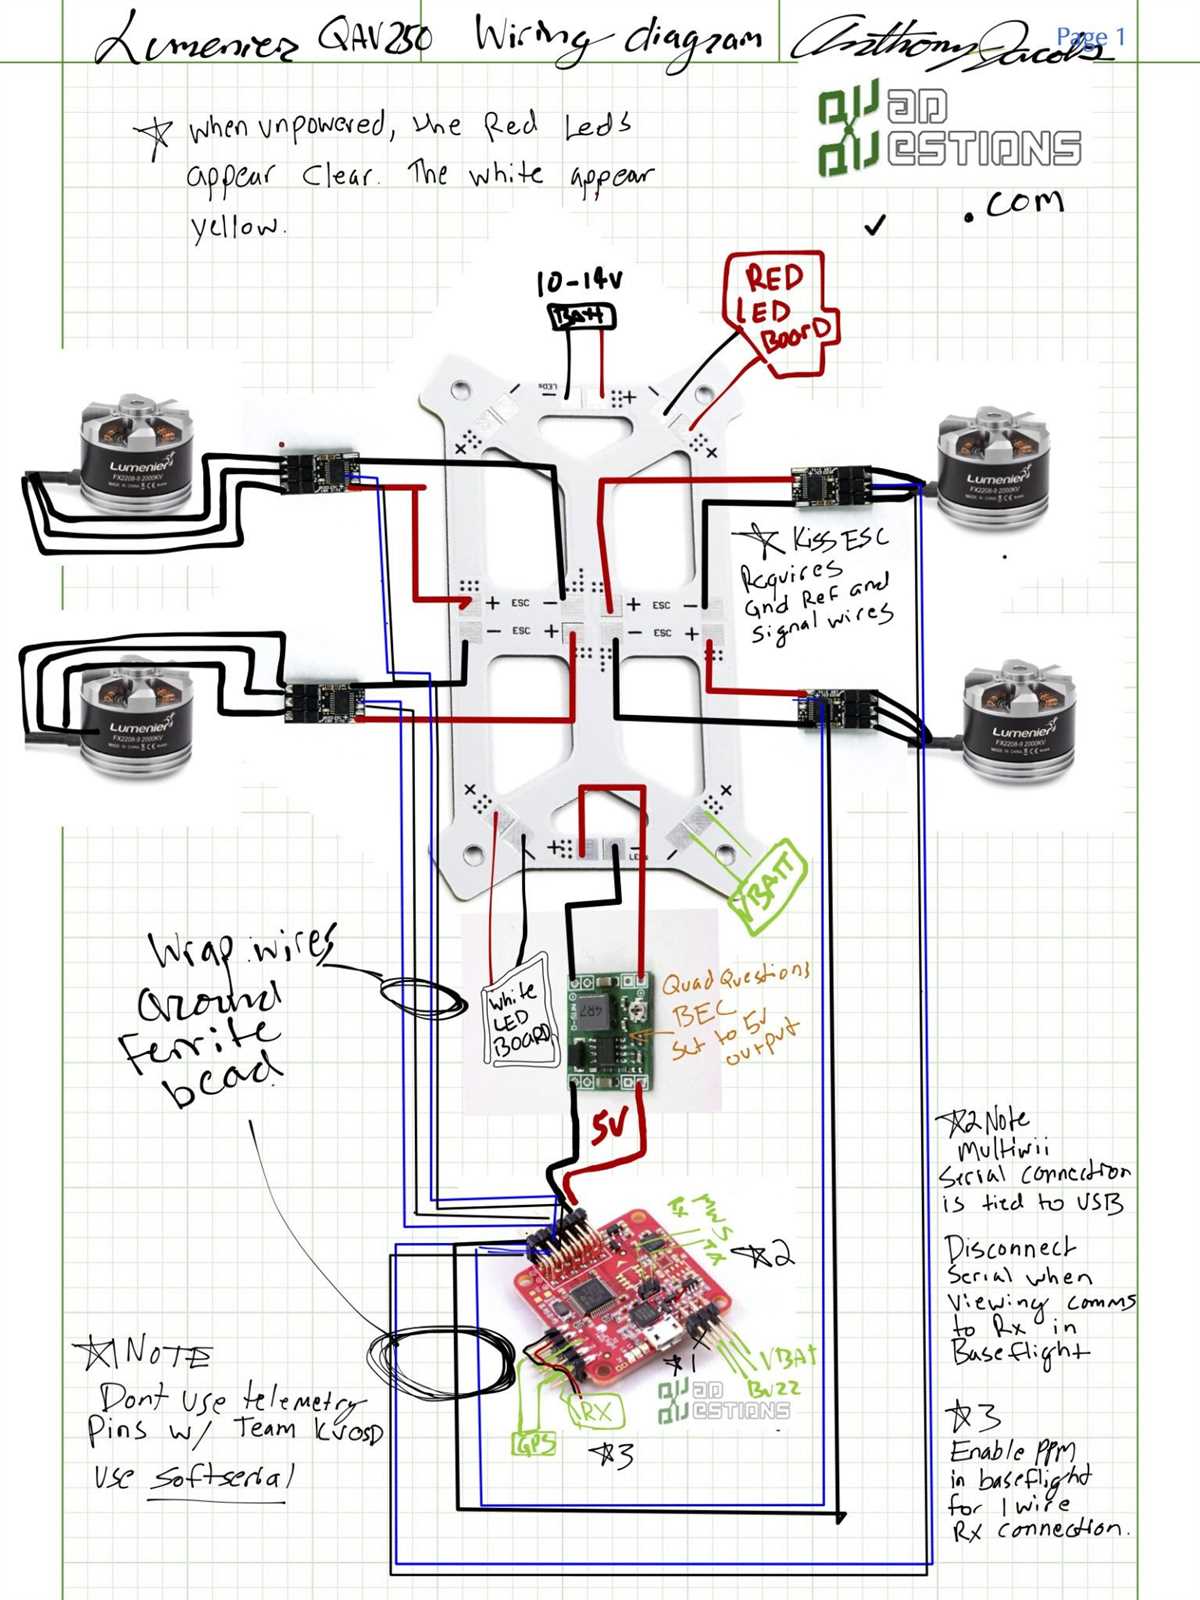
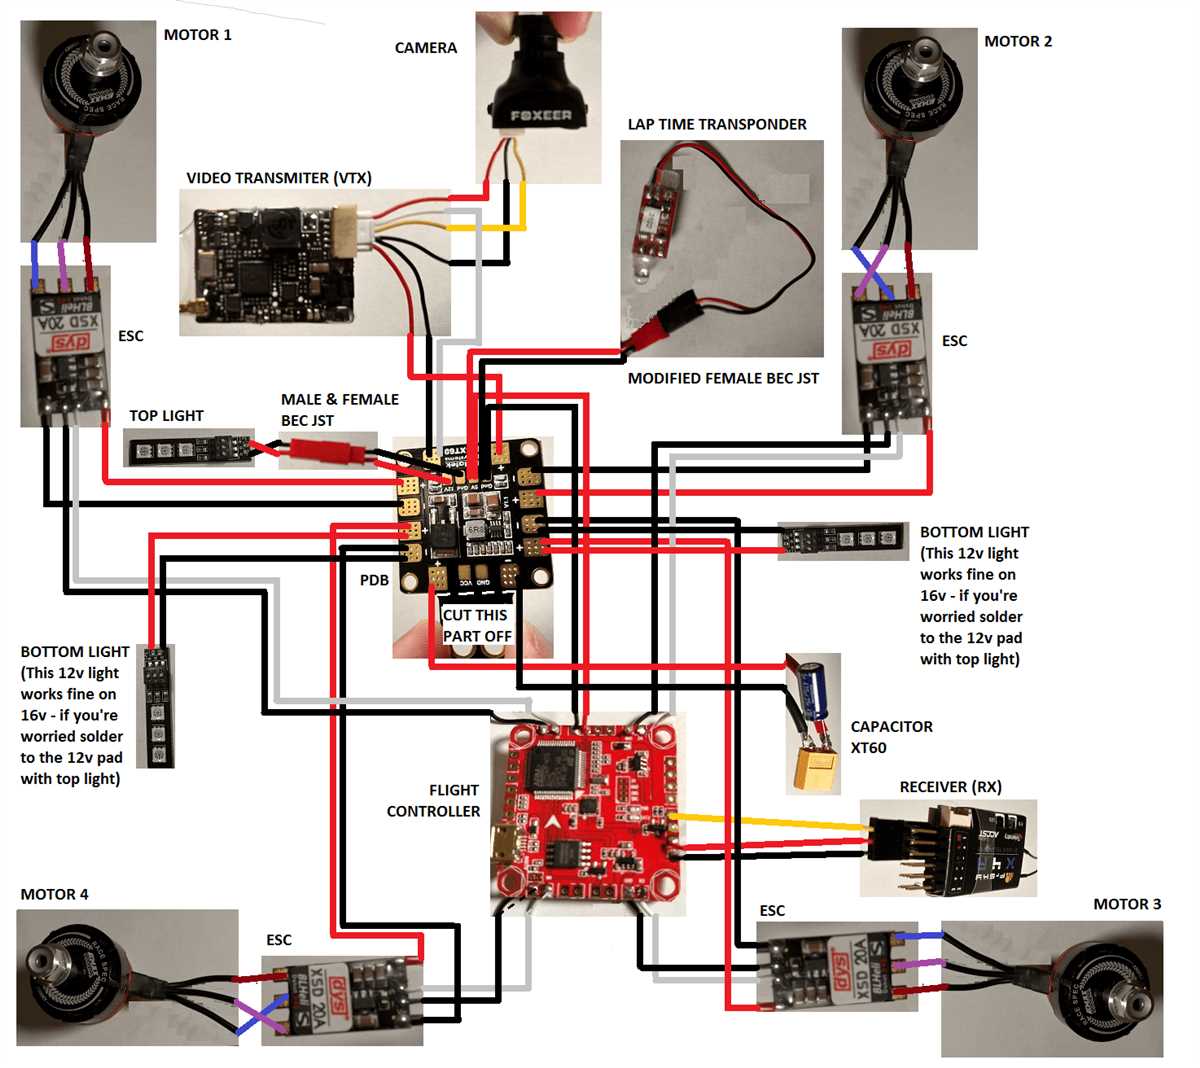
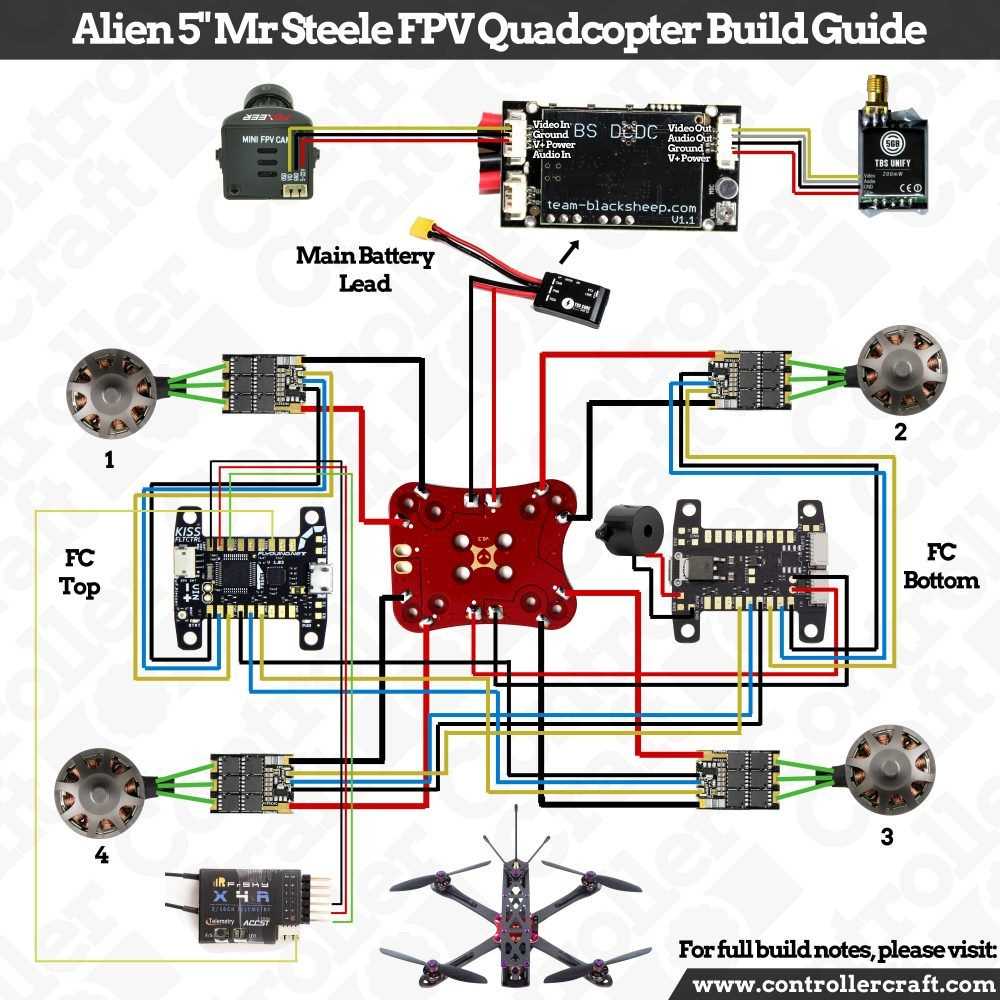
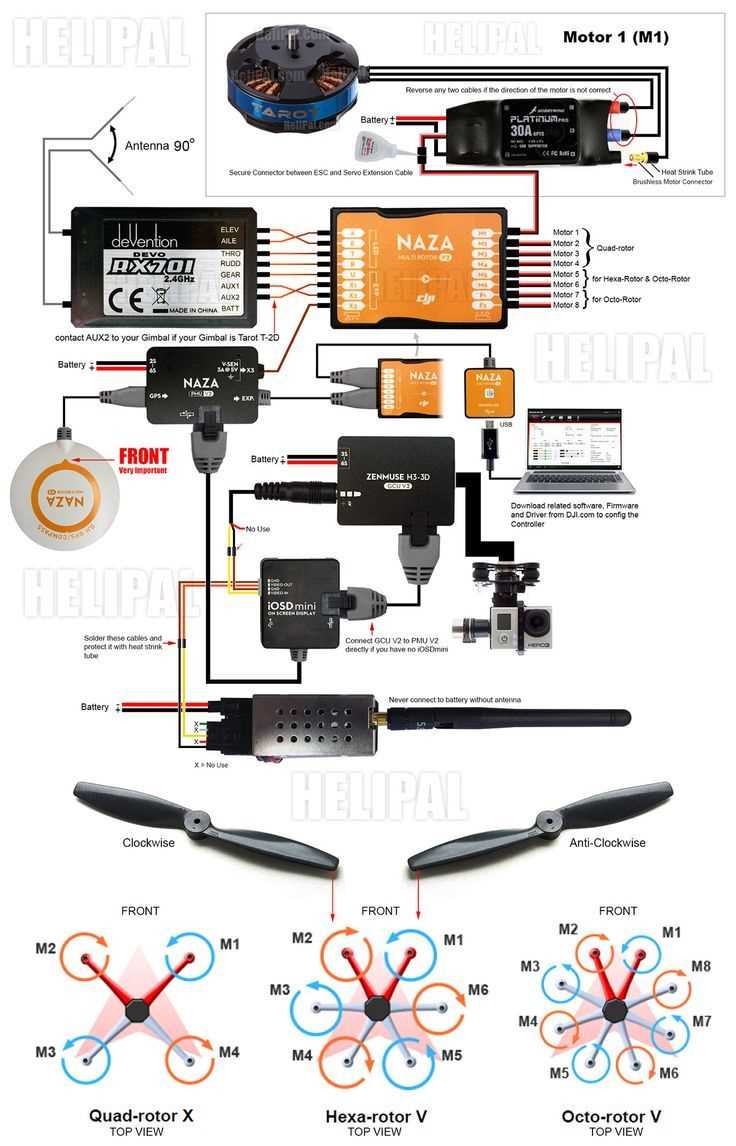
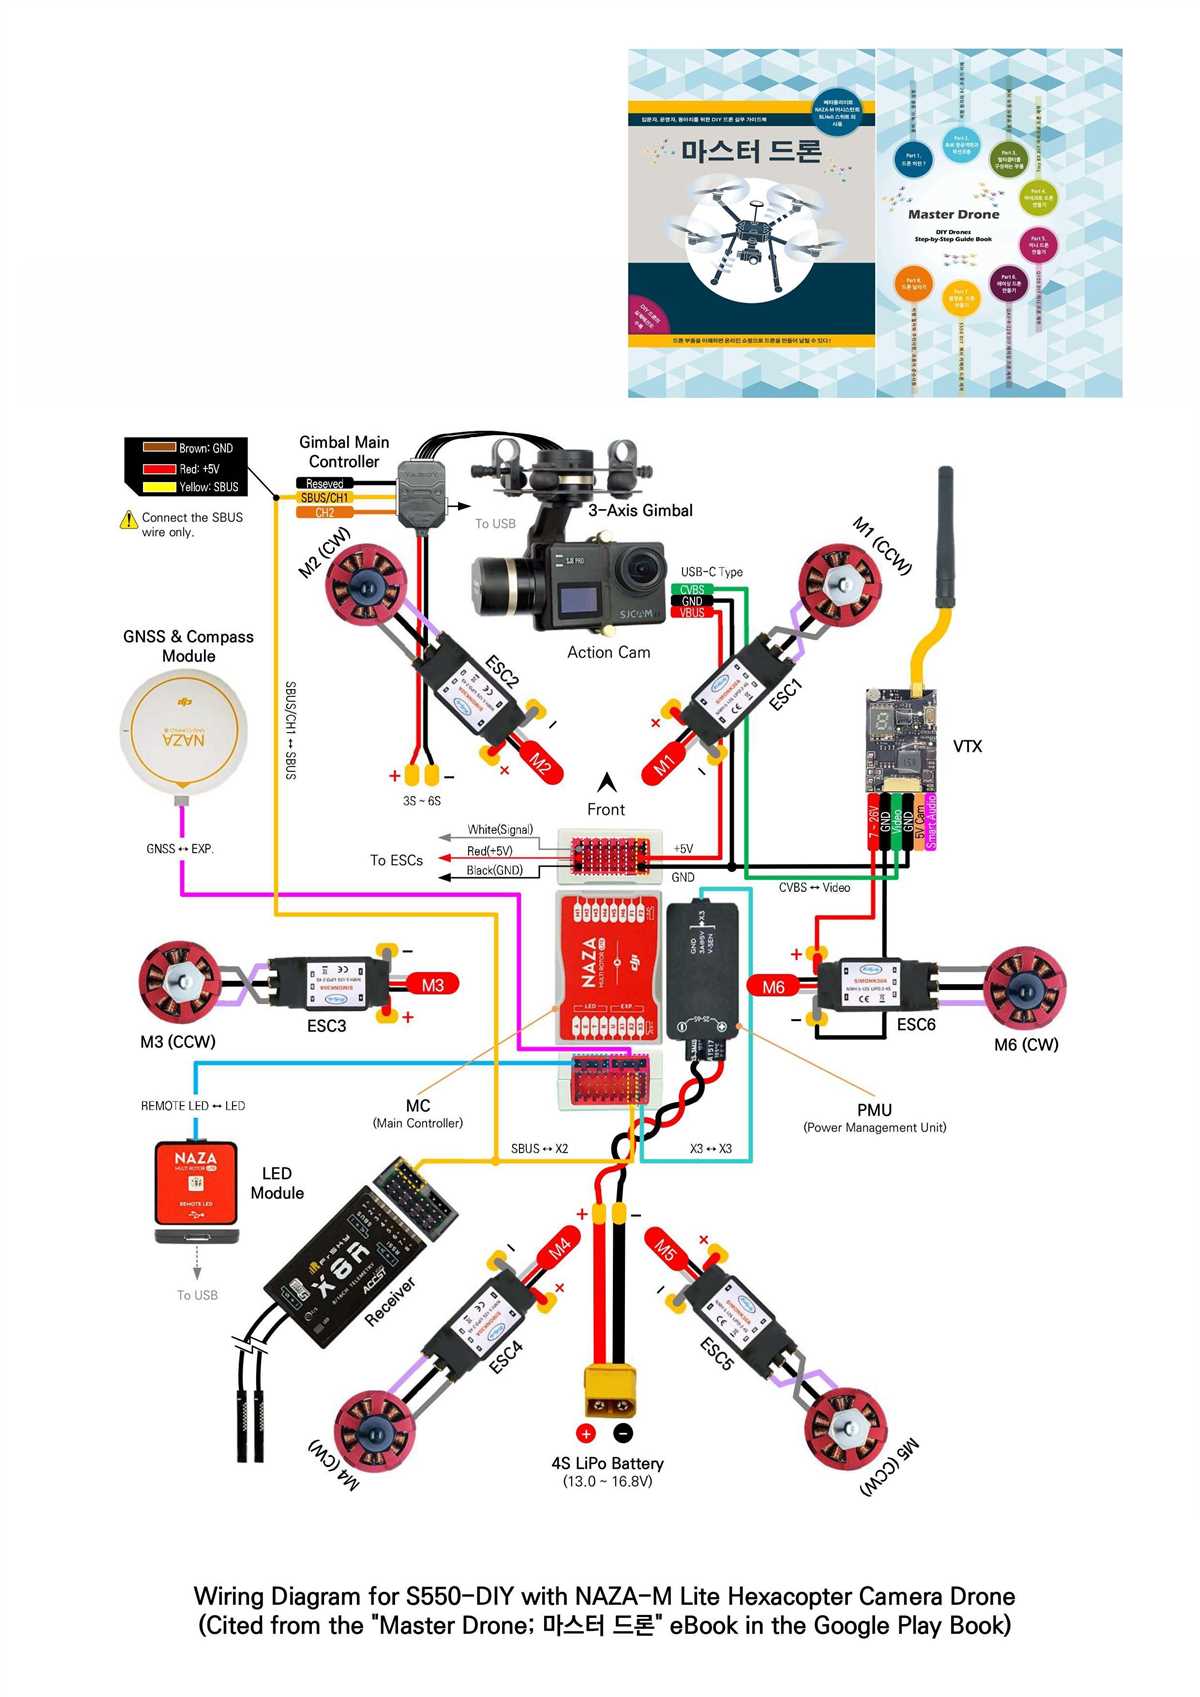
Flight Controller: The flight controller is the brain of the drone, responsible for receiving input from the pilot, processing it, and sending commands to other components. It typically includes a microcontroller, sensors, and a software interface. In the wiring diagram, the flight controller is usually located at the center, with wires extending to other components.
ESCs: Electronic Speed Controllers (ESCs) regulate the speed and power distribution to the drone’s motors. Each motor has its own ESC, which receives commands from the flight controller. The wiring diagram shows the connections between the flight controller and the ESCs, usually using three wires for each motor.
Motors: Motors are responsible for propelling the drone and generating lift. In the wiring diagram, the motors are connected to the ESCs, typically through three wires for signal, power, and ground. The exact wiring configuration may vary depending on the type of motor and connection used.
Battery: The battery provides the power needed for the drone to operate. It is usually connected to the flight controller and ESCs through a power distribution board or harness. The wiring diagram illustrates the connection between the battery and other components, ensuring a reliable power supply.
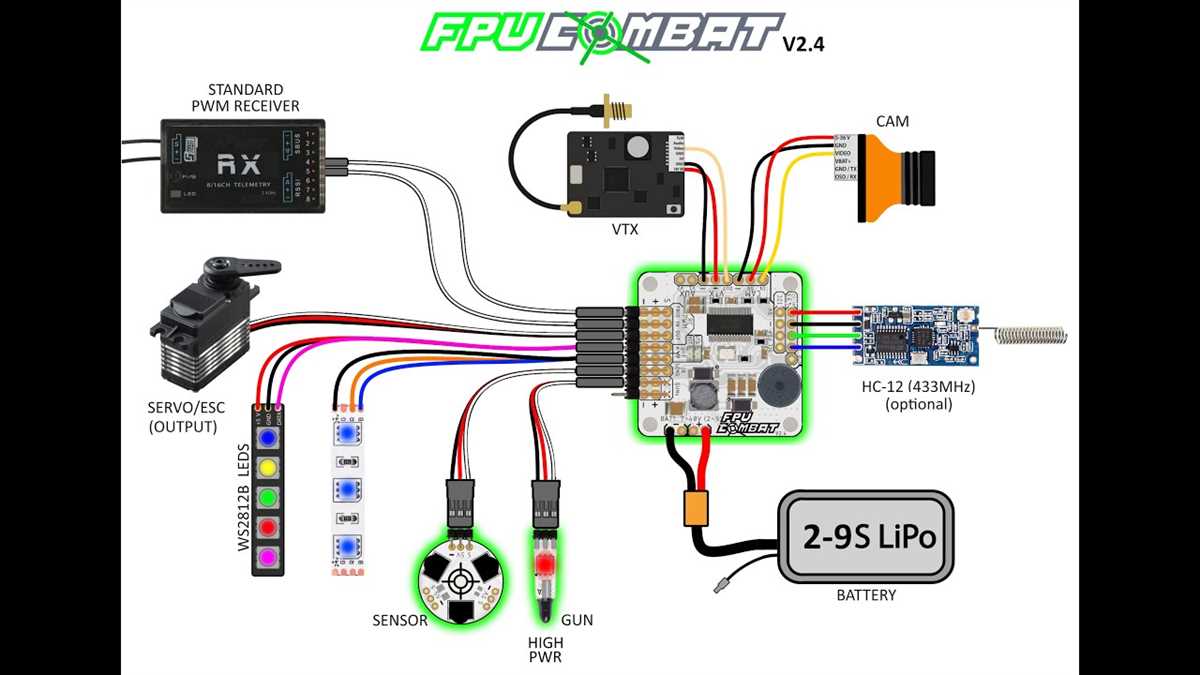
Peripherals: Drones may have additional peripherals, such as cameras, GPS modules, or LED lights. These peripherals are typically connected to the flight controller or other dedicated ports. The wiring diagram includes these connections, ensuring proper integration and communication between the peripherals and the main drone system.
Overall, a drone wiring diagram serves as a visual guide, helping drone enthusiasts understand how different components interact and ensuring proper connectivity. It is essential to refer to the specific wiring diagram provided by the drone manufacturer or consult professional resources to ensure safety and optimal performance.
Understanding the Basics of Drone Wiring
Introduction
Drone wiring plays a crucial role in the overall functionality and performance of a drone. Understanding the basics of drone wiring is essential for both building and troubleshooting drones. In this article, we will explore the key components and connections involved in drone wiring.
Power Distribution
Power distribution is a fundamental aspect of drone wiring. The main power source, typically a battery, needs to be connected to various components such as the flight controller, motors, and other electronic devices. This is usually done through a power distribution board (PDB) or a power distribution harness.
The PDB acts as a central hub, allowing multiple connections to be made from the battery to different components. It ensures that each component receives the appropriate voltage and current. The power distribution harness, on the other hand, is a pre-made wiring solution that simplifies the process of connecting the components together.
Flight Controller

The flight controller is the brain of the drone, responsible for processing inputs from the pilot and other sensors, and making adjustments to the motors accordingly. It is connected to various modules such as GPS, gyroscopes, and accelerometers, as well as the power distribution system.
The wiring for the flight controller is typically done using a combination of cables and connectors. It is essential to ensure that the correct connections are made to ensure proper communication between the flight controller and the other components.
ESC and Motors
The electronic speed controllers (ESCs) and motors are responsible for controlling the speed and direction of the drone. The ESCs receive commands from the flight controller and convert them into signals that control the motors. Wiring the ESCs and motors involves connecting the ESCs to the flight controller and the motors to the ESCs.
It is important to ensure that the wiring is done correctly and that the correct motor rotation direction is set. Improper wiring can lead to issues such as erratic motor behavior or even motor failure.
Additional Components
In addition to the main components mentioned above, drones may include various additional components such as cameras, video transmitters, and receivers. These components often have their own wiring requirements and need to be appropriately connected to the main wiring system.
It is crucial to carefully read the documentation provided with these additional components to understand their wiring needs and ensure proper integration into the overall drone wiring system.
Conclusion
In conclusion, understanding the basics of drone wiring is essential for building and troubleshooting drones. Proper wiring ensures optimal performance and reliability of the drone’s components. By familiarizing yourself with the key components and connections involved in drone wiring, you will be better equipped to handle any wiring-related issues that may arise.
Key Components of Drone Wiring
In the world of drones, wiring is a critical aspect that allows for the proper functionality of various components. Whether it’s a hobbyist drone or a professional-grade one, understanding the key components of drone wiring is essential for building and maintaining drones effectively.
Flight Controller: The flight controller is the brain of the drone and is responsible for interpreting signals from the transmitter and maintaining stability and control. It receives power from the battery and is connected to various sensors and motors.
Power Distribution Board (PDB): The PDB is the central hub for distributing power to different components of the drone. It takes power from the battery and provides regulated power to the flight controller, motors, camera, and other electronics. It also helps to prevent voltage spikes and provide a clean power supply.
Electronic Speed Controllers (ESCs): The ESCs control the speed and direction of the drone’s motors. They receive commands from the flight controller and adjust the power output to each motor accordingly. ESCs are typically connected to the flight controller through a signal wire and receive power from the PDB.
Motor: Motors are responsible for generating thrust and controlling the movement of the drone. They are connected to the ESCs via mounting and wiring. Motors vary in size and power depending on the intended use of the drone.
Battery: The battery provides the necessary power to the drone. It is typically a lithium-polymer (LiPo) battery, chosen for its high energy density and lightweight properties. The battery is connected to the PDB and powers all the electronic components of the drone.
Radio Receiver: The radio receiver receives signals from the transmitter and relays them to the flight controller. It is connected to the flight controller using a signal wire and provides the necessary control inputs to maneuver the drone.
Camera and Video Transmitter: Drones often have cameras and video transmitters for aerial photography or live streaming purposes. These components are connected to the flight controller and receive power from the PDB. They allow the pilot to view the live video feed from the drone’s camera on a ground station or FPV (first-person view) goggles.
Understanding and properly wiring these key components is crucial in building a reliable and efficient drone. Ensuring proper connections, wire gauges, and insulation not only improves the drone’s performance but also ensures safety during flight.
Step-by-Step Guide to Drone Wiring
Building a drone from scratch can be an exciting and rewarding project. One of the most important aspects of building a drone is the wiring, as it determines how all the components are connected and work together. In this step-by-step guide, we will walk you through the process of wiring a drone, from gathering the necessary tools and components to connecting everything correctly.
Gather the Necessary Tools and Components
Before you start wiring your drone, make sure you have all the necessary tools and components. This includes a soldering iron, solder, wire cutters/strippers, heat shrink tubing, electrical tape, and a multimeter. Additionally, you will need the various drone components, such as the flight controller, ESCs (Electronic Speed Controllers), motors, receiver, and battery.
Create a Wiring Diagram
Creating a wiring diagram is a crucial step in the drone building process. A wiring diagram is a visual representation of how all the components are connected, and it helps ensure that you wire everything correctly. Start by labeling each component and drawing lines to indicate the connections between them. Make sure to consider the power requirements and the direction of current flow.
Solder the Connections
Once you have your wiring diagram, it’s time to start soldering the connections. Start by stripping the wires and tinning them with solder. Then, carefully solder the connections according to your diagram. Make sure to use heat shrink tubing to insulate the soldered connections and prevent any short circuits. Test each connection with a multimeter to ensure it is properly secured.
Secure and Organize the Wiring
After soldering the connections, it’s important to secure and organize the wiring to prevent any loose or exposed wires. Use zip ties or adhesive tape to secure the wires to the frame of the drone and ensure they are neatly arranged. Additionally, consider using wire mesh or conduit to protect the wiring from any potential damage or interference.
Test the Wiring
Before powering up your drone, it’s essential to thoroughly test the wiring to ensure everything is working correctly. Use a multimeter to check for continuity and proper voltage levels. Test each connection and component individually to identify any potential issues. If any problems are found, double-check the wiring and connections and make the necessary adjustments.
In conclusion, wiring a drone requires careful planning, soldering skills, and attention to detail. By following this step-by-step guide, you can successfully wire your drone and ensure all the components work together seamlessly. Remember to always refer to the wiring diagram, test each connection, and secure the wiring properly. Happy building!
Common Mistakes to Avoid in Drone Wiring
When it comes to drone wiring, there are several common mistakes that beginners and even experienced hobbyists often make. These mistakes can lead to various issues, such as electrical shorts, unreliable connections, and even crashes. It’s important to be aware of these mistakes and take the necessary precautions to avoid them. Here are some of the most common mistakes to watch out for:
1. Poor Soldering Techniques

One of the biggest mistakes in drone wiring is poor soldering techniques. This includes using too much or too little solder, not heating the joint properly, or not using flux. Poor soldering can result in weak connections, which can break during flight and cause the drone to malfunction or crash. It’s crucial to learn proper soldering techniques and practice before attempting to solder any components in your drone.
2. Insufficient Wire Gauge
Using wire with insufficient gauge is another common mistake. Drone components, especially high-powered ones like motors and ESCs, require adequate power supply. Using thin wires can result in voltage drops, decreased performance, and even damage to the components. It’s important to consult the manufacturer’s specifications or use online calculators to determine the proper wire gauge for your specific components.
3. Incorrect Wire Routing
Improper wire routing can lead to interference and signal degradation. Avoid running wires parallel to each other or crossing over sensitive components like antennas or flight controllers. It’s important to plan the wire layout carefully and keep wires as short as possible to minimize interference. Additionally, use wire harnesses or braided sleeves to organize and protect the wires from damage.
4. Not Securing Connectors
Failure to secure connectors is another common mistake that can result in unreliable connections or even disconnections during flight. Always use appropriate connectors for your components and ensure that they are secured properly. Additionally, consider using zip ties or adhesive mounts to secure connectors and prevent them from coming loose during flight.
5. Lack of Proper Testing
Lastly, not performing proper testing before a flight is a mistake that can have serious consequences. Always double-check all the connections, verify that the power supply is stable, and test the drone’s functionality on the ground before taking it to the air. This can help you identify any issues or malfunctions and prevent potentially dangerous situations.
By avoiding these common mistakes, you can ensure that your drone’s wiring is reliable and safe, resulting in a smooth flying experience and minimizing the risk of crashes or malfunctions.
Troubleshooting Drone Wiring Issues
Drone wiring issues can be a common problem that drone owners may encounter. When there are problems with the wiring, it can result in various malfunctions and issues with the drone’s performance. It is essential to troubleshoot and identify the wiring problems early to ensure the proper functioning of the drone.
One common wiring issue is loose or disconnected wires. If the drone is not powering on or experiencing intermittent power loss, it could be due to loose connections. It is crucial to inspect all the wiring connections and make sure they are securely attached. Reconnecting any loose wires can help resolve the problem.
Another wiring issue is short circuits. Short circuits can happen when wires come into contact with each other, causing a disruption in the electrical flow. This can result in the drone not turning on or behaving erratically. Checking the wiring carefully for any exposed or bare wires that may be causing a short circuit and insulating them properly can solve this issue.
If the drone is experiencing issues with its camera or video transmission, it could be due to faulty wiring. Damaged or frayed wires can affect the signal transmission, resulting in poor video quality or complete loss of transmission. Inspecting the wiring connected to the camera and video transmitter and replacing any damaged wires can help resolve this issue.
In some cases, the issue may not be with the wiring itself, but with the connectors. Loose or damaged connectors can prevent proper electrical connection and result in various problems with the drone’s functionality. Checking and tightening all the connectors can help ensure a secure and stable electrical connection.
In conclusion, troubleshooting drone wiring issues is crucial for maintaining the proper functioning of the drone. Regularly inspecting the wiring, checking for loose or disconnected wires, addressing short circuits, and replacing damaged wires or connectors can help resolve various wiring-related problems and ensure a smooth flying experience with the drone.
Upgrading and Customizing Drone Wiring
If you want to take your drone-building skills to the next level, upgrading and customizing the wiring of your drone is a great way to do it. With the right knowledge and tools, you can optimize your drone’s performance, add new features, and make it truly unique.
Here are some key points to consider when upgrading and customizing your drone’s wiring:
- Research and Planning: Before making any changes to your drone’s wiring, it’s important to research and plan accordingly. Understand the capabilities and limitations of your drone’s components, and determine what modifications you want to make.
- Choosing the Right Components: Upgrading your drone’s wiring often involves replacing or adding components such as motors, ESCs, flight controllers, and receivers. Make sure to choose high-quality components that are compatible with your drone and desired modifications.
- Proper Wiring Techniques: When modifying your drone’s wiring, it’s crucial to follow proper wiring techniques to ensure reliability and safety. This includes using appropriate gauges of wire, securing connections with solder or connectors, and organizing the wiring cleanly to prevent tangling or damage.
- Adding New Features: Upgrading your drone’s wiring can allow you to add new features such as FPV (First Person View) systems, additional sensors for autonomous flight, or LED lights for improved visibility. Consider your specific needs and goals when deciding which features to incorporate.
- Testing and Calibration: After making any changes to your drone’s wiring, it’s essential to thoroughly test and calibrate the system. This ensures that all components are functioning properly and that the drone is properly balanced and stable.
In conclusion, upgrading and customizing your drone’s wiring can take your drone-building hobby to new heights. It allows you to optimize performance, add new features, and make your drone stand out from the crowd. Just remember to do your research, choose the right components, follow proper wiring techniques, and thoroughly test the system. Happy flying!
Q&A:
What is drone wiring?
Drone wiring refers to the electrical components and connections that make up the internal wiring system of a drone. It includes the wiring harness, connectors, and circuitry that enable power and data transmission within the drone.
Why would I want to upgrade the wiring on my drone?
Upgrading the wiring on your drone can improve its overall performance and reliability. This can be particularly beneficial if you fly your drone frequently or if you use it for professional purposes, such as aerial photography or videography. Upgrading the wiring can also allow you to add new features or accessories to your drone.
What are the benefits of customizing drone wiring?
Customizing drone wiring allows you to tailor the electrical system of your drone to your specific needs or preferences. It can enable you to optimize performance, increase power efficiency, reduce weight, or simplify maintenance and repairs. Custom wiring can also accommodate unique or specialized components that may not be compatible with the standard wiring.
Can I upgrade the wiring on any type of drone?
In most cases, you can upgrade the wiring on a drone, as long as you have the necessary knowledge, skills, and tools. However, the feasibility of upgrading may vary depending on the specific drone model and its compatibility with aftermarket wiring components. It is important to do thorough research and consult the drone manufacturer or a professional before attempting any modifications.
Are there any risks or challenges involved in upgrading and customizing drone wiring?
Yes, there are certain risks and challenges associated with upgrading and customizing drone wiring. One of the main risks is damaging the delicate electronic components or causing a short circuit, which can lead to a malfunction or even the loss of the drone. Additionally, modifying the wiring may void any warranties or legal certifications that the drone may have. It is important to take proper precautions, follow manufacturer guidelines, and seek professional assistance if necessary.
What are the benefits of upgrading drone wiring?
Upgrading drone wiring can provide better power transmission and efficiency, resulting in improved performance and longer flight times. It can also provide increased reliability and durability, reducing the chances of wire failure during flight. Additionally, upgraded wiring can allow for more customization options and the use of advanced features and accessories.