
When it comes to maintaining and troubleshooting any machine, having the right information is crucial. This is particularly true for a complex piece of equipment like the John Deere x300. One important resource for understanding the electrical system of this machine is the fuse box diagram. This diagram provides a visual representation of the fuses and their corresponding circuits, allowing users to easily identify and troubleshoot electrical issues.
The fuse box diagram for the John Deere x300 provides information on the location of each fuse, the amp rating of the fuse, and the circuits protected by the fuse. This information is essential for determining which fuse may be causing an electrical problem and for replacing a blown fuse with the correct amp rating. Without the fuse box diagram, troubleshooting and repairing electrical issues could become a time-consuming and frustrating task.
With the fuse box diagram for the John Deere x300 at your disposal, you can quickly and confidently tackle any electrical problem that may arise. Whether you are a homeowner performing routine maintenance or a professional technician diagnosing a complex issue, having access to this diagram will save you time and effort in the troubleshooting process. So, whether you’re out in the field or in your own backyard, refer to the John Deere x300 fuse box diagram to keep your machine running smoothly.
John Deere X300 Fuse Box Diagram
If you’re experiencing electrical issues with your John Deere X300 riding mower, it may be helpful to refer to the fuse box diagram. The fuse box diagram provides a visual representation of the fuse layout and helps identify which fuses control different electrical components. This can be useful when troubleshooting or replacing fuses.
The John Deere X300 fuse box is typically located under the hood on the right-hand side of the mower. It is a black plastic box with a cover that can be easily removed to access the fuses. The fuse box diagram is usually printed on the inside of the cover, providing a quick and easy reference.
Inside the fuse box, you will find a variety of fuses that correspond to different electrical components, such as the headlights, ignition system, fuel pump, and more. The diagram will indicate which fuse is assigned to each component, making it easier to identify and replace a blown fuse.
When troubleshooting electrical issues on your John Deere X300, it is important to check the fuse box and visually inspect the fuses. If a fuse appears to be blown or damaged, it should be replaced with a fuse of the same amperage rating. It is always a good idea to have spare fuses on hand in case of emergencies.
In summary, the fuse box diagram for the John Deere X300 is a valuable resource for identifying and troubleshooting electrical issues. It provides a visual representation of the fuse layout and helps locate specific fuses for different components. By referencing the diagram and visually inspecting the fuses, you can quickly and easily replace any blown fuses, ensuring proper functionality of your riding mower.
Importance of Having a Fuse Box Diagram for John Deere X300
When it comes to owning a John Deere X300, having a fuse box diagram is of utmost importance. The fuse box diagram provides essential information on the electrical system and allows owners to identify and locate specific fuses for their tractor. This diagram acts as a guide to troubleshoot electrical issues and ensure the proper functioning of various components.
With the complexity of modern tractors like the John Deere X300, having a fuse box diagram can save a lot of time and effort when it comes to diagnosing electrical problems. It helps owners quickly identify the specific fuse related to a particular circuit or component, which in turn can help pinpoint the cause of an issue. The diagram provides detailed information on fuse ratings, locations, and functions, making it easier to replace a blown fuse and restore the tractor’s electrical system.
Benefits of having a fuse box diagram for John Deere X300:
- Easy identification of specific fuses and their functions
- Time-saving troubleshooting process for electrical issues
- Prevention of further damage by replacing blown fuses promptly
- Ability to perform basic electrical repairs and maintenance
Overall, having a fuse box diagram for the John Deere X300 is essential for any owner or operator. It allows for quick and accurate troubleshooting of electrical problems and ensures the proper functioning of the tractor’s electrical system. By referring to the diagram, owners can save time, money, and effort by easily identifying and replacing blown fuses, without the need for professional assistance.
Ensures Proper Functioning of Electrical Systems
Electrical systems are an integral part of modern machinery and equipment, and they play a crucial role in ensuring proper functioning and performance. The fuse box diagram for John Deere X300 is an essential reference tool that helps in understanding the layout and organization of the electrical system. It provides valuable information about the different circuits, components, and fuses involved in maintaining the electrical integrity of the machine.
The fuse box diagram serves as a visual guide, indicating the location of each fuse and its corresponding circuit. By referring to this diagram, technicians and operators can easily identify and troubleshoot electrical issues. It helps in quickly determining which fuse is responsible for a specific circuit, allowing for efficient repairs and maintenance.
The fuse box diagram also helps in ensuring the safety of the electrical system. Each fuse is designed to protect the circuit it is connected to from excessive current flow, preventing damage to the components and minimizing the risk of electrical fires. By understanding the layout of the fuse box and the rating of each fuse, operators can ensure that the correct fuse is installed and that the electrical system remains adequately protected.
In addition to its functional aspects, the fuse box diagram also promotes proper maintenance practices. Regular inspection and replacement of blown fuses are essential to keep the electrical system in optimal condition. The diagram provides a clear overview of the fuses and their corresponding circuits, making it easier to identify and replace faulty fuses. This proactive approach to maintenance prevents potential problems and extends the lifespan of the electrical system.
In conclusion, the fuse box diagram for John Deere X300 is a crucial tool that ensures the proper functioning of the electrical system. It provides essential information about the layout and organization of the system, helping in troubleshooting, safety, and maintenance. By understanding and utilizing this diagram, operators and technicians can ensure the reliable and efficient operation of their machines.
Helps in Troubleshooting Electrical Issues
When dealing with electrical issues in your John Deere X300, having a fuse box diagram can greatly help in troubleshooting. The fuse box diagram provides a visual representation of the electrical system, showing the location and function of each fuse. By referring to the diagram, you can quickly identify the fuse that may be causing the problem and take the necessary steps to resolve it.
One of the main advantages of having a fuse box diagram is that it saves time. Instead of randomly checking each fuse, you can easily locate the specific one related to the issue you’re experiencing. This can help in minimizing the downtime of your equipment and getting it back up and running as quickly as possible.
Additionally, the fuse box diagram can also assist in understanding the electrical system. It provides a clear overview of how the fuses are connected and the different circuits they protect. This knowledge can be useful when troubleshooting more complex electrical problems, as it allows you to trace the flow of electricity and identify potential points of failure.
Furthermore, a fuse box diagram can be beneficial for maintenance purposes. It enables you to keep track of the fuses in your John Deere X300 and ensure that they are all in working condition. Regularly checking and replacing faulty fuses can help prevent future electrical issues and preserve the overall performance of your equipment.
In conclusion, having a fuse box diagram for your John Deere X300 is an invaluable tool for troubleshooting electrical issues. It saves time, provides a clear understanding of the electrical system, and enables effective maintenance. By utilizing this diagram, you can confidently tackle electrical problems and keep your equipment in optimal condition.
Facilitates Easy Identification of Fuses
Having a fuse box diagram is essential for easily identifying and locating fuses in electronic devices or machinery, such as the John Deere X300. The diagram acts as a visual guide, providing a clear representation of how the fuses are arranged and organized within the fuse box.
With a fuse box diagram, users can quickly determine which fuse corresponds to a specific electrical component or system. This helps to streamline the troubleshooting process, as it eliminates the need for time-consuming trial and error methods to identify the correct fuse.
The John Deere X300 fuse box diagram is designed to be user-friendly, with clear labeling and easy-to-understand symbols. Each fuse is numbered and corresponds to a specific circuit or function. This allows users to easily locate and replace a blown fuse, minimizing downtime and increasing productivity.
In addition to numbering, the fuse box diagram may also include color-coding or other visual indicators to further aid in identification. For example, different types of fuses may be color-coded to indicate their amperage rating, making it easy to select the right replacement fuse.
Overall, a fuse box diagram is an invaluable tool for anyone working with electrical systems. It not only simplifies the process of identifying fuses but also enhances safety by ensuring that the correct fuse is used for each circuit. By facilitating easy identification of fuses, the diagram promotes efficiency and accuracy in troubleshooting and maintenance tasks.
Understanding the Fuse Box Diagram of John Deere X300
When it comes to maintaining and troubleshooting electrical issues in your John Deere X300, understanding the fuse box diagram is essential. The fuse box diagram provides a visual representation of the fuses and their corresponding circuits, helping you identify and address any potential problems.
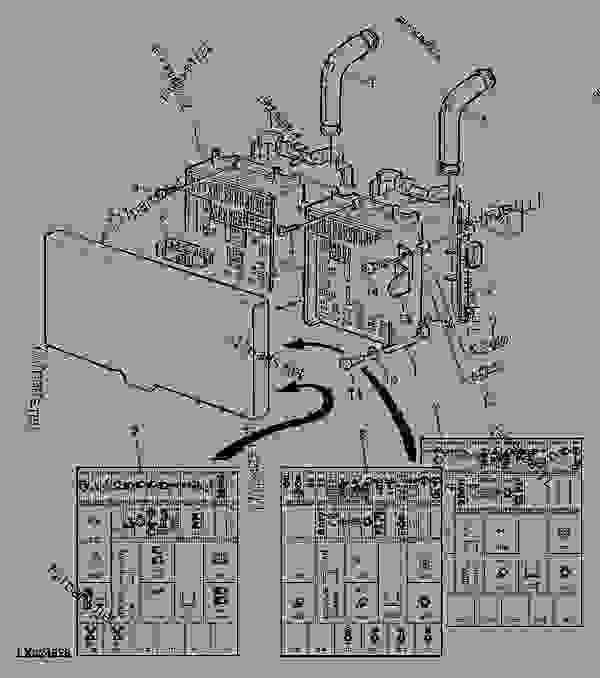
Locating the Fuse Box: The fuse box in the John Deere X300 can typically be found under the hood near the battery. It is a rectangular box with a removable cover. Once you locate the fuse box, you can refer to the fuse box diagram to understand the layout and function of each fuse.
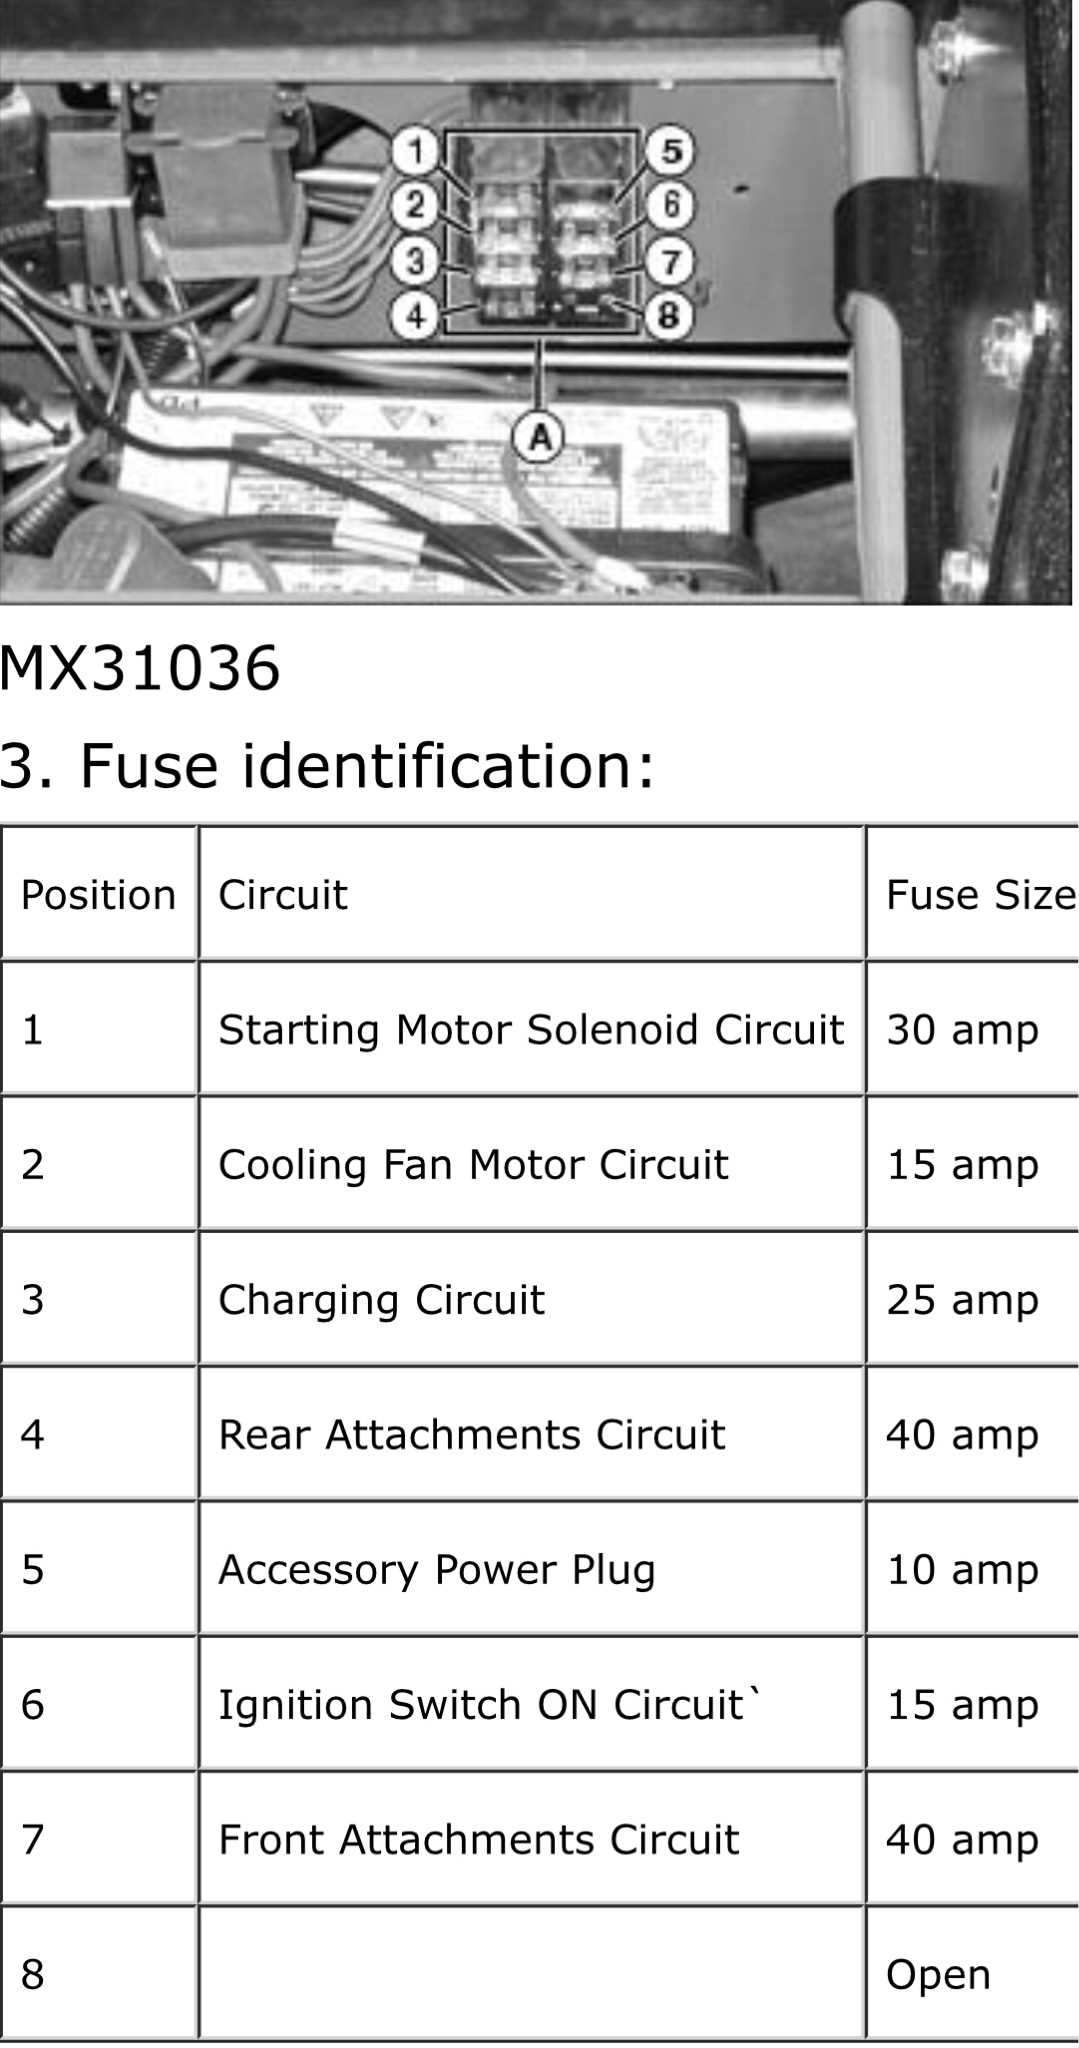
Interpreting the Diagram: The fuse box diagram is typically printed on the inside of the fuse box cover or on a separate card. It consists of a grid with numbered rows and columns, each representing a fuse slot. The rows indicate the circuits or systems that each fuse corresponds to, such as headlights, taillights, or the ignition system. The columns represent the amp rating of each fuse.
Determining Fuse Ratings: The amp ratings indicate the maximum amount of electrical current the fuse can handle before it blows and disrupts the circuit. It is crucial to ensure that the replacement fuse has the same amp rating as the one it is replacing. Using a fuse with a higher amp rating can lead to electrical damage and potential fire hazards.
Troubleshooting Electrical Issues: If you are experiencing electrical problems with your John Deere X300, referring to the fuse box diagram can help you narrow down the issue. By identifying which fuse corresponds to the problematic circuit, you can check the fuse for signs of damage or use a multimeter to test its continuity. If the fuse is blown, replacing it with a new one of the same rating may resolve the issue. However, if the fuse continues to blow, further diagnosis and repair may be necessary.
In conclusion, understanding the fuse box diagram of your John Deere X300 is crucial for maintaining and troubleshooting electrical issues. By familiarizing yourself with the diagram, you can quickly identify and address any faulty fuses or circuits, ensuring the optimal performance and safety of your equipment.
Location and Layout of the Fuse Box
In the John Deere x300, the fuse box is located near the battery. It is designed to protect the electrical system of the machine by housing fuses that will blow and interrupt the flow of electricity in the event of an electrical overload or short circuit. The fuse box is crucial for preventing damage to the machine’s wiring and components.
The layout of the fuse box in the John Deere x300 is organized and labeled for easy identification of the fuses. The lid of the fuse box often has a diagram or a reference chart that indicates the function of each fuse. This helps the user quickly locate and replace any blown fuses in the event of an electrical issue.
Some key features of the fuse box in the John Deere x300 include:
- Clear labeling: Each fuse position is clearly labeled with its function, making it easy to identify which fuse corresponds to a particular electrical component or circuit.
- Fuse types: The fuse box in the John Deere x300 typically contains a variety of fuse types, including blade-type fuses and mini blade fuses. This ensures compatibility with different electrical systems and components.
- Ease of access: The fuse box is strategically located near the battery for easy access and maintenance. It is usually secured with bolts or clips that can be easily removed to open the box and access the fuses.
In conclusion, the fuse box in the John Deere x300 is an essential component for protecting the electrical system of the machine. Its location near the battery and organized layout make it easy to locate and replace blown fuses. Regular inspection and maintenance of the fuse box can help ensure the proper functioning of the electrical system in the machine.
Interpretation of Fuse Symbols
Fuse symbols are used to represent different types of fuses and their functions. Understanding these symbols is important for troubleshooting electrical issues in the John Deere X300.
Here are some common fuse symbols and their interpretations:
- Blown Fuse Symbol: This symbol represents a blown fuse. When this symbol is displayed, it indicates that a fuse has failed and needs to be replaced.
- Amperage Rating Symbol: This symbol indicates the amperage rating of a fuse. It is typically represented by a number followed by the letter “A” (e.g., 10A, 15A, etc.). The amperage rating of a fuse determines the maximum amount of current it can handle before blowing.
- Slow-Blow Fuse Symbol: This symbol represents a slow-blow fuse, also known as a time-delay fuse. Slow-blow fuses are designed to withstand temporary surges in current and provide protection for sensitive electrical components.
- Low-Profile Fuse Symbol: This symbol indicates a low-profile fuse. Low-profile fuses are smaller in size and are commonly used in compact electronic devices where space is limited.
- Circuit Breaker Symbol: This symbol represents a circuit breaker. Unlike fuses, circuit breakers can be reset after tripping due to an overload or short circuit. When a circuit breaker trips, it interrupts the flow of current and prevents damage to the electrical system.
Overall, understanding the meaning of fuse symbols is crucial for identifying and resolving electrical issues in the John Deere X300. By knowing what each symbol represents, you can quickly diagnose problems and ensure that the electrical system is properly protected.
Q&A:
What is the symbol for a fast acting fuse?
The symbol for a fast acting fuse is a straight line with a diagonal line crossing through it.
What does the symbol for a time delay fuse look like?
The symbol for a time delay fuse is a straight line with a squiggly line crossing through it.
What does the symbol for a high voltage fuse look like?
The symbol for a high voltage fuse is a straight line with a T-shape crossing through it.
What is the symbol for a thermal fuse?
The symbol for a thermal fuse is a straight line with a curved line crossing through it.
What does the symbol for a resettable fuse look like?
The symbol for a resettable fuse is a straight line with two diagonal lines crossing through it
What is the interpretation of a fuse symbol with a wavy line?
A fuse symbol with a wavy line represents a slow-blow or time-delay fuse. This type of fuse is designed to withstand short-term overloads without blowing, making it suitable for protecting sensitive electronic components.