
An on-off toggle switch is a type of switch that is commonly used in electrical circuits to control the flow of electricity. It consists of a lever that can be moved to either an “on” or “off” position, which opens or closes the circuit respectively. This type of switch is often used to control the power supply to a device or appliance.
The wiring diagram for an on-off toggle switch includes three basic components: the switch itself, the power source, and the device or appliance that the switch controls. The switch is connected to the power source through two wires, one of which is connected to the common terminal and the other to the normally open terminal.
When the switch is in the “on” position, the common terminal is connected to the normally open terminal, allowing electricity to flow through the circuit and power the device or appliance. When the switch is in the “off” position, the circuit is broken and no electricity flows, turning off the device or appliance.
It is important to follow the wiring diagram provided by the manufacturer when installing an on-off toggle switch. This ensures that the switch is properly connected to the power source and the device or appliance, preventing any potential electrical hazards. Additionally, it is important to choose a switch that is compatible with the power requirements of the device or appliance.
How to Wire an On Off Toggle Switch: Step-by-Step Guide
An on off toggle switch is a simple yet effective device that allows you to control the flow of electricity to a specific circuit or device. It is commonly used in various applications, such as automotive and electrical projects, to turn on or off lights, fans, motors, and other electrical components.
Wiring an on off toggle switch may seem intimidating, but it is actually quite straightforward. Follow these steps to wire it correctly:
- Gather the necessary materials: Before you begin, make sure you have all the required materials, including an on off toggle switch, wires, wire strippers, electrical tape, and a power source.
- Turn off the power: Safety should always be your top priority. Before working on any electrical wiring, ensure to turn off the power source to the circuit you will be connecting the switch to.
- Identify the terminals: The on off toggle switch typically has three terminals, labeled as “common,” “normally open,” and “normally closed.” The common terminal is usually the center one.
- Strip the wire ends: Using wire strippers, remove a small portion of insulation from each wire that will be connected to the switch.
- Connect the wires: Connect one wire to the common terminal, and the remaining two wires to the normally open and normally closed terminals, depending on the desired functionality.
- Secure the connections: Once the wires are connected to the switch terminals, use electrical tape or wire connectors to secure the connections and prevent any exposed wires or loose connections.
- Test the switch: After completing the wiring, turn on the power source and test the switch by toggling it on and off. Ensure the connected circuit or device responds accordingly.
Congratulations! You have successfully wired an on off toggle switch. Remember to always follow safety precautions and consult a professional if you are unsure about any step of the process. Enjoy the convenience and control provided by your newly installed toggle switch!
Understanding the Basics of an On Off Toggle Switch
An on off toggle switch is a simple but essential component in electrical circuits. It is commonly used to control the flow of electricity by either allowing or interrupting the current. This type of switch is often found in household appliances, electronic devices, and automotive applications.
The on off toggle switch consists of a lever or toggle that can be moved between two positions – the on position and the off position. When the switch is in the on position, it completes the electrical circuit, allowing the current to flow from the power source to the connected load. In the off position, the switch breaks the circuit, stopping the flow of electricity.
The wiring of an on off toggle switch typically involves connecting the switch between the power source and the load. The power source can be a battery, an electrical outlet, or any other source of electricity. The load is the device or component that the switch controls.
In a basic wiring diagram, the power source is connected to one terminal of the switch, while the other terminal is connected to the load. When the switch is in the on position, the circuit is closed, and the current flows from the power source to the load. When the switch is in the off position, the circuit is open, and the current is interrupted, preventing it from reaching the load.
It is important to follow the proper wiring diagram and ensure that the switch is connected correctly to avoid any electrical hazards. Toggle switches are available in a variety of configurations, including single-pole, single-throw (SPST), double-pole, double-throw (DPDT), and many others, offering different functionalities for specific applications.
Overall, understanding the basics of an on off toggle switch is crucial for anyone working with electrical circuits. By grasping the concept of how the switch controls the flow of electricity, one can effectively use it to regulate power to various devices and ensure safe and proper circuit operation.
Tools and Materials Needed for Wiring
When it comes to wiring an on-off toggle switch, there are several tools and materials that you will need to ensure a successful installation. Whether you are replacing an existing switch or installing a new one, having the right tools and materials on hand is essential.
1. Toggle switch: The most important component for this project is the on-off toggle switch itself. Make sure to choose a switch that is compatible with your electrical system and meets your specific needs.
2. Wire strippers: Wire strippers are necessary for removing the insulation from the ends of the wires. This allows for proper connection and ensures a secure and efficient electrical connection.
3. Electrical tape: Electrical tape is used to secure and insulate the connections. It helps to prevent any accidental contact with the wires, which could lead to electrical shock or other hazards.
4. Screwdrivers: Depending on the type of switch you are installing, you may need a flathead or Phillips screwdriver to secure the switch to the mounting plate or electrical box.
5. Wire connectors: Wire connectors are used to join multiple wires together. They provide a secure and reliable connection, ensuring that the wires remain connected and do not come loose over time.
6. Electrical box: If you are installing a new switch, you may need an electrical box to mount the switch onto the wall. The electrical box helps to protect the wiring and provides a secure location for the switch.
7. Wire nuts: Wire nuts are threaded caps that are used to secure and connect wires. They twist onto the ends of the wires, creating a tight connection and preventing any loose or exposed wires.
8. Safety goggles: Safety goggles are an essential piece of personal protective equipment (PPE) when working with electrical wiring. They protect your eyes from any potential hazards, such as flying debris or sparks.
- Toggle switch
- Wire strippers
- Electrical tape
- Screwdrivers
- Wire connectors
- Electrical box
- Wire nuts
- Safety goggles
By having all of these tools and materials readily available, you can ensure a smooth and successful wiring installation for your on-off toggle switch. It’s important to work safely and follow proper wiring techniques to prevent any electrical accidents or damage to your electrical system.
Step 1: Determine the Wiring Configuration
Before installing or connecting an on-off toggle switch, it is important to determine the wiring configuration you need for your specific application. This step is crucial to ensure the switch functions properly and meets your requirements. There are different wiring configurations available for on-off toggle switches, so it is essential to understand the options and choose the one that suits your needs best.
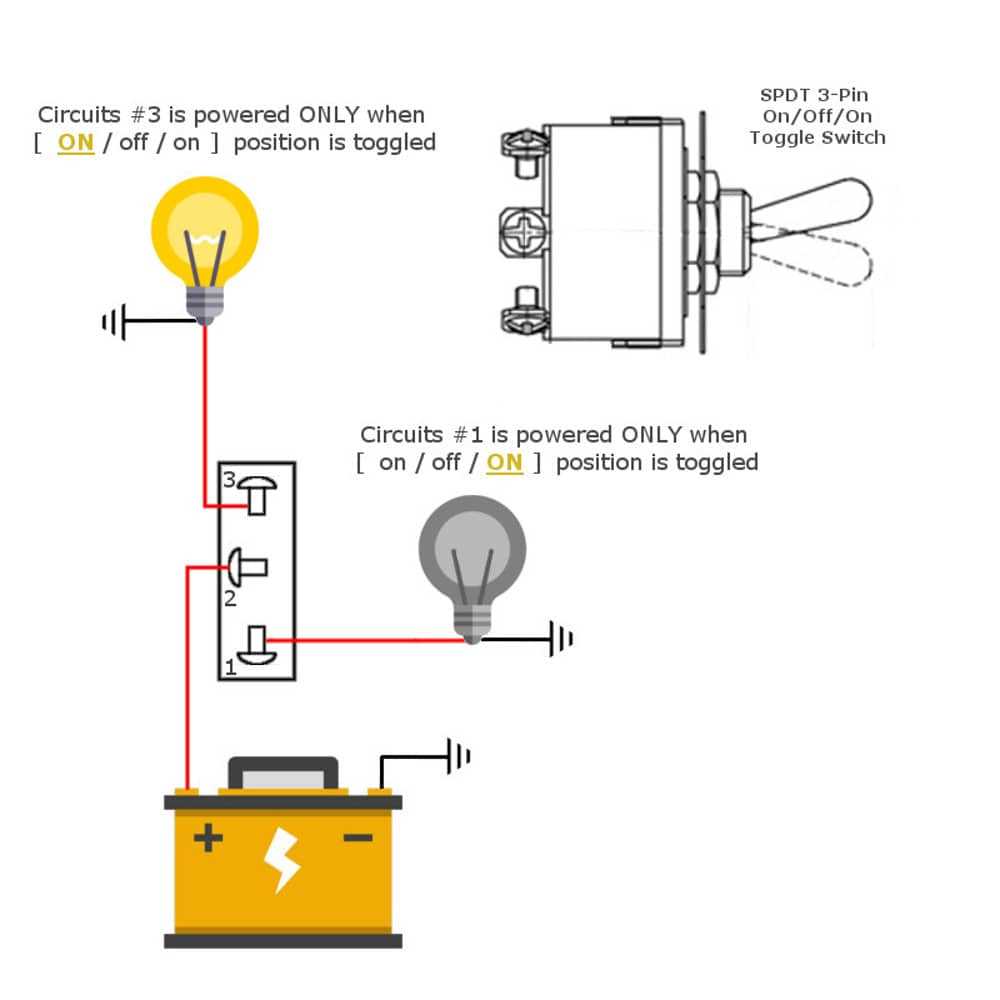
One common wiring configuration for an on-off toggle switch is the single-pole, single-throw (SPST) configuration. In this configuration, the switch has two terminals: one for the power input and one for the power output. When the switch is in the “on” position, it completes the circuit and allows electricity to flow from the input terminal to the output terminal. When the switch is in the “off” position, the circuit is interrupted, and no electricity flows. This configuration is often used for simple on/off applications.
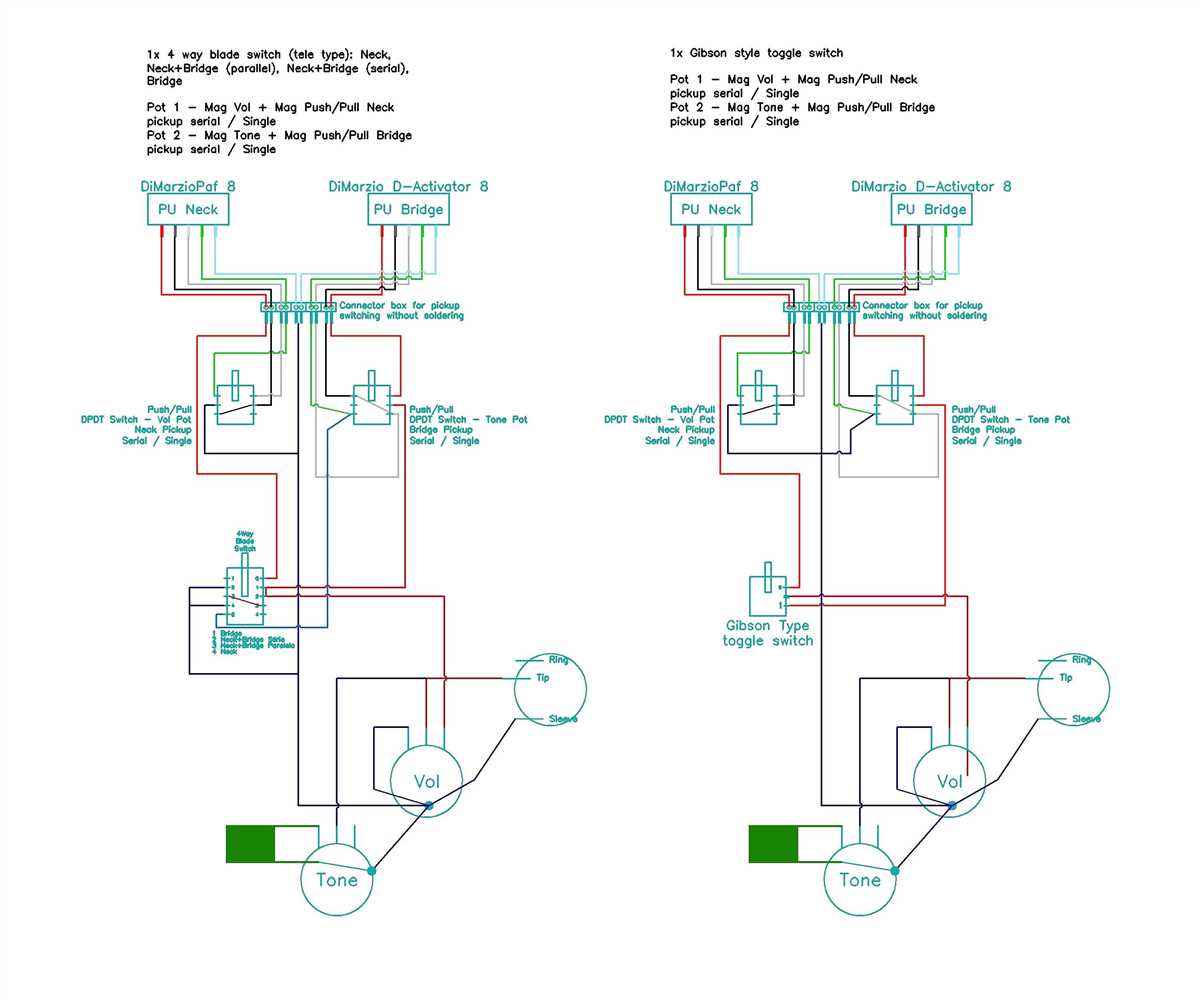
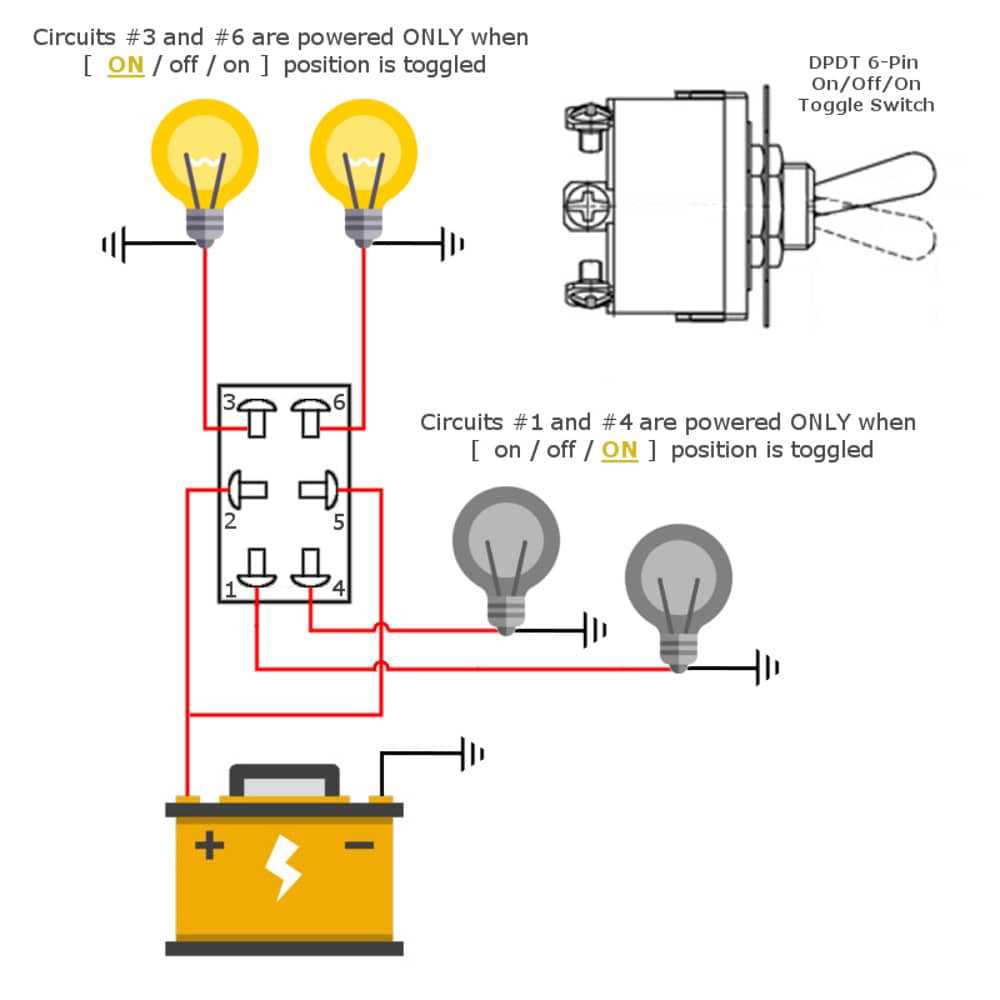
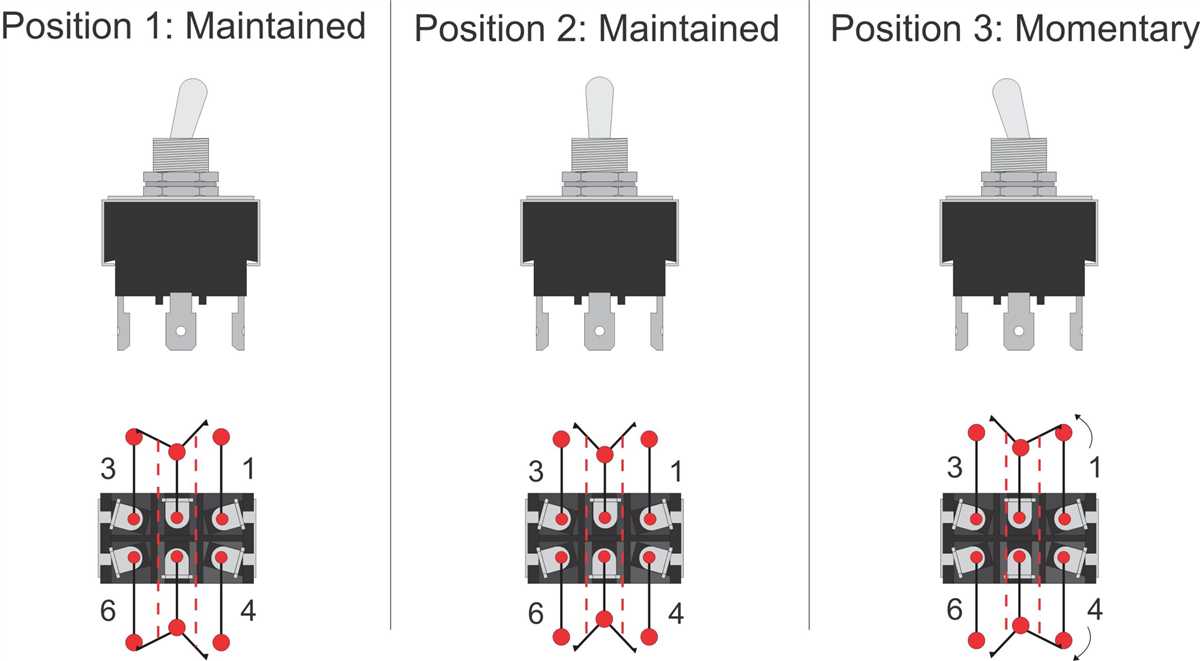
Another wiring configuration is the double-pole, double-throw (DPDT) configuration. In DPDT switches, there are two input terminals and two output terminals. This configuration allows you to control two separate circuits or devices with a single switch. When the switch is in one position, it connects the first input terminal to the first output terminal, and when it is in the other position, it connects the second input terminal to the second output terminal. DPDT switches are commonly used for more complex applications that require the control of multiple circuits or devices.
It is important to consult the wiring diagram provided by the manufacturer of the on-off toggle switch you are using. This diagram will show you the specific wiring connections for each terminal of the switch, as well as any additional features or options the switch may have. Following the manufacturer’s instructions and diagram will ensure a proper and safe installation of the switch.
Step 2: Prepare the Toggle Switch and Wires
Before starting the wiring process, it is important to prepare the toggle switch and wires. This involves ensuring that you have all the necessary materials and tools for the task.
First, gather the toggle switch and examine it for any damage or defects. Make sure the switch is in good working condition and suitable for the intended purpose. If you are unsure about the specifications or type of switch needed, consult the manufacturer’s instructions or seek professional advice.
Next, gather the wires that will be used in the wiring process. It is recommended to use wires that are rated for the specific application and have the appropriate gauge. This will ensure proper conductivity and reduce the risk of electrical issues. Inspect the wires for any signs of damage or wear, such as frayed insulation or exposed conductors, and replace them if necessary.
Once you have the toggle switch and wires ready, you can proceed to connect them according to the wiring diagram. It is important to follow the diagram precisely to ensure the switch functions correctly and safely. If you are unsure about any aspect of the wiring process, seek professional assistance to avoid any potential hazards.
Before proceeding to the next step, double-check all the connections to ensure they are secure and properly insulated. This will help prevent any short circuits or electrical accidents when the switch is activated. Taking the time to prepare and check the toggle switch and wires will help ensure a successful and safe wiring installation.
Step 3: Connect the Wires to the Toggle Switch
Once you have prepared the wires by stripping the insulation from the ends, it’s time to connect them to the toggle switch. The toggle switch typically has three terminals: two for the power source and one for the load. Here’s how you can connect the wires:
- Identify the power source wire: The power source wire is usually the one that comes from the battery or power supply. It should be connected to one of the terminals on the toggle switch.
- Connect the power source wire: Take the stripped end of the power source wire and insert it into one of the terminals on the toggle switch. You may need to use a screwdriver to loosen the terminal screw, insert the wire, and then tighten the screw to secure it in place.
- Identify the load wire: The load wire is the one that will be connected to the device or component you want to control with the toggle switch. It should be connected to the other terminal on the toggle switch.
- Connect the load wire: Take the stripped end of the load wire and insert it into the remaining terminal on the toggle switch. Again, use a screwdriver to loosen the screw, insert the wire, and then tighten the screw to secure it.
Once you have connected the wires to the toggle switch, double-check all the connections to ensure they are secure. It’s also a good idea to use electrical tape or wire nuts to cover the exposed wire and prevent any accidental contact or short circuits. The wiring diagram provided with the toggle switch can also serve as a reference to ensure you have connected the wires correctly.
Step 4: Test the Wiring and Troubleshoot if Necessary
Once you have completed the wiring for your on off toggle switch, it’s important to test it to ensure everything is working correctly. Follow these steps to test the wiring and troubleshoot any issues if necessary:
- Make sure all connections are secure and properly tightened. Loose connections can cause problems with the switch functionality.
- Power on the circuit or device that you have connected the switch to.
- Toggle the switch to the desired position (on or off) and check if the circuit or device responds accordingly.
- If the circuit or device does not respond as expected, double-check your wiring connections and make sure they are correct.
- If the wiring connections are correct and the circuit or device still does not respond, there may be an issue with the switch itself. Consider replacing the switch or consulting a professional for further troubleshooting.
- During the testing process, take note of any unusual sounds, smells, or excessive heat coming from the switch or connected circuit. These can indicate a potential problem that should be addressed.
Overall, testing the wiring and troubleshooting any issues is an important step to ensure the proper functioning and safety of your on off toggle switch. By following these steps and addressing any problems that arise, you can confidently use your switch with peace of mind.
Q&A:
Why is it important to test the wiring?
Testing the wiring is important to ensure that all connections are properly made and that there are no faults or errors in the circuit. It helps to identify any potential issues and allows for troubleshooting before moving forward with the project.
How do I test the wiring?
To test the wiring, you can use a multimeter to check for continuity or to measure voltage. Connect the multimeter probes to the appropriate points in the circuit and observe the readings. If there is continuity or the expected voltage, the wiring is likely correct. If not, there may be a problem that needs to be addressed.
What should I do if I find a problem with the wiring?
If you find a problem with the wiring, it is important to troubleshoot and identify the cause of the issue. Double-check the connections, make sure they are securely fastened and correctly wired. Inspect for any damaged or frayed wires that may need to be replaced. If necessary, consult a professional for further assistance.
Are there any common wiring issues that I should be aware of?
Yes, there are several common wiring issues that you should be aware of. These include loose connections, incorrect wiring, damaged wires, and short circuits. It is important to be diligent while testing the wiring to catch any of these issues and address them promptly to ensure the safety and functionality of the circuit.