To ensure a stable and high-speed data transfer, it’s crucial to understand the proper wiring setup for Ethernet cables. Begin by following a specific sequence of wire placements that correspond to the standards of your networking needs, whether it’s for home use or professional environments. This structured approach ensures that each wire is correctly aligned to support proper communication between devices.
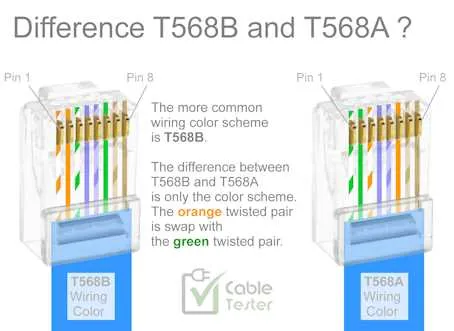
For the most common setup, use the T568B standard, which dictates the precise order of wires within the cable. The color codes follow a strict order, ensuring that each wire is placed in the correct slot. This configuration helps to avoid signal interference and ensures that the data is transmitted without errors, providing reliable performance across all connected devices.
Each wire must be terminated correctly at both ends of the cable. A slight misalignment or incorrect order of wires could lead to performance issues, such as slow internet speeds or connection drops. Therefore, when preparing cables for your network, carefully follow the wiring pattern, paying attention to the color coding and sequence at both ends.
Make sure to use the appropriate tools for terminating the cable ends, such as a crimping tool. This will ensure that each wire is securely attached, providing a solid connection that can withstand physical wear while maintaining optimal performance.
Lastly, double-check the entire assembly before using the cable. A simple visual inspection can help catch any wiring errors that may have been overlooked during the assembly process. A correctly wired Ethernet cable will improve your network’s reliability and ensure long-term performance without issues.
Wiring of Network Cable Terminals
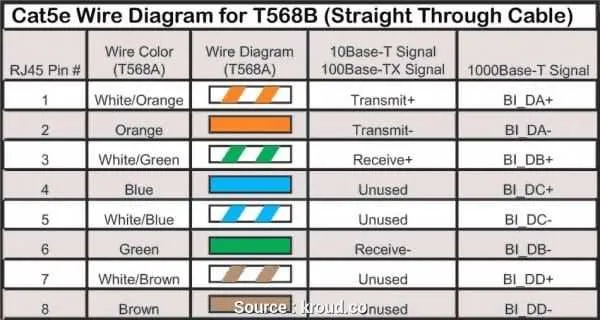
For proper network cable assembly, align the eight wires correctly inside the terminal. The standard color coding ensures reliable data transmission. Starting from left to right, the order should be: white-orange, orange, white-green, blue, white-blue, green, white-brown, brown.
Important: Ensure that the wire pairs are twisted tightly, minimizing interference. This setup is used for both Ethernet and Gigabit Ethernet standards. The twist at the cable’s end is crucial to maintaining signal integrity.
The correct pairing of each color sequence ensures that your system will perform at optimal speeds. Avoid mixing pairs, as this can lead to poor performance or failure to establish a connection.
Make sure that the wires are fully inserted into the terminal, ensuring no gaps. Once the terminal is crimped, check the connections for any loose wires or improper placement, which may result in connection issues.
Understanding the Pinout of RJ45 Connector

When wiring a network cable, pay close attention to the exact order of the pins. The most common wiring standards for Ethernet cables are TIA/EIA-568A and TIA/EIA-568B, each specifying the position of the wires in the connector.
For the TIA/EIA-568A standard, the pinout starts with the following sequence from left to right: White/Green, Green, White/Orange, Blue, White/Blue, Orange, White/Brown, and Brown. This setup ensures proper signal transmission and minimizes interference.
For TIA/EIA-568B, the order of the colors is slightly different: White/Orange, Orange, White/Green, Blue, White/Blue, Green, White/Brown, and Brown. Understanding the difference between these two standards is essential when terminating cables, as using the wrong sequence can lead to communication issues.
Ensure each wire is fully inserted into its designated slot to guarantee the connection’s reliability. Improper crimping or misalignment of wires can cause poor performance, signal loss, or complete failure of the link.
Wiring Methods for Correct RJ45 Plug Assembly
For a reliable assembly, always follow the T568A or T568B wiring standards. These are the most commonly used pinout configurations for Ethernet cables. T568A wiring starts with the white/green pair in the first position, while T568B places the white/orange pair in the same position.
Ensure the wires are stripped to the correct length–around 1 inch (2.5 cm) for optimal insertion into the connector. Cut the wires evenly, making sure they align with the guide channels in the connector. The copper ends should not protrude beyond the connector’s end.
When inserting the wires, keep them in the correct order as specified by the chosen standard. Push the wires firmly into the connector until they reach the metal contacts. The contact pins should pierce the insulation of the wires, ensuring a solid electrical connection.
Once inserted, use a crimping tool to compress the connector onto the cable. This step is crucial for ensuring the connector’s metal contacts make a strong connection with the wires. Avoid over-crimping as it can damage the cable or connector.
After assembly, test the cable with a continuity tester or network tester to ensure all connections are properly established. This step is essential for troubleshooting any issues related to poor contact or miswiring.
Common Issues and Troubleshooting Network Cable Connections
Ensure correct pinout order when wiring cables. Incorrect placement of wires often leads to malfunctioning data transmission. Verify that the wires match the T568A or T568B standards, depending on your setup.
If the cable is not functioning properly, follow these steps:
- Check wire order: Double-check the alignment of each wire in the connector. Even a single misplaced wire can result in a non-working link.
- Test cable continuity: Use a cable tester to verify that all connections are intact and there are no broken wires or shorts.
- Inspect connectors: Look for damaged or bent pins inside the connector. Poorly seated pins can cause intermittent or failed connections.
- Inspect cable quality: Use only high-quality, shielded cables. Low-quality cables may cause interference, leading to signal degradation or complete failure.
- Check for wiring faults: Ensure no sharp bends or physical stress is placed on the cable. Excessive strain can break internal wires.
- Test on different devices: If one device fails to connect, try the cable on another device to rule out equipment malfunctions.
- Verify network settings: Ensure proper IP configuration and check for any network-related issues, such as incorrect subnet or DNS settings.
By following these steps, you can efficiently troubleshoot most common issues related to improperly functioning data cables and restore connectivity quickly.