
When it comes to troubleshooting electrical issues in your 2002 Ford Explorer, one of the first things you’ll need is an interior fuse diagram. The interior fuse diagram provides a detailed overview of the location and function of each fuse in your vehicle, allowing you to quickly identify and replace any blown fuses. This comprehensive guide will walk you through everything you need to know about the 2002 Ford Explorer interior fuse diagram.
The fuse diagram is crucial for understanding the electrical system of your vehicle. It breaks down which fuses control specific components, such as the radio, power windows, or interior lights. With this information, you can easily diagnose and fix any electrical problems you may encounter.
Having a clear understanding of the fuse diagram can save you both time and money. By knowing exactly which fuse to check or replace, you can avoid unnecessary trial and error, ensuring a quick and efficient repair. Whether you’re a seasoned mechanic or a DIY enthusiast, this interior fuse diagram will be an invaluable resource in your toolbox.
2002 Ford Explorer Interior Fuse Diagram
The 2002 Ford Explorer is a reliable and popular SUV known for its spacious interior and powerful performance. However, like any vehicle, it may encounter electrical issues from time to time. If you’re experiencing electrical problems in your 2002 Ford Explorer, it’s essential to understand the interior fuse diagram to troubleshoot and fix the issue.
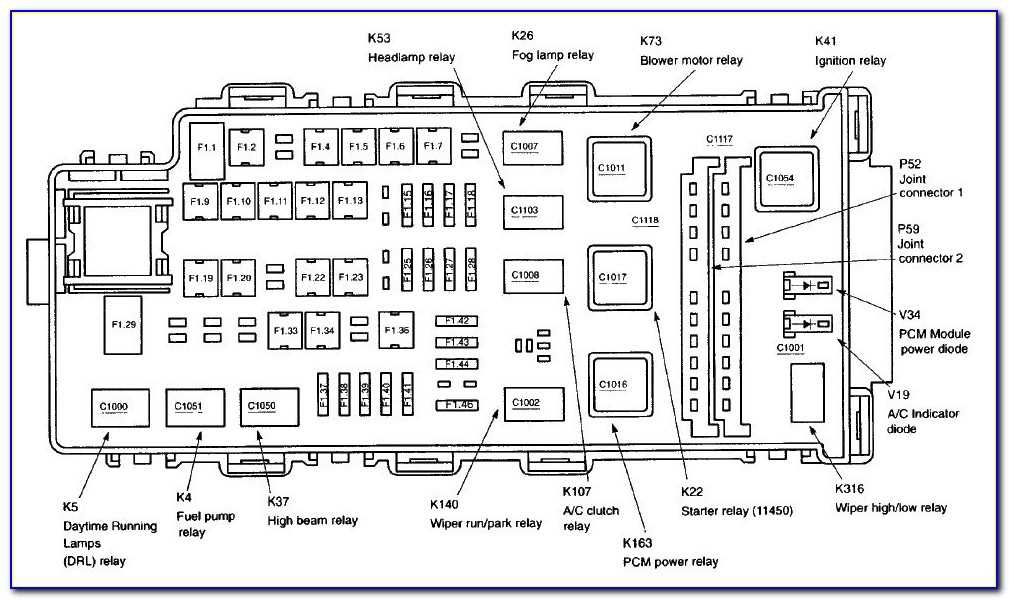
The interior fuse diagram provides a visual representation of the fuse box layout inside the vehicle. It indicates the location and function of each fuse, making it easier to identify and replace a blown fuse. To access the fuse box, open the driver’s side door and locate the panel on the side of the dashboard. On the panel, you’ll find a diagram that shows the fuse box layout.
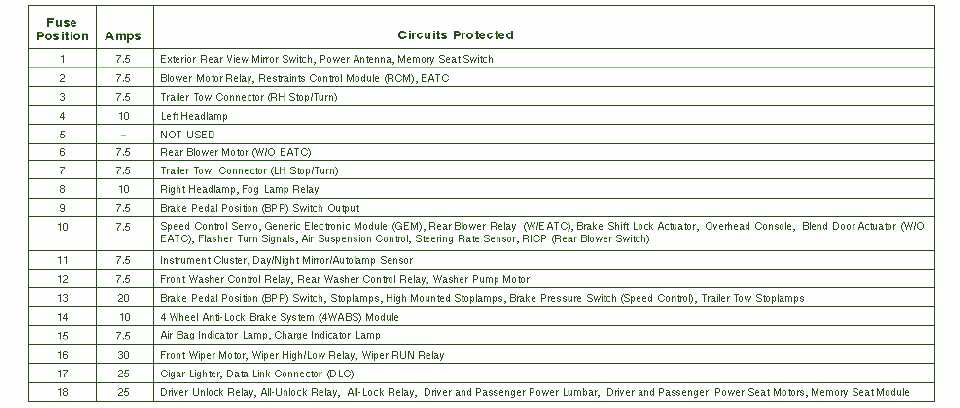
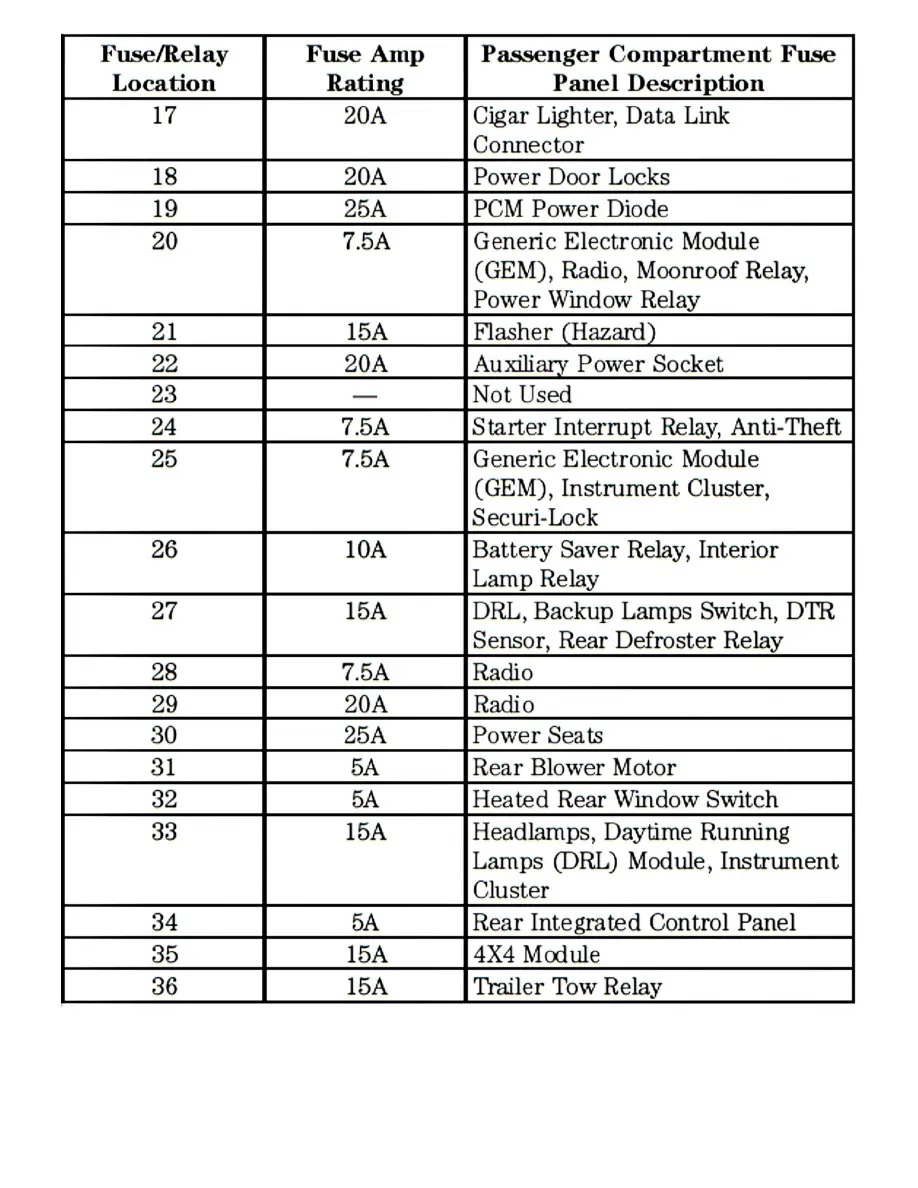
The 2002 Ford Explorer interior fuse diagram includes various fuses for different components of the vehicle. Some common fuse types and their functions include:
- Fuse 6: Controls the power seats, adjustable pedals, and driver’s side seat module.
- Fuse 7: Manages the memory seats and lumbar support module.
- Fuse 17: Controls the rear air suspension module.
- Fuse 20: Manages the power windows, moonroof, and sliding roof module.
It’s important to note that the fuse diagram may vary depending on the trim level and optional equipment in your 2002 Ford Explorer. Always refer to the specific diagram provided in your vehicle to ensure accurate fuse identification.
In conclusion, understanding the 2002 Ford Explorer interior fuse diagram is essential for troubleshooting and fixing electrical issues in your vehicle. By familiarizing yourself with the fuse box layout and knowing the function of each fuse, you can easily locate and replace a blown fuse, restoring electrical functionality to your 2002 Ford Explorer.
Understanding Your Vehicle’s Fuse Box
In every vehicle, there is a fuse box that contains fuses and relays, which play a crucial role in ensuring the proper functioning of various electrical components. Understanding how your vehicle’s fuse box works is important for troubleshooting and maintaining your vehicle.
The fuse box is usually located either under the dashboard or in the engine compartment. It contains a series of fuses, which are small, colored plastic cylinders that protect electrical circuits from overloading. Each fuse is assigned to a specific electrical component in your vehicle, such as headlights or power windows.
When an electrical circuit in your vehicle experiences an overload or short circuit, the corresponding fuse will blow, cutting off the power to that particular component. This prevents further damage to the electrical system or the component itself. It is important to note that fuses are designed to be easily replaceable, allowing you to quickly restore power to the affected component.
To understand which fuse corresponds to a specific component, you will need to refer to your vehicle’s fuse box diagram. This diagram usually indicates the fuse’s location, amperage rating, and the electrical component it protects. You can find the fuse box diagram in your vehicle’s owner’s manual or by doing a quick online search using your vehicle’s make, model, and year.
It is important to remember that fuses should always be replaced with one of the same amperage rating to ensure the proper protection of the electrical circuit. Using a fuse with a higher amperage rating can lead to electrical damage and potentially cause a fire. If you are unsure about which fuse to replace or if you are experiencing frequent fuse blowouts, it is recommended to consult a professional mechanic to avoid any further complications.
In conclusion, understanding your vehicle’s fuse box and its components is essential for maintaining and troubleshooting your vehicle’s electrical system. By familiarizing yourself with the fuse box diagram and knowing how to replace fuses, you can quickly and efficiently address any electrical issues that may arise.
Locating the Interior Fuse Box
If you are experiencing electrical issues or need to replace a blown fuse in your 2002 Ford Explorer, it is important to know the location of the interior fuse box. The interior fuse box contains fuses that control various electrical components inside the vehicle, such as the radio, power windows, and interior lights.
To locate the interior fuse box in your 2002 Ford Explorer, you will need to first open the driver’s side door and locate the panel on the side of the dashboard. This panel is known as the “kick panel” and can be found on the lower part of the driver’s side dashboard.
- Start by removing any floor mats or other objects from the driver’s side floor area.
- Locate the plastic kick panel on the side of the dashboard, just in front of the driver’s side door.
- Using a flathead screwdriver or a trim panel removal tool, gently pry off the kick panel to reveal the interior fuse box.
Once you have removed the kick panel, you will see a rectangular black plastic cover over the interior fuse box. It is held in place by a few clips. Use your fingers or a small flathead screwdriver to release the clips and remove the cover.
Inside the interior fuse box, you will find a diagram that indicates the location and function of each fuse. The fuses are labeled with a number and a description of the component it controls. Use the diagram to locate the specific fuse that you need to check or replace.
When replacing a blown fuse, make sure to use a fuse with the same amperage rating as the original. This information can also be found on the diagram inside the fuse box. Simply remove the old fuse and insert the new fuse in its place.
Once you have replaced the fuse or completed any necessary repairs, reattach the black plastic cover and snap the kick panel back into place. Make sure it is securely fastened.
Knowing the location of the interior fuse box in your 2002 Ford Explorer can help you quickly troubleshoot and resolve any electrical issues. Refer to the owner’s manual for more detailed instructions and diagrams, if needed.
Identifying Fuse Types
When it comes to understanding the electrical system of your 2002 Ford Explorer, it is important to be able to identify and understand the different types of fuses used in the interior fuse box. Fuses are essential components that protect the electrical circuit from excessive current and prevent damage to the vehicle’s electronics.
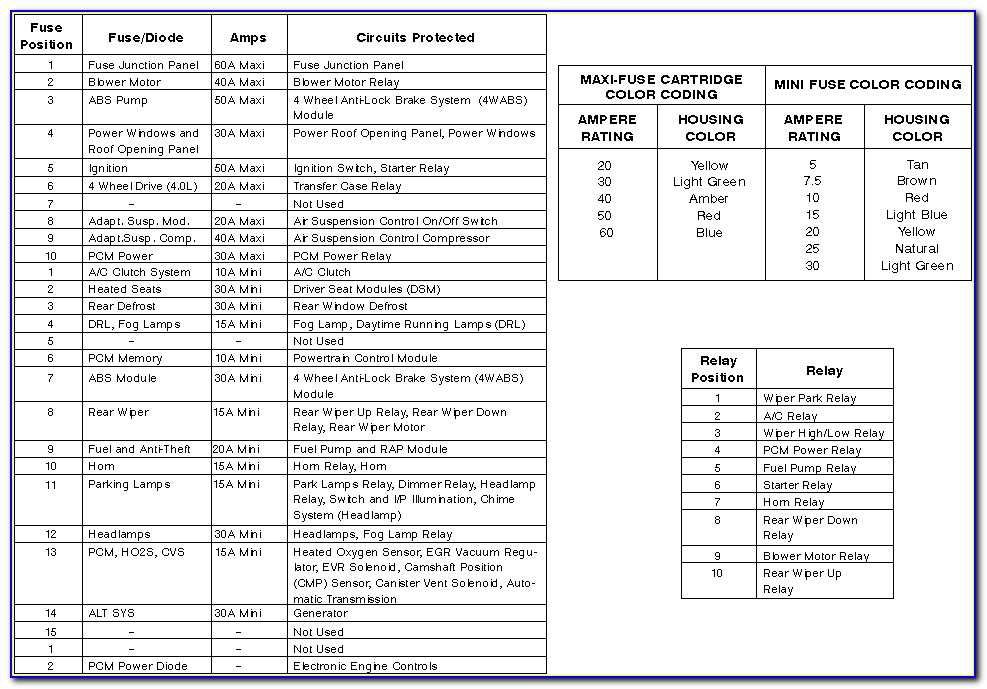
Glass Tube Fuses: One type of fuse commonly used in the interior fuse box is the glass tube fuse. These fuses are cylindrical in shape and have metal ends with a glass tube in the middle. The rating of the fuse is usually indicated on the metal ends. To check if a glass tube fuse is blown, you can visually inspect the metal inside the glass tube. If the metal is broken or melted, the fuse is blown and needs to be replaced.
Blade Fuses: Another type of fuse commonly found in the interior fuse box is the blade fuse. These fuses have a rectangular shape with two metal blades on the bottom that plug into the fuse box. The rating of the fuse is usually indicated on the top of the blade. To check if a blade fuse is blown, you can visually inspect the metal inside the top of the blade. If the metal is broken or melted, the fuse is blown and needs to be replaced.
It is important to note that the interior fuse box of the 2002 Ford Explorer may contain a combination of different types of fuses. Each fuse is designed to protect a specific electrical circuit, so it is essential to check the diagram or labeling on the fuse box cover to determine the function and rating of each fuse.
Mini Blade Fuses: In addition to glass tube fuses and blade fuses, the interior fuse box may also contain mini blade fuses. These fuses have a smaller size compared to regular blade fuses and are often used for low amperage circuits. They have a rectangular shape with two metal blades on the bottom. The rating of the mini blade fuse is usually indicated on the top of the blade. To check if a mini blade fuse is blown, you can visually inspect the metal inside the top of the blade, similar to regular blade fuses.
By understanding the different types of fuses used in the interior fuse box of your 2002 Ford Explorer, you can easily identify and replace any blown fuses. It is important to use the correct type and rating of fuse to ensure the safety and proper functioning of the vehicle’s electrical system.
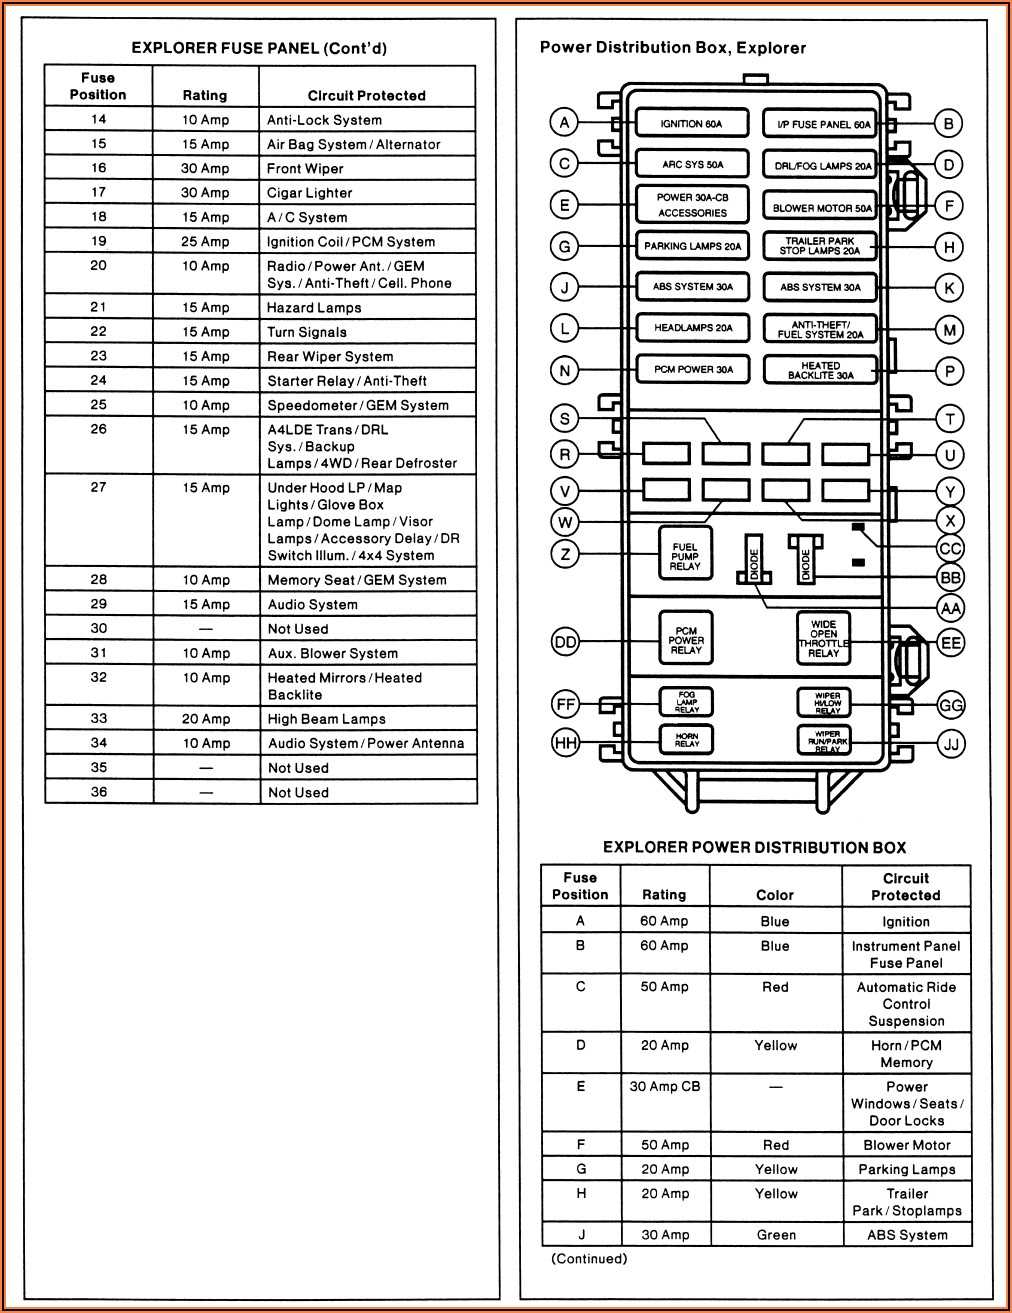
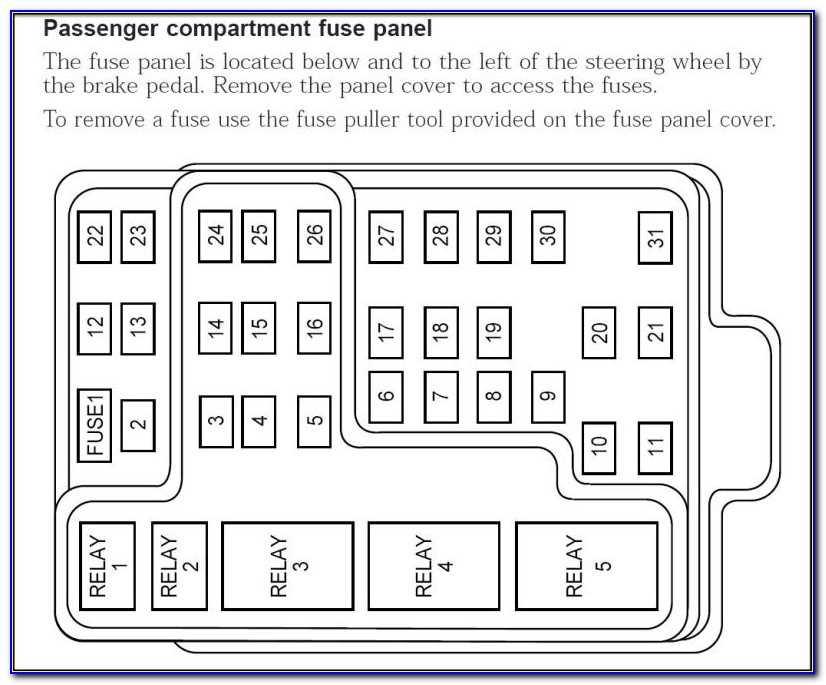
Fuse Box Layout
When it comes to understanding the electrical system of your 2002 Ford Explorer, one important component to know about is the fuse box. The fuse box, also known as the fuse panel, is responsible for housing the various fuses that protect different electrical circuits in your vehicle. It is located on the driver’s side of the dashboard, behind a cover.
Inside the fuse box, you will find a diagram that outlines the layout of the different fuses and their corresponding amperages. This diagram is essential when troubleshooting electrical issues or replacing fuses, as it helps you identify the correct fuse for a specific circuit.
Here is a breakdown of the fuse box layout for the 2002 Ford Explorer:
- Fuse #1: 15A – Exterior lamps
- Fuse #2: 5A – Radio
- Fuse #3: 5A – Moonroof
- Fuse #4: 5A – HVAC module, heated seats
- Fuse #5: 15A – Brake lamps, cruise control
- Fuse #6: 5A – Instrument cluster, trailer tow battery charge relay
- Fuse #7: 15A – Back-up lamps, daytime running lamps (DRL) relay coil, turn hazard lamps
- Fuse #8: 5A – PCM relay coil, fuel pump relay, starter relay, ignition relay
- Fuse #9: 5A – Trailer tow stop and turn lamps
- Fuse #10: 15A – Speed control module
Please note that this is just a sample of the fuse box layout for the 2002 Ford Explorer. The actual layout may vary depending on the specific trim level and options installed in your vehicle. It is always recommended to refer to the owner’s manual for the most accurate and up-to-date information on fuse locations and amperages.
Troubleshooting Fuse Issues
If you are experiencing electrical issues in your 2002 Ford Explorer, it is possible that a fuse has blown. Fuses are designed to protect electrical circuits from damage caused by excessive current. When a fuse blows, it cuts off the flow of electricity to the affected circuit, preventing further damage.
To troubleshoot fuse issues in your Ford Explorer, you will need to locate the fuse box and identify the fuse that corresponds to the malfunctioning component. The interior fuse box is located underneath the dashboard on the driver’s side.
Once you have located the fuse box, refer to the fuse diagram to find the specific fuse that controls the component experiencing issues. The fuse diagram is usually found on the inside of the fuse box cover or in the owner’s manual.
Inspect the fuse to see if it is blown. A blown fuse will have a broken wire or a burnt appearance. If the fuse is intact, it is likely that the issue lies elsewhere. However, if the fuse is blown, you will need to replace it with a fuse of the same amperage rating.
If the replaced fuse blows again immediately or shortly after, it may indicate a deeper electrical problem. In this case, it is best to consult a professional mechanic or seek assistance from a Ford dealership for further diagnosis and repair.
Replacing Blown Fuses
Replacing a blown fuse in your 2002 Ford Explorer is a simple and straightforward task that can be done at home. Here are the steps to follow:
- Identify the blown fuse: First, you need to locate the fuse box in your vehicle. Refer to the interior fuse diagram for your 2002 Ford Explorer to find the specific fuse that needs to be replaced.
- Gather the necessary tools: To replace the blown fuse, you will need a pair of needle-nose pliers or fuse puller tool, a flashlight (if necessary), and the correct replacement fuse. Make sure the replacement fuse has the same amperage rating as the blown fuse.
- Disconnect the battery: Before replacing the fuse, it’s important to disconnect the negative battery cable to prevent any electrical shocks or damage. Locate the battery in your vehicle and use a wrench to loosen the negative terminal and then remove it.
- Remove the blown fuse: Use the needle-nose pliers or fuse puller tool to firmly grasp the blown fuse and gently pull it out of the fuse box. Be careful not to twist or damage the fuse.
- Install the replacement fuse: Take the new fuse and insert it into the slot where the blown fuse was. Make sure it is securely seated and fits tightly.
- Reconnect the battery: Reattach the negative battery cable to the battery terminal and tighten it with the wrench.
- Test the new fuse: After replacing the blown fuse, test the corresponding electrical component to ensure that it is functioning properly.
Remember to always consult your vehicle’s owner manual for specific instructions and to double-check the interior fuse diagram for your 2002 Ford Explorer to ensure you are replacing the correct fuse. If you are unsure or uncomfortable with replacing the fuse yourself, it is recommended to seek assistance from a professional mechanic.