
If you are looking for a detailed wiring diagram for a 2005 Lincoln Navigator, you have come to the right place. Whether you are a car enthusiast or a professional mechanic, having access to accurate wiring diagrams is essential for diagnosing and repairing electrical issues in your vehicle.
The wiring diagram for the 2005 Lincoln Navigator is a comprehensive guide that outlines the electrical connections and components in the vehicle. It shows the location and function of each wire, providing a detailed map of the electrical system. This diagram is particularly useful when troubleshooting issues with the vehicle’s lighting, audio system, climate control, and other electrical functions.
With the 2005 Lincoln Navigator wiring diagram, you can easily identify which wires connect to which components and troubleshoot any electrical problems you may encounter. Whether you are replacing a faulty switch, installing a new stereo system, or diagnosing a wiring issue, having access to this diagram will save you time and prevent any costly mistakes.
So, whether you are a DIYer or a professional mechanic, having the 2005 Lincoln Navigator wiring diagram at your disposal is a valuable resource. It provides a clear and detailed map of the electrical system, allowing you to troubleshoot and repair any electrical issues with confidence and accuracy. With this diagram, you can ensure that your vehicle’s electrical system is working properly and avoid any potential electrical failures.
Overview of the 2005 Lincoln Navigator
The 2005 Lincoln Navigator is a full-size luxury SUV that offers a comfortable and spacious interior, powerful performance, and a range of luxury features. With its distinctive design and premium amenities, the Navigator is a popular choice among buyers looking for a high-end SUV.
The Navigator is powered by a 5.4-liter V8 engine that delivers plenty of power and acceleration. It comes standard with rear-wheel drive, but four-wheel drive is optional for those who want enhanced off-road capabilities. The SUV also features a smooth and comfortable ride, thanks to its independent rear suspension and air ride suspension system.
- The interior of the 2005 Navigator is well-appointed and luxurious. It offers seating for up to eight passengers, with plenty of headroom and legroom in all three rows. The front seats are power-adjustable and heated, while the second row can be equipped with either captain’s chairs or a bench seat.
- Standard features include leather upholstery, wood trim, dual-zone automatic climate control, and an upgraded sound system. Optional features include a DVD entertainment system, navigation system, and a power moonroof.
- In terms of safety, the Navigator comes equipped with features such as anti-lock brakes, traction control, stability control, and a full array of airbags. It also offers available parking sensors and a rearview camera to assist with maneuvering in tight spaces.
- In terms of cargo space, the Navigator offers ample room with up to 103.5 cubic feet of cargo capacity when the second and third rows are folded down. There are also numerous storage compartments throughout the cabin to keep smaller items organized.
In conclusion, the 2005 Lincoln Navigator is a luxury SUV that offers powerful performance, a comfortable and luxurious interior, and a range of premium features. Whether you’re navigating city streets or tackling off-road adventures, the Navigator is sure to provide an enjoyable and luxurious driving experience.
Understanding the Wiring Diagram
The wiring diagram for a 2005 Lincoln Navigator is a crucial tool for understanding the electrical system of the vehicle. It provides a visual representation of how the different components are interconnected and how electricity flows through them.
Using the wiring diagram, you can identify the various wires and their functions, such as power supply, ground, sensor inputs, and output signals. This information is essential for troubleshooting electrical issues, installing aftermarket components, or modifying the existing wiring.
Key components:
- Battery: The battery is the main power source for the vehicle’s electrical system. It provides the necessary voltage for the components to function.
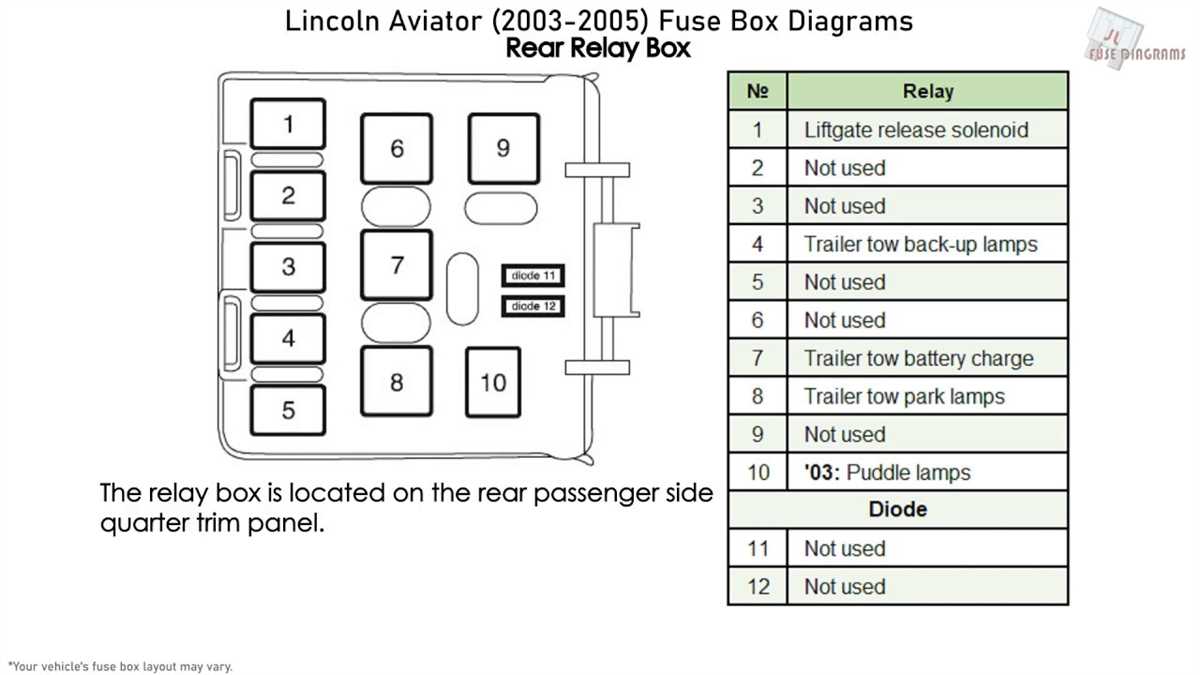
- Fuses and relays: Fuses and relays protect the electrical system from overload and provide control for various components and systems. They are located in the fuse box or power distribution center.
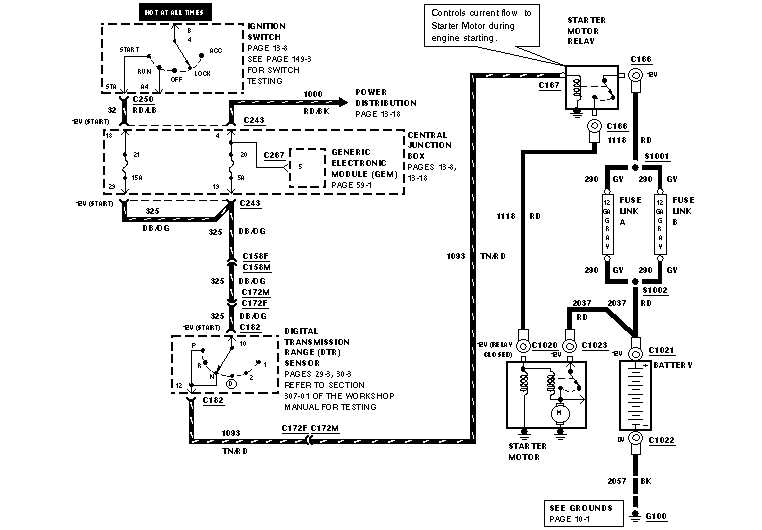
- Ignition switch: The ignition switch is responsible for controlling the power to the vehicle’s electrical system. It has different positions (off, accessory, on, and start) that determine which circuits are activated.
- Wiring harnesses: Wiring harnesses are bundles of wires that connect the various components of the vehicle. They provide a neat and organized way for the electrical signals to travel without interference.
- Sensors and switches: Sensors and switches detect various conditions and send signals to the vehicle’s computer or control modules. These signals are used to control the operation of different systems, such as the engine, transmission, and climate control.
- Connectors and terminals: Connectors and terminals are used to join the different wires and components together. They ensure a secure and reliable connection, allowing the flow of electricity between components.
The wiring diagram is typically presented in a schematic format, with symbols representing the various components and connections. It may also include color codes to indicate the wire’s function or voltage level. Understanding these symbols and codes is essential for accurately interpreting the diagram.
Overall, the wiring diagram is a valuable resource for understanding the electrical system of a 2005 Lincoln Navigator. It provides detailed information on the connections, functions, and locations of the various components, allowing for effective troubleshooting and modification. By referring to the wiring diagram, technicians and enthusiasts can work with confidence to diagnose and repair electrical issues or customize the vehicle to meet their specific needs.
Electrical Components and their Functions
Understanding the electrical components and their functions in a vehicle is crucial for troubleshooting and repairing any electrical issues. Each component plays a specific role in ensuring the electrical system functions properly. Here are some of the key components you may come across in a 2005 Lincoln Navigator wiring diagram:
Battery:
The battery is the primary source of electrical power in the vehicle. It stores energy and provides electrical current to start the engine and power various electrical systems when the vehicle is running. It also acts as a buffer to stabilize voltage fluctuations in the electrical system.
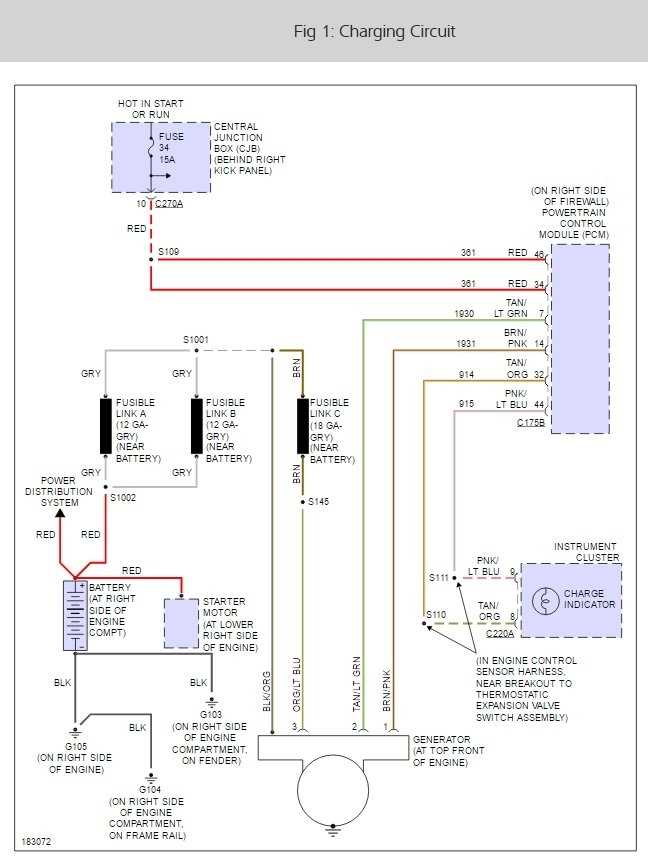
Alternator:
The alternator is responsible for generating electrical power while the engine is running. It converts mechanical energy from the engine into electrical energy, which charges the battery and powers the vehicle’s electrical systems. The alternator also helps maintain a consistent voltage output to meet the demands of the electrical components.
Fuses and Relays:
Fuses and relays protect electrical circuits from damage caused by excessive current. Fuses are designed to blow and break the circuit when they detect an overload or a short circuit, preventing further damage. Relays, on the other hand, control the flow of electrical current to various components, such as the fuel pump or cooling fan, based on signals from the vehicle’s control modules.
Sensors:
Sensors are vital components in the electrical system as they provide input to the vehicle’s control modules, helping them make decisions and adjust various systems. Examples of sensors include the oxygen sensor, temperature sensor, and throttle position sensor. These sensors measure different parameters and send signals to the control modules to ensure proper engine performance and efficient operation of other electrical systems.
Switches and Controls:
Switches and controls allow the driver and passengers to operate various electrical systems in the vehicle. These can include power window switches, door lock switches, climate control buttons, and multimedia controls. They are typically connected to control modules or relays, and their proper functioning is essential for convenient and safe operation of the vehicle’s electrical systems.
Wiring Harnesses:
Wiring harnesses are bundles of electrical wires that connect various components in the vehicle. They serve as the pathways for electrical current to travel from the power source to the destination component. Each wire in a wiring harness has a specific purpose and is often color-coded for easy identification. A wiring diagram helps to trace the path of electrical current and identify any potential issues in the circuit.
Control Modules:
Control modules are electronic units that receive signals from sensors and switches and make decisions to control various systems. Examples of control modules include the Engine Control Module (ECM), Transmission Control Module (TCM), and Body Control Module (BCM). These modules communicate with each other and with the vehicle’s electrical components to ensure proper operation and coordination of different systems.
Lights and Bulbs:
Lights and bulbs play a critical role in providing visibility and safety in the vehicle. The wiring diagram may include information about the wiring and connections for headlights, taillights, brake lights, turn signals, and interior lights. Each light and bulb has a specific function and requirement in terms of electrical connections, ensuring proper illumination and signaling.
Audio and Entertainment Systems:
Modern vehicles often come equipped with advanced audio and entertainment systems. These systems may include a radio, CD player, navigation system, and speakers. The wiring diagram may provide details on the connections and wiring for these systems, ensuring proper functionality and integration with the vehicle’s electrical system.
These are just some of the electrical components and their functions that you may find in a 2005 Lincoln Navigator wiring diagram. Understanding these components and how they work together is essential for diagnosing and repairing electrical issues in the vehicle.
Common Wiring Issues and Troubleshooting
When it comes to the wiring system in a 2005 Lincoln Navigator, there are several common issues that can arise. These issues can cause various electrical problems, ranging from malfunctioning lights to non-functional power windows. By understanding these common wiring issues, owners can effectively troubleshoot and resolve them.
One of the most common wiring issues in a 2005 Lincoln Navigator is a short circuit. A short circuit occurs when the hot wire (positive wire) and the ground wire (negative wire) come into contact with each other or with a conductive material, causing an excessive flow of electrical current. This can lead to blown fuses, malfunctioning electrical components, and even electrical fires. To troubleshoot a short circuit, owners should carefully inspect the wiring harnesses for any signs of damage or frayed wires. If a short circuit is detected, the affected wiring should be repaired or replaced.
Another common wiring issue is a loose or corroded connection. Over time, the connections between the various electrical components in the vehicle can become loose or corroded, resulting in poor electrical conductivity. This can cause intermittent electrical problems, such as flickering lights or a loss of power to certain components. To troubleshoot this issue, owners should inspect the connections and terminals for any signs of corrosion or looseness. If necessary, the connections should be cleaned and tightened to ensure a solid electrical connection.
In some cases, the issue may lie with a faulty relay or switch. Relays and switches are responsible for controlling the flow of electrical current to various components in the vehicle. If a relay or switch is faulty, it can cause issues such as non-functional power windows or unresponsive lights. To troubleshoot this issue, owners can use a multimeter to test the continuity and functionality of the relays and switches. If a faulty relay or switch is identified, it should be replaced with a new one to restore proper electrical function.
In conclusion, common wiring issues in a 2005 Lincoln Navigator can include short circuits, loose or corroded connections, and faulty relays or switches. By carefully inspecting and troubleshooting these wiring issues, owners can effectively resolve electrical problems and ensure the proper functioning of their vehicle’s electrical system.
Step-by-Step Wiring Installation Guide
Installing the wiring in a 2005 Lincoln Navigator requires careful planning and attention to detail. The following step-by-step guide will help ensure a successful installation:
1. Prepare the Tools and Materials
Before beginning the wiring installation, gather all the necessary tools and materials. This may include wire strippers, crimping tools, electrical tape, soldering iron, wire connectors, and the wiring diagram for the Navigator. Make sure to have the correct gauge of wire for each circuit.
2. Disconnect the Battery
Prior to working on the vehicle’s electrical system, it is crucial to disconnect the battery to prevent any accidental electrical shocks or damage. Locate the battery in the engine compartment and remove the negative (-) cable.
3. Identify the Wiring Connections
Refer to the wiring diagram to identify the different wiring connections in the Navigator. This will help determine where each wire needs to be routed and connected. Take note of any color codes or specific instructions mentioned in the diagram.
4. Route and Secure the Wiring
Carefully route the wires to their respective destinations, ensuring that they are away from any moving parts or sources of heat. Use zip ties or clamps to secure the wiring in place and prevent it from rubbing against sharp edges.
5. Make the Necessary Connections
Follow the wiring diagram to make the necessary connections. Strip the insulation off the wires, twist the exposed ends together with the corresponding wire, and secure them with wire connectors. For a more secure connection, consider soldering the wires together and covering them with electrical tape.
6. Test the Wiring
After completing the wiring installation, reconnect the battery and test each circuit to ensure that it is functioning properly. Use a multimeter or a test light to check for continuity and voltage at different points along the wiring.
7. Secure and Clean Up
Once everything is confirmed to be in working order, secure any loose wiring and clean up the work area. Remove any excess wires or connectors, and neatly organize the remaining wiring to prevent future issues.
By following this step-by-step guide, you can install the wiring in your 2005 Lincoln Navigator with confidence and ensure a reliable and efficient electrical system.
Recommended Tools and Supplies
In order to successfully complete the wiring process for your 2005 Lincoln Navigator, it is important to have the right tools and supplies on hand. Here are some items that are recommended for this task:
- Wire Strippers: These are essential for removing the insulation from the wires and preparing them for installation.
- Wire Crimpers: These tools are used to securely connect the wires together using crimp connectors.
- Electrical Tape: This is used to insulate and protect the connections from moisture and damage.
- Test Light or Multimeter: These tools will help you test the electrical connections and ensure they are working properly.
- Soldering Iron and Solder: If you prefer soldering the connections, you will need these items for a secure and reliable connection.
- Heat Gun: This tool is useful for shrinking heat shrink tubing, which provides additional protection for the wire connections.
- Wire Ties or Zip Ties: These can be used to secure the wires and prevent them from coming loose or getting tangled.
- Owner’s Manual or Wiring Diagram: It is important to have a reference guide, such as the owner’s manual or wiring diagram, to ensure that you are connecting the wires correctly.
By having these tools and supplies readily available, you will be well-equipped to tackle the wiring process for your 2005 Lincoln Navigator. Remember to follow safety precautions, double-check your connections, and consult a professional if you are unsure about any aspect of the wiring process.