
A microphone is an essential tool in the audio industry, allowing us to capture sound and transmit it for various purposes. Microphones come in different types, with different wiring configurations. One common wiring diagram for a microphone is the 3 wire setup, which consists of three separate wires.
The 3 wire microphone wiring diagram includes three wires: the ground wire, the audio wire, and the power wire. The ground wire, often referenced as the shield wire, is responsible for preventing unwanted noise and interference. The audio wire carries the actual audio signal, while the power wire supplies voltage to the microphone.
When connecting a 3 wire microphone, it is crucial to follow the correct wiring diagram to ensure proper functioning. Improper wiring can result in distorted audio, background noise, or even damage to the microphone or audio equipment. By understanding the 3 wire microphone wiring diagram, you can confidently connect your microphone and achieve the desired audio quality.
Understanding the 3 Wire Microphone Wiring Diagram
When it comes to connecting a microphone to a device or sound system, it is important to understand the wiring diagram. A 3 wire microphone wiring diagram provides a visual representation of how the microphone’s three wires should be connected. By understanding this diagram, you can ensure that the microphone is properly wired and will function correctly.
In a typical 3 wire microphone wiring diagram, you will see three wires: the ground wire, the audio signal wire, and the power wire. The ground wire is usually connected to the microphone’s metal casing or shield, which helps eliminate any unwanted noise or interference. The audio signal wire carries the actual sound signal from the microphone to the device or sound system. The power wire is responsible for providing power to the microphone, often in the form of phantom power.
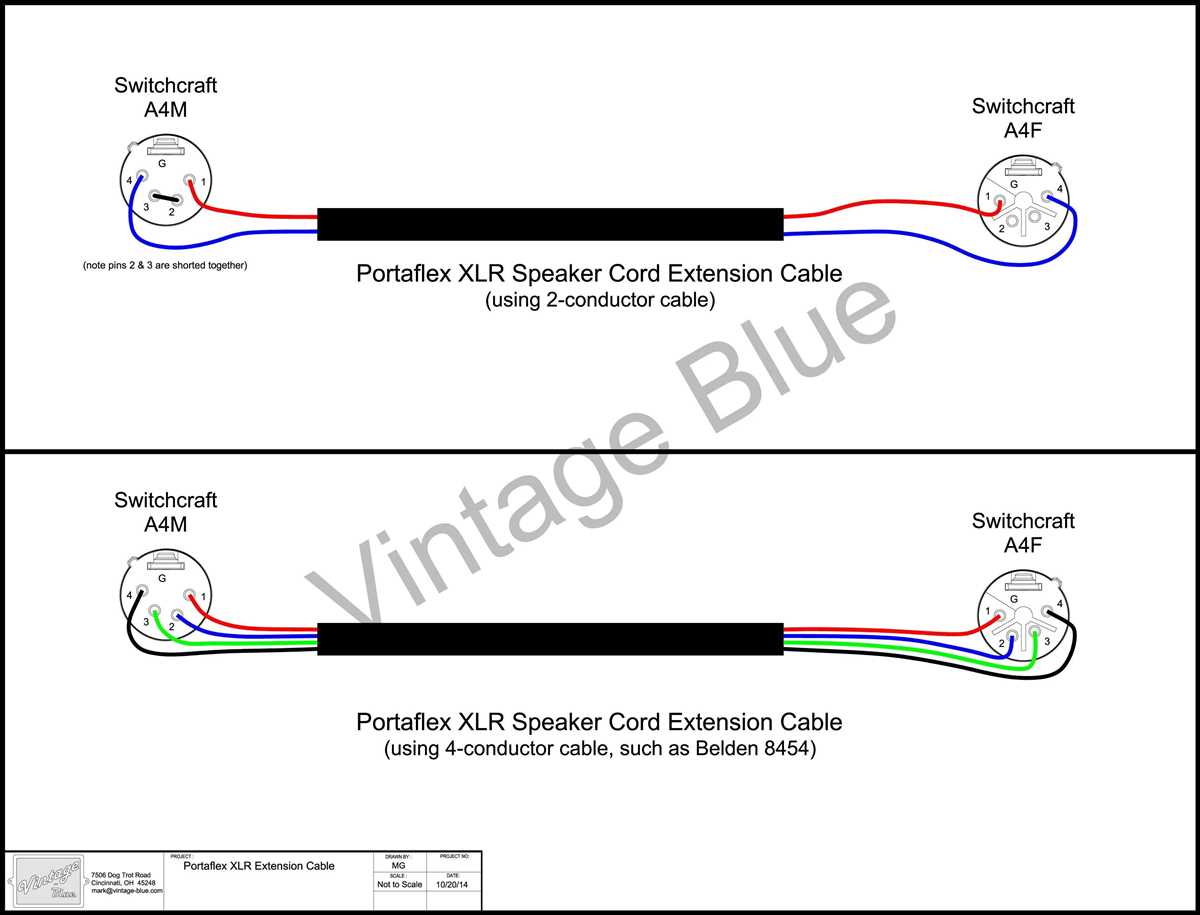
The wiring diagram will also indicate which wire is connected to which connector or terminal on both the microphone and the device or sound system. This is crucial for ensuring that the connections are made correctly. It is important to note that different microphones may have slightly different wiring diagrams, so it is always recommended to consult the manufacturer’s instructions or documentation for the specific microphone being used.
- Ground Wire: This wire is usually connected to the microphone’s metal casing or shield to eliminate unwanted noise or interference.
- Audio Signal Wire: This wire carries the actual sound signal from the microphone to the device or sound system.
- Power Wire: This wire provides power to the microphone, often in the form of phantom power.
By correctly following the 3 wire microphone wiring diagram and making the appropriate connections, you can ensure that the microphone functions properly and that the sound signal is transmitted accurately. This is essential for achieving high-quality audio recordings or live sound reinforcement.
Why understanding microphone wiring is important
When it comes to using microphones, understanding their wiring is crucial for proper functionality and compatibility with audio devices. A microphone converts sound waves into electrical signals and transmits them to recording or amplification equipment. Having a clear understanding of microphone wiring ensures that the signals are correctly transmitted, resulting in high-quality sound reproduction.
One of the main reasons why understanding microphone wiring is important is because it allows you to troubleshoot any issues that may arise. If you encounter problems with your microphone, knowing how the wires are connected and their corresponding functions will help you identify and rectify any faults. You can easily check if the wiring is intact and properly connected, which can save you time and money from unnecessary repairs or replacements.
Microphone wiring diagrams play a crucial role in comprehending the inner workings of a microphone. These diagrams provide a visual representation of the different wires and their connections. They typically include information about ground wires, power supply wires, and audio signal wires, allowing users to follow the correct wiring configuration.
Additionally, understanding microphone wiring allows you to customize and adapt microphones to suit specific needs. Depending on the application, you may need to modify or rewire the microphone to accommodate different connectors or audio systems. Having a solid understanding of microphone wiring gives you the flexibility to make these modifications effectively and safely.
In conclusion, understanding microphone wiring is essential for troubleshooting issues, ensuring proper functionality, and customizing microphones to meet specific requirements. By familiarizing yourself with the wiring diagrams and the purpose of each wire, you can optimize the performance of your microphones and achieve excellent sound quality in various audio applications.
What is a 3 wire microphone?
A 3 wire microphone is a type of microphone that uses three separate wires for transmitting audio signals. This differs from other types of microphones, such as 2 wire microphones, which use only two wires for transmission.
The three wires in a 3 wire microphone are typically labeled as the ground wire, the microphone signal wire, and the microphone power wire. The ground wire is used to connect the microphone to the ground reference, providing a stable reference point for the audio signal. The microphone signal wire carries the actual audio signal from the microphone to the recording or amplifying device. The microphone power wire supplies power to the microphone, allowing it to function.
One common application of a 3 wire microphone is in professional audio recording and broadcasting. These microphones often have XLR connectors, which can accommodate the three wires. The use of three wires allows for a more reliable and higher quality audio signal transmission, as it allows for separate grounding and power supply from the audio signal.
- Ground wire: Connects the microphone to the ground reference.
- Microphone signal wire: Carries the audio signal from the microphone to the recording or amplifying device.
- Microphone power wire: Supplies power to the microphone for its operation.
Overall, a 3 wire microphone provides an efficient and effective way of transmitting audio signals, particularly in professional audio applications where high quality and reliable audio transmission is crucial.
The components of a 3 wire microphone
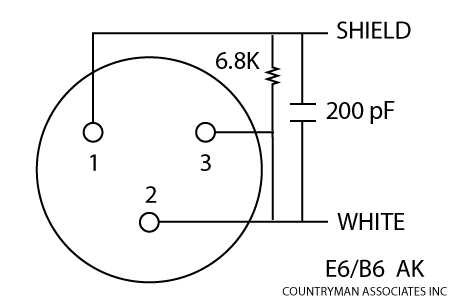
A 3 wire microphone is a type of microphone that utilizes three separate wires for its operation. These wires are connected to various components that work together to capture and transmit audio signals. The diagram below illustrates the different components of a typical 3 wire microphone:
1. Microphone capsule: The microphone capsule is the main component responsible for converting sound waves into electrical signals. It consists of a diaphragm and a set of backplates that vibrate in response to sound. These vibrations create fluctuations in the electrical current, generating an analog audio signal.
2. Pre-amplifier: The pre-amplifier is a crucial component that amplifies the weak audio signals produced by the microphone capsule. It boosts the signal to a usable level before it is further processed or transmitted.
3. Shielding wire: The shielding wire is an important part of the microphone’s design as it helps to minimize unwanted electromagnetic interference. It is typically wrapped around the other wires and acts as a protective layer to prevent interference from external sources.
4. Ground wire: The ground wire is a key component that provides a reference point for the microphone’s electrical circuit. It helps to establish a stable voltage and prevents unwanted noise or hum from being introduced into the audio signal.
5. Signal wire: The signal wire carries the amplified audio signal from the microphone capsule to other audio equipment such as mixers, audio interfaces, or recording devices. It is responsible for transmitting the audio signal accurately and efficiently.
Overall, the components of a 3 wire microphone work in harmony to capture sound, amplify it, and transmit it as an electrical signal. This allows for clear and accurate audio reproduction in various professional and recreational settings.
How to wire a 3 wire microphone
Wiring a 3 wire microphone properly is essential to ensure its functionality and compatibility with other audio devices. The three wires typically found in a microphone cable are the ground wire, the positive signal wire, and the negative signal wire. Each wire serves a specific purpose and must be connected correctly for the microphone to work effectively.
To wire a 3 wire microphone, you will first need to identify which wire is which. The ground wire is typically the one with the thickest insulation and is often color-coded as black. The positive signal wire is usually red or white, while the negative signal wire is often green or blue.
Once you have identified the wires, you can begin the wiring process. Start by stripping the insulation from the end of each wire, exposing a small section of the bare wire. Make sure to only strip a small amount to prevent any short circuits or damage to the wires.
Next, you will need to attach the wires to the appropriate connectors. The ground wire should be connected to the ground terminal, which is usually labeled as “GND” or “G”. The positive signal wire should be connected to the positive terminal, often labeled as “POS” or “+”. Finally, the negative signal wire should be connected to the negative terminal, typically labeled as “NEG” or “-“.
After securely attaching the wires to the connectors, you may need to solder them for a more secure connection. Soldering ensures a solid electrical connection and helps prevent any issues with signal loss or interference. It is important to be cautious when soldering and avoid applying too much heat, as excessive heat can damage the microphone components.
Once the wiring and soldering are complete, you can test the microphone to ensure it is functioning properly. Connect the microphone to an audio device, such as an amplifier or mixer, and check for any sound output. If the microphone is not producing sound, double-check the wiring connections and make sure they are securely attached.
Overall, properly wiring a 3 wire microphone is a straightforward process that requires careful identification of the wires and correct connection to the appropriate terminals. Following the steps outlined above will help ensure your microphone works effectively and produces high-quality audio.
Tips for troubleshooting a 3 wire microphone
When encountering issues with a 3 wire microphone, there are a few troubleshooting steps you can take to identify and resolve the problem. Here are some tips to help you troubleshoot:
- Check the connections: Ensure that the microphone is properly connected to the device or amplifier. Make sure all the wiring connections are secure and properly connected to their respective terminals.
- Test with a different microphone: If possible, try using a different 3 wire microphone to see if the issue persists. This can help determine if the problem lies with the microphone itself or with the device or amplifier it is connected to.
- Inspect the wiring: Check for any visible signs of damage or wear on the microphone’s wiring. If you notice any frayed or broken wires, they may need to be repaired or replaced.
- Test the cables and connectors: If the microphone is detachable, try using different cables and connectors to see if the issue is related to a faulty cable or connector. Sometimes, a simple replacement of these components can resolve the problem.
- Check the device settings: Make sure the device or amplifier settings are configured correctly for the microphone. Ensure that the microphone is selected as the input source, and adjust the volume levels accordingly.
- Consult the manufacturer’s documentation: If you are unable to identify or resolve the issue, refer to the manufacturer’s documentation or support resources for further guidance. They may have specific troubleshooting steps or recommendations for your specific microphone model.
In summary, troubleshooting a 3 wire microphone requires checking connections, testing with a different microphone, inspecting the wiring, testing the cables and connectors, checking device settings, and consulting the manufacturer’s documentation if needed. These steps can help identify and resolve common issues with 3 wire microphones, ensuring optimal performance and functionality.