Have you ever wondered what goes on inside a three-pin plug? Although it may seem like a simple piece of equipment, understanding the wiring diagram of a three-pin plug can be useful for various purposes, such as troubleshooting electrical problems or installing new electrical outlets.
A three-pin plug consists of three main components: the earth pin, the live pin, and the neutral pin. Each of these pins serves a specific purpose in order to provide a safe and reliable electrical connection.
The earth pin, usually identified by its distinctive green and yellow color, is responsible for grounding the electrical appliance. This pin is connected to the grounding wire of the electrical system to prevent electrical shocks and reduce the risk of fires caused by faulty electrical devices.
Understanding the Basics of 3 Pin Plug Wiring Diagram
In electrical wiring, a 3-pin plug is commonly used to provide power to various electrical appliances and devices. The wiring diagram of a 3-pin plug refers to the connection of its three pins to the corresponding wires or terminals inside the plug. Understanding the basics of the 3-pin plug wiring diagram is essential for proper installation and maintenance of electrical connections.
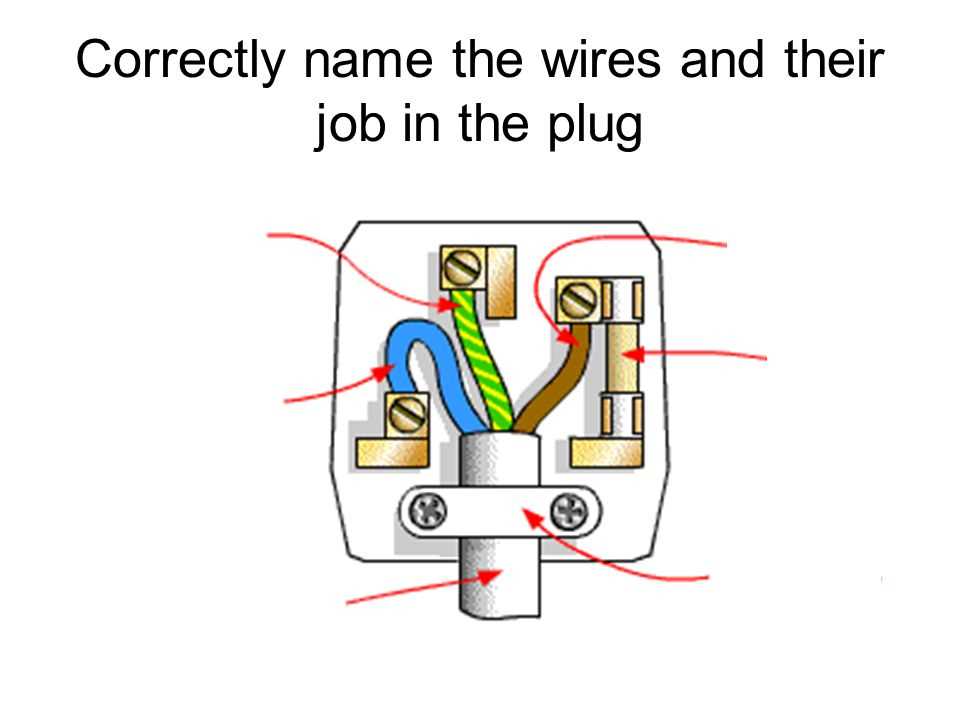
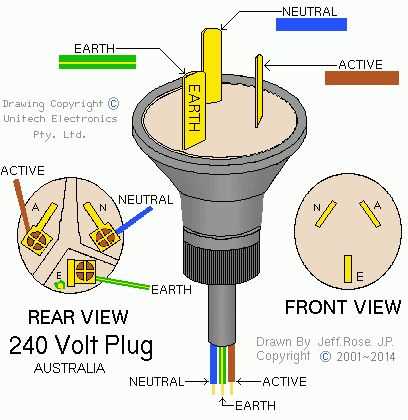
The three pins in a 3-pin plug are the live pin, neutral pin, and earth pin. The live pin is responsible for carrying the current from the power source to the appliance. It is connected to the brown wire in the wiring diagram. The neutral pin completes the circuit and carries the current back to the power source. It is connected to the blue wire. The earth pin, also known as the grounding pin, is for safety purposes and provides a path for electrical faults to the ground. It is connected to the green and yellow wire.
When wiring a 3-pin plug, it is important to ensure that the correct wires are connected to their respective pins. The live wire should be connected to the live pin, the neutral wire to the neutral pin, and the earth wire to the earth pin. Any incorrect connection can result in electrical hazards or damage to the appliance. It is also important to properly secure the wires inside the plug using the appropriate terminal screws to prevent them from coming loose.
Overall, understanding the basics of the 3-pin plug wiring diagram is crucial for anyone working with electrical connections. Following the correct wiring diagram and ensuring the proper connection of wires to their respective pins helps ensure the safety and efficiency of electrical systems. Regular maintenance and inspection of the wiring connections are also important to identify any potential issues and prevent accidents or electrical failures.
What is a 3 pin plug?
A 3 pin plug is a type of electrical plug that is commonly used in many countries around the world. It is designed to connect electrical devices to a power source and is known for its safety features. The plug consists of a plastic casing with three metal pins and a cable attached to it.
The three pins in a 3 pin plug are designed to serve specific purposes. The first pin, usually the larger one, is the earth pin. It is connected to the earth wire in the electrical system and is important for grounding the plug and preventing electric shocks. The second pin is the live pin, which carries the current from the power source to the device. The third pin is the neutral pin, which returns the current back to the power source.
In addition to the three pins, a 3 pin plug also has safety features such as fuse protection and a shutter mechanism. The fuse inside the plug is designed to break the circuit in case of an overload or short circuit, protecting the device and the user from electrical damage. The shutter mechanism prevents accidental access to the live and neutral pins, providing an extra layer of safety.
Components of a 3 pin plug
A 3 pin plug is an essential component used in electrical systems to connect electrical devices to a power source. It consists of several key components that ensure safe and efficient power transmission. Understanding the different components of a 3 pin plug is important for proper installation and maintenance.
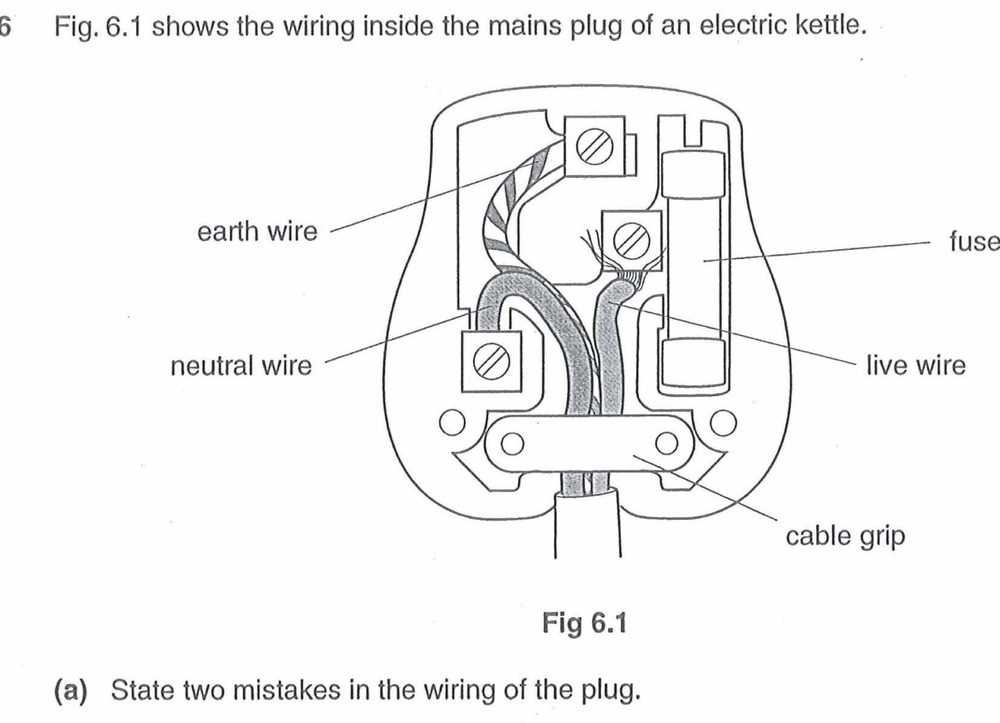
1. Pins: The pins are the metal prongs at the end of the plug that fit into the electrical socket. In a 3 pin plug, there are three pins: a live pin, a neutral pin, and an earth pin. The live pin carries the current from the power source, the neutral pin completes the circuit, and the earth pin provides a safe path for any leakage of electrical current.
2. Cable: The cable is the insulated wire that connects the plug to the electrical device. It carries the electric current from the plug to the device. The cable is made of conductive material, usually copper, that allows for efficient transmission of electrical power.
3. Fuse: The fuse is a safety device located within the plug. It is designed to protect the electrical device from excessive current. If the current exceeds a certain level, the fuse will melt, breaking the circuit and preventing damage to the device. The fuse can be easily replaced if it blows, ensuring the safety of the electrical system.
4. Insulation: The insulation is the protective covering that surrounds the pins and cable of the plug. It prevents any contact between the live, neutral, and earth pins, reducing the risk of electrical shock. The insulation is typically made of a non-conductive material, such as plastic or rubber.
5. Plug casing: The plug casing is the outer covering of the plug. It houses all the components and provides a protective barrier against external elements, such as dust and moisture. The plug casing is designed to be durable and withstand regular use.
In conclusion, the components of a 3 pin plug work together to ensure safe and efficient power transmission. Understanding the role of each component is essential for proper installation and maintenance, reducing the risk of electrical hazards.
Wiring diagram for a 3 pin plug
When it comes to electrical appliances and devices, it is important to understand how they are wired in order to ensure safety and proper functioning. One common type of plug used for many household appliances is the 3 pin plug. This plug typically has three wires inside, each serving a specific purpose. Understanding the wiring diagram for a 3 pin plug can help you troubleshoot and connect various appliances.
The 3 pin plug typically consists of three terminals labeled as live, neutral, and earth. The live wire carries the electrical current from the power source to the appliance. It is usually colored brown or red. The neutral wire, colored blue or black, returns the current back to the power source. The earth wire, colored green and yellow, provides a path for any stray electrical currents to safely discharge into the ground.
When wiring a 3 pin plug, it is important to ensure that the wires are connected to the correct terminals. Connecting the live wire to the neutral or earth terminal can result in electrical shock or damage to the appliance. Similarly, connecting the neutral wire to the live terminal can cause a short circuit. Therefore, it is crucial to follow the wiring diagram and double-check the connections before use.
Here is a step-by-step guide to wiring a 3 pin plug:
- Start by removing the outer cover of the plug.
- Identify the terminals and label them accordingly – live, neutral, and earth.
- Strip a small section of insulation from the end of each wire.
- Connect the live wire to the live terminal, the neutral wire to the neutral terminal, and the earth wire to the earth terminal.
- Tighten the terminal screws to secure the wires in place.
- Replace the outer cover of the plug.
- Double-check the connections and ensure there are no loose wires.
By following the correct wiring diagram for a 3 pin plug and understanding the purpose of each wire, you can ensure the safe and reliable operation of your electrical appliances.
Functionality of each wire in a 3 pin plug
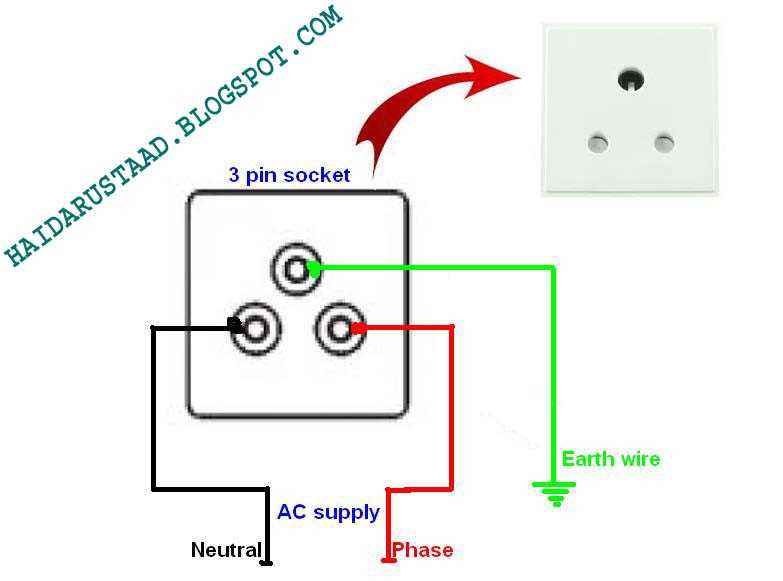
In a typical 3 pin plug, there are three wires that serve different functions:
- Live wire (brown): The live wire is responsible for carrying the current from the mains supply to the device. It is connected to the fuse in the plug and provides the power for the device to operate. It is essential that the live wire is properly insulated to prevent any electrical shocks.
- Neutral wire (blue): The neutral wire completes the electrical circuit and carries the current back to the mains supply. It acts as a return path for the current and is usually connected to the neutral terminal in the device. Like the live wire, it must be well-insulated to ensure safety.
- Earth wire (green and yellow): The earth wire is a safety measure that provides a path for electrical current to flow into the ground in the event of a fault. It helps in preventing electric shocks by providing an alternate route for the current to follow. The earth wire is connected to the earth terminal in the plug and is usually attached to the metal casing of the device, creating a protective barrier. It is important to have a proper earth connection for devices to operate safely.
Each of these wires plays a crucial role in ensuring the safe and efficient functioning of electrical devices. Wiring a 3 pin plug correctly is important to avoid any electrical hazards and maintain the integrity of the electrical system.
Safety precautions when working with 3 pin plug wiring
When it comes to working with 3 pin plug wiring, it is important to take certain safety precautions to ensure that you and others are protected from potential electrical hazards. Here are some key precautions to keep in mind:
1. Ensure the power is off

Before starting any work on the 3 pin plug wiring, it is crucial to switch off the power supply to the area where you will be working. This can be done by turning off the relevant circuit breaker or removing the corresponding fuse. Double-check that the power is off using a voltage tester to avoid any accidental electrical shocks.
2. Wear protective gear
Always wear appropriate personal protective equipment (PPE) when working with 3 pin plug wiring. This includes insulated gloves, safety glasses, and non-conductive footwear. PPE helps to protect you from electric shocks and injuries caused by accidental contact with live wires or other electrical components.
3. Avoid wet conditions
Avoid working on 3 pin plug wiring in wet or damp conditions, as moisture can increase the risk of electrical accidents. Ensure that the area is dry before starting any work and if necessary, use a moisture meter to check for any hidden moisture.
4. Use insulated tools
When working with 3 pin plug wiring, always use insulated tools specifically designed for electrical work. Insulated tools have a protective layer that prevents electrical current from flowing through them, reducing the risk of electric shock.
5. Follow proper wiring techniques
Follow the recommended wiring techniques for connecting wires to the correct pins in the plug. Ensure that the wires are securely connected and that there are no exposed or damaged wires. It is also important to use the correct size and type of wire for the specific application.
6. Seek professional help if unsure
If you are unsure about any aspect of working with 3 pin plug wiring or if you are inexperienced, it is always best to seek professional help. Attempting to do electrical work without the necessary knowledge and skills can be extremely dangerous and potentially lead to harmful consequences.
Remember, electrical work should not be taken lightly, and it is always better to prioritize safety and seek professional assistance when needed. By following these safety precautions, you can minimize the risk of accidents and ensure a safe working environment when dealing with 3 pin plug wiring.
Troubleshooting common issues with 3 pin plug wiring
When wiring a 3 pin plug, it is important to do it correctly to ensure safety and proper functioning of electrical appliances. However, there can be some common issues that may arise with the wiring, leading to potential problems. Here are some troubleshooting tips for common issues with 3 pin plug wiring:
1. Loose connections
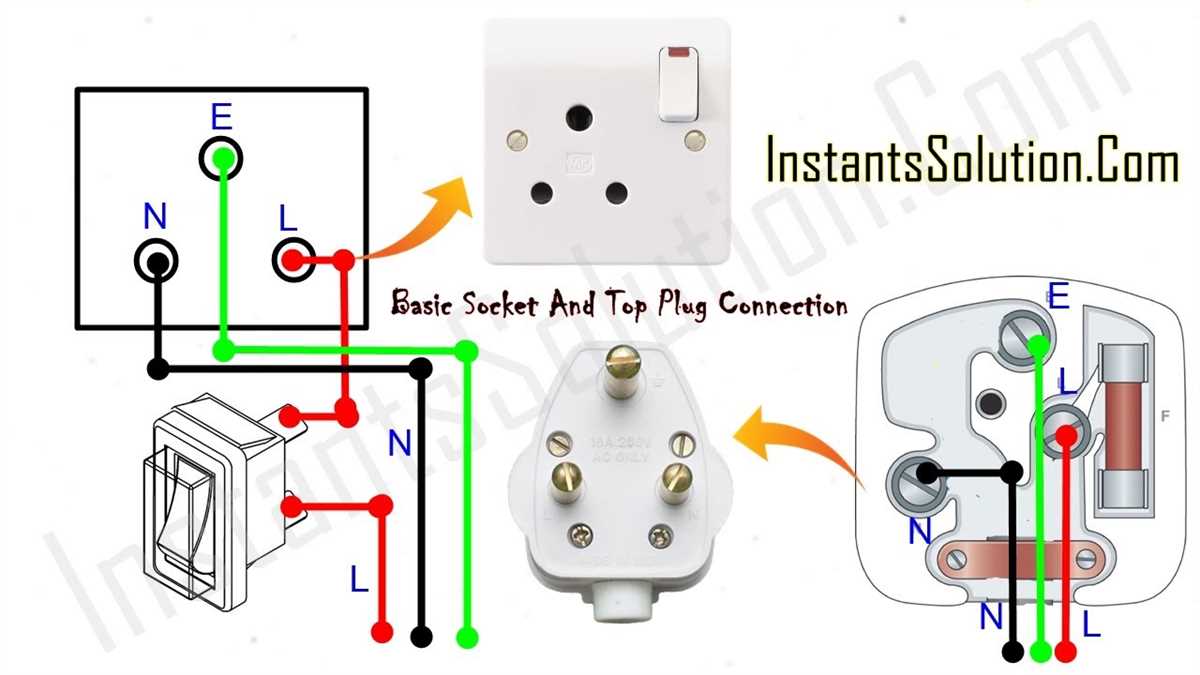
A common issue with 3 pin plug wiring is loose connections, which can cause poor electrical conductivity and even electrical sparks. To troubleshoot this issue, check if the wires are properly connected to the respective terminals. Ensure that the screws are tightened securely to hold the wires in place. If necessary, rewire the plug using proper wiring techniques to ensure a tight and secure connection.
2. Damaged insulation
Damaged insulation can compromise the safety of 3 pin plug wiring. If you notice any exposed wires or frayed insulation, it is essential to replace the wire immediately. Use wire strippers to remove the damaged section and strip the insulation from the wire ends before reconnecting them to the plug terminals. Always ensure that the wires are properly insulated to prevent electrical shocks or short circuits.
3. Incorrect wire placement
Another common issue is incorrect wire placement within the plug. This can result in reversed polarity, where the live wire is connected to the neutral terminal and vice versa. Reversed polarity can lead to appliance damage or even electric shock. To troubleshoot this issue, make sure to double-check the wire placement according to the wiring diagram. Ensure that the live wire (brown or red) is connected to the live terminal, the neutral wire (blue or black) is connected to the neutral terminal, and the earth wire (green and yellow) is connected to the earth terminal.
In conclusion, troubleshooting common issues with 3 pin plug wiring requires attention to detail and adherence to proper wiring techniques. By addressing loose connections, damaged insulation, and incorrect wire placement, you can ensure the safety and reliable operation of electrical appliances connected to the plug. Remember to always follow electrical safety guidelines and consult a certified electrician if you are unsure about any wiring issues.