
The C3 Corvette is a classic American sports car that is known for its sleek design and powerful performance. However, like any vehicle, it relies on a complex system of components to function properly. One crucial aspect of the C3 Corvette’s functionality is its vacuum system, which plays a vital role in engine performance, emission control, and various other functions.
The vacuum system in the C3 Corvette consists of a network of hoses and valves that work together to create and control vacuum pressure. This pressure is essential for the operation of various systems, including the brakes, HVAC controls, and emissions control systems. Understanding the layout and function of the vacuum system is crucial for troubleshooting issues and performing maintenance on your C3 Corvette.
This article serves as a comprehensive guide to the C3 Corvette vacuum line diagram, providing you with valuable information on how the system is laid out and how each component works. We will explore the various vacuum lines and their connections, as well as provide tips and techniques for diagnosing and resolving common vacuum system issues.
Whether you are a seasoned C3 Corvette owner or a newcomer to the world of classic cars, this guide will equip you with the knowledge and understanding you need to keep your vehicle’s vacuum system in top shape. By familiarizing yourself with the vacuum line diagram and learning how to identify and resolve issues, you can ensure that your C3 Corvette continues to perform at its best for years to come.
C3 Corvette Vacuum Line Diagram: A Comprehensive Guide
The C3 Corvette is a classic American sports car that was produced from 1968 to 1982. One important aspect of maintaining and troubleshooting this iconic vehicle is understanding its vacuum system. The vacuum system in the C3 Corvette plays a crucial role in various functions, including the operation of the headlights, heating and cooling controls, power brakes, and emission controls.
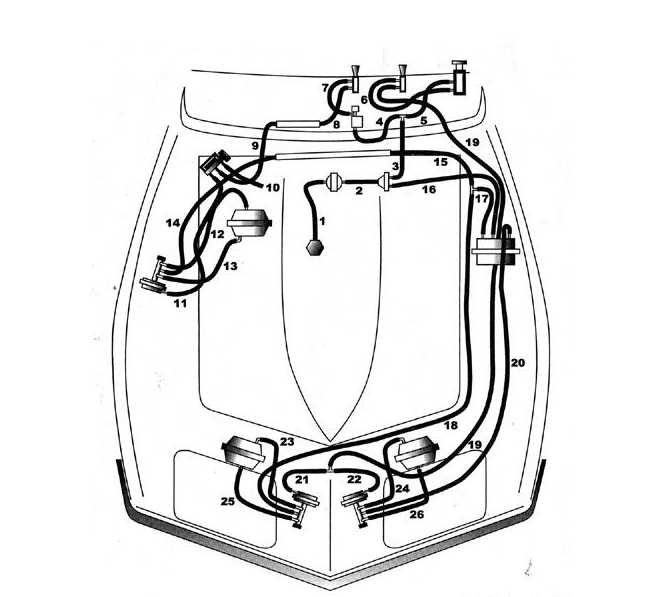
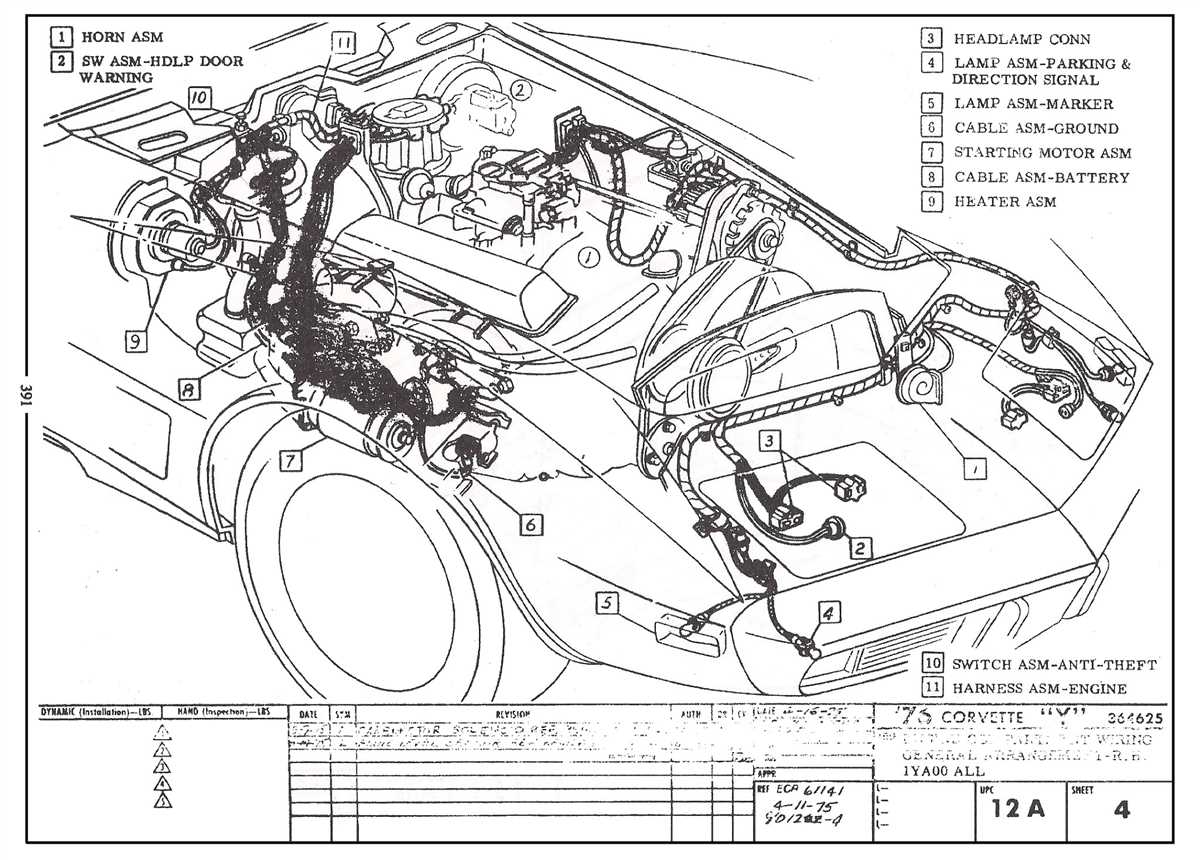
To help Corvette enthusiasts navigate the vacuum system of their C3 models, a comprehensive vacuum line diagram is essential. This diagram provides a visual representation of all the vacuum lines, connectors, and components in the engine bay and interior of the vehicle. It allows owners and mechanics to identify and trace the vacuum lines, making troubleshooting and repairs much easier.
Understanding the Vacuum Line Diagram:
The vacuum line diagram for the C3 Corvette is typically divided into sections, such as the engine compartment, interior, and underhood. Each section includes detailed illustrations and labels that indicate the various components and their connections. The diagram may also include color-coded lines to differentiate between different vacuum systems.
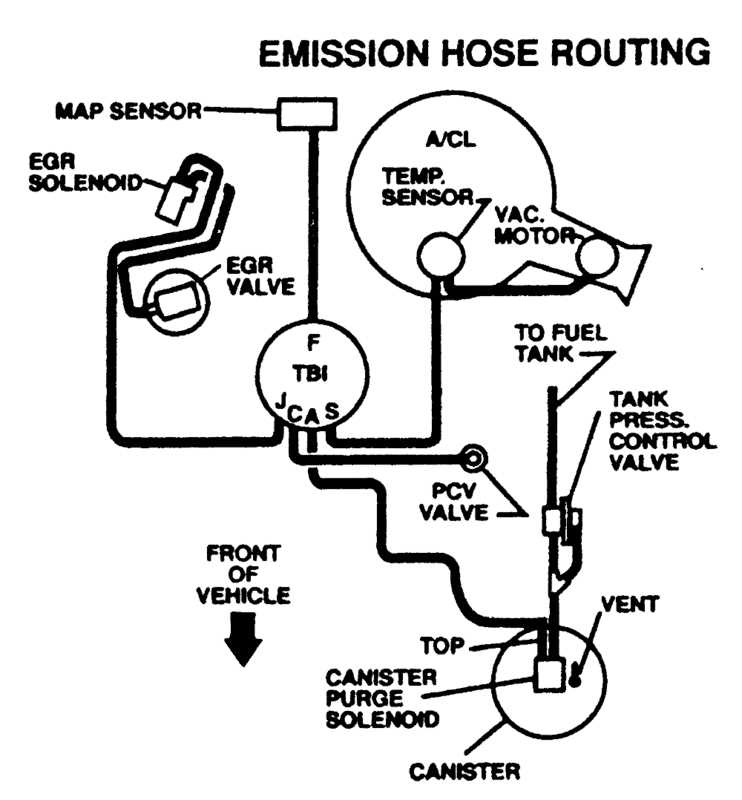
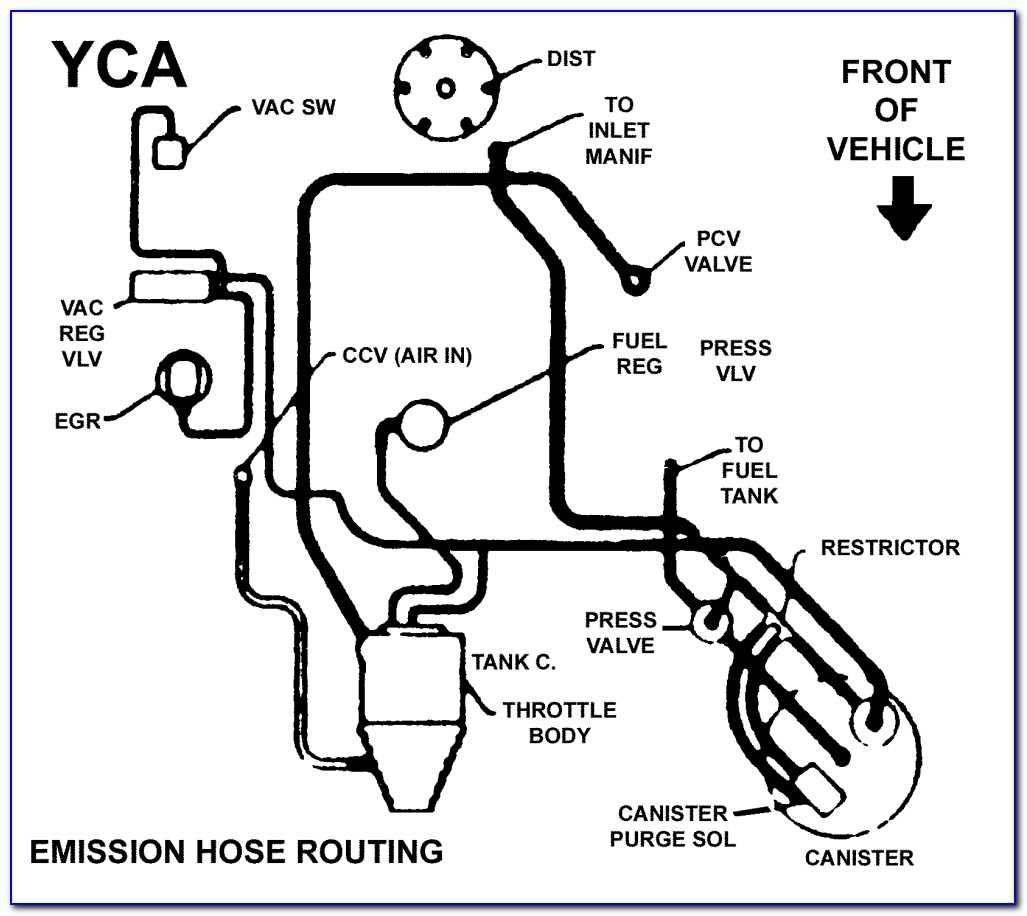
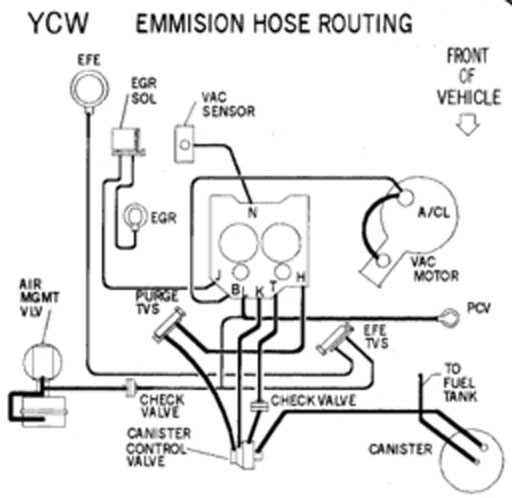
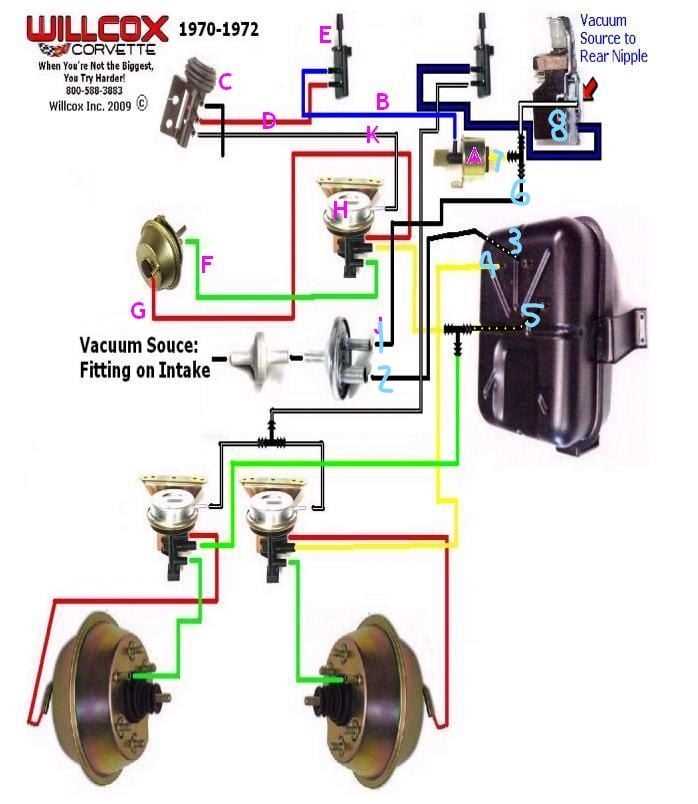
The engine compartment section of the vacuum line diagram includes the vacuum source, such as the intake manifold or throttle body, and shows how the lines are connected to various components, such as the distributor, PCV valve, and brake booster. It also indicates any vacuum reservoirs or check valves that may be present.
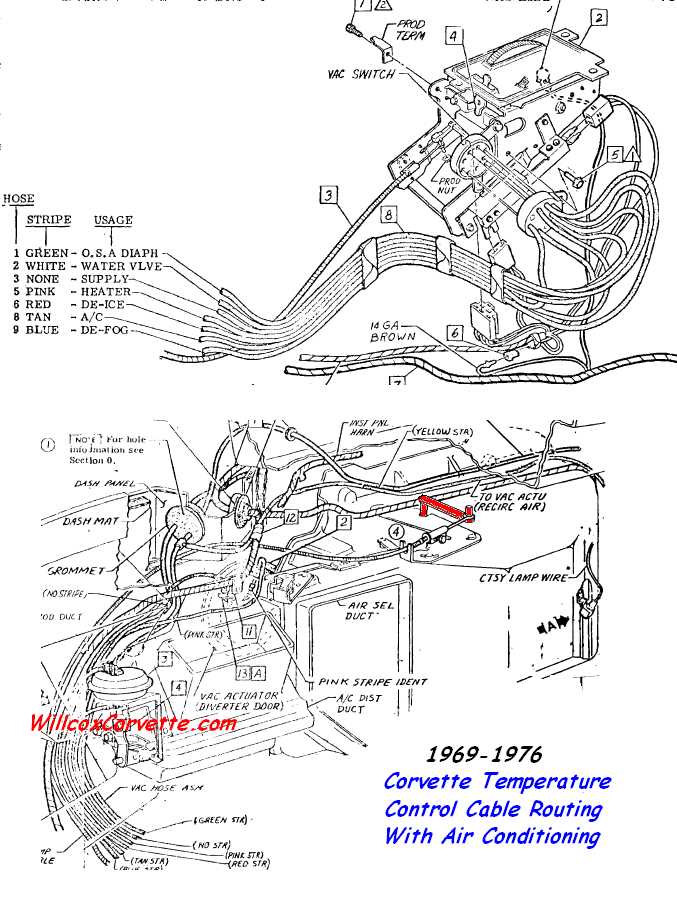
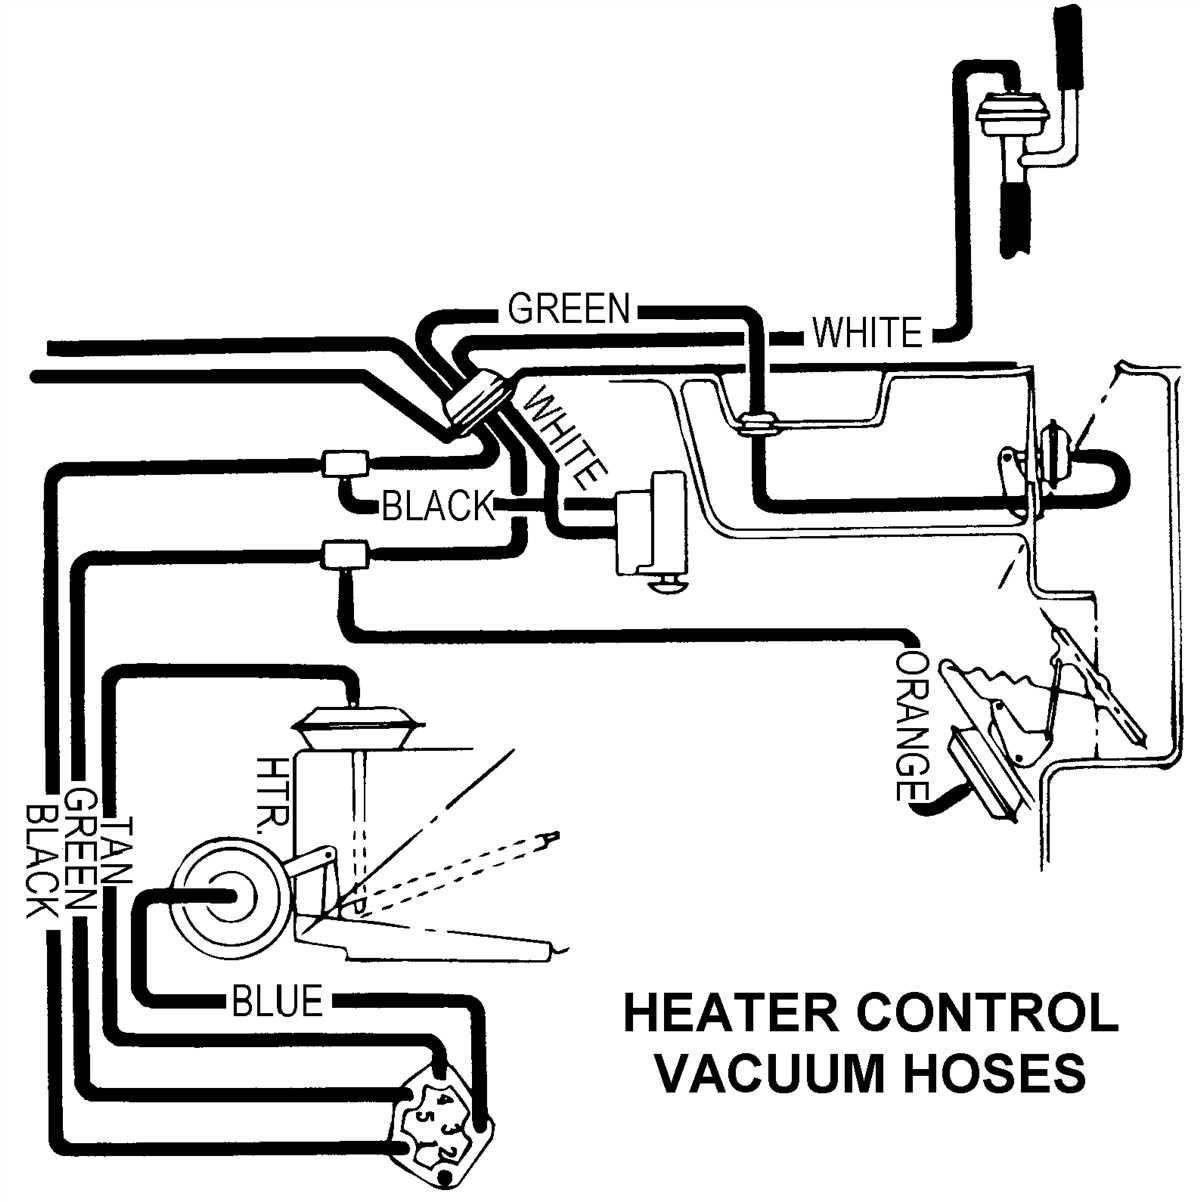
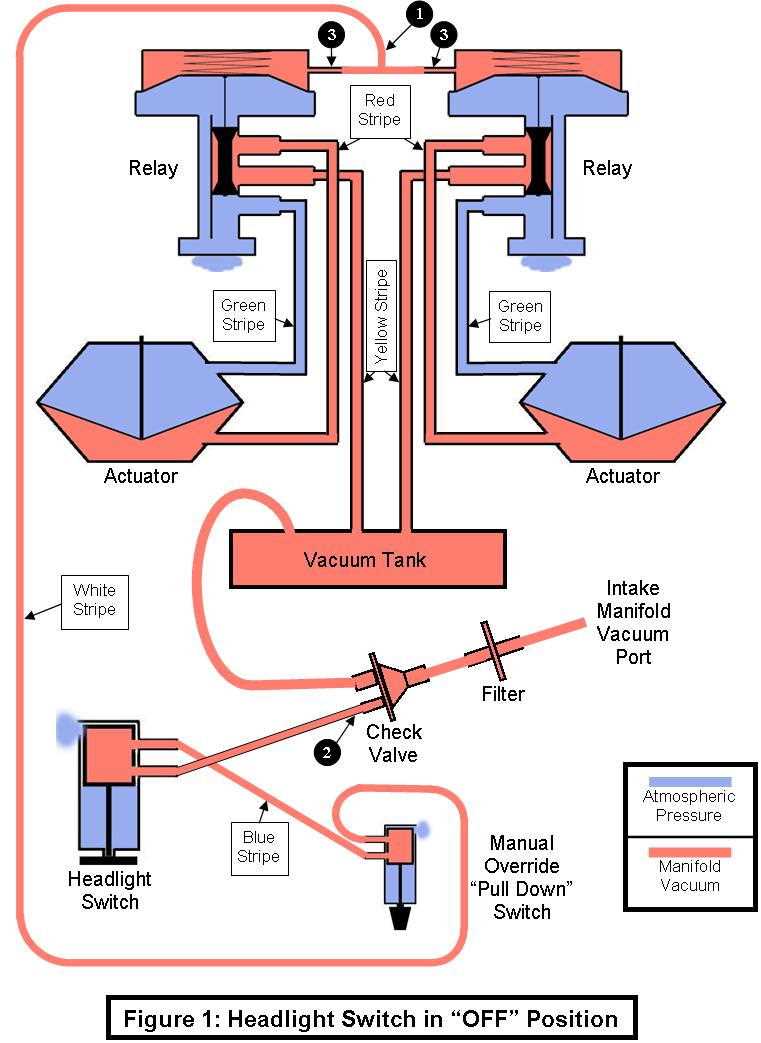
The interior section of the diagram focuses on the vacuum lines and components that are located inside the cabin of the Corvette. This includes the vacuum controls for the heating and cooling system, as well as the vacuum-operated headlight actuators and controls.
The underhood section of the diagram provides an overview of the vacuum lines and components that are located outside the engine compartment but are still crucial to the operation of various systems. This may include the vacuum advance for the distributor, emission control devices, and any additional vacuum reservoirs.
Using the Vacuum Line Diagram:
When using the vacuum line diagram, it is important to refer to the specific diagram that corresponds to your year and model of C3 Corvette, as slight variations may exist between different years and trim levels. Additionally, it is helpful to have a vacuum gauge and a vacuum pump for testing and troubleshooting purposes.
The vacuum line diagram is a valuable resource for diagnosing and repairing vacuum-related issues in the C3 Corvette. By following the lines and identifying any disconnected or damaged lines, misrouted connections, or faulty components, owners and mechanics can ensure the proper functioning of the vacuum system and all its associated systems.
In conclusion, the C3 Corvette vacuum line diagram is an essential tool for understanding and maintaining the vacuum system of these classic cars. By referring to this comprehensive guide, Corvette enthusiasts can navigate the complex network of vacuum lines and components, ensuring the proper functioning of their beloved C3 models.
Understanding the Importance of Vacuum Lines in a C3 Corvette
The vacuum lines in a C3 Corvette play an essential role in ensuring the proper functioning of various systems within the vehicle. These lines are responsible for creating and maintaining the vacuum pressure necessary for optimal performance, particularly in the engine and braking systems. Understanding the importance of vacuum lines and their correct installation and maintenance is crucial for maintaining the overall performance and reliability of a C3 Corvette.
One of the key functions of vacuum lines in a C3 Corvette is to control the air/fuel mixture within the engine. The vacuum lines connect various engine components, such as the carburetor and intake manifold, allowing for the proper flow of air and creating the necessary vacuum pressure for efficient combustion. Incorrectly installed or damaged vacuum lines can result in an improper air/fuel ratio, leading to engine misfires, reduced power, and decreased fuel efficiency.
Vacuum lines also play a vital role in the braking system of a C3 Corvette. The brake booster, which assists in applying the brakes, relies on vacuum pressure to function effectively. The vacuum line connected to the brake booster provides the necessary vacuum pressure to assist the driver in applying the brakes with less effort. Any leaks or blockages in this line can result in a loss of braking power, compromising the safety of the vehicle.
It is important to regularly inspect and maintain the vacuum lines in a C3 Corvette to ensure proper performance. Checking for any signs of cracks, leaks, or loose connections is crucial, as even small issues can lead to significant problems. Additionally, proper installation and routing of the vacuum lines according to the manufacturer’s specifications are essential to avoid any performance issues or potential damage to engine components.
In conclusion, understanding the importance of vacuum lines in a C3 Corvette is essential for maintaining its overall performance and reliability. These lines are responsible for creating and maintaining vacuum pressure necessary for optimal engine performance and effective braking. Regular inspection, maintenance, and correct installation of vacuum lines are crucial for ensuring the proper functioning of a C3 Corvette.
Identifying the Different Components of the Vacuum System
The vacuum system in a C3 Corvette is an important component that helps in powering various functions of the vehicle. It is responsible for operating systems such as the headlights, wipers, heater controls, and various other accessories. Understanding the different components of the vacuum system is essential for proper troubleshooting and maintenance of the system.
The vacuum system in a C3 Corvette consists of several key components. These include the vacuum pump, vacuum reservoir, vacuum lines, and various vacuum-operated components. The vacuum pump is responsible for creating vacuum pressure, which is then stored in the vacuum reservoir. This reservoir acts as a temporary storage, ensuring there is always enough vacuum pressure available for the operation of various components.
- Vacuum lines: The vacuum lines are the channels through which the vacuum pressure is distributed to different components. They are typically made of rubber or plastic and are connected to the vacuum pump, reservoir, and other vacuum-operated components. It is important to inspect these lines for any cracks or leaks, as they can affect the overall performance of the system.
- Vacuum-operated components: The vacuum-operated components are the various parts of the vehicle that rely on vacuum pressure for their operation. These can include the headlights, wipers, HVAC controls, and various other accessories. Each component is connected to the vacuum system through vacuum lines, allowing them to operate smoothly and efficiently.
Identifying and understanding the different components of the vacuum system in a C3 Corvette is crucial for maintaining the proper functioning of the vehicle. Regular inspection and maintenance of the vacuum lines, reservoir, and vacuum-operated components can help ensure optimal performance and prevent any potential issues or malfunctions. If any problems are detected, it is recommended to consult a professional technician with experience in Corvette vacuum systems to resolve them effectively.
Step-by-Step Guide to Reading and Analyzing a C3 Corvette Vacuum Line Diagram
When it comes to troubleshooting and understanding the vacuum system in your C3 Corvette, it’s important to have a good grasp of the vacuum line diagram. This diagram provides a visual representation of how the vacuum lines are routed throughout the vehicle. By understanding the diagram, you can easily identify potential issues or areas of concern.
1. Familiarize yourself with the components: Before diving into the diagram, take some time to understand the different components of the vacuum system in your C3 Corvette. This includes the vacuum pump, check valves, vacuum reservoir, and various vacuum lines. Knowing the function and location of each component will make it easier to interpret the diagram.
2. Locate the diagram: The vacuum line diagram for your C3 Corvette can usually be found in the vehicle’s service manual or on reputable Corvette forums and websites. Use these resources to locate an accurate and up-to-date diagram specific to your year and model of Corvette.
3. Interpret the diagram symbols: Vacuum line diagrams use various symbols and lines to represent different components and connections. Some common symbols you may encounter include solid lines to represent vacuum lines, dashed lines to represent electrical connections, and arrows to indicate the flow of vacuum pressure. Take the time to understand the meaning of each symbol before analyzing the diagram.
4. Follow the flow of vacuum: Start by identifying the vacuum pump and trace the flow of vacuum pressure throughout the system. Pay close attention to where each vacuum line connects to different components, such as the intake manifold, power brake booster, or HVAC system. This will help you understand the overall layout of the system and identify any potential issues.
5. Identify potential problem areas: As you analyze the vacuum line diagram, keep an eye out for any areas where the vacuum lines may be loose, disconnected, or damaged. These can often be the cause of vacuum-related issues, such as poor engine performance or non-functional HVAC controls. Use the diagram to guide you in inspecting and troubleshooting these potential problem areas.
6. Consult the service manual: If you encounter any questions or uncertainties while analyzing the vacuum line diagram, refer to the vehicle’s service manual for more detailed information. The manual may provide additional context or explanations that can help you better understand the vacuum system in your C3 Corvette.
7. Seek professional help if needed: If you’re unable to determine the cause of a vacuum issue or if you’re uncomfortable working with the vacuum system, it’s always best to seek professional help from a qualified mechanic or Corvette specialist. They will have the knowledge and experience needed to diagnose and repair any vacuum-related problems.
By following this step-by-step guide, you’ll be well-equipped to read and analyze a C3 Corvette vacuum line diagram. Understanding how the vacuum system works and being able to identify potential issues will give you the confidence to maintain and troubleshoot your Corvette’s vacuum system effectively.
Common Vacuum Line Issues in C3 Corvettes and How to Troubleshoot Them
Vacuum lines play a critical role in the functioning of various systems in C3 Corvettes. However, over time, these lines can develop issues that can affect the overall performance of the vehicle. Understanding common vacuum line issues and how to troubleshoot them can help Corvette owners maintain their vehicles and prevent potential problems.
1. Vacuum Line Leaks
One of the most common issues with vacuum lines in C3 Corvettes is leaks. These leaks can occur due to aging, exposure to heat, or physical damage. A leak in a vacuum line can lead to a loss of vacuum pressure, affecting the performance of systems such as the brakes, air conditioning, or power locks.
To troubleshoot vacuum line leaks, start by visually inspecting all the lines for any signs of cracks, holes, or loose connections. Use your hand to feel for air escaping from the lines. If a leak is identified, replace the affected line with a new one. Remember to use the correct size and type of vacuum line for your Corvette model to ensure proper function.
2. Clogged Vacuum Lines
Clogged vacuum lines can also cause issues in C3 Corvettes. Over time, debris, dirt, or even old engine oil can accumulate inside the lines, restricting the flow of vacuum pressure. This can lead to reduced engine performance, poor fuel economy, or improper functioning of various systems.
To troubleshoot clogged vacuum lines, start by visually inspecting the lines for any signs of blockage. If a blockage is visible, carefully remove the affected line and clean it using compressed air. In some cases, it may be necessary to replace the line if the blockage cannot be cleared.
3. Incorrectly Routed Vacuum Lines
Another common issue in C3 Corvettes is incorrectly routed vacuum lines. If the lines are not routed correctly, it can lead to miscommunication between different systems, resulting in poor performance or malfunctioning of various components.
To troubleshoot incorrectly routed vacuum lines, refer to the vacuum line diagram specific to your Corvette model. This diagram provides a visual guide on how the vacuum lines should be connected and routed. Check each line against the diagram and make any necessary adjustments to ensure proper routing.
By understanding and troubleshooting these common vacuum line issues in C3 Corvettes, owners can ensure the optimal performance of their vehicles and prevent potential problems. Regular inspection and maintenance of vacuum lines can help prolong the lifespan of these critical components and maintain the overall functionality of the vehicle.
Proper Maintenance and Care for Vacuum Lines in a C3 Corvette
Vacuum lines play a crucial role in the proper functioning of a C3 Corvette, as they help regulate important components such as the braking system and engine idle. To ensure the longevity and performance of your Corvette, it is essential to properly maintain and care for these vacuum lines. Here are some guidelines to help you keep your vacuum lines in top condition.
Regular Inspection
It is important to regularly inspect your vacuum lines for any signs of wear, damage, or leaks. Look for cracks, loose fittings, or deteriorating rubber hoses. Any signs of damage should be addressed immediately to prevent further issues. Additionally, check the connections and make sure they are secure and tight.
Cleanliness
Keeping your vacuum lines clean can prevent debris and dirt from clogging them and causing potential issues. Regularly clean the exterior of the vacuum lines with a mild detergent and water solution. Avoid using strong chemicals or solvents that could damage the rubber and plastic components.
Replacement
If you notice any significant damage or leaks in your vacuum lines, it is important to replace them as soon as possible. A damaged or leaking vacuum line can lead to a loss of performance and potentially expensive repairs if not addressed promptly. When replacing vacuum lines, ensure you use the correct size and type of hose or tubing to maintain proper function.
Proper Installation
During installation or replacement of vacuum lines, it is essential to ensure proper routing and connections. Follow the manufacturer’s instructions or consult a professional to ensure correct installation. Improperly routed or connected vacuum lines can cause performance issues or even damage other components.
Regular Maintenance
In addition to regular inspection, consider incorporating vacuum line maintenance into your routine maintenance schedule. This can include checking for any loose connections, reapplying sealant if necessary, and verifying that the lines are functioning properly. Regular maintenance can help identify and address any potential issues before they become major problems.
By following these guidelines for proper maintenance and care of your vacuum lines, you can help ensure the optimal performance and longevity of your C3 Corvette. Regular inspection, cleanliness, timely replacement, proper installation, and regular maintenance are all key factors in keeping your vacuum lines in top condition.
Expert Tips and Tricks for Optimizing Performance of Vacuum Lines in a C3 Corvette
Vacuum lines play a crucial role in the performance of a C3 Corvette engine. Ensuring that these lines are functioning properly can improve overall engine performance and prevent potential issues. Here are some expert tips and tricks to optimize the performance of vacuum lines in a C3 Corvette:
1. Regularly Inspect and Replace Vacuum Lines

It is important to regularly inspect the condition of your vacuum lines for any cracks, leaks, or signs of wear. Replace any damaged or deteriorated lines immediately to maintain optimal performance.
2. Use High-Quality Vacuum Lines
Investing in high-quality vacuum lines is essential for optimal performance. These lines should be made of durable materials that can withstand high temperatures and pressure. Look for vacuum lines that are specifically designed for automotive use.
3. Properly Size Vacuum Lines
Ensure that the vacuum lines are properly sized for the specific needs of your Corvette’s engine. Using lines that are too small can restrict airflow, while lines that are too large can lead to loss of vacuum pressure. Consult your Corvette’s manual or seek advice from a trusted mechanic to determine the appropriate sizes for your vacuum lines.
4. Keep Vacuum Lines Away from Heat Sources
Avoid running vacuum lines near heat sources such as exhaust manifolds or headers. Excessive heat can damage vacuum lines and result in leaks or decreased performance. Ensure that the lines are properly routed and secured to prevent contact with hot surfaces.
5. Test and Adjust Vacuum Pressure
Regularly test the vacuum pressure of your Corvette’s engine using a vacuum gauge. This will help you identify any issues and allow you to adjust the vacuum pressure if necessary. Consult your owner’s manual or seek professional assistance to understand the recommended vacuum pressure levels for your specific Corvette model.
6. Use Vacuum Line Insulators
To further protect vacuum lines from heat and abrasion, consider using insulators or heat shields. These can prevent damage and maintain optimal performance by keeping the lines insulated from surrounding components.
By following these expert tips and tricks, you can optimize the performance of vacuum lines in your C3 Corvette. Regular inspections, proper sizing, using high-quality materials, and protecting the lines from heat sources will help maintain vacuum pressure and ensure efficient engine operation. Don’t overlook the importance of vacuum lines, as they play a vital role in the overall performance of your Corvette.
Q&A:
What are some expert tips for optimizing the performance of vacuum lines in a C3 Corvette?
Some expert tips for optimizing the performance of vacuum lines in a C3 Corvette include checking for any leaks or cracks in the lines, ensuring proper routing and securing of the lines, using high-quality vacuum hoses, and properly maintaining and cleaning the check valves and vacuum reservoirs.
How can I check for leaks or cracks in the vacuum lines of my C3 Corvette?
To check for leaks or cracks in the vacuum lines of a C3 Corvette, you can perform a visual inspection by closely examining the lines for any visible damage. Additionally, you can use a vacuum gauge or smoke machine to identify any leaks in the system.
What is the importance of proper routing and securing of vacuum lines in a C3 Corvette?
Proper routing and securing of vacuum lines in a C3 Corvette is important to ensure that the lines are not obstructed or pinched, which can lead to a loss of vacuum pressure and decreased performance. Securely fastening the lines also helps prevent them from coming loose or disconnecting during operation.
Why is using high-quality vacuum hoses recommended for a C3 Corvette?
Using high-quality vacuum hoses in a C3 Corvette is recommended because they are more durable and less prone to cracking or leaking under the high temperatures and vibrations typically experienced in a car engine compartment. High-quality hoses also ensure a proper seal and help maintain consistent vacuum pressure.
How should I properly maintain and clean the check valves and vacuum reservoirs in my C3 Corvette?
To properly maintain and clean the check valves and vacuum reservoirs in a C3 Corvette, you should regularly inspect them for any signs of damage or wear and replace them if necessary. Cleaning can be done by removing any debris or buildup using compressed air or a vacuum cleaner. It is also important to ensure that the check valves are functioning correctly by testing them with a vacuum gauge.