
If you’re looking to wire a lighting switch in your home or workplace, it’s important to understand the basics of electrical wiring. A lighting switch controls the flow of electricity to your light fixture, allowing you to turn the light on or off. Understanding how to properly wire a lighting switch can help you avoid electrical hazards and ensure that your lighting system functions correctly.
Before beginning any electrical work, it’s important to turn off the power to the circuit you’ll be working on. This can be done by switching off the circuit breaker that controls the specific circuit. Once the power is off, you can safely proceed with the wiring process. It’s also a good idea to use a voltage tester to ensure that the power is indeed off before working on the wiring.
The first step in wiring a lighting switch is to remove the existing switch if there is one. This can usually be done by unscrewing the mounting screws and gently pulling the switch from the electrical box. Next, you’ll need to determine whether your switch is a single-pole or a three-way switch. A single-pole switch controls a light fixture from a single location, while a three-way switch allows you to control the light from multiple locations.
Understanding Lighting Switch Wiring Diagrams
Lighting switch wiring diagrams are essential tools for understanding and installing lighting systems in homes and buildings. These diagrams provide detailed information about the connections between switches, lights, and power sources, allowing electricians and homeowners to correctly wire and operate their lighting setups.
One key component of lighting switch wiring diagrams is the identification of different types of switches. There are several types of switches used in lighting systems, including single-pole, double-pole, three-way, and four-way switches. Each type of switch has specific functions and wiring configurations that are crucial to understand in order to properly wire the lighting system.
Lighting switch wiring diagrams also illustrate the proper connection of wires between switches, lights, and power sources. This includes identifying the hot wires, neutral wires, and ground wires, as well as the appropriate terminals on the switches and lights for making connections. Following the diagrams ensures that the wiring is done safely and effectively.
In addition, lighting switch wiring diagrams often include additional information, such as circuit breakers and wire sizes. These details are important for ensuring that the electrical system can handle the load of the lighting setup and comply with safety regulations. It is crucial to consult the appropriate wiring diagram and adhere to electrical codes when installing or modifying lighting switch systems.
Overall, understanding lighting switch wiring diagrams is essential for anyone involved in the installation or maintenance of lighting systems. Whether you are an electrician or a homeowner, these diagrams provide the necessary guidance to ensure a safe and functional lighting setup.
What is a Lighting Switch Wiring Diagram?
A lighting switch wiring diagram is a visual representation of how to wire a lighting switch in a circuit. It shows the connection points and the flow of electricity from the power source to the switch and then to the light fixture. This diagram is helpful for electricians and homeowners who are installing or repairing a lighting switch.
At its most basic level, a lighting switch wiring diagram will have three main components: the power source, the switch, and the light fixture. The power source provides the electricity for the circuit, and the switch controls whether the light fixture is on or off. The wiring diagram shows how to connect these components together using wires and terminals.
The diagram may also include additional components, such as a ground wire, which provides an additional safety measure by redirecting excess electricity to the ground. It may also show multiple switches or lights connected in the same circuit, indicating how they are wired together.
A lighting switch wiring diagram is an essential tool for ensuring that the electrical connections are made correctly. It helps prevent electrical hazards, such as short circuits or improper grounding. By following the diagram, electricians and homeowners can safely install or repair lighting switches in their homes or buildings.
Components of a Lighting Switch Wiring Diagram
A lighting switch wiring diagram is a visual representation of the electrical connections and components involved in connecting a switch to a lighting fixture. It helps electricians and homeowners understand the correct wiring configuration for safe and efficient operation of the lighting system. The diagram typically includes several key components that are important to consider when installing or troubleshooting a lighting switch.
Switch
The switch is the central component of the lighting switch wiring diagram. It is the electrical device that controls the flow of electricity to the lighting fixture. The diagram will indicate the type of switch being used, whether it is a single-pole switch, three-way switch, or dimmer switch. Each type of switch has a specific wiring configuration that must be followed for proper functionality.
Wiring Cables
The wiring cables, also known as conductors, are represented in the lighting switch wiring diagram to indicate the path of electrical current. The diagram will show the different color-coded wires used in the wiring system, such as black for hot wires, white for neutral wires, and green or bare copper for ground wires. The diagram will also indicate the specific wiring connections, such as how the switch is connected to the lighting fixture and the power source.
Lighting Fixture
The lighting fixture is the device that produces light and is connected to the switch through the wiring system. The diagram will show the connection points between the lighting fixture and the switch, including any additional components, such as a junction box or outlet, if applicable. The diagram may also include information about the type of lighting fixture, such as whether it is a ceiling light, wall sconce, or pendant light.
Additional Components
In some cases, the lighting switch wiring diagram may include additional components that are part of the overall electrical system. This can include items such as circuit breakers, fuses, or transformers. These components are important for protecting the electrical system and ensuring safe operation. The diagram will indicate their location and connection points within the wiring system.
In conclusion, a lighting switch wiring diagram includes various components, such as the switch, wiring cables, lighting fixture, and additional components. Understanding these components and their connection points is essential for proper installation and troubleshooting of a lighting switch. Following the diagram accurately is crucial for safe and efficient operation of the lighting system.
Different Types of Lighting Switch Wiring Diagrams
When it comes to wiring a lighting switch, there are several different diagrams that you can follow depending on your specific needs and the type of switch you are using. Each diagram is designed to provide a step-by-step guide on how to connect the wires correctly, ensuring that your lighting switch functions properly.
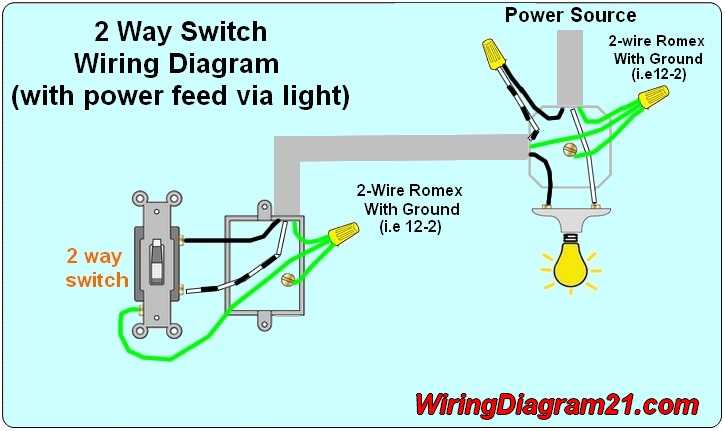
One common type of lighting switch wiring diagram is the single-pole switch diagram. This diagram is used when you have a single switch controlling a single light fixture. The diagram typically shows a power source, a switch, and a light fixture. The power source is connected to the switch, and the switch is connected to the light fixture. This diagram is relatively simple and straightforward to follow.
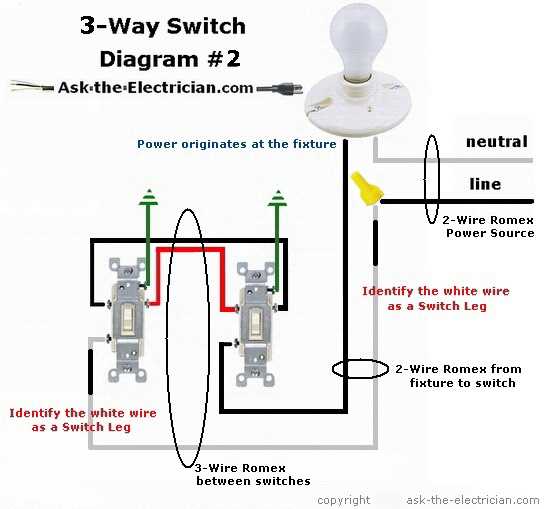
If you have multiple switches controlling a single light fixture, you will need a different type of diagram. This is called a three-way switch diagram. In this diagram, you will typically have two switches and a light fixture. The power source is connected to one switch, and then two wires are run from that switch to the second switch. From the second switch, another set of wires is run to the light fixture. This allows you to control the light fixture from either switch.
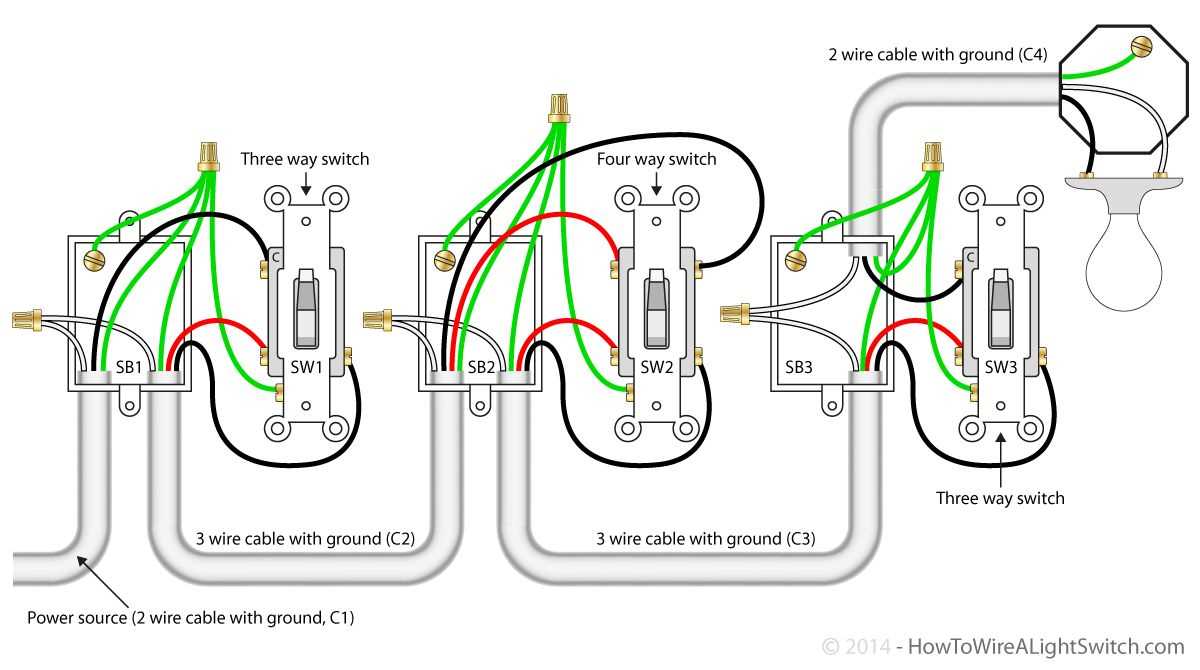
Another type of lighting switch wiring diagram is the four-way switch diagram. This diagram is used when you have three or more switches that control a single light fixture. The diagram typically shows the power source connected to one switch, and then multiple wires running from that switch to the other switches. From the final switch, wires are run to the light fixture. This allows you to control the light fixture from multiple locations.
It is important to carefully follow the wiring diagram that corresponds to your specific switch and lighting setup to ensure that everything is wired correctly. Improper wiring can lead to malfunctioning switches or fixtures, or even electrical hazards. If you are unsure about any aspect of the wiring process, it is best to consult a professional electrician to ensure the job is done safely and correctly.
How to Read and Interpret a Lighting Switch Wiring Diagram
Understanding how to read and interpret a lighting switch wiring diagram is essential for electricians and homeowners who need to troubleshoot or install new lighting fixtures. A wiring diagram is a visual representation of the electrical circuitry and connections involved in a specific lighting switch setup.
Components and Symbols: A lighting switch wiring diagram will include various components and symbols that represent different elements of the electrical circuit. For example, a switch will be represented by a square or rectangle with an “on” or “off” label, while wires will be shown as lines with different colors or dashes. It is important to familiarize yourself with these symbols before attempting to interpret the diagram.
Layout and Connections: The layout of a lighting switch wiring diagram will typically show the placement of switches, lights, and other components in relation to each other. It will also indicate how these components are connected using wires. The diagram will provide information on which wire connects to which terminal or screw on the switches and lights.
Circuits and Pathways: Lighting switch wiring diagrams will often show the different circuits and pathways that the electrical current travels through. This can include information on how power is supplied to the switches and lights, as well as any intermediate connections or junction boxes that are involved.
Colors and Markings: Wiring diagrams may also include information on wire colors and markings. Different colors and markings indicate different functions or purposes of the wires, such as hot or neutral wires. It is important to pay attention to these details when interpreting the diagram to ensure proper wiring.
By understanding the components, symbols, layout, connections, circuits, pathways, and colors/markings depicted in a lighting switch wiring diagram, individuals can effectively troubleshoot, repair, or install lighting switch systems with confidence.
Common Wiring Mistakes to Avoid
When it comes to electrical wiring, it is important to pay close attention to detail and follow proper procedures to ensure safety and avoid potential hazards. Unfortunately, there are several common wiring mistakes that people often make, which can result in electrical problems or even accidents. Here are some of the common wiring mistakes to avoid:
1. Incorrect wire sizing:
Choosing the correct wire size is crucial for the safe operation of electrical circuits. Using wires that are too small for the load can lead to overheating and potential fire hazards. On the other hand, using wires that are too large for the load can be wasteful and unnecessarily increase costs. It is important to consult a wire sizing chart or consult with a professional to determine the appropriate wire size for your specific needs.
2. Poor wire connections:
Properly connecting wires is essential for electrical circuits to function correctly. One common mistake is not stripping the wire insulation properly, which can result in poor connections and potential electrical arcing. Another common mistake is not tightening wire connections securely enough, which can lead to loose connections and overheating. It is important to use the appropriate wire connectors and ensure that all connections are tight and secure.
3. Overloading circuits:
Overloading circuits by connecting too many devices or appliances can lead to tripped breakers or blown fuses, as well as increased risk of electrical fires. It is important to distribute the load evenly across multiple circuits and use circuit breakers or fuses of the appropriate rating. If you find that a circuit is frequently tripping, it may be necessary to add additional circuits or upgrade the electrical panel to accommodate the increased load.
4. Not following electrical codes:
Electrical codes are put in place to ensure the safety and proper operation of electrical systems. Ignoring or bypassing these codes can result in dangerous conditions and potential legal consequences. It is crucial to familiarize yourself with the local electrical codes and regulations and follow them diligently during any wiring projects. If you are unsure about any aspect of the wiring process, it is best to consult with a licensed electrician.
5. Lack of grounding:
Proper grounding is essential for electrical safety. Grounding provides a path of least resistance for electrical current in the event of a fault or short circuit, protecting both people and property. One common mistake is not properly grounding electrical devices or circuits. It is important to ensure that all outlets, switches, and electrical panels are properly grounded according to code requirements.
Avoiding these common wiring mistakes is essential for maintaining electrical safety and preventing potential hazards. It is always recommended to hire a qualified electrician for any major wiring projects or to seek their guidance if you are unsure about any aspect of electrical work.
Tips for Successful Lighting Switch Installation
Installing a lighting switch may seem like a simple task, but it requires careful planning and proper execution to ensure successful installation. Here are some tips to help you with your lighting switch installation:
1. Plan the Wiring Layout
Before starting the installation, it is essential to plan the wiring layout. Determine the location of the switch and the lighting fixture and identify the path for the electrical wiring. This will help you avoid any obstacles and ensure a smooth installation process.
2. Turn off the Power
Before working on any electrical installation, always turn off the power at the breaker box. This will prevent any potential electrical hazards and ensure your safety during the installation process. Use a voltage tester to double-check if the power is off before proceeding.
3. Use the Proper Tools and Materials
Make sure you have all the necessary tools and materials for the installation. This may include wire strippers, screwdrivers, electrical tape, wire nuts, and a wire cutter. Using the proper tools will make the installation process easier and ensure a secure connection.
4. Follow the Wiring Diagram
Refer to the wiring diagram specific to the type of lighting switch you are installing. This diagram will illustrate how to connect the wires correctly and ensure proper functionality. Any deviation from the diagram can result in a malfunctioning switch or light fixture.
5. Test the Installation
Once the wiring is complete, turn on the power and test the switch and light fixture. Make sure the switch controls the light as expected and that there are no issues with the connection. If there are any problems, double-check the wiring and troubleshoot accordingly.
6. Secure the Connections

After testing the installation, secure all the wire connections properly. This will prevent any accidental disconnections or loose wires, ultimately ensuring a safe and reliable lighting switch.
7. Seek Professional Help if Needed
If you are unsure about any aspect of the lighting switch installation, it is best to seek professional help. Electricians are trained to handle electrical installations safely and can ensure a successful and compliant installation.
By following these tips, you can ensure a successful lighting switch installation. Remember to prioritize safety and take your time during the process to avoid any mistakes. Happy wiring!