
Yamaha TTR 225 is a popular off-road motorcycle that offers both beginners and experienced riders an exciting and adventurous riding experience. When it comes to working on the electrical system of the TTR 225, having a wiring diagram is essential. A wiring diagram serves as a visual representation of the electrical circuitry of a motorcycle, making it easier to understand and troubleshoot any issues that may arise.
In this article, we will provide you with a comprehensive guide on the Yamaha TTR 225 wiring diagram. We will break down the various components of the electrical system and explain their functioning. Additionally, we will cover common wiring issues that TTR 225 owners may encounter and provide step-by-step instructions on how to diagnose and fix them.
Whether you are a motorcycle enthusiast, a mechanic, or simply an owner looking to better understand the electrical system of your Yamaha TTR 225, this wiring diagram guide will be a valuable resource. By the end of this article, you will have a thorough understanding of the TTR 225’s electrical system and be equipped with the knowledge to tackle any wiring issues that may arise.
What is a Yamaha TTR 225 Wiring Diagram?
A Yamaha TTR 225 wiring diagram is a visual representation of the electrical connections and components of the Yamaha TTR 225 motorcycle. It provides a detailed illustration of how the different electrical systems and components are interconnected and should be wired together.
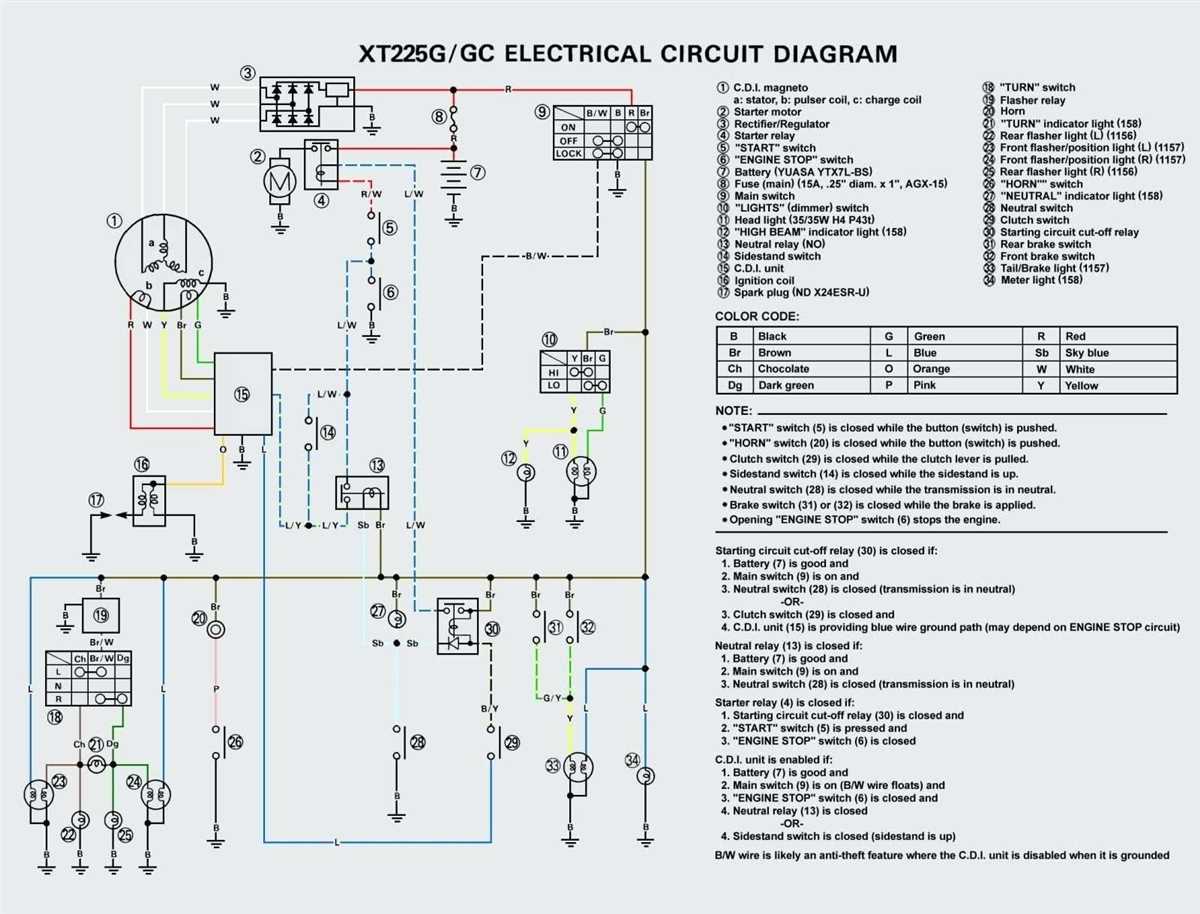
The wiring diagram includes information about the various electrical components such as the ignition system, battery, starter motor, lights, switches, and other electrical circuits. It also shows the color-coding of the wires and the connectors used to make the connections.
The Yamaha TTR 225 wiring diagram is an essential tool for troubleshooting electrical issues, performing maintenance tasks, and making modifications or upgrades to the electrical system. It can help in identifying faulty connections, short circuits, or damaged components.
The diagram is typically included in the owner’s manual or service manual for the Yamaha TTR 225. It can also be found online on various websites or forums dedicated to Yamaha motorcycles. It is recommended to refer to the specific wiring diagram for the exact model and year of the Yamaha TTR 225 being worked on, as there may be variations between different years and versions of the motorcycle.
By following the wiring diagram, technicians and DIY enthusiasts can ensure that the electrical system of the Yamaha TTR 225 is functioning correctly and safely. It provides a roadmap for understanding the complex network of wires and connections, helping to avoid confusion and potential mistakes during electrical work.
Overall, a Yamaha TTR 225 wiring diagram is an invaluable resource for anyone working on or maintaining a Yamaha TTR 225 motorcycle. It provides a clear and concise visual representation of the electrical system, making it easier to diagnose and fix electrical problems and perform electrical modifications.
Why Do You Need a Wiring Diagram for Your Yamaha TTR 225?
When it comes to working on your Yamaha TTR 225, having a wiring diagram is an essential tool for any owner or mechanic. The wiring diagram provides a detailed visual representation of the electrical system of your motorcycle, including all the wires, connections, and components. It allows you to understand how the electrical circuit works and helps you troubleshoot any issues that may arise.
One of the main reasons you need a wiring diagram for your Yamaha TTR 225 is for troubleshooting electrical problems. If you’re experiencing issues with your motorcycle’s electrical system, such as a malfunctioning headlight or a dead battery, the wiring diagram can help you locate the problem area quickly. By following the diagram, you can identify the specific wires and connections related to the faulty component and check for any loose connections, damaged wires, or blown fuses.
Another reason to have a wiring diagram is for making modifications or additions to your Yamaha TTR 225’s electrical system. Whether you want to install aftermarket accessories like heated grips or LED lights, or you’re planning to upgrade the ignition system, having a wiring diagram will make the installation process much easier. It will show you where to tap into existing wires, how to connect new components, and ensure that everything is properly grounded and fused.
Having a wiring diagram for your Yamaha TTR 225 also allows you to understand the overall layout and organization of the electrical system. This knowledge can come in handy when performing routine maintenance tasks like replacing the spark plugs or checking the battery. By familiarizing yourself with the wiring diagram, you’ll know which wires to disconnect and reconnect when working on specific areas of your motorcycle.
In conclusion, a wiring diagram for your Yamaha TTR 225 is an invaluable tool that helps you troubleshoot electrical problems, make modifications or additions to the electrical system, and understand the overall organization of the electrical components. It saves time, prevents mistakes, and ensures that you have a complete understanding of your motorcycle’s electrical system. Whether you’re a DIY enthusiast or a professional mechanic, having a wiring diagram is a must-have when working on your Yamaha TTR 225.
Understanding the Components of a Yamaha TTR 225 Wiring Diagram
A Yamaha TTR 225 wiring diagram is a visual representation of the electrical components and their connections in the motorcycle. It provides a roadmap for understanding how the various parts of the electrical system interact and work together to power the bike.
One of the main components of the wiring diagram is the battery. The battery is responsible for storing and supplying electrical energy to the motorcycle. It is connected to other electrical components through a series of wires and connectors. The wiring diagram shows the specific connections and routing of these wires.
Another important component shown in the wiring diagram is the ignition switch. The ignition switch is responsible for controlling the flow of electrical current to the different systems of the motorcycle. It allows the rider to start and stop the engine, as well as control other electrical functions such as the lights and horn.
The diagram also includes various sensors and switches, such as the throttle position sensor, clutch switch, and neutral switch. These sensors and switches play a crucial role in detecting the rider’s input and providing the necessary signals to the electrical system. They are connected to the main wiring harness, which is a bundle of wires that interconnects all the electrical components of the motorcycle.
In addition to the components mentioned above, the wiring diagram may also feature other electrical devices such as the stator, regulator/rectifier, and various lights and indicators. These devices are essential for generating and regulating electrical power, as well as providing visibility and safety to the rider.
By studying and understanding the components of a Yamaha TTR 225 wiring diagram, riders and mechanics can diagnose and troubleshoot electrical issues more effectively. This knowledge allows them to identify faulty connections, damaged components, or problematic wiring, and take the necessary steps to rectify the problem. It is an indispensable tool for maintaining and repairing the electrical system of the motorcycle.
How to Read and Interpret a Yamaha TTR 225 Wiring Diagram?
When it comes to working on your Yamaha TTR 225, having a wiring diagram can be incredibly helpful. The wiring diagram is a detailed diagram that shows the connections and components of the electrical system in your motorcycle. It can help you troubleshoot electrical issues, understand how the various parts of the system work together, and make modifications or repairs.
To read and interpret a Yamaha TTR 225 wiring diagram, start by understanding the symbols and abbreviations used. These symbols represent different electrical components, such as switches, resistors, and wires. Familiarize yourself with the key at the beginning of the diagram to ensure you understand what each symbol represents.
Next, follow the flow of the diagram from the battery or power source through the various components and back to the battery. The diagram will show how the wires are connected, providing a roadmap to the electrical system. Look for any breaks or disconnects in the wiring, which could indicate a problem.
- Identify the various colors of wires in the diagram. Different colors often indicate different functions or connections, so pay attention to this detail.
- Pay attention to the arrows in the diagram. These indicate the flow of electrical current and can help you understand how electricity moves through the system.
- If you need to make modifications or repairs, use the wiring diagram as a guide. It will show you where each wire is connected and help you troubleshoot any issues.
It’s important to note that the Yamaha TTR 225 wiring diagram may vary depending on the specific year and model of your motorcycle. Therefore, always refer to the appropriate diagram for your bike to ensure accuracy.
Overall, learning how to read and interpret a Yamaha TTR 225 wiring diagram is an essential skill for any motorcycle owner or mechanic. It can help you understand the electrical system and make necessary repairs or modifications with confidence.
Common Issues and Troubleshooting of Yamaha TTR 225 Wiring
The Yamaha TTR 225 is a popular off-road motorcycle known for its durability and versatility. However, like any other vehicle, it may experience wiring issues over time. Understanding common problems and troubleshooting can help riders ensure a smooth and safe riding experience. Here are some common issues and their possible solutions:
1. Electrical Short Circuit
One of the most common wiring issues with the Yamaha TTR 225 is an electrical short circuit. This can occur due to damaged wires, loose connections, or faulty components. To troubleshoot this issue, start by inspecting the wiring harness for any visible signs of damage or loose connections. Check all the connectors, terminals, and ground connections for corrosion or damage. If any issues are found, repair or replace the affected components.
2. Blown Fuses
If the electrical system is not functioning properly or certain electrical components are not working, it may be due to blown fuses. Check the fuse box and replace any blown fuses with ones of the correct amperage. It is important to use the correct size and amperage fuses to avoid damage to the electrical system.
3. Battery Issues
If the motorcycle is having trouble starting or the electrical system is not providing enough power, it may indicate a battery issue. Check the battery voltage using a multimeter and ensure it meets the manufacturer’s specifications. If the battery is weak or not holding a charge, it may need to be replaced.
4. Ignition System Problems
If the motorcycle is experiencing issues with starting or running, it may be due to problems in the ignition system. Check the ignition coil, spark plug, and spark plug wire for any signs of damage or wear. Clean or replace any faulty components to restore proper ignition.
5. Wiring Harness Damage
Over time, the wiring harness of the Yamaha TTR 225 may become damaged due to wear and tear or exposure to the elements. Inspect the wiring harness for any frayed or damaged wires. Replace any damaged sections of the wiring harness to ensure proper electrical connections.
Overall, regular inspection and maintenance of the wiring system can help prevent issues and ensure the Yamaha TTR 225 operates smoothly. If troubleshooting the wiring system becomes challenging, it is recommended to consult a professional motorcycle mechanic for further assistance.
Tips for Using a Yamaha TTR 225 Wiring Diagram Effectively
Working with a Yamaha TTR 225 wiring diagram can be a useful tool when it comes to troubleshooting electrical issues or making modifications to your motorcycle’s electrical system. To ensure you get the most out of your wiring diagram, follow these tips:
- Study the Diagram: Take the time to carefully examine the wiring diagram and understand how each component is connected. Familiarize yourself with the symbols used in the diagram to represent different electrical elements.
- Use Color Codes: Many wiring diagrams include color codes to make it easier to identify the connections. Refer to the color codes provided and ensure that the wires you are working with match the designated colors in the diagram.
- Label Connections: As you work through the wiring process, it can be helpful to label each connection with a small piece of tape or a marker. This makes it easier to keep track of which wire goes where, especially if you need to temporarily disconnect any components.
- Double-Check Connections: Before powering up your motorcycle or moving on to the next step, verify that all connections are properly made and secure. A loose or incorrectly connected wire can lead to electrical issues or even damage to your motorcycle.
- Consult a Professional: If you are unfamiliar with working on electrical systems or have any doubts about your abilities, it is best to consult a professional. They have the experience and knowledge to ensure your wiring is done correctly and safely.
By following these tips, you can effectively use a Yamaha TTR 225 wiring diagram to troubleshoot and modify your motorcycle’s electrical system with confidence.
Q&A:
What is a Yamaha TTR 225 Wiring Diagram?
A Yamaha TTR 225 wiring diagram is a visual representation of the electrical system of the Yamaha TTR 225 motorcycle. It shows the various components of the system and how they are connected.
Why is it important to use a Yamaha TTR 225 Wiring Diagram?
Using a Yamaha TTR 225 wiring diagram is important because it allows you to understand the electrical system of the motorcycle. It can help you diagnose any electrical issues and make repairs or modifications accurately.
How can I effectively use a Yamaha TTR 225 Wiring Diagram?
To effectively use a Yamaha TTR 225 wiring diagram, you should first familiarize yourself with the various symbols and components shown in the diagram. Take your time to study the diagram and understand how the different parts are connected. You can use colors and labels to make the diagram easier to understand. Additionally, you can use a multimeter to test the continuity of the wires and ensure that the electrical connections are functioning properly.
Where can I find a Yamaha TTR 225 Wiring Diagram?
You can find a Yamaha TTR 225 wiring diagram in the owner’s manual of the motorcycle. It may also be available online on websites that provide technical information and resources for Yamaha motorcycles.
Can I use a Yamaha TTR 225 Wiring Diagram for other motorcycle models?
No, a Yamaha TTR 225 wiring diagram is specific to the Yamaha TTR 225 model. Other motorcycle models may have different electrical systems and components, so it is important to use the correct wiring diagram for your specific model.
What is a Yamaha TTR 225 Wiring Diagram?
A Yamaha TTR 225 Wiring Diagram is a visual representation of the electrical components and wiring connections on a Yamaha TTR 225 off-road motorcycle. It shows the routing of wires and the locations of electrical components such as the battery, ignition switch, regulator/rectifier, and various other sensors and switches.